QUICK GUIDE TABLE OF CONTENTS
INTRODUCTION
SI Systems, Inc. has designed the SI Systems Software System as a complete
business solution, specifically designed to meet the unique and complex needs
of the commercial specialty contractor. Both hardware and software are designed
in modular format so your system can grow and change as you do. Your system
is backed by a 33 year old company, committed to meeting your needs.
Hardware is carefully chosen from top-of-the-line national brands, and components
are selected to meet your needs now and in the foreseeable future. As you grow,
your system can be expanded and upgraded, as you require.
Software is written in PROGRESS, a true 4th generation data base language
and multi-user database manager. The UNIX operating system provides a highly
reliable and efficient multi-user, multi-tasking environment. Built-in data
security allows you to specify authorized users and their access levels.
The Accounting Modules utilize the advanced features of the Progress database
language to provide an interactive environment for the entire accounting system.
Information entered by any user, in any part of the accounting system, (from
General Ledger, to Accounts Payable, Accounts Receivable, Inventory, Job Costing,
etc.) is immediately available to any user. This "Real Time" feature
provides management with a powerful tool to oversee the financial condition
of the company as a whole, or the profitability of any specific job. Each Module
provides a variety of standard management reports, and the database can be queried
for custom reports as well.
The Estimating Module is configured with a custom English language takeoff
library for Electrical, Mechanical, or General Contractors. The system will
accommodate multiple price tables, multi-user access, and will provide audit
trails, last minute alterations, and detailed printed bids.
The purpose of this Quick Guide is to provide an overview reference for getting
your system up and running, and to help new users become acquainted with turning
the SI Systems', Inc. server on and off. Detailed instructions on each procedure
are provided in the manual. If you have a question which is not covered in the
manual, or a problem you cannot resolve, please call our national service hotline,
800/422-2277.
Top
GENERAL SYSTEM INFORMATION
Turning On The Computer
NOTE: These power-up procedures relate to SCO machine
and will be slightly different for other Unix systems.
1. Turn on the power switch. This may be located in different places,
depending on the type of computer.
2. When the screen shows:
Boot:
type unix auto (case sensitive) then press <ENTER>.
3. When the screen becomes full of printing, ending with:
Type control-d to proceed with normal startup,
(or give root password for system maintenance):
Press control d (hold down the control key while pressing
the d key; then release both keys).
4. The system will then prompt:
Current system time is Thu May 31 10:10:00 EDT 1990
Enter new time ([yymmdd]hhmm):
Either type the correct date and time, or if the date and time are accurate,
press ENTER.
The time must be entered as four digits: (i.e. 0745 = 7:45 AM)
5. When the screen prompts:
login:
Type your operator name and press ENTER.
6. When the screen prompts:
password
Type your personal password and press ENTER.
7. Normally at this point you will be at the Main Menu.
Top
1. It is first necessary that someone "BOOT" the server.
2. When you turn on your terminal, press control d (hold down the control
key while pressing the d key; then release both keys).
3. When the screen prompts:
login:
Type your operator name and press ENTER.
This will display the Main Menu.
Top
If the power goes out or you accidentally pull the plug out of the wall,
the first thing to do is DO NOT PANIC. When the
power is restored, or the plug put back in, follow these steps:
1. Turn on the computer as described above.
At the Boot type unix auto <ENTER> , case sensitive.
The system will do a great deal of self- testing and will put reams of
information on the screen. You can ignore this.
On some systems, the computer prompts:
The system was not shut down properly, and the
root file system should be cleaned.
Proceed with cleaning (y/n)?
Type Y. At any other questions, you MUST ANSWER Y. The system
may take several minutes to clean the files before it displays the login
prompt.
2. When the system displays the prompt:
login:
You may continue from this point as described above in the daily power
up procedure.
Top
Shutting Down The Computer
1. Move back through the menus by pressing ENTER several times
until you reach the Main Menu.
2. From the main menu, type q and ENTER.
When the system displays:
login:
You may cut off the power to your terminal.
Top
1. Make sure that everyone else has logged off the system.
2. Back through the menus until you reach the Main Menu.
3. From the main menu, press q and ENTER.
4. When the screen displays:
login:
Type "shut-down" and press <ENTER>. At Password:
type yes then <ENTER>. The system may take several
minutes to complete this procedure.
5. When the screen displays this or a similar message:
Safe to power off
or
Press Any key to Reboot
You may turn off the main power.
Top
Backing Up Your Files
Despite the protection given to your data by the system, there are always
accidents which can damage the hard disk on which the data are stored. To protect
against such accidents and to keep you from having to re?enter all of your data,
you should back up your data files frequently, daily if at all possible.
To back-up your accounting files, follow these steps:
1. First be sure that no one else is using the system. After insuring that
all other users are logged off, move back through the menus to the Main Menu.
2. From the main menu press q and ENTER.
3. When the login: prompt is displayed, type bkupacct. Before pressing
ENTER, place a tape in the tape drive. Then press ENTER and the
computer will begin backing up your data. As another tape is needed, you will
be prompted by the screen to put in another one.
4. When the back-up is complete, the login: prompt will be displayed.
It is recommended that at least FIVE sets of tapes be used for back-up,
with at least one set kept away from the office. Rotate the sets of tapes so
that the first set is used one day, the second set is used the next day, and
the third set is used the third day etc. through the fifth day. Then start over
with the first set.
Top
GETTING STARTED
Required Setup
Certain areas of the system must be set up prior to using other areas of the
system. These are as follows:
|
Area to set up
Passwords
User access
General ledger divisions
General ledger chart of accounts
Accounts payable accounts
Accounts receivable accounts
Sales type information
Salesman information
Sales tax information
Customer information
Jobs (OH and STOCK)
Inventory
Class & union information
Misc pay & deductions
Department information
Employee information
| Area Affected
Entire system
All menu selections
General ledger
General ledger
General ledger & AP
General ledger & AR
Customer & order entry
Customer & order entry
Customer & order entry
Order entry & AR
Inventory, Payroll, Job Cost
Order entry, Purchase orders, Service orders
Payroll & employee
Payroll & employee
Payroll & employee
Payroll & employee
|
Items which you need to type, as well as keys you must press are shown in
bold type, and screen messages and prompts which you must answer are shown indented
and in bold type.
Top
Types of Menus
-
Vertical Menu
Two types of menus will be found in the system. The first is a vertical
menu, such as the one below:
To use this style of menu, simply type the number of the selection you
wish to use and press ENTER. To leave a menu, leave selection blank
and press ENTER.
-
Horizontal Menu
The second style of menu is a strip or horizontal menu, such as the one
below:
To use this style of menu, press the indicated key for your choice of function,
or use the up/down arrow keys or page up/down to move through the displayed
data. Pressing the HOME key moves you to the last line of the displayed
data, pressing the HOME key again moves you to the first line of the
displayed data. Press ENTER to update information. After pressing the
INS key you will be in the add or insert mode and can continue to add
new lines without having to press the INS key for each new line. To get out
of the add mode, press any of these keys: HOME, Page-Up/Down
or Up/Down arrow, when finished with entering data on a line. To go
back from a horizontal menu to the previous menu, press the END key.
Top
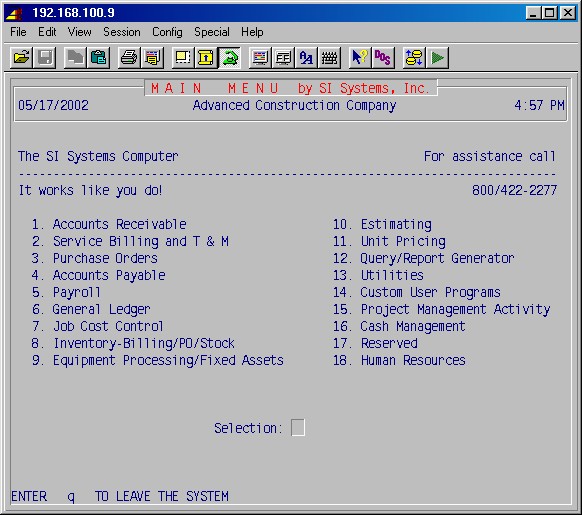
Main Menu
After you have booted up the system, logged in as a user, the Main Menu will
be displayed.
Setting Up User Access
Before you can start setting up your accounting system on the computer and
entering data, you must first authorize users for the system. This is done by
selecting 13-2: Permission to Run Programs from the Main Menu. This may
only be done by the system administrator, and the information on how to do it
should be removed from the Quick Guide and stored separately. This will have
to be done once for your original users, and again when new users are added,
or users are removed.
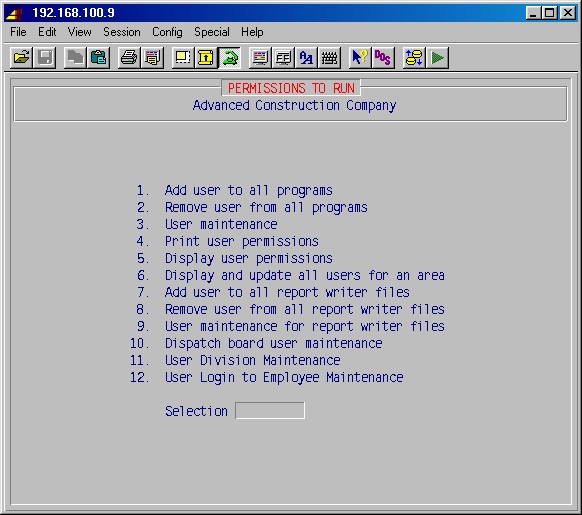
Selection 13-2: Permission to Run Programs from
the Main Menu displays the following menu:
You authorize users for the system and specify what modules and individual
programs they have permission to use by utilizing one or more of selections
#1, #2, or #3 from the 13-2: Permissions to Run Menu.
Top
-
13-2-1 Add User to All Programs
This is used to add a user to all programs within a module. You may add
the user to all modules or specify particular modules, adding the user to
each module one-at-a-time.
This is the best procedure to use to either add a user to a few modules
or add a user to all except a few modules by using this procedure
in conjunction with 13-2-2: Remove User from All Programs,
which is described below.
Similarly, this is the best way to add a user to all except a few programs
within a module by using this in conjunction with 13-2-3:
User Maintenance, also described below.
Selecting this procedure will display the following input screen:
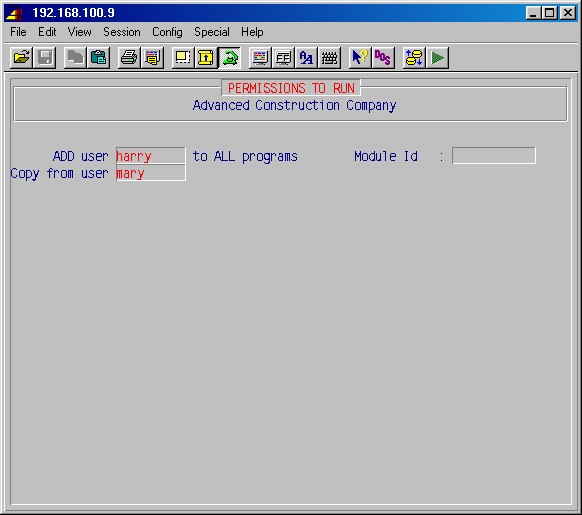
The cursor will be positioned in the first field ready to type the name
of the user you want to add to the system. This name may be up to ten letters
or digits long and must be exactly the same as the name used to login.
Type the user name an used to login to the system and press ENTER.
The cursor will move to the Module ID field. You may specify a particular
module or leave blank for all. The module IDs are as follows:
|
MENU = Main Menu
AR = Accounts Receivable
SO = Service Billing (T & M)
PO = Purchase Orders/Submittals
AP = Accounts Payable
PR = Payroll
GL = General Ledger
JC = Job Cost
|
IN = Inventory-Billing/PO/Stock
TL = Equipment Processing/Fixed Assets
UP = Unit Pricing
UT = Utilities
CP = Custom User Programs
ML = List Management
HR = Human Resources
|
Type the module ID and press ENTER. The system will pause to update
the permissions database and the screen will return to the 13-2:
Permissions to Run Menu.
If you left the Module ID field blank, you have added this
user to all programs in all modules.
If you specified a particular module, you may now add that user to another
module by repeating the procedure.
NOTE: The name of the user and the module ID typed in those
fields remains there until you change it or until you exit the 13-2:
Permissions to Run Menu. This is to facilitate adding or removing
a user from particular programs or modules by using combinations of steps
#1, #2, and #3 as described in this section.
Top
-
13-2-2 Remove User from All Programs
This is used to remove a user from all programs within a module.
You may remove the user from all modules or specify particular modules,
removing the user from each module one-at-a-time. This is the best procedure
to use to remove a user from the entire system if that person resigns or
is transferred to another department that doesn't require access to the
computer.
This is also the best way to set up a user on all except a few modules
by using this procedure in conjunction with 13-2-1
Add User to All Programs as described above.
Similarly, this is the best way prohibit a user to run all except a few
programs within a module by using this in conjunction with 13-2-3:
User Maintenance, described below.
Selecting this procedure will display the following input screen:

As described in 13-2-1 above, type the user name and
the Module ID pressing ENTER after each. The system will pause to update
the permissions database and the screen will return to the 13-2:
Permissions to Run Menu.
If you left the Module ID field blank, you have removed this user from all
programs in all modules.
If you specified a particular module, you may now remove that user from
another module by repeating the procedure.
Top
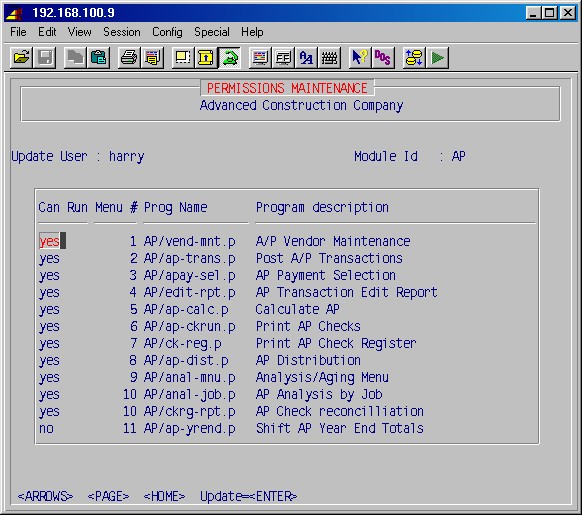
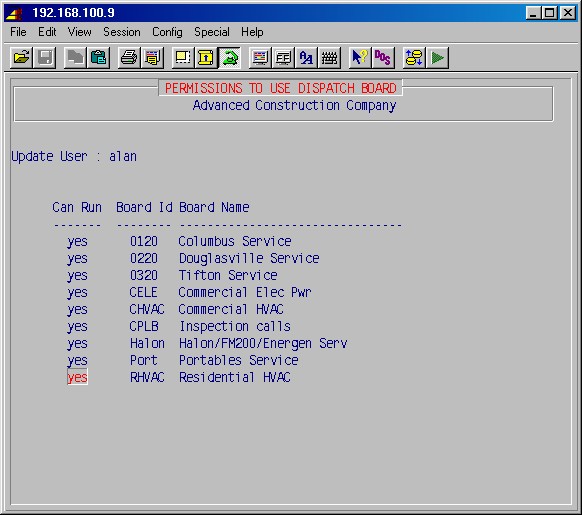
As described in 13-2-1 above, type the user name and
the Module ID pressing ENTER after each. The system will display the
first menu number of this module, representing a particular program or procedure,
with the cursor on the yes or no in the Can Run column.
Use the arrows to select the required line, then press <ENTER>
to change the permission.
Type YES to permit the user to run this program; type NO to
prevent the user from running this program; then press ENTER.
You may now select this procedure again and type a different Module ID which
will display the menu items for that module. Specify one line-at-a-time which
programs to permit the user to run.
You can completely set up a user by this method. If desired, you may also
leave the module ID blank and all menu items in all modules will be displayed
one line-at-a-time. This however, is not the most efficient way to accomplish
this task.
If you want to permit a user to run all except a few programs in a module,
first add the user to all programs by using procedure #1, and then use this
procedure #3 to remove the user from those you specify.
If you want to prohibit a user from running all except a few programs in
a module, first remove the user from all programs by using procedure #2, and
then use this procedure #3 to add the user to those you specify.
Top
Removing Users
If users leave the firm or change their positions so that they no longer need
access to all or part of the system, their names will need to be removed from
the menus to which they had access. This is done in the same manner in which
names are added to portions of the system using one or more of the procedures
described in Setting up User Access.
Top
General and Default Setups
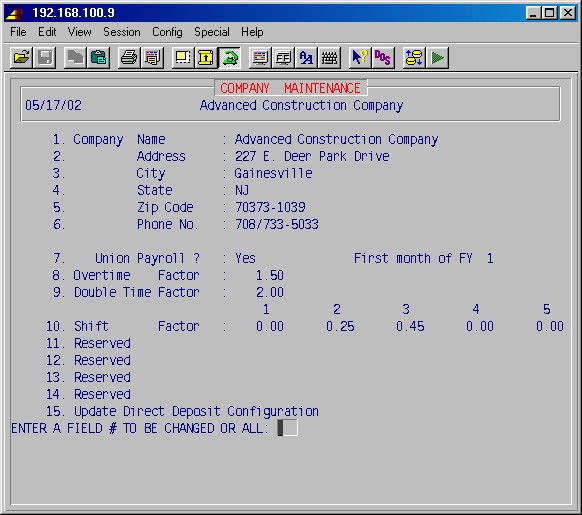
13-1 Client information
Selecting 13-1 will display the following input screen:
1-6. Company name, address, & phone
Complete these fields with your company's name and address as you
wish them to appear on all reports and transmittals. This address will appear
on W2s, magnetic media, and all union, governmental, and other system reports.
7. Union payroll? First
month of FY
Answer YES if this company has a union payroll. This will
cause union areas to be accessible for input and payroll will be processed as
a union payroll.
Specify the first month (1-12) of your fiscal year (FY). This is a GL setup,
but must be completed because it controls the accounting.
The remaining fields are set up for the payroll module and are covered there.
Top
13-3 Printer Setups
Once system printers have been set up by your Unix and network supplier, as
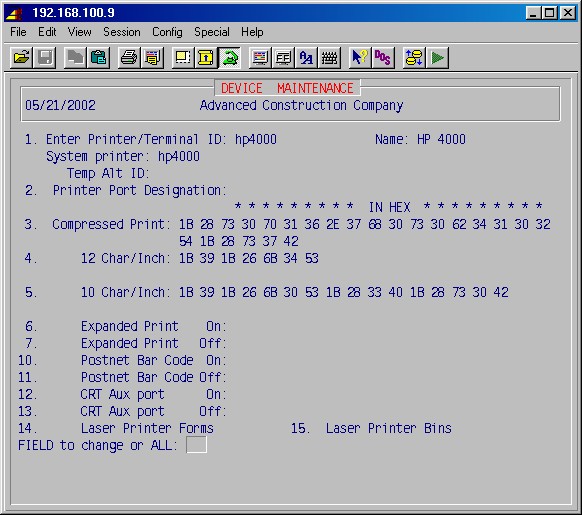
needed, select 13-3: Printer Designation & Codes.
Enter Printer/Terminal ID:
Enter the code you want for the printer you are setting up here.
Name:
Enter a description for this printer.
System printer:
If the Printer/Terminal ID entered above is not the same as the operating
system's designation of the printer, enter that here.
Temp alternate ID:
If you wish to temporarily re-directed to another system printer,
enter its ID here.
Printer Port Designation:
Not used by the system. You can enter the port designation here,
just as a record. E.g. /dev/ttya12.
Compressed Print:
12 Characters/Inch:
10 Characters/Inch:
Expanded Print On:
Expanded Print Off:
Letter Quality On:
Letter Quality Off:
Postnet Bar Code On:
Postnet Bar Code Off:
CRT Aux port On:
CRT Aux port Off:
Enter the appropriate hex codes, as found in the printer's manual, for compressed
(16 - 17 characters per inch), 10 characters per inch, 12 characters per inch
and Post Net bar code printing (if you printer supports this).
ENTER A FIELD # TO BE CHANGED OR ALL:
If you need to change any of the above, enter the number of the field
you wish to change or type ALL to change all fields, or just press ENTER
to return to the previous menu.
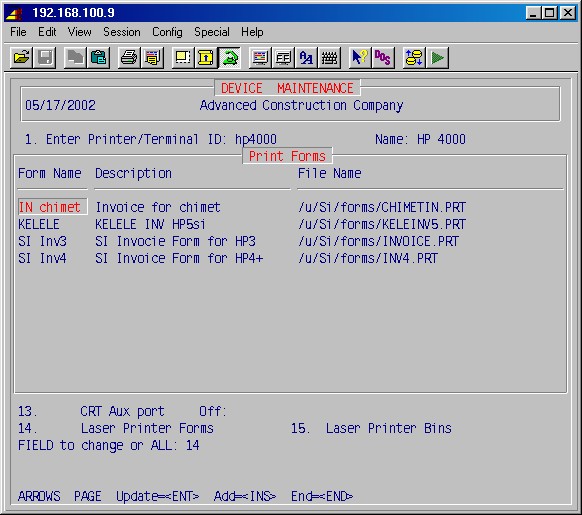
The laser generated forms for use with approved printers are listed here. This
screen is normally set up by SI Systems for you.
The listing of various bins avaliable for the laser printer, along with their characteristics is set up here. This is normally set up by SI Systems.
Top
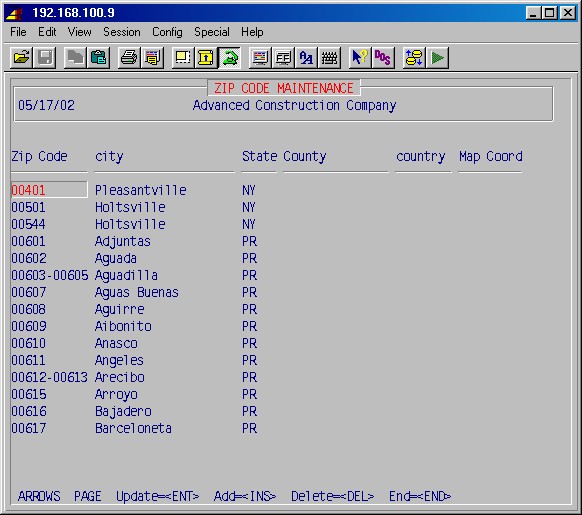
13-5 Zip/City Maintenance
If you need to change or add to the State/City/Zip Code table, select 13-5.
Zip Code
This is the standard 5 digit US postal zip code or zip code range.
City
This is the city for this zip code.
State
This is the state for this zip code.
County
The county is generally not used.
Country
The country is generally not used.
Map Coord
Map coordinates for this zip code is generally not used.
Press END when done.
Top
13-6 UPS Zone Chart Maintenance
Optional. Is used in 1-9: UPS Shipping. This selection
allows you to set up a table to translate the first 3 digits of a zip code to
the corresponding UPS zone.
13-7 UPS Zone Charge Maintenance
Optional. Is used in 1-9: UPS Shipping. This selection
allows you to set up a table of UPS charges for each UPS zone, for each type
of UPS shipping (Ground, Second Day, etc.) for various weights.
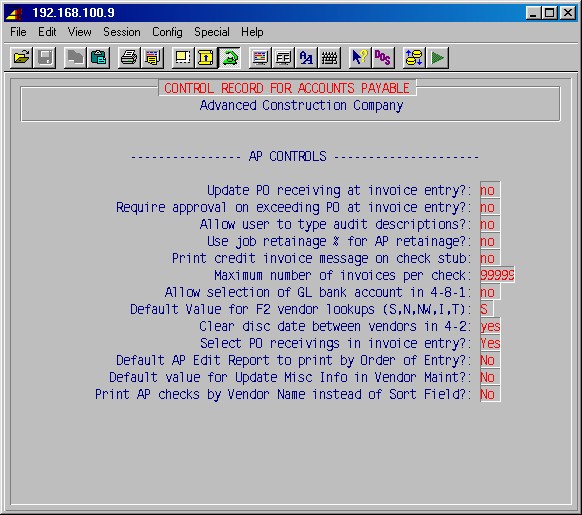
13-8-1 Accounts Payable
Update PO receiving at invoice entry?:
Normally No.
If this is set to Yes, then the PO receiving procedure will be run during
4-2: Enter Accounts Payable Invoices, if a PO number
has been entered for the invoice.
Require approval on exceeding PO at invoice entry?:
Normally No.
If you answer Yes, the system will warn you and require that you confirm
that you are exceeding the PO, and then let you enter the invoice. If you answer
No (usual answer), it only warns you that you are exceeding the PO.
Allow user to type audit descriptions?:
Normally No.
If answered Yes, when entering an AP invoice in 4-2,
the description on each GL and JC line may be edited by the operator.
Top
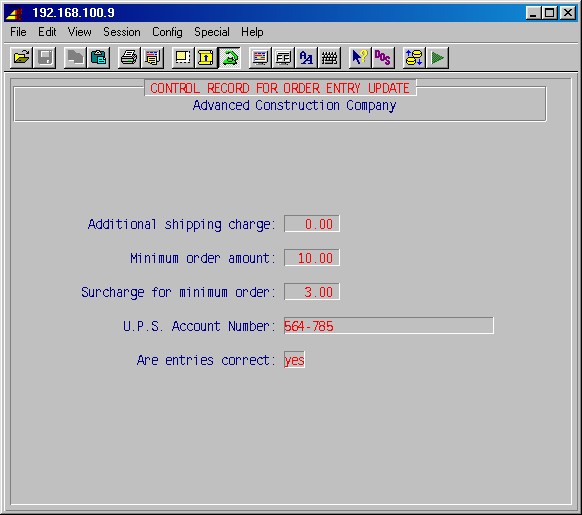
13-8-2 Order Update
Used in 1-10-3: Counter Sales.
Enter the appropriate amounts for you company, if applicable.
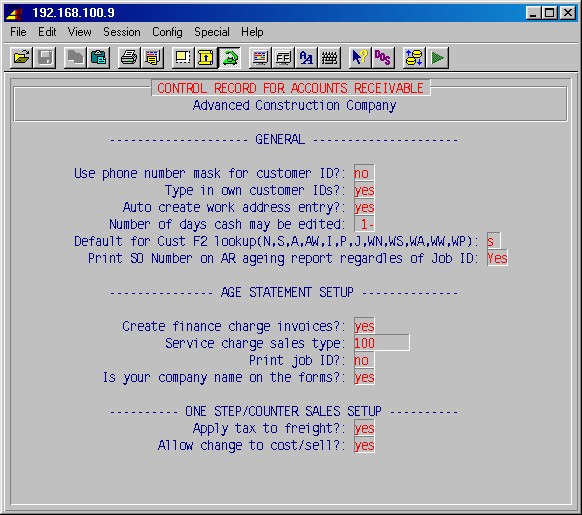
13-8-3 Accounts Receivable Customer
Use phone number mask for customer ID?:
Normally No.
Type in own customer IDs?:
If this is answered No the system will assign a unique customer
ID. This is usually used for systems with a high volume of service work where
service operators do not have time to make up a unique customer ID.
Auto create work address entry?:
The system allows for multiple work addresses for a customer. Set
to No if you are not using the service order module. If set to Yes,
the system will create a work address the first time a customer is created.
Otherwise, the system will create a work address the first time a service ticket
is entered.
Create finance charge invoices?:
If set to Yes finance invoices will be automatically created for
customers with past due invoices when you print customer statements.
Service charge sales type:
Enter the sales type (as set up in 1-4-1:
Sales Type Maintenance) for finance change invoices created as outlined
above.
Print job ID?:
Enter Yes if you want job IDs printed on customers statements.
Is your company name on the forms?:
If you'll be printing customer statements on forms with your company
pre-printed on them, answer Yes here.
Apply tax to freight?:
If freight is taxable in your area, enter Yes here.
Top
13-8-4 Free form invoicing
<R>esidential OR <G>eneral only:
Normally G.
This selects the billing type codes used in free form invoicing. Residential
will give you billing codes specific for home construction billing.
Enter form length (in lines 17 or 38):
Normally 38. 17 if you use the short invoice forms.
Enter percentage for rough billings:
Specify the percentage of the contract for this item as you want
it billed.
Enter percentage for trim billings:
Specify the percentage of the contract for this item as you want
it billed.
Enter entry program name:
Normally leave blank.
Post sales tax to job?:
If you select No, the amount of the invoice posted to the
job will not include the tax amount. If Yes, the tax amount will be included.
Enter retainage terminology:
The default for this field is the word Retainage which is the accepted
term in the United States. In Canada, this term is Holdback. You may specify
another term if you wish.
Enter labor terminology:
The default for this field is Labor which is the accepted spelling
in the United States. In Canada, this word is spelled Labour. You may specify
as required.
Enable transfer? (Export, Import, None):
Set this to N unless you have remote locations where invoices
are being created using a copy of this system and then transferred (e.g.
by magnetic media) to be incorporated into this systems main database:
I (Import) if this is the main database system.
E (Export) if this is the remote location where invoices are being created.
Transfer directory:
If the above (Export/Import/None) is set to
None leave this blank. Otherwise enter the directory that has been created
on this system where the invoice file to be exported is to be written to, or
where it's to be read from when importing invoices. (E.g. FP)
Top
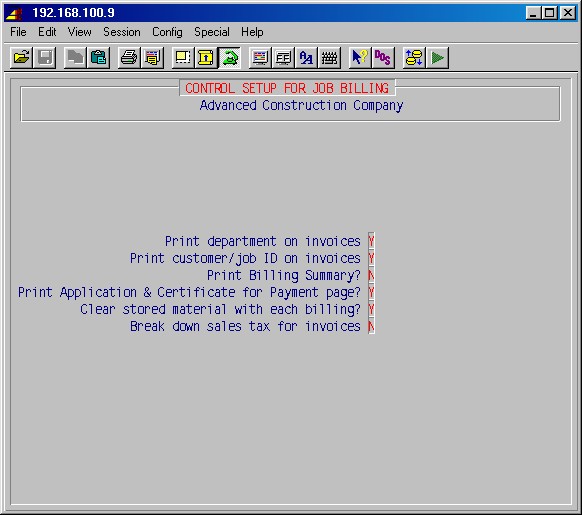
13-8-7 Schedule of values (Job) billing
Used in 7-6: Job Cost Billing.
Print department on invoices
Answer Yes if you want the department (sales type) to print
on invoices.
Print customer/job ID on invoices
If Yes then the customer and job ID will print on invoices.
Print Billing Summary?
If you want the Billing Summary page printed, answer Yes.
Print Application & Certificate for Payment page?
If you want the standard AIA form printed, answer Yes.
Break down sales tax for invoices
If Yes then taxes will be broken out on invoices.
Top
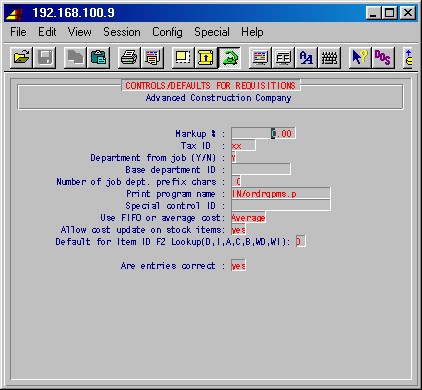
13-8-9 Order requisition control
Used in 8-16: Requisitions Processing.
Markup %
Enter the percentage that item cost is to be marked up when requisitioning
to a job.
Tax ID
Enter the tax ID for tax on item requisitioned to a job.
Department from job (Y/N)
If you want the department (sales type) for the requisition to come
from the job, enter Yes. If you want the department to be the default
below, enter No.
Base department ID
Enter the default department (sales type) for requisitions to jobs.
Number of job dept. prefix chars
Normally 0.
Print program name
Normally IN/ordrqpms.p
Special control ID
Leave blank.
Use FIFO or average cost
Specify for stock requisitions, POs and Service Orders whether the
system uses the actual cost of an item (FIFO) or a weighted average as
a basis for cost. Answer <A>verage or <F>ifo. If you
haven't been using FIFO, you can't just switch, so answer <A>.
Allow cost update on stock items
If answered no the system prevents you from changing the cost on
stock items during requisition.
Top
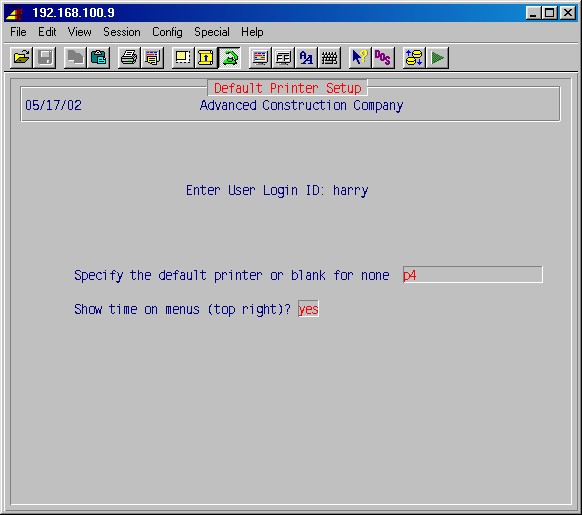
13-8-10 Default printer setup
This allows you to set up a default printer for a user. Whenever the user
is presented with the printer selection screen, the printer entered here will
have been filled in and the user just has to press ENTER to accept it.
Enter User Login ID:
Enter the ID of the user for whom you want to set up a default printer.
Specify the default printer or blank for none
Enter a printer number (as set up in 13-3) or
leave blank to force the user to always enter a printer number when printing.
Show time on menus (top right)?
Sometimes when printing to a printer attached to a terminal or PC,
the display of the system time in the upper right hand corner of menus will
interfere with the printing. In that case set this to No. Otherwise leave
it as Yes.
Top
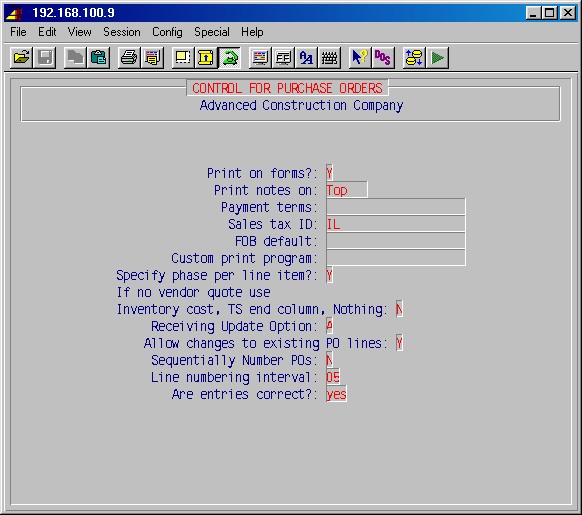
13-8-12 Purchase orders
Print on forms?
Select Yes if your POs are to be printed on preprinted forms,
or No to have them printed on plain paper.
Print notes on:
Select T to print PO notes in the top of the PO body, or B
to have them printed in the bottom of the PO (after item lines).
Payment terms:
Enter the default payment terms you want to have printed on POs,
e.g. Net30.
Sales tax ID:
Must be filled in but now comes from job.
FOB default:
You may enter a default answer here which will show on all POs.
Custom print program:
Normally blank.
Specify phase per line item?
If answered Yes, PO entry will ask for a phase on every line instead
of assuming the phase on the top of the PO.
If NoVendor Quote Use:
Inventory cost, TS end column, Nothing:
If there isn't a vendor quote in the vendor quote area for this item,
specify which cost basis to use: <I>nventory cost, <T>S
end column (Trade service end column cost), <N>othing. If you specify
N you must fill in the cost yourself.
Receiving Update Option:
Specify your inventory receiving cost basis. <A>verage,
<O>ld, <N>ew.
Allow changes to existing PO lines:
If you want a full audit trail of changes made to POs, set this to
No and changes to an PO will have to be changed by adding lines.
Sequentially Number PO's:
If Yes then POs will be automatically numbered.
If you wish POs numbered as per the PO # Option (7-1-1
#4), then answer No.
Top
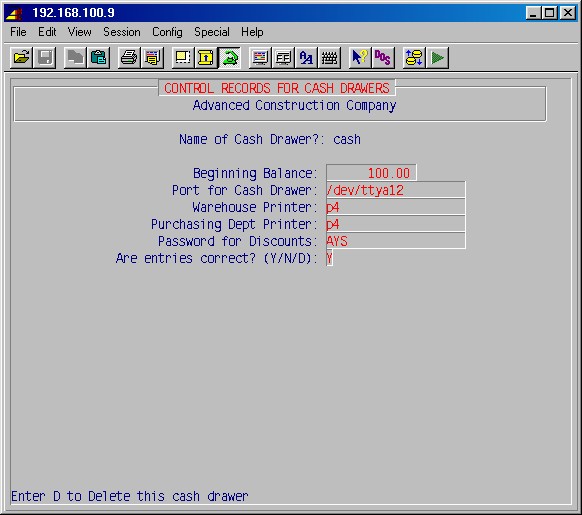
13-8-13 Cash Drawers
Used in 1-10-1: Order Entry,1-10-2:
Update Orders, & 1-10-3: Counter Sales.
Name of Cash Drawer?:
Enter the name/ID for this cash drawer.
Beginning Balance:
Enter any beginning balance.
Port for Cash Drawer:
Enter the operating system's designation for the port to which this
cash drawer is connected.
Warehouse Printer:
Enter the printer number of the printer on which list of items to
be pulled from stock is to be printed, if any.
Purchasing Dept Printer:
Enter the number of the printer to which purchase notes are to be
printed, if any.
Password for Discounts:
If not blank, this password will be required if giving discounts
on sales of items from stock.
Are entries correct? (Y/N/D):
Enter D to delete this cash drawer, N to go back and
correct entries, or Y when done.
Top
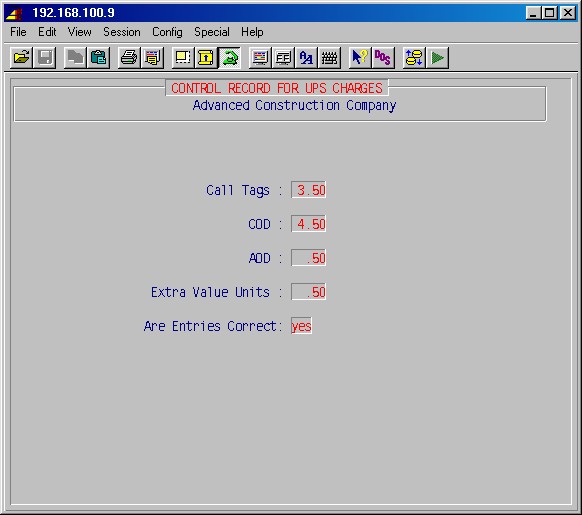
13-8-14 UPS Constants
Used in 1-9: UPS Shipping.
Call Tags:
Enter the UPS charge for call tags.
COD:
Enter the UPS charge for COD deliveries.
AOD:
Enter the UPS charge for acceptance of delivery evidence.
Extra Value Unit:
Enter the UPS value for this.
Top
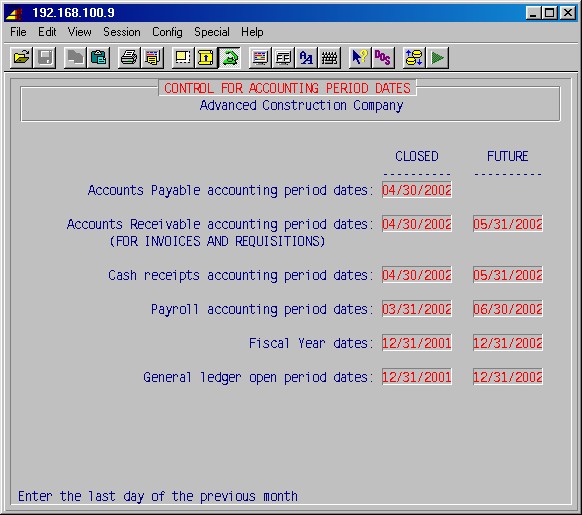
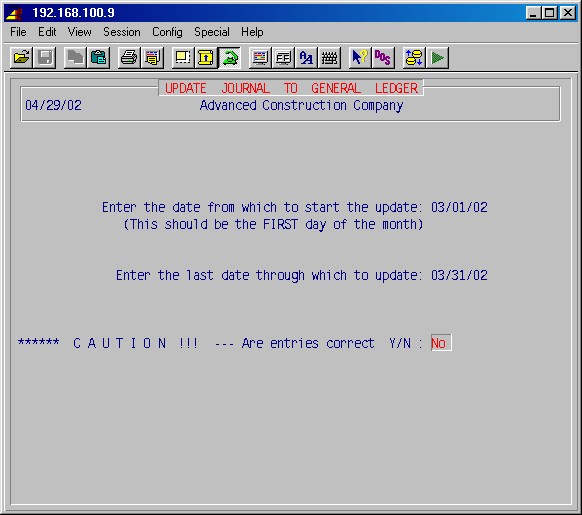
13-8-15 Accounting period dates
Used in AP, AR,
IN, PR and SO.
Enter appropriate dates to control the accounting dates (new transaction dates
entered will have to be later than the "closed" dates and before or
on the "future" dates). The purpose of these "date locks"
is to prevent inadvertent entry of wrong dates, e.g. wrong year.
Accounts Payable closed accounting period date
In 4-2: Enter Accounts Payable Invoices,
operators will not be allowed to start a new accounting cycle with or earlier
than this date.
Accounts Receivable closed accounting period date
Operators will not be allowed to enter invoice dates with or earlier
than this date.
Accounts Receivable future date limit
Operators will not be allowed to enter invoice dates later than this
date.
Cash receipts closed accounting period date
Operators will not be allowed to enter cash posting dates with or
earlier than this date.
Cash receipts future date limit
Operators will not be allowed to enter cash posting dates later than
this date.
Payroll closed accounting period date
Operators will not be allowed to enter payroll dates (e.g. payroll
batch beginning date) with or earlier than this date.
Payroll future date limit
Operators will not be allowed to enter payroll dates (e.g. payroll
ending period date) later than this date.
Top
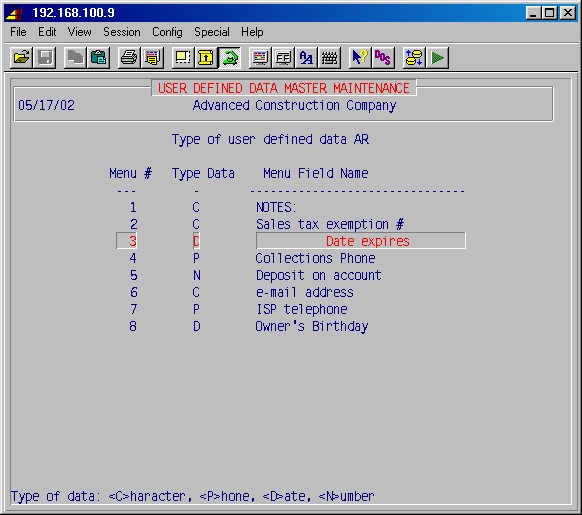
13-8-16 User Defined Data Maintenance
This setup area allows you to specify custom user-defined data entry fields
for each module which are accessed from the field called "Custom data"
in each module. You to enter up to 17 lines of user-defined data which may be
in the format of characters, numbers, phone numbers or dates. For example, on
the 1-1-1: Customer Maintenance Screen, choosing
field #23, Custom data, will take you to a new screen where you may access the
custom fields which you define here.
Type of user defined data
Enter the abbreviation for the module you wish to define custom fields
for:
AR - Accounts Receivable, 1-1-1: Customer Maintenance,
#23
AP - Accounts Payable, 4-1-1: Vendor Maintenance,
#18
PR - Payroll, 5-1-1: Employee Maintenance,
3rd screen #7
JC - Job Cost Control, 7-1-1: Job Description
Maintenance, 2nd screen #11
IN - Inventory, 8-1: Item Maintenance, #11 or
23
Menu #
Enter the number of the field; 1 - 17. This determines the sequence
in which the fields are shown.
Type Data
Enter on of:
Character (any letters, numbers or symbols can be types
in such a field)
Phone (only allows format of ###/###-#### ####, where # is any number)
Date (only allows dates to be entered)
Number (only allows numbers to be entered)
Menu Field Name
Enter the label of this field as you wish it to appear.
Top
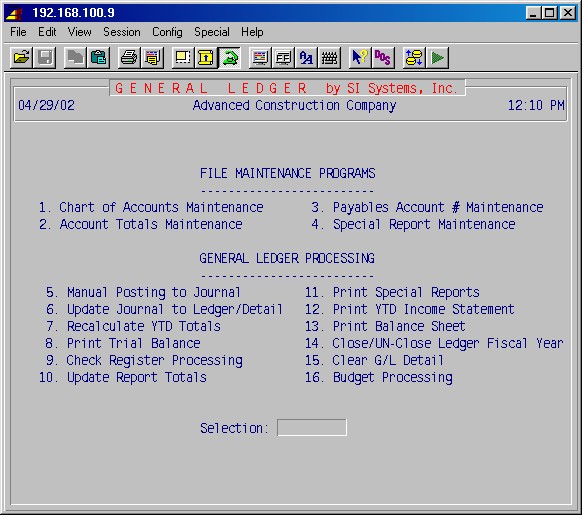
General Ledger Setup
Once you have set up user access, certain information must be entered before
you can use the rest of the system. The next step is to enter account numbers
in the general ledger module. Here you will enter the chart of accounts, payables
account numbers, and division identifiers (optional). Selecting #6 General
Ledger from the main menu will display the following menu:
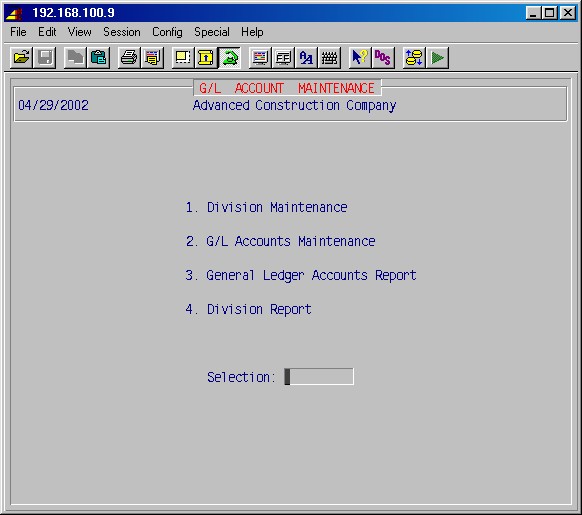
6-1 Entering Chart of Accounts
To enter the chart of accounts, select 6-1: Chart of
Accounts Maintenance from the general ledger menu. This selection will display
the following menu:
If your company operates with divisions, you must first set up the division
numbers.
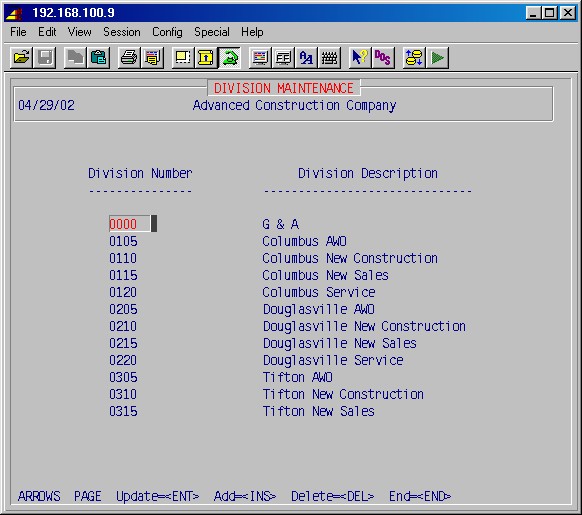
Selecting 6-1-1 Division Maintenance
will display the following input screen (items in bold type are examples):
Divisions may be though of as profit centers. One way to decide how many divisions
you need and what they should be is to specify a division for each partial Income
Statement required. A consolidated Income Statement may be printed for all divisions
(profit centers).
The first division should be for G & A (General and Administrative) expenses.
Type a three to six digit number for each division and the corresponding description
of that division. Press INS to add division numbers, or use Page
or Arrow keys to highlight a line and press ENTER to update a
line.
When you have entered your divisions, press END to return to the GL
Account Maintenance Menu.
Selection 6-1-2 GL: Accounts Maintenance, will
allow you to input, or at a later time edit, the general ledger accounts. This
selection will display the following input screen:
You should have received a list of accounts from your accountant, and should
use this list to input the account numbers. The numbering system most easily
used by the computer is:
10000 - 19999 = Assets
20000 - 29999 = Liabilities and Capital
30000 - 39999 = Income
40000 & up = Expenses
Using this numbering system will allow the system to fill in most of the other
items with the typically correct answers.
Type a five digit account number for all accounts. For titles and totals,
enter a sub?account number of 50 - leave sub-account blank for everything else.
1 - The Division entry is either YES or NO. This will
be set automatically by the system.
2 - The Account Description is entered from the descriptions
on the list of accounts provided by your accountant. Do not indent any descriptions
since this will be handled automatically.
3 - Account Type - For the real accounts, as opposed
to titles and totals, enter R as the account type. For titles, such as
ASSETS, the account type is TI. For totals, such as TOTAL
CURRENT ASSETS, the account type is TO. If you use the
account numbering system as described in 13-1: Client Information,
items 4 and 5 will be set automatically by the system.
4 - The Report Type will be B for accounts used in the
balance sheet, and I for accounts used on the income statement.
5 - The Normal Balance will be D (debit) for asset and
expense accounts, and C (credit) for liabilities, capital and income
accounts. Using these codes will cause a debit balance in an account that normally
carries a credit balance to print with brackets.
6 - The Total Level determines where totals and sub?totals break.
Always 1 except on titles and totals.
7 - The Extra Lines entry determines when blank lines will be
placed after an account on the balance sheet and income statement. Often this
will only apply to titles and totals, and is used to make the reports more readable.
Always zero except on some titles and totals.
8 - The Special Code is an optional entry, but is required on
three accounts. The first is the grand total net profit or loss account
(P). This account is computed for the income statement and is then carried
to the balance sheet, where it is placed in the retained earnings for current
year account. The retained earnings for current year account (R)
is the second account needing a special code. The total income (I)
is the final account needing a special code.
9 - The Underline entry determines if (S)ingle or (D)ouble
underlines are placed under the accounts marked with an S or D.
The entry goes with the account above the total account.
10 - The Allocate By Job entry is either YES or NO.
If you answer YES, when you post items to this account, you will also
be asked to enter the job ID for the job to which the entry should also be posted.
Press ENTER while the account # field is blank to return to the GL menu.
Top
6-3 Payables Account Number Maintenance
The next area to be set-up is the payables account # maintenance. Selecting
6-3: Payables Account Number Maintenance, from the
General Lledger menu, will display the following screen:
Press ENTER while the field # field is blank to return to the GL Menu.
Top
Accounts Receivable Setup
1-4-1 Sales Type Information
The next area to set up is the sales type information. This selection allows
you to set up the general ledger accounts for sales types (also called sales
departments or product types). The types are used to group various sales together
for reporting and accounting purposes.
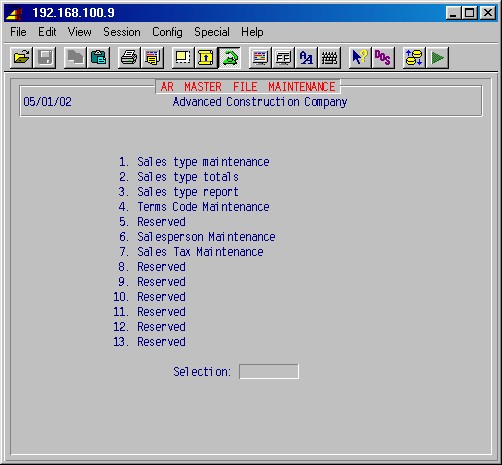
From the main menu, select 1 Accounts Receivable. Then, from the Accounts
Receivable Menu, select 1-4: AR Master File Maintenance.
This will display the following menu:
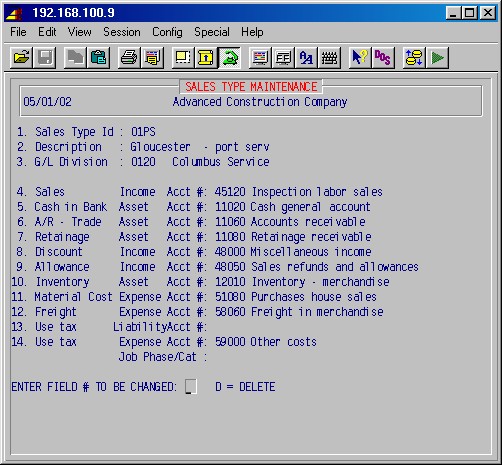
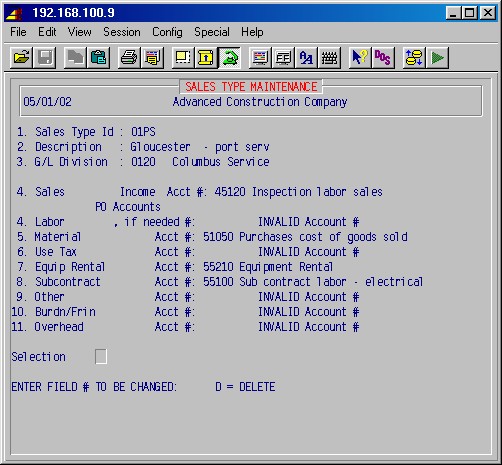
Selecting 1-4-1: Sales Type Maintenance from this
menu will display the following input screens:
The entries above are examples; use the appropriate accounts for your company.
At least two types should be set up:
requisitions
contract sales
Press ENTER while the type ID field is blank to return to the
sales type maintenance menu. Press ENTER at the sales type maintenance
menu to go back to the AR Menu.
Top
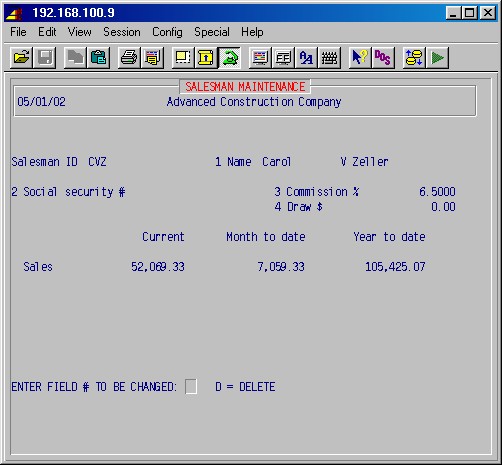
1-4-6 Salesperson Maintenance
The next area to be set up is the salesman information. From the Accounts
Receivable Master File Maintenance Menu, selecting 1-4-6
Salesperson Maintenance, will display the following input screen:
The Salesman ID may be up to 12 characters, but should be as short
and easy to remember as possible. One method is to use the three initials of
the salesman. Even if you do not normally credit sales to a salesman, at least
one ID, Misc for miscellaneous, must be entered. Type other information
as needed.
Press ENTER while the Field # field is blank to return to the
AR menu.
Top
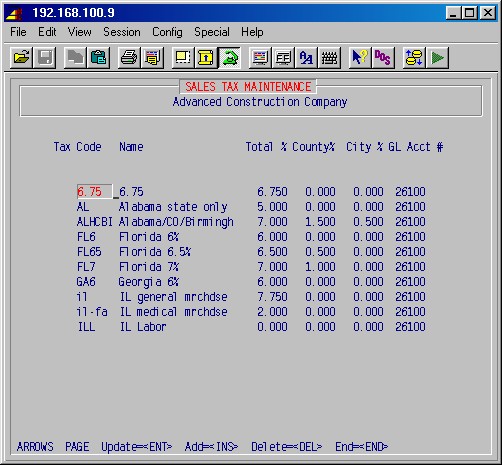
1-4-7 Sales Tax Maintenance
The next area to be set up is the sales tax information. Selecting 1-4-7:
Sales Tax Maintenance from the Accounts Receivable master file Maintenance
Menu will display this input screen:
The entries above are examples. You must input at least one two digit tax
code, XX for Exempt, with a percent of 0.00. The account
number is whatever general ledger account number you set up for sales tax liability
(sales taxes which you must pay).
Press INS to add codes, ENTER to change a code, and END
to go back to the AR master file maintenance menu.
Top
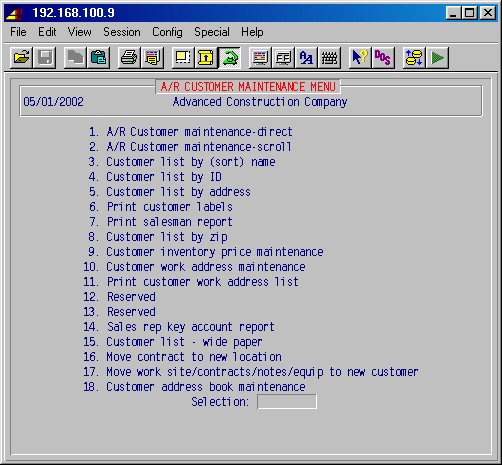
1-1 Customer Information
Next, you should enter the customer information, using selection 1-1:
Customer Information from the Accounts Receivable Menu. This will display
the following menu:
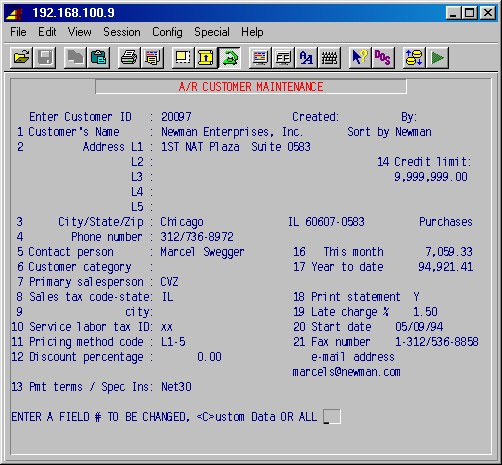
Selecting 1-1-1: AR Customer Maintenance from the
AR Customer Maintenance menu will display the following input screen:
1 - Customer ID is a 12 character code, letters or numbers. You may
use the same customer codes in the new system as you used in your old system
if you prefer. The new system can be set to automatically number each new customer
for you. Optionally, the operator adding the customer may assign a customer
Code/ID which might be a partial name.
The customer sort (or search) field is used to make looking up customers easier.
For instance, customer Dr. Frank Smith would have Dr. Frank Smith
in the name field so that invoices printed for him look nice. In the sort (search)
field, you should put something like Smith, Frank so that you may easily
look him up.
6 - Customer Category is an optional five character optional code used
to sort customers, such as RES for residential and COM for commercial.
7 - Primary Salesperson is a required code for the salesperson to use
for this customer during order entry. Use MISC if no salesperson is normally
used. This may be changed during order entry.
8-10 - Sales tax code - state is a required two to six character code
for sales tax computation during order entry. Use XX if the customer
is tax exempt. This may be changed during order entry. The city code is not
normally used. The labor tax code is required.
11 - Pricing Method Code is a required up to 10 character code used
to calculate prices during order entry. A code entered here may be changed during
order entry. For example, you may enter Cost or L1, L2,
L3, L4 for the various selling prices you have previously entered;
or C+5 for cost + 5%, or L1-10 for list price 1 - 10%.
12 - Discount Percentage is not used.
13 - Pmt terms/Spec Ins is a place for you to show special instructions
such as COD, or Net 10 or Net 30.
Top
Accounts Payable Setup
Vendor Information
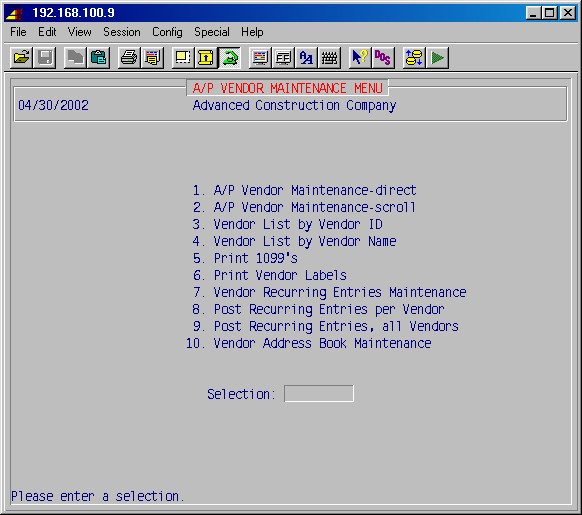
The next area to set up is vendor information. Vendor information is entered
by selecting 4-1: Vendor File Maintenance from the
accounts payable menu. This selection will display the following menu:
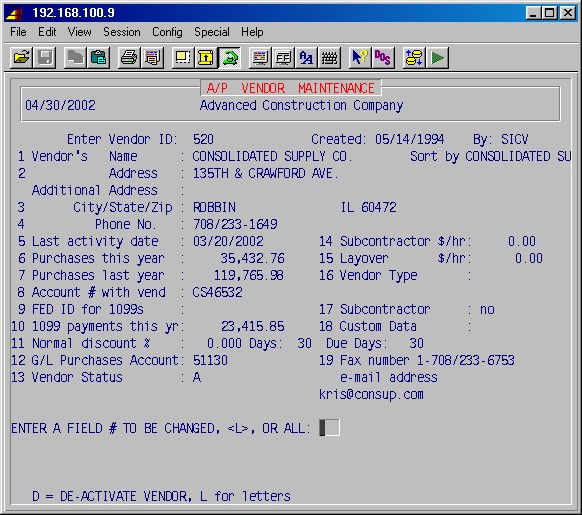
Selecting 4-1-1: AP Vendor Maintenance from the
AP vendor maintenance menu will display the following input screen:
Enter vendor ID:
You may type up to a twelve character vendor ID [H] or just press
ENTER to exit. If a vendor already exists with this ID, the information
for that vendor will be displayed. You may modify the information as desired.
If a vendor does not exist with this ID, then you will see a message:
No vendor exists. Do you want to create a new one? YES
Answer YES to this question and proceed to fill in the fields with
the information requested.
NOTE: Information in fields #5, #6, and #7, is updated
by the system and reflect current information for your use which is not
part of the accounting system. These fields are usually manually modified
only when setting up the system for the first time.
1-4 - Vendor name and address Type this information
as you want it to appear on reports, checks and purchase orders [H].
5 - Last activity date Date of last activity with this
vendor.
6 - Purchases this year Amount purchased this year to date.
7 - Purchases last year Amount of purchases last year with this vendor.
8 - Account # with vend Type the account ID this vendor uses for
your company.
9 - Fed ID for 1099s Type this vendor's federal ID for 1099s. This
may be filled in whether or not a 1099 is needed for this vendor.
10 - 1099 payments this year The amount of payments to this vendor
this year.
11 - Normal discount % Type the normal discount % allowed by this
vendor for your company. If this vendor normally has the dollar amount of
discount printed on the invoice, then leave this entry blank. Disc days is
the number of days after the invoice date during which discounts may be taken.
Due days is the number of days after the invoice date in which the invoice
must be paid regardless of discount.
12 - GL purchases account Type a GL ledger account number [H].
This is the general ledger account number to which purchases from this vendor
are normally debited. This may be left blank.
13 - Vendor status The status of a vendor may be A-active
or I-inactive.
Top
Jobs and Phases Setup
The next area to set up is jobs and phases. Information about jobs and phases
is entered into the job cost module. Note that two job are
already set up: OH and STOCK.
7-1 Job Description Setup
Active jobs, plus any jobs with open AP or AR invoices must be set up now.
At your leisure, all jobs which have been active this fiscal year may be set
up.
The first thing to set up in this area is information about each job which
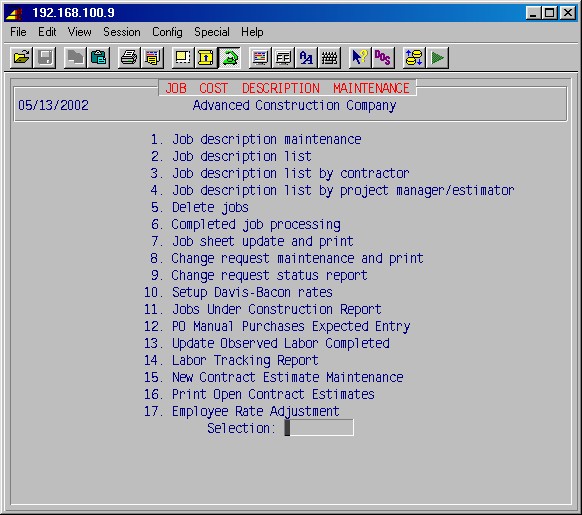
is currently active. Selecting 7-1: Job Description Maintenance
from the main menu will display the following menu:
Selecting 7-1-1: Job Description Maintenance from
this menu will display the following input screen (items in bold type are examples):
Enter job ID:
Type a job ID of your choosing, up to 12 characters of letters and
numbers.
1. Job name:
Type a job name up to 30 characters. This is the name that will appear
in the heading of all job cost reports and invoices.
2. Client ID:
Type an existing customer ID [H] from the accounts receivable
customer list. This must be an existing customer or you cannot continue.
NOTE: If you have not yet set up this customer, you may use
the express key (press F2 twice), go to 1-1: Accounts
Receivable Maintenance, and set up the new customer. When you return
to this screen, type the new customer ID in this field and continue.
3. Job type:
This is a one or two character code. The first character must be
either a C for those jobs requiring certified payroll reports, or R for residential;
otherwise leave blank.
4. PO # option:
This field controls how the system automatically numbers the purchase
orders. Enter one of the following:
J001 = Consecutively numbers within jobs starting with 001.
J-P001 = Consecutively numbers within job phases starting with 001.
Blank = Requires you to manually put in the PO numbers.
5. Total Sq. Ft.
Optional. Type the square footage of the project if desired.
6. Sales Type ID:
Specify the accounts receivable sales department for this job. These
departments were entered as Sales Type ID in 1-4-1:
Sales Type Maintenance. This controls the GL entries that are affected by
invoicing.
7. Retainage %
Specify the retainage percentage (ie. 10% = 10.0) that is
normal for billings for this job.
8. Terms:
This is an informational field. You may use to specify your payment
terms if desired. (Example: Net 10 days).
9. Completed?
If the job is completed, type YES; this will cause the reports
to skip this job and prevent PR or AP postings to this job. Otherwise leave
blank. If completed, type the date for completion of this project. If this is
not available or unknown, press ENTER.
The next six fields are used to identify the job address and are used during
invoice printing and POs. The names of these fields are governed by the job
type in field #3, Job Type.
If this is a Certified type job, or if you left field #3 blank, the
following job address fields are displayed:
10. Job Address line 1:
11. Address line 2:
12. City:
13. St:
14. Zip:
15. County:
Complete these fields as you wish the job address to be identified
on invoices and POs.
If this is a Residential job, the following fields are displayed:
10. Model:
11. Lot:
12. Block:
13. Street:
14. Sub division:
15. County:
County:
If a valid tax ID is entered here and 7-1-1-1:
#4 Miscellaneous Information, field #3, Use tax exempt, is "no"
then this tax ID will be used to calculate use tax when requisitioning to the
job. Otherwise just enter the county.
16 - 18 PAYROLL TAX INFORMATION
These entries specify for payroll the state, locality/city and other
for income tax withholding for work on this job. The State tax ID is required.
When these fields are completed and corrected if necessary, press ENTER
and the next input screen will be displayed as follows (items in bold type are
examples):
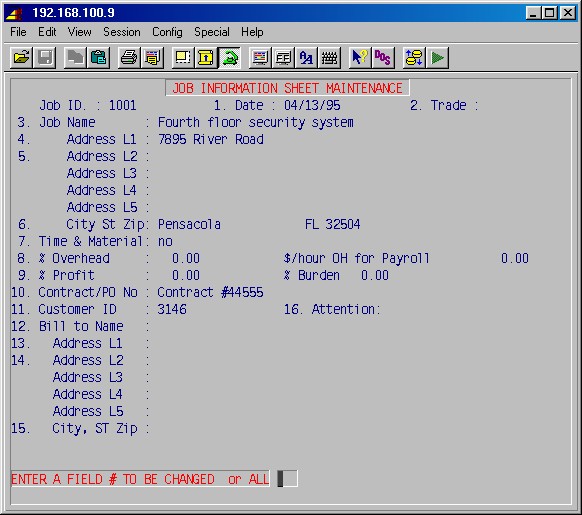
Selecting 2, Billing information, displays this input screen:
This screen will carry forward the job ID, job name and address, and customer
ID from the previous screen.
1. Date: (optional)
Type the date this job was booked.
2. Trade: (optional)
This field must be left blank, except for General Contractors.
3-6 Job:
Job name and address was transferred from the prior input screen.
Review and correct if necessary.
7. Time & material:
Type YES or NO to specify whether or not this job is
a time and material job.
8. % Overhead:
Type the normal overhead percentage used for this job. This percentage
can be used for preparing change orders.
$/hour OH for payroll:
Type a dollar per hour overhead to be used by payroll for this job.
Important: normally 0.
9. % Profit:
Type the normal profit percentage used for this job. This percentage
can be used for change orders.
% Burden
Type the normal burden percentage to be used by payroll for this
job.
10. Contract/PO No:
Type the contract or purchase order number specified by the customer.
11. Customer ID:
Transferred from the previous screen. Review and correct if necessary.
12-16 Bill to:
Type in the billing address for this job only if it is different
from the customer's address. If it is the same, leave blank.
When these fields are completed and corrected if necessary, press ENTER.
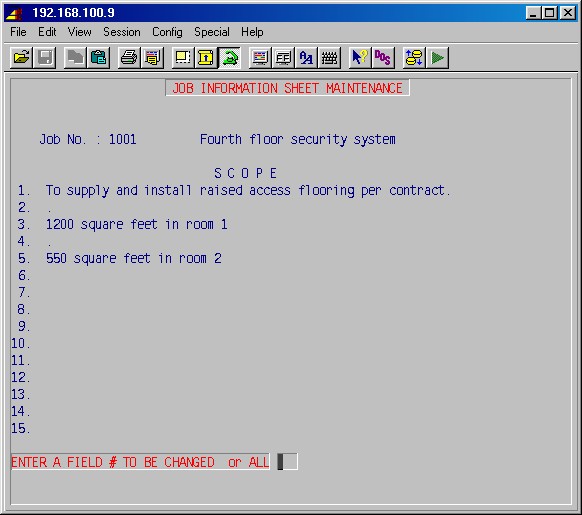
Selecting 3, Job Scope, will display the following screen:
This screen contains 15 lines available for description of the work to be done
on this job or
any other notations you may wish to make. When this screen is completed, press
ENTER.
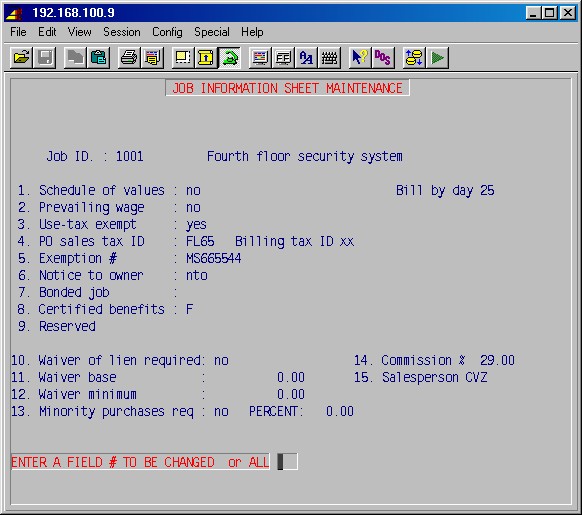
Selecting 4, Miscellaneous Information, will display this input screen as
follows (items in bold type are examples):
1. Schedule Of Values:
Type YES or NO to specify whether this job is to be
billed from a schedule of values (AIA billing).
2. Prevailing Wage:
Type YES or NO to specify whether this is a prevailing
wage job.
3. Use Tax Exempt:
Type YES or NO to specify whether this job is Use Tax
exempt. (If the is "NO" and a valid tax ID is entered in 7-1-1-1
#15, County, then that tax ID will be used to calculate use tax when requisitioning
to the job or entering AP invoices.)
4. PO Sales tax ID:
Enter the tax ID for sales tax to be paid on purchase orders (or
"xx" for none).
Billing tax ID:
Enter the ID of the tax authority for billings for this job or "xx"
if exempt.
5. Exemption number:
Type in the sales tax exemption number for this job if applicable.
6. Notice to owner:
Type three characters of your choice that will appear on the accounts
receivable aging report with any invoices for this job.
7. Bonded job:
Type three characters of your choice that will appear on the accounts
receivable aging report with any invoices for this job.
8. Certified Benefits:
This is a mandatory field if this is a certified job. Type a C
or F as follows:
C if you pay benefits in cash to bring their wages up to scale.
F if you pay benefits to a pension fund or other funds other than cash
to bring their wages up to scale.
9. Job Site Inventory:
Enter YES if this job has an on-site inventory or is set up
as an inventory.
10. Waiver of Lien Required:
Enter YES if a waiver of lien is required when issuing accounts
payable checks to subcontractors on this job.
11. Waiver Base:
Currently not used.
12. Waiver Minimum:
Enter the minimum amount for which a waiver of lien is required.
(Any purchase at or above this amount will generate a waiver of lien.)
Minority Purchases Rq:
Enter YES is minority purchases are required for this job.
PERCENT:
Enter the minority percentage of purchases required for this job.
When these fields have been completed, press ENTER.
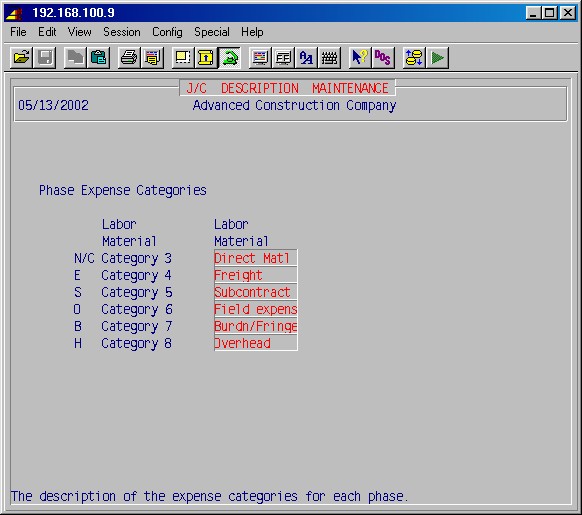
Selecting 5, Phase expense categories, will display the following :
Each phase of each job has eight possible categories of expense. Labor
and Material are fixed categories for every phase. The remaining six categories
may be altered as required from the master list.
NOTE: This master list is located in job ID OH,
which is a special job with information required by the system. The master
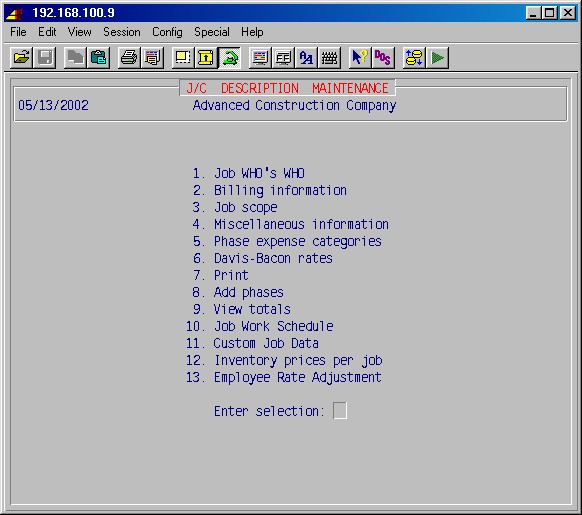
list of phase expense categories may be changed to your specifications
by selecting 7-1-1: Job Cost Description Maintenance,
entering OH as the job ID, and paging to the above screen to make
the changes.
The system will initially display a list with the standard categories as in
the example above. These may now be changed for this job if desired. If you
regularly use a different set of expense categories, it is best to change the
master list as described in the note above.
Selecting 7, Print, will print a two page report of this job with the information
you have entered in the above input screens. One page is a field copy and the
other page is an office copy with information and checklists appropriate to
each.
Phases may be entered by selecting 8, Add phases, as well as in step 7-2.
When done, hit ENTER twice to return to the JOB
COST DESCRIPTION MAINTENANCE menu.
Top
Phase Code Setup
This procedure allows adding phases to existing jobs, one at a time. Every
job must have at least one phase due to the fact that the system must post the
job costs to a phase.
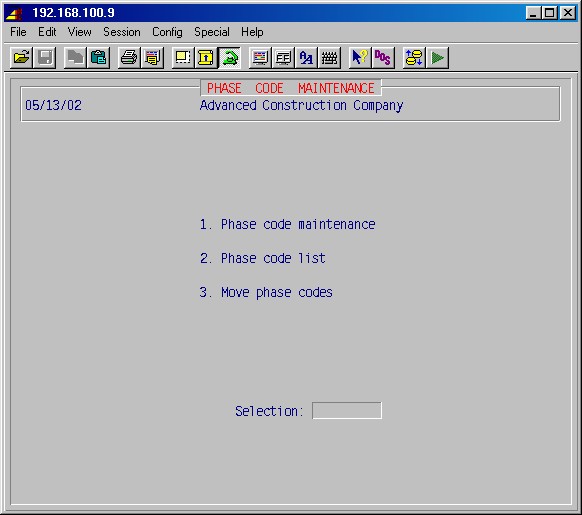
Select 7-2: Phase Code Maintenance from the job cost
main menu to display the following input screen:
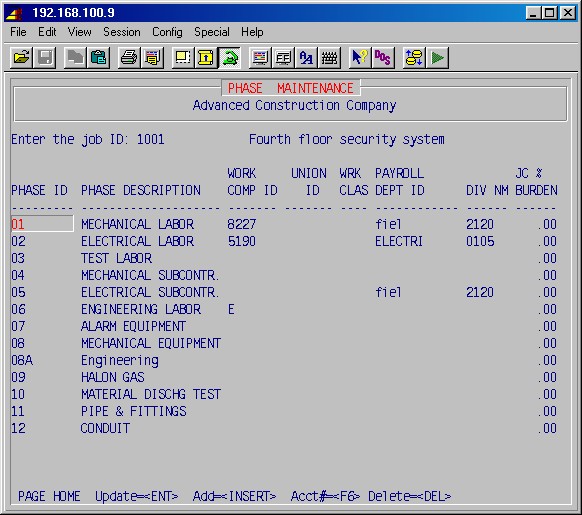
Selecting 7-2-1: Phase Code Maintenance from this
menu will display the following input menu (items in bold type are examples):
Enter the job ID
This must be an existing job set up through the job description procedure.
When this is typed, the system will display the job name.
Use ARROW, PAGE, HOME, INS, DEL and ENTER
keys as described earlier (horizontal menu).
Phase ID
Type up to nine characters for the phase ID, letters or numbers.
The reports will alphabetize phases according to the phase IDs. If desired,
certain cost reports will subtotal phases based on the first two characters
of the phase ID.
Phase description
Type a short description for each phase.
When you have entered all phases for a job press END to exit this area.
You will be returned to the phase maintenance input screen to enter the phases
for another job.
Top
Payroll Setup
There are several payroll areas that must be set up before you can process
a payroll. The following setups must be completed in order:
General Setup
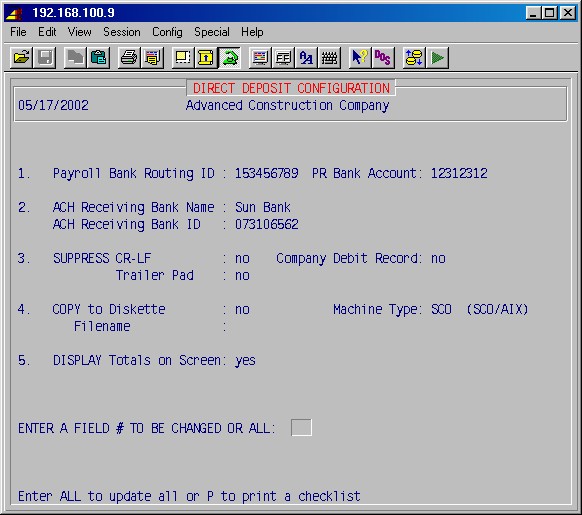
Step 13-1: Client Information has several fields
related to payroll that must be completed, including the company name and address
as it will appear on official reports and bank account information for direct
deposit. Selecting 13-1 will display the following input
screen (items in bold type are examples):
1-6. Company Name, Address, & Phone
Complete these fields with your company's name and address as you
wish them to appear on all reports and transmittals. This address will appear
on W2s, magnetic media, and all union, governmental, and other system reports.
7. Union payroll? First month of FY
Answer YES if this is a union payroll. This will cause union
areas to be accessible for input and payroll will be processed as a union payroll.
Specify the first month (1-12) of your fiscal year end (FY). This is a GL
setup, but must be completed because it controls the accounting.
8. Overtime factor
Specify (as a decimal) the hourly pay factor for overtime pay.
Example: Overtime pay is typically one and one-half times the normal hourly
pay and would be entered as 1.50.
9. Double time factor
Specify (as a decimal) the hourly pay factor for doubletime pay.
Example: Doubletime pay is typically two times the normal hourly pay and would
be entered as 2.00.
10. Shift factor 1 2 3 4 5
Specify, if applicable, the shift premium (extra pay per hour), you
pay for employees working different shifts. This is entered as a dollar amount
(Example: 25 cents per hour is entered as 0.25) and may be entered
for up to five shifts. The amount is added to the employee's basic rate at time
card entry.
11. Reserved
12. Reserved
13. Reserved
The next three fields are for direct deposit only and must be left blank if
you are not using the direct deposit feature of payroll.
NOTE: #14 and #15 should be left blank unless you are utilizing
the direct deposit feature
14. Company direct deposit account # Bank
ID:
Enter your bank account number (generally your payroll account number)
from which direct deposits from payroll will be deducted. The bank ID number
is the nine digit bank routing number which identifies your bank to the banking
system. This number is on your checks or you may call your bank for the proper
number.
15. ACH receiving bank ID
Enter the nine digit bank routing number for the ACH (automated clearing
house) bank ID. This is the bank where your bank will send the direct deposit
deducted from your payroll account for routing to your employee's bank. This
bank number must be obtained from your bank.
Miscellaneous Pay & Deductions
Step 5-3-1: Deduction Maintenance, explained
in the Payroll Manual, is used to create a list of all
possible employee deductions, miscellaneous pay, reimbursements and company
overhead categories.
Work Comp Classifications
Step 5-4-1: Work Comp Classification Maintenance,
explained in the Payroll Manual, is used to input the work
comp classification codes and rates for your employees.
Union Maintenance
Step 5-4-3-1: Union Maintenance, explained
in the Payroll Manual, is used to input the master files
for each union.
Union Work Class
Step 5-4-3-3: Union Work Class Maintenance,
explained in the Payroll Manual, is used to input union
work class information.
Union Contribution
Step 5-4-3-2: Contribution Maintenance,
explained in the Payroll Manual, is used to input the union
contributions for each union entered above.
Payroll Departments
Step 5-5-1: Department Maintenance, explained
in the Payroll Manual, is used to set up the various payroll
departments and the general ledger numbers associated with each department,
which control the accounting.
Tax Tables Setup
Step 5-7-1: Tax Table Maintenance, explained
in detail in the Payroll Manual, must be used next to maintain
tax tables for federal, state, and local taxes. Note that the FDM and FDS (Federal)
are the master tax tables from which the system pulls various information. In
addition to federal tax table information, the federal tax ID for all federal
reports including W2s, magnetic media, and direct deposit, as well as the FUTA
percent and limit are pulled from this table. It is essential that all information
on these tables be accurate.
Davis-Bacon skill setup
Step 5-7-6: Davis-Bacon Skill Maintenance,
explained in detail in the Payroll Manual, must be done.
Employee Information
Step 5-1-1: Employee Maintenance, explained
in the Payroll Manual, is where employees are set up and
most employee information is entered.
Employee Deductions
Step 5-3-2: Employee Deduction Maintenance,
explained in the Payroll Manual, may now be used to enter
each employee's deductions and miscellaneous payments.
Time Entry Setup
There are several options for time entry which must be set before
you process a payroll for the first time. These are set according to your preference
and company policy, and are normally set once at installation and not changed
again.
To access this setup screen, go to the main menu and choose #13 Utilities,
then #8 Control record maintenance, then #8 Time card entry/tax control.
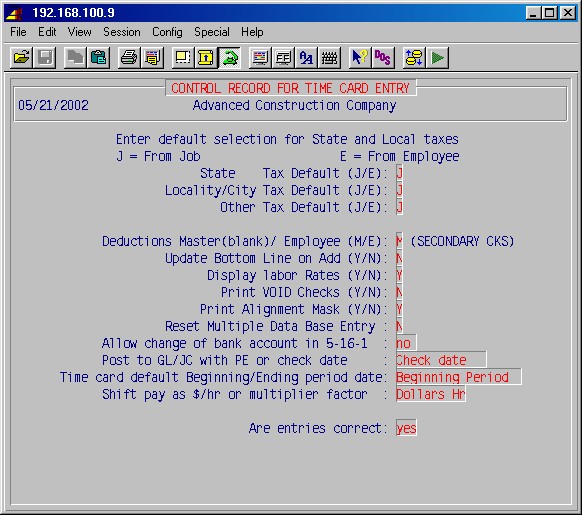
Selecting 13-8-8: Time Card Entry/Tax
Control, will display the following input menu (items in bold type are examples):
State tax default (J/E):
Specify whether you want the location of the job, or the home state
of the employee to control the taxes. If your jobs are primarily in one state,
you will generally set this to Employee. If your jobs are in several states,
you will generally set this to Job.
Locality tax default (J/E):
This is similar to the state tax default option above. If your jobs
are in different localities that have local taxes, set this option to Job. If
not, set it to Employee.
Other tax default (J/E):
This is similar to the state tax default option above. If your jobs
are in different localities that have local taxes, set this option to Job. If
not, set it to Employee.
Deductions from master or employee (M/E):
This option relates to secondary or multiple checks created in step
5-8-6.
It is often necessary to omit or change all or some of the normal deductions,
as entered in 5-3-2: Employee Deduction Maintenance,
on a secondary check. This requirement necessitates the use of a deduction
screen if you are writing a secondary check.
This deduction screen may either be a complete listing of all possible deductions
with no amounts from the Master list in 5-3-1: Deduction
Maintenance, or the Employee deduction record for this employee with the
amounts per regular pay period, from 5-3-2: Employee
Deduction Maintenance.
Update bottom line on ADD (Y/N):
The time entry screens have a horizontal line of fields on the lower
third of the screen to input information for department, class and union information,
shift, and tax state. These fields are filled in with information from the master
files.
If you often need to change any of these fields in time entry, set this
option by typing Yes. This will allow you to access these fields in
the normal Add mode when you are doing time entry.
If you seldom change these fields, set this option to No. This will
cause the cursor to skip over these fields in the Add mode. They may be changed,
but only in the Update mode.
Display labor rates (Y/N):
This option allows you to omit the labor rates from time card entry
fields to maintain confidentiality of employee pay rates. If you set this to
No, you can have operators enter time without revealing pay rates to
them.
Print VOID checks (Y/N):
This option gives you the choice of printing void checks. This is
a matter of preference, sometimes for internal control purposes. If you set
this to Yes, you will have a paper check to account for each check number.
Print Alignment Check: (Y/N):
This specifies whether option to print alignment check is offered
during check printing.
Are entries correct: YES
If you need to make changes, type NO ENTER and make your corrections.
Otherwise press just ENTER.
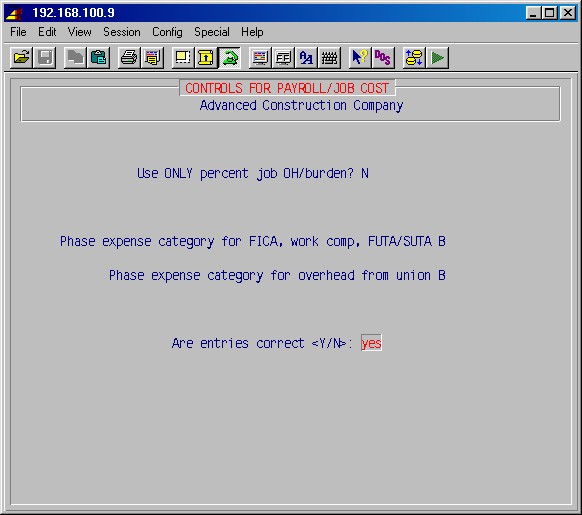
Selecting 13-8-5: Payroll to
Job Cost Burden/Fringe/Overhead, will display the following input menu:
Use only percent job OH/burden?
If you want to use a fixed percentage of payroll for job overhead/burden
cost, rather than actual cost (FICA, work comp, FUTA/SUTA, Medicare, Company
Overhead, etc.) type Y and press ENTER. The system will prompt:
Percent job OH/burden
Enter the overhead/burden percentage.
Phase expense category for OH/burden
Enter the percentage and phase expense category (one of L,
M, N, C, E, S, O or B, as viewed
in 7-1-1-#5).
Please note that the choice of these categories is a company
policy issue.
Otherwise just press ENTER, and the system will prompt:
Phase expense category for FICA, work comp, FUTA/SUTA
Phase expense category for overhead from union
Enter the phase expense category to be used for each.
Are entries correct <Y/N>: yes
If you need to make changes, type NO ENTER and make your corrections.
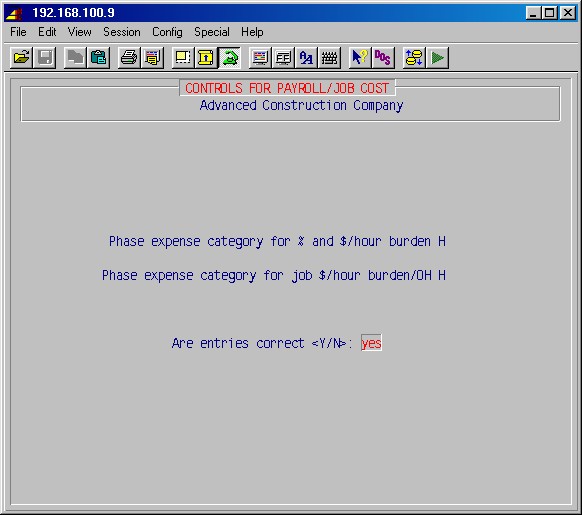
Otherwise just press ENTER, and the system will prompt:
Phase expense category for % and $/hour burden
Phase expense category for job $/hour burden/OH
Enter the phase expense category to be used for each.
Are entries correct <Y/N>: yes
If you need to make changes, type NO ENTER and make your corrections.
Otherwise just press ENTER, and the system will prompt:
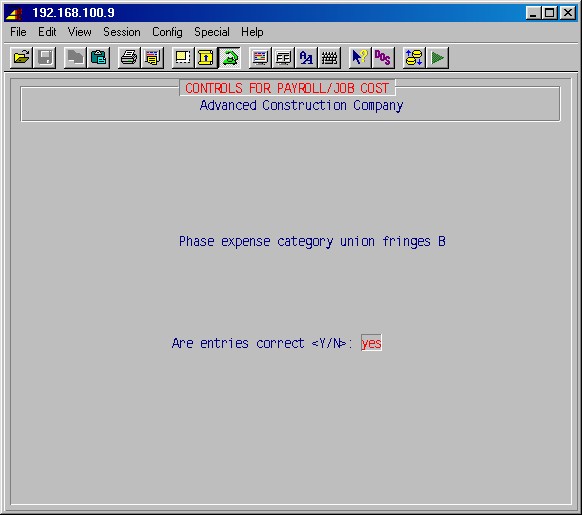
Phase expense category union fringes
Enter the phase expense category to be used for union fringes.
Are entries correct <Y/N>: yes
If you need to make changes, type NO ENTER and make your corrections.
Otherwise press just ENTER three times until you return to the main menu.
Top
Inventory Setup
Select 8-1: Inventory Maintenance
and ensure that the item with ID :M has been set up.
Select 8-10: Unit of Measure Maintenance:
This selection allows you to specify various units of measure and the count
that they represent.
When you are finished press END and the system will return you to the
Inventory control menu.
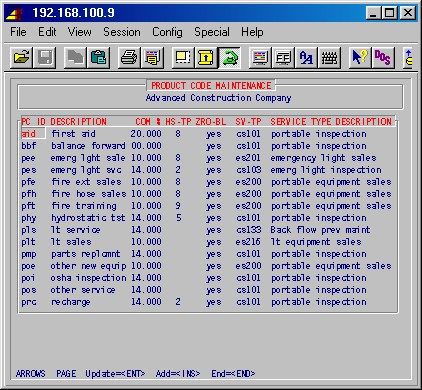
Select 8-18: Product Code Maintenance:
The product code allows you to identify items in inventory as belonging to
groups.
PC ID
Enter a product code ID of up to 5 characters.
DESCRIPTION
Enter the description of this product code.
COM %
Enter a commission percentage, if applicable.
HS?TP
If you have the Preventive Maintenance Contract Module, enter the
history type under which you want this product to show.
ZRO?BL
If you enter No you'll not be allowed to requisition or sell
more items than you have; if you enter Yes you'll be allowed to go below
zero on hand for items with this product code.
SV?TP
You may associate this product code with a service type by entering
a service type ID, as set up in 8-19: Service Type Maintenance.
SERVICE TYPE DESCRIPTION
This description will automatically display, once a service type
has been entered.
Set up at least one product code na.
When done, press END.
Top
Service Order Setup
There are several service order areas that must be set up before you can use
the service order module. The following setups should be completed in order:
General Setup
The following areas should already have been set up with printers, sales types,
employees and payroll departments to be used in the following setups as noted:
13-3 Printer Designation & Codes, used in
13-8-6 below.
1-4-1 Sales Type Maintenance, used in 2-15-3
and 2-15-8 below.
5-1-1 Employee Maintenance, used in 2-15-7
below.
5-5-1 Department Maintenance, used in 13-8-6
below.
The job service should already have been set up in 7-1-1:
Job Description Maintenance.
The item with ID :M should already have been set up in 8-1:
Inventory Maintenance.
Top
13-8-6: Service Orders
Selecting 13-8-6: Service Orders from the main
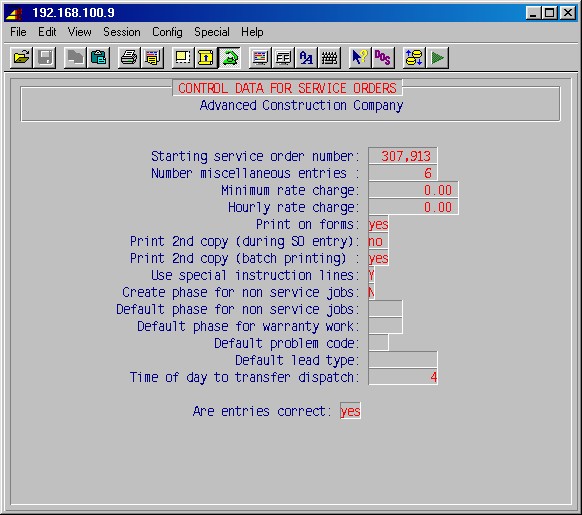
menu presents this input screen (items in bold type are examples):
Starting service order number:
This is used in the automatic numbering of service orders during
entry. Enter the first number to be used, e.g. 300,000 will number the first
service order entered as SO300000, thus establishing 6 digit service order numbers.
Number miscellaneous entries:
This determines the number of available miscellaneous charges you
can set up to choose from during service order billing (see the second screen
following this). Enter a number from 0 to 8.
Minimum rate charge:
Not used.
Hourly rate charge:
Not used.
Print on forms:
Enter YES if you want service orders to be printed in a format
that fits our standard form, or enter No to have them print on plain
paper.
Print 2nd copy (during SO entry):
If you are printing service orders on plain paper, you may want 2
copies printed. If so enter YES here to have 2 copies printed when you
ask to have a service order printed immediately following entry.
Print 2nd copy (batch printing):
Same as above, but when printing service orders after entering a
batch of them (2-7).
Use special instruction lines:
While entering a service order you may have four lines available
to enter special instructions in addition to the standard six lines for "work
description". Enter Yes here if you want these printed on service
orders.
Create phase for non service jobs:
The default job for service orders is normally "Service"
and when entering a service order a phase is created for the job "Service"
with the phase ID of the service order number, e.g. "300001". If you
also want phases created for jobs where the job ID is not "Service",
enter Yes here.
Default phase for non service jobs:
If you have entered Yes above, you may enter the default phase ID
here. If this is left blank, then the SO number will be the phase ID.
Default phase for warranty work:
Enter the phase ID for service orders done under warranty.
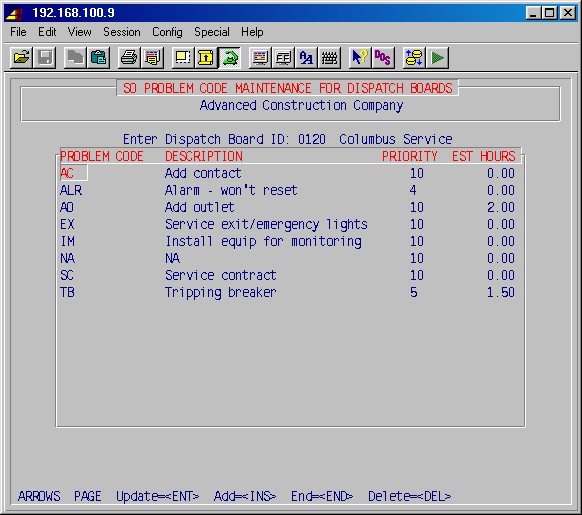
Default problem code:
Enter the problem code you want to automatically fill in when entering
new service orders in 2-1. (Problem codes will be set
up in 2-15-1: Problem Code Maintenance.)
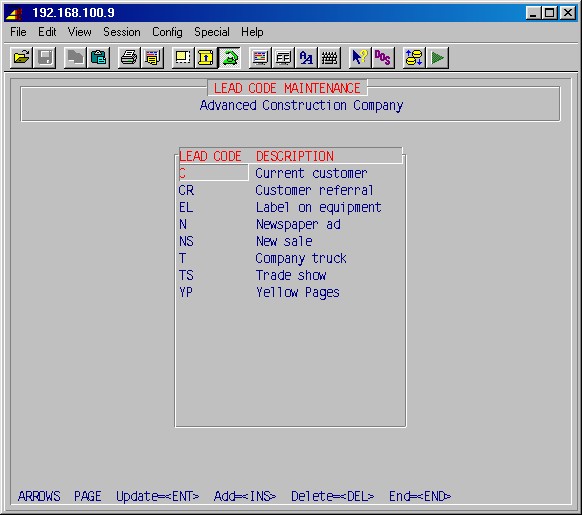
Default lead type:
Enter the lead type code you want to automatically fill in when entering
new service orders in 2-1. (Lead codes will be set
up in 2-15-2: Lead Code Maintenance.)
Are entries correct:
If the above entries are correct, press ENTER to go to the
next screen. Otherwise enter No to go back and correct one or more of
the above.
% Labor burden:
Enter the labor burden in percent to be used in service order profit
analysis reports. (Actual burden is calculated and posted to jobs during payroll
processing, as determined by setups in 13-8-5: Payroll
toJob Cost Burden/Fringe/Overhead, and as set up for individual jobs in
7-1-1, second screen #2, Billing information, fields
#8, $/hour OH for payroll, and field #9, % Burden.)
Form length setting:
This is normally 30 for our standard form, but can be changed
to match forms with fewer or more than 66 lines per form.
Alignment adjustment:
Normally 8. Determines where the first line is printed on
the form.
Default Job ID:
Normally "Service". However, see
2-15-3.
Default Payroll Dept:
Enter the payroll department to be automatically filled in (in the
phase created for the service order, if any) when entering a new service order
in 2-1.
Cost % Markup :M Item:
The item with ID ":M" is a special item set up in
8-1 (Inventory) and is used for material charges for items that are not
in any inventory, i.e. miscellaneous material items. Enter the percentage
you want the customer to be charged over your entered cost.
Post:M item costs to GL?
If you want the costs of ":M" items (see above)
posted to the General Ledger, enter Yes here.
Are entries correct:
If the above entries are correct, press ENTER to go to the
next screen. Otherwise enter No to go back and correct one or more of
the above.
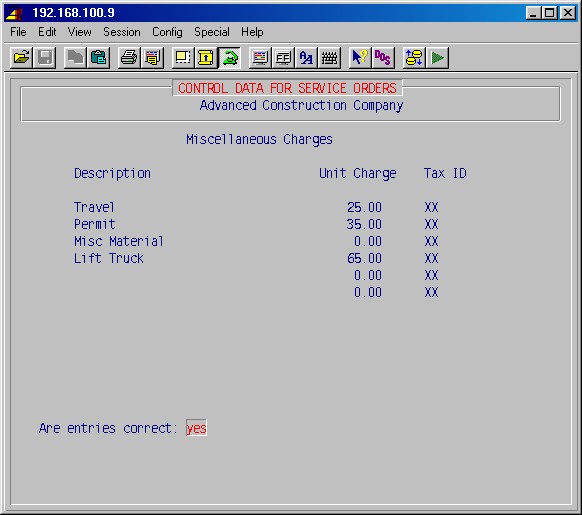
Here you set up the miscellaneous charges you can choose from when billing
a service order.
Description
Enter the description of the charge.
Unit Charge
Enter the amount of this charge.
Tax ID
Enter the tax ID for this charge, use XX for exempt.
Are entries correct:
If the above entries are correct, press ENTER to go to the
next screen. Otherwise enter No to go back and correct one or more of
the above.
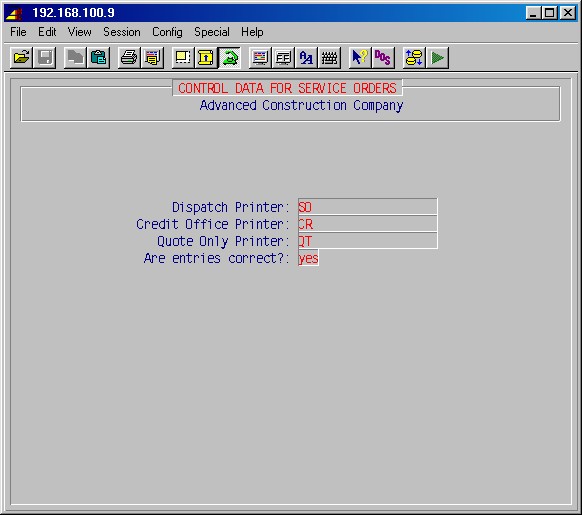
Here you may enter the printer numbers of printers as set up in 13-3:
Printer Designation & Codes. If any of these are left blank, you'll
be asked for the printer number each time you print.
Dispatch Printer:
Enter the number of the printer on which to print newly entered service
orders.
Credit Office Printer:
Enter the number of the printer where credit notices are to be printed.
Quote Only Printer:
If particular printer is used to print service order quotes, enter
its number here.
Are entries correct?:
If the above entries are correct, press ENTER to go to the
next screen. Otherwise enter No to go back and correct one or more of
the above.
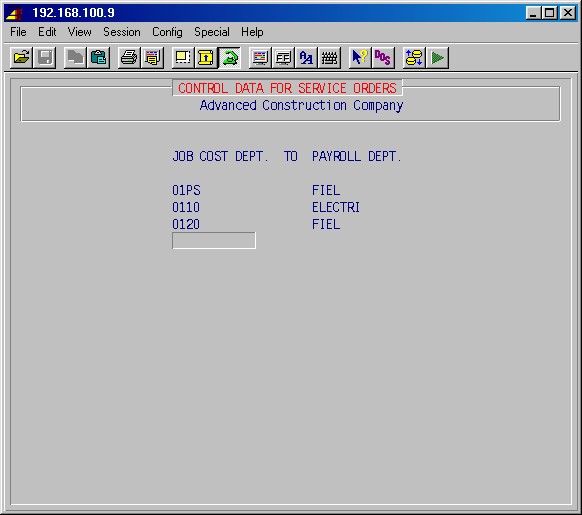
Here you may set up relations between sales types (departments) as set up
in 1-4-1: Sales Type Maintenance, and payroll departments
as set up in 5-5-1: Department Maintenance. Up to
seven such relations may be defined. This is used when transferring labor from
service orders into payroll (5-8-9).
JOB COST DEPT.
Enter a sales type ID as set up in 1-4-1.
TO PAYROLL DEPT.
Enter the payroll department, as set up in 5-5-1,
which is to receive the cost of the above sales type.
Press ENTER till you get back to the main menu, then select 2-12:
Labor Rate Maintenance.
Top
2-12 Labor Rate Maintenance
This procedure allows you to set up and maintain labor class tables with specified
labor rates for billing service orders. These are user-defined tables which
facilitate billing different labor rates for different classes of employees
and different customers. These tables are assigned "Labor class IDs"
which may be entered for each customer (7-1-2: Miscellaneous
Customer Data) or for each work address for a customer (1-1-10
or 2-14: Work Address Maintenance) in the field Labor
code. During service order entry (2-1), the system
will use the code set up for the selected work address or customer. The default
of S is set up for each work address and customer. Thus the table S must be
set up.
Each table is assigned an ID such as S = standard, R = retail,
P = preferred, or any code of your choosing. Then, you build a table by
work class, assigning the hourly rate you wish to charge.
If there is no need to bill a different labor rate for journeyman versus foreman,
versus helper, then a simplified labor rate table may be constructed with labor
classes of Reg for regular work, OT for overtime work, and DT
for doubletime work. Otherwise, the work class for each employee, such as J,
A65, A45, must be entered in the table with its appropriate billing
rates.
In order for the work class to automatically fill in when billing time for
an employee on a service order, the work class codes should correspond to the
codes entered for employees (5-1-1 #20). If you have
different trades, you should set up different work classes for each trade, e.g.
JP Journeyman - Plumber, A45P Helper - Plumber, JE Journeyman
- Electrician, A45E Helper - Electrician, etc.
This selection will display the following input screen:
Enter labor class ID:
If you are creating a new table, type an ID (up to four characters)
of your choice and press ENTER. When prompted NO ENTRIES ADD: Yes,
just press ENTER.
If you are updating an existing table, type the labor class ID [H]
and press ENTER. If this is a valid ID, the system will display the
work classes previously entered. Use the ARROW, PAGE, ENTER
and INSERT keys as needed to select, update and add entries, as needed.
WORK CLASS
Type the work classification code [H] and press ENTER.
DESCRIPTION
Type the description for this work class and press ENTER.
Reg RATE
Enter the rate in dollars/hour a customer is charged for regular
time.
OT RATE
Enter the rate in dollars/hour a customer is charged for overtime.
DT RATE
Enter the rate in dollars/hour a customer is charged for double time.
OH %
Not currently used.
Profit %
Not currently used.
When done with entering work classes for this labor class, press END.
Enter another labor class to set up, or leave blank and press ENTER to
return to the service order menu.
Top
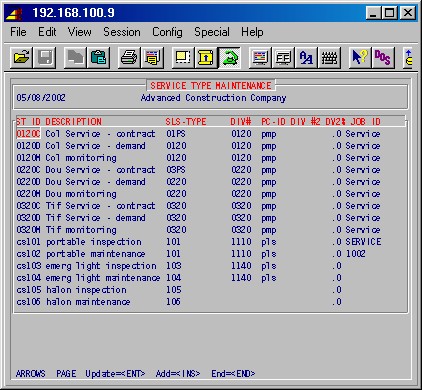
2-15-8 Service type maintenance
Select 2-15-8: Service Type Maintenance.
Service types parallel AR sales types (as set up in 1-4-1:
Sales Type Maintenance) and controls your accounting in service, but this
feature allows you to have multiple service types without having to set up an
AR sales type for each. You need to have one service type for each sales type,
but you may have multiple service types pointing toward the same sales type.
If desired, you may just set up one service type for each sales type with the
service type ID the same as the sales type ID.
ST ID
Enter the ID for this service type, maximum five characters.
DESCRIPTION
Enter the description for this service type (this description will
automatically be copied to the first line of the work description when entering
a new service order in 2-1).
SLS?TYPE
Enter a valid sales type as set up in 1-4-1:
Sales Type Maintenance.
DIV#
Enter the division number, if applicable.
PC?ID
This allows you to associate this service type with a product code,
as set up in 8-18: Product Code Maintenance.
Press END when you are done, then select 2-15-3:
Setup Dispatch Boards.
Top
2-15-3 Setup Dispatch Boards
The purpose of a dispatch board is to be able to collect service calls into
groups (which we call dispatch boards) for the purpose of dispatching different
types of service calls. You need to set up at least one board.
TYPE
Enter the ID for the dispatch board (maximum 5 characters).
DISPATCH
DESCRIPTION
Enter a description for this dispatch board.
SALES TYPE
Enter a sales type (as set up in 1-4-1: Sales
Type Maintenance).
JOB ID
Normally service. This is the job ID that will automatically be filled
in when entering new service orders in 2-1.
DISPATCH
TIME SLOTS
When entering a truck or tech during entering a new service order
in 2-1, you may press F5 to get a summary of
calls in each of these time slots. Enter dispatch time slots cut-off times to
define these slots - e.g. 12 (= 12 noon), 16 (= 4 pm), 20
(= 8 pm).
LATE
TIME
If you have the Dispatch Board module, enter the period (in minutes)
after which a service call is considered late (the call will turn red on the
dispatch board if not called in before this number of minutes after scheduled
time).
Press END when done. Then select 2-15-1 Problem
Code Maintenance:
Top
2-15-1: Problem Code Maintenance
Problem codes allow an operator entering a service call to specify with just
a few letters the nature of the service call.
Enter Dispatch Board ID:
Enter the ID [H] of the dispatch board (as set up in 2-15-3:
Setup Dispatch Boards) for which you'll be setting up problem codes.
PROBLEM CODE
Enter a problem code (maximum three characters).
DESCRIPTION
Enter your description of this problem code.
PRIORITY
Enter the relative priority of service calls with this problem code.
Priorities range from 1 to 99 where 1 is the highest priority.
EST HOURS
Enter the normal estimated hours to complete this type of call.
Enter at least one problem code for each dispatch board you have set up in
2-15-3: Setup Dispatch Boards. This could be just
a cc for check equipment, or at least an na if you don't want
to use this feature.
Press END when done with a dispatch board.
When done with all dispatch boards, simply press ENTER when prompted
for dispatch board ID.
Select 2-15-2: Lead Code Maintenance
Top
2-15-2: Lead Code Maintenance:
Lead codes allow you to analyze service orders against their sources, e.g.
yellow pages, newspaper ads, customer referral.
LEAD CODE
Enter the code for this kind of lead.
DESCRIPTION
Enter a description for this kind of lead.
Enter at least one code, e.g. na.
When done press END.
Next, select 2-15-4: Setup Trucks.
Top
2-15-4 Setup trucks:
Setting up "trucks" is the only way to make a person and
truck available for the dispatch board. You need one or more entries in this
list before a dispatch board will work. If you have people only, make up a truck
number (truck numbers must be unique - don't duplicate).
This is a cross reference between a real employee and a truck.
Enter Dispatch Board ID:
Enter the ID [H] of the dispatch board (as set up in 2-15-3:
Setup Dispatch Boards) for which you'll be setting up trucks/employees.
TRUCK
Enter the number of the truck (or just an arbitrary number).
EMPLOYEE ID
Enter the ID [H] of the employee (as entered in 5-1-1:
Employee Maintenance) associated with this truck.
DISP NAME
Enter a name for this employee/truck as you wish it to appear on
the dispatch board.
HELPER
Enter Yes if this truck has a helper (multiple man truck).
Enter a truck (whether real or just a number) for each service employee, for
each dispatch board.
Press END when done with a dispatch board.
When done with all dispatch boards, simply press ENTER when prompted
for dispatch board ID.
If you wish to enter map-coordinates for customers and work addresses, select
2-15-5: Map Coordinate Maintenance.
Top
2-15-5: Map Coordinate Maintenance:
ST
Enter the two letter state abbreviation for this location.
ID
Enter a shorthand code for this city/county (maximum 5 characters).
CITY/COUNTY NAME
Enter the name of this city or county.
STREET NAME
Enter the name of the street of this location.
MAP CORD
Enter the map coordinates for this location.
When done with entering all coordinates, press END.
If you'll be billing service call against a price book, select 2-15-6
Price Book Maintenance.
Top
2-15-6 Price book maintenance
WORK CODE
Enter the code for this work.
DESCRIPTION
Enter the description for this work.
TIME
Enter the standard time for this work.
L.RATE
Enter the labor rate for this work.
For each service order billing line you enter against the price book, you'll
be allowed to choose from one of the below charges:
PRI REP
Enter the primary repair charge.
ADL REP
Enter the charge for additional repair.
AFH PRI
Enter the charge for after hours primary repair.
AFH ADL
Enter the charge for after hours additional repair.
SVC PRI
Enter the charge for primary service.
SVC ADL
Enter the charge for additional service.
When done entering the price book, press END.
If you are using the paging system utilizing the fax
software, go to 2-15-7: Pager Maintenance.
Top
13-2-10 Dispatch board user maintenance
Here you will want to give permission to users who'll be entering service
calls (service orders) and access the dispatch board for scheduling. If a user
does not have permission to a dispatch board he or she will not be allowed to
enter service orders for that board.
Update User:
Enter the user ID of the person who wish to give access.
Can Run
Enter Yes or No as applicable, as each dispatch board
is presented.
When done with all applicable users, simply press ENTER when prompted
for User.
Top
ENTERING BEGINNING BALANCES
This is the final step in setting up your accounts. You will need to plan the
conversion from your present accounting system to the SI System at the close
of an accounting period. The timing of the conversion is somewhat determined
by your present system, however, it is normally done at the end of a month after
all entries are posted and balanced.
General Ledger
It is best to input beginning balances using a balanced general ledger from
the accounting system you are now using.
Manual posting to journal - posting the account balances to the journal; then
posting the journal to the general ledger.
-
Manual Posting to Journal
-
Using a month end balanced general ledger, you will post all entries to
the general ledger, make sure it is in balance, and then remove the manual
postings, leaving the beginning balances.
Select 6-5: Manual Posting to Journal from the
general ledger system. This will display the following input screen:
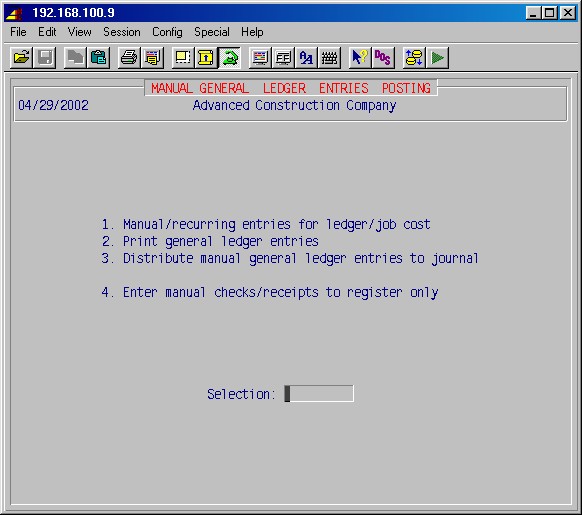
Selecting 6-5-1: Manual/Recurring Entries for Ledger/Job
Cost from this menu will display the following input screen:
Source # - If you press ENTER without giving a source number,
the system will create a new source number. This is the computer's way of
identifying a group of postings.
If prompted: Do you want to create a new GL entry?, answer Yes
and press ENTER.
Enter Post Date MMDDYY: - Type in the date for the month end you
are posting and press ENTER.
If prompted: NO ENTRIES - add? answer Yes and press ENTER.
Account # - Type the first GL account number and press ENTER.
Div # - Type the number of the division (if any) for which you are
entering beginning balances.
Description - The description field will display the name of this
account for verification. It is suggested that you now type Beginning
Balance in this field and press ENTER.
D/C - The screen will display whether this GL account has a Debit
or Credit balance.
Debits +/ Credits - The cursor will be positioned on the correct
debit or credit column for this GL account. Type the balance and press ENTER.
You may now post the rest of the GL account balances, one-at-a-time until
all have been entered. Use the ARROW, PAGE, HOME, INS,
DEL and ENTER keys as described earlier, if needed. When you
have finished, press END. You will not be allowed to leave this area
until these entries are in balance.
If you are not in balance, you will be prompted ***Out of Balance***
with the total of the debits and credits and the amount you are out.
You will now be returned to the GL posting screen. Press END to exit
and you will return to the 6-5: Manual Posting to Journal
Menu.
Top
NOTE: Although the system would not let you leave the
manual posting area until the totals balanced, it is possible to make
offsetting errors in individual postings that still allow the totals
to balance. Therefore, it is necessary to verify these entries before
they are distributed to the journal.
Select the printer number and the number of copies and press ENTER.
The screen will then prompt:
Type today's date for the run date, and the date of the general ledger you
just posted for the distribution date. Verify these dates and type YES
ENTER to print the general ledger entries. Now use this report to verify
the accuracy of your postings.
Top
-
Distribute Manual General Ledger Entries to Journal
Next, select 6-5-3: Distribute Manual General Ledger
Entries to Journal. Follow the same procedure as outlined in 6-5-2,
using the date of the general ledger you just posted for the Cutoff date
for this update. This procedure will distribute your postings to the journal
and produce another report which you should keep as a permanent record of
this procedure.
-
6-6 Update Journal to Ledger/Detail
Next, select 6-6: Update Journal to Ledger/Detail
from the general ledger menu. This will display the following menu:
Selecting 6-6-1 Update Journal to General Ledger
Totals will display the printer selection screen. Specify the printer
number and the number of copies and press ENTER. The following input
screen will be displayed:
Enter the date from which to start the update:
Type the beginning-of-month date for the month of general ledger
you just posted.
Date through which to update:
Type the last day of the month for the general ledger you just
posted.
Verify these dates and type YES ENTER. This procedure will
update the journal and print a report of these entries which should be kept
as a permanent record of this procedure.
The last thing to do, now that the GL balances have been posted, is to go
back to field # 10 Allocate by job in the 6-1-2 GL
Accounts Maintenance input screen. There you will change the setting to
YES for all GL account numbers that are associated with jobs.
Top
Accounts Payable
This procedure will allow you to input the amount owed to each vendor as of
the end of the month you are using as a conversion date. You will be posting
all unpaid invoices and then distributing the amounts back to the normal expense
accounts. This will allow you to input the payables information for the system
to begin to use. The posting generated to the General Ledger will be removed.
First, collect together all unpaid invoices and run a tape of the total. The
sum of these invoices must equal the AP balance.
-
Post Accounts Payable Invoices
Next select 4-2: Post Accounts Payable Invoices
from the main menu. For the accounting date, you will type the month end
conversion date. From this point, follow the procedures outlined in the
accounts payable manual for posting accounts payable invoices, with one
exception:
When the system prompts for the GL account #, type in the GL account number
normally used for this invoice.
-
Accounts Payable Edit Report, Payables Distributions
Input each invoice using this procedure. When you are finished, perform
step 4-4: Accounts Payable Edit Report, and step
4-8 Payables Distributions as outlined in the AP
Manual.
Top
Accounts Receivable
This procedure will allow you to input the amount owed by each customer as
of the conversion date. You will be posting all unpaid invoices in a loading
area which does not affect any other area. This will allow you to input the
receivables information for the system to begin to use without altering the
AR balance you posted to general ledger in the previous section.
First, collect together all unpaid invoices and run a tape of the total. The
sum of these invoices must equal the AR balance.
-
Invoice Maintenance
Next select 1-5-1: Invoice Maintenance from
the accounts receivable system. With this input screen, you will now input
each unpaid invoice using the procedures outlined in the accounts receivable
manual.
-
Print/Display Accounts Recievable Analysis
Then select 1-17-1: Print/Display Accounts Receivable
Analysis and print an AR aging report and confirm that the total agrees
with your calculator total for the total of all unpaid invoices.
Top
Jobs & Phases
This procedure will allow you to input actual job cost figures up to the conversion
date, and estimated job cost totals for each phase of each job.
Using your job cost records as of the conversion date, you need to input the
"to date" job cost figures for all active jobs plus any jobs
with open AP or AR invoices. Then, at your leisure, put in the estimated job
cost totals.
We will outline here the procedures to use to post these beginning figures.
The specifics of these input screens are discussed in detail in the job cost
manual.
Top
Actual Job Cost to Date
1. Select 7-7: Manual
Posting to Journal from the job cost system menu. Then select 7-7-1:
Manual Posting to Jobs. Using your job cost records as of the conversion
date, post each category of expenses for each phase of each job.
2. Select 7-7-2:
Print Job Posting Entries and print a report of your postings. Check
these carefully against your job cost records.
3. Select 7-8: Update
Journal to the Jobs. This will print a report of the figures you have
just entered and post these figures to the jobs. The screen will prompt for
your printer number, and then prompt:
Enter ending date / /
Update manual postings only: NO (or system
postings only)
Update estimated postings only: NO (or manual
postings only)
Are these correct ?
Type the conversion date for the ending date and press ENTER. Next,
type YES ENTER to "Update manual postings only" and NO ENTER
to "Update estimated postings only?". If these are correct, press
ENTER. Your report will be printed and the figures posted to the jobs.
Top
Estimated Job Cost
1. Select 7-7:
Manual Posting to Journal from the job cost
system menu. Then select 7-7-3: Manual Posting &
List Original Estimate Entries. Using
your job cost records as of the conversion date, post each category of expenses
for each phase of each job.
2. Select 7-7-2:
Print Job Posting Entries and print a report of your postings. Check
these carefully against your job cost records.
3. Select 7-8:
Update Journal to the Jobs. This will print a report of the figures
you have just entered and post these figures to the jobs. The screen will prompt
for your printer number, and then prompt:
Enter ending date / /
Update manual postings only: NO (or system
postings only)
Update estimated postings only: NO (or manual
postings only)
Are these correct ?
Type the conversion date for the ending date and press ENTER. Next,
type YES ENTER to "Update manual postings only" and YES
ENTER to "Update estimated postings only?". If these are correct,
press ENTER. Your report will be printed and the figures posted to the
jobs.
Payroll
It is necessary to input the year-to-date payroll balances for each employee
in order for the system to begin generating accurate quarterly reports, and
it is essential to input this information before you can use the system to run
weekly payrolls. The employee and pay information necessary to do a payroll
was entered in the payroll setup section. This section will describe entering
the year-to-date pay and deductions totals.
The basic procedure outlined below is to run a series of time entry payrolls
for each employee, one for each quarter and portion of a quarter, up until the
conversion date, adjusting the tax totals and employee deductions for each quarter
to equal the actual. The specifics of the input screens are discussed in detail
in the payroll manual.
1. Select 5-8-7: Time
Card Entry for Manual Checks from the payroll system. Using your quarterly
payroll records, fill in only the following fields, typing the information for
each employee, one-at-a-time:
Employee ID
Date - Type the date of the end of the first quarter (or portion
thereof if the conversion date is in the first quarter).
Job ID - Use job OH.
Rate - Type the sum of the gross pay for the entire quarter (or portion
thereof) for this employee.
Reg hrs - Type 1 hour.
After this line is typed, answer YES to enter deductions, and the
employee deduction maintenance input screen will be displayed. Type in the
lump sum deductions for the quarter, for each employee, setting the frequency
to W0 (1 time).
2. Select 5-9:
Employee Time Edit Report and print a report to verify the gross pay
for each employee you just entered.
3. If you did not input the employee deductions in step
#1 or you need to make a change or verify an entry, select 5-3-2:
Employee Deduction Maintenance and type in the lump sum deductions for
the quarter for each employee, setting the frequency to W0 (1 time) for
the purpose of this procedure.
NOTE: It is mandatory to input all deductions correctly before
you process the payroll. If you make any changes in deductions after you
process the payroll, you must process the payroll again before you continue.
4. Select 5-10: Process
Payroll.
5. Select 5-11:
Print Pre-Check Journal, print a report, and verify the deductions before
you continue. Go back to step #3 and make corrections if necessary.
6. Select 5-2: Employee
Totals and manually force the tax totals for each employee to reflect
what was actually deducted, if the amounts entered in 5-8-6
were not correct.
7. Select 5-11: Print Pre-Check Journal and print
a report of the taxes and deductions to proof your work. Check this very carefully
- every deduction must be accurate and every total must equal your quarterly
records.
8. Select 5-12:
Update YTD & QTD Totals and perform this procedure updating the
quarter-to-date and the year-to-date totals for each employee.
9. Do 5-13 and 5-16.
10. Select 5-18:
Clear Payroll Work Files and perform this
procedure to clear the payroll work files for the next set of entries.
At this point you start over again for the second quarter (or portion thereof)
performing steps 1 through 8 as described above. When you have entered all quarters
and the partial quarter up to the conversion date, continue as follows:
11. Select 5-3-2: Employee Deduction Maintenance
and set the deductions and the frequency for a normal pay period.
12. Select 5-3-6: Employee Deduction Register Maintenance
and set the register to reflect the balance remaining on any deductions with
a specified total amount, i.e. loans or employee purchases.
Top
Summary of Procedures 1999
Calendar Year End
A) Payroll
1. Complete final payroll of the year and make a backup of your database
2. Copy the payroll files to a new database & verify copy (run from
root)
3. Process W2s and check the results with a preliminary printing - In Payroll
Database
4. Clear employee totals - Main Database
5. Delete terminated employees (optional) - In Main Database
6. Print W2s on forms (at your convenience) - In Payroll Database
7. Adjust tax tables - In Main Database
B) Accounts Payable
1. Complete final run of payables checks for the year and make a backup
2. Process 1099s and check the results with a preliminary printing
3. After results are correct, clear year-to-date totals
4. Delete inactive vendors (optional)
5. DO NOT PROCESS AGAIN. Print 1099s on forms
(at your convenience)
C) Accounts Receivable (may be done as a part of FYE)
1. Print a list of customers showing total billings if your company wants
this data. (optional)
2. Clear the year-to-date totals (optional)
3. Delete paid invoices - normally keep a year's history. (optional)
Fiscal Year End - FYE
(May be done at the dsame time as Calendar Year End)
A) Print Permanent Reports at FYE (must be done right at FYE)
1. Print a complete AP aging report that reflects FYE
2. Print a complete AR aging report that reflects FYE
3. Print a report of all job costs that reflects FYE
B) General Ledger (Closing FYE after adjusting entries are made)
1. Complete all entries to GL for the fiscal year
2. Update the journal
3. Make a backup of your data
4. Print any year-end reports required by management or accountant (detail
GL report, etc.)
5. Close the ledger for the fiscal year
6. Clear GL detail for the fiscal year you are closing (may be done any
time)
7. Update transactions posted in the new fiscal year.
C) General Ledger (Closing FYE before adjusting entries are made)
Top
CALENDAR YEAR-END PROCEDURES
CAUTION: After January 1 of the new year, any entries
you make to the previous year must be entered with a complete date including
the correct year. After the 1st, the system will automatically default
to the new year and you must be sure to specify the previous year if
you intend the posting to go to the previous year.
Payroll
1. Complete final payroll of the year through step #18 and make
a backup of your database
Do all normal weekly and quarterly reports and any other procedures
you normally perform with a payroll, then do a regular backup (bkupacct) before
you close.
2. Copy payroll files only to new database (this step only, must be done
from root login)
Login as root (ask your supervisor for the password)
At question about terminal type, just hit <ENTER>.
At # type cd $SI
Access your company data, usually your company initials.
At the main menu, run step 5-20-3
Normal payroll processing requires you to finish the last payroll of the
year, run your W2's, and then clear the QTD and YTD employee totals before
you start the new payroll in the new year. This step allows you to make a
copy of the payroll part of your database as of calendar year end. You may
then utilize this year-end copy of payroll to do your W2's at your convenience.
This is an optional step, but strongly recommended
in any case. This step is mandatory if you need extra
time to make payroll adjustments and process and print W2's before you have
to start a payroll in the new year.
This payroll copy must be verified before you clear the totals.
5-20-11: Access Prior Year Payroll Database,
and specify two digits as the year.
The copy will look just like the main database except the company name on
the main menu will be followed by the 2 digit year. You then need to
verify the copy is good by looking at some employee YTD totals. Unless you
have run this in the past, we suggest you call us for assistance in running
and verifying this step. After you have made the payroll copy and verified
that it works, log out of root, log back in under your name, and go back to
your main company database and proceed to payroll steps 4 through 7 below.
Log out as root (at # hit Ctrl-D)
3. Process W2s and check the results with a preliminary printing - In Payroll
Database
If you have made a copy of the payroll as recommended in #2 above (step
5-20-3), this process W2's step must be done using the payroll copy of
the database.
Payroll step 5-20-1 processes and saves the
W2 information to a file on the fixed disk of your computer. This file may
then be printed, using step 5-20-2, on plain paper
to verify the accuracy of the W2s. If corrections are made, step
5-20-1: Process W2s must be run again and the W2s should be printed again
on plain paper for final verification. This process may be repeated as necessary
until all W2s are accurate.
NOTE: The results must be correct before payroll totals
are cleared. Once the W2s have been processed and the terminated employees
deleted or the totals cleared, do not process the W2s again. Doing so
will destroy the original and only copy of the good W2s.
NOTE: The next two steps, clear totals and delete terminated
employees, may only be run after all W2 processing, printing, and magnetic
media steps are finished.
4. Clear employee totals - In Main Database
The system maintains totals for each quarter and for the year-to-date.
After a year has been completed and the W2s have been processed, clear the employee
totals, using step 5-20-10 so that the new year
can be started with a 0.00 for the quarters and the year-to-date total. After
the totals have been cleared, you may begin processing payrolls for the new
year.
5. Delete terminated employees (optional) - In Main Database
During the normal course of a year, it is not practical to delete
terminated employees from your payroll records because it is necessary to send
them a W2 form at the end of the year. After the W2s have been processed, you
may use step 5-20-9 to delete terminated employees.
This is the only time of the year when you may delete terminated employees from
your records.
NOTE: Terminated employees should not be deleted for at
least 18 months due to workman's comp and unemployment claims.
6. Print W2s on forms (at your convenience) - In Payroll Database
The W2 file created in the process step may be used to print the
W2s, using step 5-20-2, on forms at your convenience,
even weeks later.
7. Adjust tax tables for the new year - In Main Database
The payroll tax tables in 5-7, called
FDS (Federal Single) and FDM (Federal Married) should be adjusted
to match the tables of your new circular E. Be sure to adjust the exemption
amounts if they have changed.
If there are changes in any of your state unemployment taxes, those tax
tables are identified as the two letter abbreviation of your state. For example,
the state tax table for Florida is called "FL".
If there are changes in any of your state income taxes, those tax tables
are identified as the two letter abbreviation of your state plus either an
M or S for married or single. For example, the income tax tables for Georgia
are GAM and GAS.
Adjust FICA and Medicare tax rates and limits in 5-7-1:
Company Maintenance.
Top
Accounts Payable
1. Complete final run of payables checks for the year and make a backup
1099 forms sent to the IRS and to your vendors should show the amount
of actual payments made to each vendor during the calendar year. Note that it
is not the amount of purchases, but rather the amount of actual checks written
- payments. Therefore, it is necessary to complete the final run of checks for
the year before the 1099s can be processed.
2. Process 1099s and check the results with a preliminary printing
AP step 4-1-5-1 processes and saves
the 1099 information to a file on the fixed disk of your computer. This file
may then be printed, using step 4-1-5-2, on plain
paper to verify the accuracy of the 1099s. If corrections are made, step 4-1-5-1
Process 1099s must be run again and the 1099s should be printed again on plain
paper for final verification. This process may be repeated as necessary until
all 1099s are accurate.
NOTE: The next two steps, clear totals and delete inactive
vendors, may only be run after the 1099s have been processed.
3. AFTER results are correct, clear year-to-date totals
After the final run of checks for a calendar year and after the 1099s
have been processed, the year-to-date totals for the vendors should be reset
to $0.00. This will allow the computer to begin accumulating the total purchases
and payments for the new calendar year. AP step 4-1-5-3
shifts the totals back one year or to $0.00 as appropriate.
4. Delete inactive vendors (optional)
Step 4-1-5-4 will delete the vendors
marked as inactive and reclaim the space and vendor IDs for use in the future.
5. DO NOT PROCESS AGAIN. Print 1099s on forms
(at your convenience)
The 1099 file created in the process step may be used to print the
1099s on forms at your convenience, even weeks later.
Top
Accounts Receivable
(may be done as a part of FYE)
1. Print a list of customers showing total billings if your company wants
this data. (optional)
The system accumulates a total of monies billed to each accounts
receivable customer. This total is for your own information only.
You may see these amounts for a customer by either going directly to the
customer information in step 1-1-1, or by printing
the customer list.
2. Clear the year-to-date totals (optional)
Normally, you might wish to reset this total at the end of the year
(fiscal or calendar) so that the computer will begin accumulating from $0.00
for the new year. Whether these totals are cleared by fiscal year or calendar
year is purely a choice based on your company policy. AR step 1-18
clears the totals.
3. Delete paid invoices - normally keep a year's history (optional)
This step is a matter of choice partially governed by your need to
free up disk storage space and the frequency with which you need to quickly
refer to paid invoices. Some of our customers prefer to leave two or more years
of invoice history on the system. AR step 1-19 will
delete the specified paid invoices.
Top
FISCAL (FYE) YEAR-END PROCEDURES
Print Permanent Reports at FYE
(must be done right at FYE)
1. Print a complete AP aging report that reflects FYE
After the final run of payables checks and invoice entry for the
year, print one or more AP aging reports from step 4-9:
AP Analysis Reports.
2. Print a complete AR aging report that reflects FYE
After the final billings and posting of cash receipts for the year,
print the AR aging report via 1-17-1 and the AR
retainage receivable analysis via step 1-17-3.
3. Print a report of all job costs that reflects FYE
After the final run of payables, the final billings and posting of
cash receipts, and updating job cost via 7-8 through
the year end, print a report of all jobs in progress via 7-10-1.
General Ledger
(Closing FYE after adjusting entries are made)
You may "hold open" the closing of the FYE until adjusting
entries are available and still continue to process all work into the new fiscal
year. However, you cannot update the ledger or print monthly balance sheet and
income statements until adjusting entries are made and the ledger is closed.
1. Complete all entries to GL for the fiscal year
Normally it will be several weeks, or possibly a couple of months,
after the end of the fiscal year before all adjusting or final entries are posted
to the general ledger.
CAUTION: While you may continue processing your normal
work, do not run step 6-6-1 using dates into
the new year. Doing so will corrupt balances which will later be shifted
to previous year when you close the ledger for the fiscal year.
After you have made all final entries to the general ledger for the fiscal
year, you may continue with the following steps.
2. Update the journal
Update the journal via GL step 6-6 so that
the account balances will reflect the changes being careful to use the FYE date.
3. Make a backup of your data
4. Print any year-end reports required by management or accountant
The GL module has a variety of reports which you may desire or be
required to retain on a permanent basis. As a minimum, you will want to print
the trial balance, MTD and YTD income statement, and the closing balance sheet.
Optionally, print the detail GL via step 6-6-2.
5. Close the ledger for the fiscal year
GL step 6-14 will close the ledger for
the fiscal year. This step should only be run at the end of the fiscal year,
and then only after all general ledger adjusting entries for the year just finished
have been updated to the general ledger and all reports printed.
This step closes out the general ledger income and expense accounts for
the fiscal year and shifts the totals back one year, leaving zero balances
in the current year for income statement accounts.
Next, the current year's profit/loss figure is added into your retained
earnings account (or whatever balance sheet account you have specified). That
adjusted retained earnings balance, along with the other year end GL account
balances, is then put into a separate FYE file which is not visible on the
account totals (6-2-1) screen). Since these FYE
balances are not visible, we sometimes refer to them as the "hidden 13th
month". This FYE balance file is the source of figures for the financial
statements and also supplies the beginning general ledger balances for the
new year.
NOTE: The FYE balances may be printed by running step 6-8:
Print Trial Balance, and specifying "no" for current
balances, which selects FY beginning balances for the trial balance.
6. Clear GL detail for the fiscal year you are closing (may be done any
time)
Via step 6-15, delete the detail of the
GL individual postings from the system for the fiscal year.
CAUTION: When running step 6-15,
be certain that you enter the proper date (your fiscal year end date)
to prevent deleting information for the new year.
7. Update transactions posted in the new fiscal year.
Run step 6-6-1 once for each month, starting with
the first day of the new fiscal year. For each month specify a range of dates
starting with the first day of the month following the month with correct
YTD balances, and ending with the last day of the month you are updating.
Do this for each month from your FYE through the last current month just ended.
This will update from the journal the new postings and you may resume normal
procedures from here on.
Top
General Ledger
(Closing FYE before adjusting entries are made)
Many businesses choose to close the ledger at year-end and run the various reports
and steps described above shortly after the FYE, long before year-end adjusting
entries are available from the accountant. When these year-end figures are available
several weeks or months later, take the adjusting entries and the final balance
sheet figures from your accountant and follow these steps.
If you close the ledger after making-year end adjusting entries, you will
be able to produce a final balance sheet and income statement for the year.
If you close the ledger before the adjusting entries are made, you will not
be able to produce final statements which reflect the year-end adjusting entries;
however these are normally produced by your accountant.
Since closing the ledger at year end sets all of the income and expense accounts
to zero, the monthly statements produced after closing will be accurate. Monthly
balance sheets will need to be run (or re-run) after the adjusting entries are
posted and updated because the starting balances will be different.
1. Post year-end adjusting entries into FYE totals.
Post year-end adjusting entries to the FYE totals using step 6-5-1:
Post Manual GL Entries. The system will first prompt, "Is this a
fiscal year-end posting after the fiscal year has been closed?". Answer
"yes" and you will be posting directly to the FYE file. Distribute
those entries to the ledger with step 6-5-3.
NOTE: Due to the fact that the ledger has been closed and
income and expense accounts have been set to zero, this FYE file contains
only balance sheet account balances. This necessitates posting adjusting
entries to retained earnings and the appropriate balance sheet accounts
only. After the ledger has been closed, you cannot post adjusting entries
to income and expense accounts. Please check with your accountant to see
if this is acceptable prior to closing the ledger.
2. Update transactions posted in the new fiscal year.
Run step 6-7: Recalculate YTD Totals, once
for each month, starting with the first day of the new fiscal year.
CAUTION: Once the ledger has been cleared, you cannot
go back and enter a date before the last day of the fiscal year just ended.
You must start with the first day of the new fiscal year and not before.
Starting with the first month of your new fiscal year, specify a range of
dates starting with the first day of the month and ending with the last day
of the month. Do this for each month from your FYE through the last current
month just ended. This will update from the journal the new postings and you
may resume normal procedures from here on.
Top
© 2001 SI Systems, Inc.
2323 Belleair Road
Clearwater, FL 33764
800/422-2277, 727/531-0669
Fax: 727/536-8858