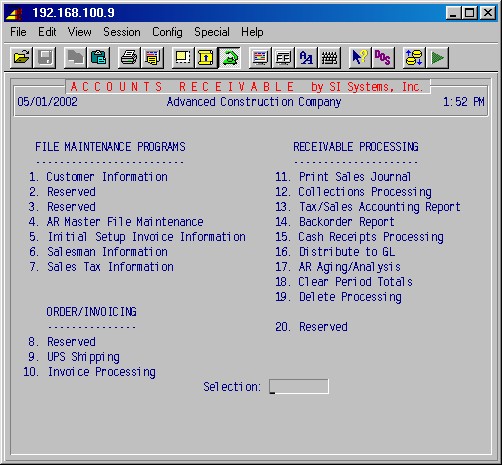
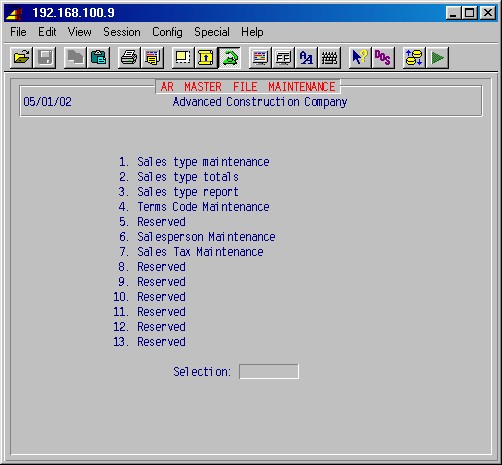
Selections 1, 4, 6, and 7 are the AR file maintenance procedures. This is where you set up customer information, sales type information, salesman information and sales tax information. These set up areas must be completed before you can begin to process accounts receivable. Step 1-5 Invoice Information is a loading area to enter AR invoices without updating general ledger, for use when you are first starting to use the computer, and is not used after the initial loading, except to review an invoice.
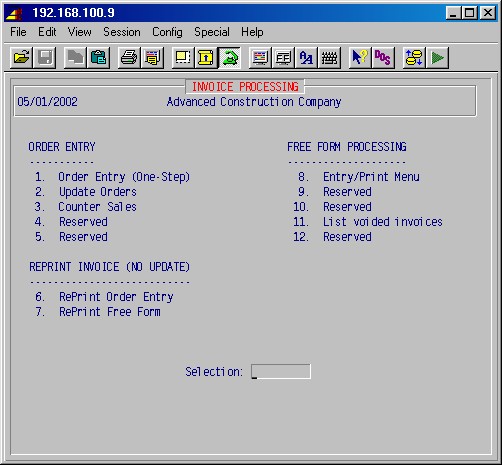
Selection 1-10 Invoice Processing displays a large menu of procedures for order entry, billing and invoice printing. Procedures are provided to handle one step order entry, counter sales, various types of free form invoicing, and manual invoice entry. Invoices may be printed on plain paper, letterhead, and forms and may be reprinted as required. Selection 1-9 is a UPS shipping area, for high volume UPS shipping situations, designed to facilitate the preparation of UPS shipping tags and manifests.
Selections 11 through 19 are the general ledger updating, collections processing, cash receipts posting, and report printing procedures. Procedures are provided to print sales reports, sales tax reports, sales/product type reports, salesman reports, backorder reports, and numerous AR aging and analysis reports. Step 1-19 provides a way to delete customers and invoices.
In addition to setting up Sales Types, Sales Taxes and Sales Persons in 1-4-1, AR Master File Maintenance, there are some important setup areas that must be addressed to allow various procedures to work as you want them in accounts receivable. These are management decisions and should be set prior to using AR and should not need to be set again. They are in #13 Utilities, under #8 Control record maintenance. Note that accounting period dates in 13-8-15, are usually changed each month or quarter.
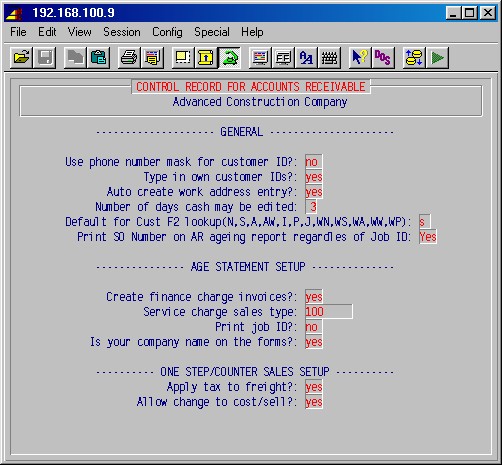
Use phone number mask for customer ID?: NO
The default is NO which allows you to designate your customer ID's according to your rules. If you select YES, the customer's phone number will be the customer ID number and the system will require and prompt for a phone number for the customer.
Type in own Customer ID's: YES
The default is YES which allows you to designate your customer ID's according to your rules. If you select NO, the computer will assign customer ID numbers.
Auto create work address entry?
The system allows for multiple work addresses for a customer. Set to no if you are not using the service order module. If set to yes, the system will create a work address the first time a customer is created. Otherwise, the system will create a work address the first time a service ticket is entered.
Create finance charge invoices?: NO
The default is NO which will not create invoices for finance charges. Finance charges will be calculated and shown on the statement, but no invoice is created. If you answer YES, any monthly finance charges will cause the system to create an invoice for that month's finance charges due.
Service charge sales typeIf you specified YES above to create finance charge invoices, specify the sales type (as set up in 1-4-1: Sales type Maintenance) for those invoices here.
Print job ID? YES
The default YES will print the job ID on the statement. Selecting NO will not print the job ID on the statement. You should match the type of form you have.
Is your company name on the forms?
Answering NO will cause the computer to print your company name on AR statements. If your forms are pre-printed, select YES.
Apply tax to freight?: NO
Answer YES if you are in a state or area that taxes freight.
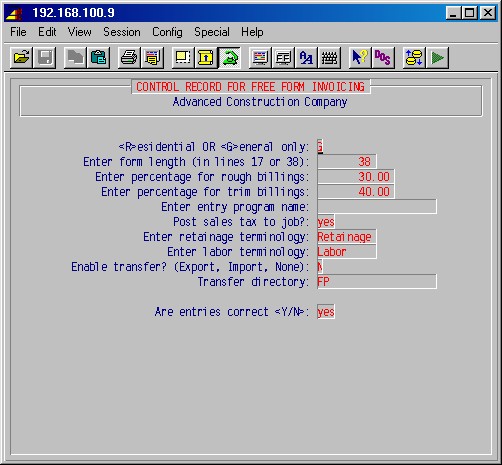
Top<R>esidential OR <G>eneral only:
Normally G.
This selects the billing type codes used in free form invoicing. Residential will give you billing codes specific for home construction billing.Enter form length (in lines 17 or 38):
Normally 38. 17 if you use the short invoice forms.
Enter percentage for rough billings:
Specify the percentage of the contract for this item as you want it billed.
Enter percentage for trim billings:
Specify the percentage of the contract for this item as you want it billed.
Enter entry program name:
Normally leave blank.
Post sales tax to job?:
If you select No, the amount of the invoice posted to the job will not include the tax amount. If Yes, the tax amount will be included.
Enter retainage terminology:
The default for this field is the word Retainage which is the accepted term in the United States. In Canada, this term is Holdback. You may specify another term if you wish.
Enter labor terminology:
The default for this field is Labor which is the accepted spelling in the United States. In Canada, this word is spelled Labour. You may specify as required.
Enable transfer? (Export, Import, None):
Set this to N unless you have remote locations where invoices are being created using a copy of this system and then transferred (e.g. by magnetic media) to be incorporated into this systems main database:
I (Import) if this is the main database system.
E (Export) if this is the remote location where invoices are being created.Transfer directory:
If the above (Export/Import/None) is set to None leave this blank. Otherwise enter the directory that has been created on this system where the invoice file to be exported is to be written to, or where it's to be read from when importing invoices. (E.g. FP)
Are entries correct <Y/N>: YES
Answer NO to go back and make changes or press just ENTER to accept these settings and return to the previous menu.
This allows the supervisor to set up a new cash drawer or update the original settings on cash drawers. This selection will first prompt:
Name of Cash Drawer?:
Type the drawer designation and press ENTER. If you are setting up a new drawer, the system will prompt:
Cash drawer does not exist. Create it? YES
Press just ENTER to create a new cash drawer. Whether you are creating a new drawer or updating an existing drawer, the following input screen will be displayed :
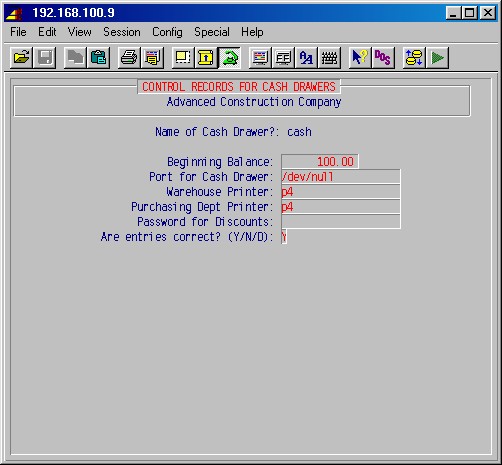
Beginning balance:
This is the amount of cash you put in the drawer the first time it is set up only. Normal daily balancing procedures will keep it up to date.
Port for cash drawer:
This is the operating system designation for the physical computer port where this cash drawer is connected.
Warehouse printer:
This is your database designation for the warehouse printer if you use the system to print picking lists in the warehouse from counter sales.
Purchasing dept printer:
This is your database designation for the printer in the purchasing department that prints the back ordered items from counter sales. Must be filled in.
Password for discounts:
The system will not let operators give discounts unless they enter a password. If you allow discounts, specify that password here; otherwise, leave blank.
Are entries correct? (Y/N/D): Y
Type NO to go back and make changes, or type "D" to delete this cash drawer. Press YES ENTER to accept these settings and return to the previous menu.
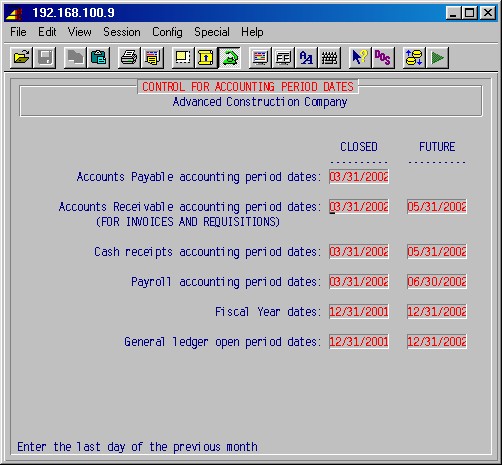
Enter appropriate dates to control the accounting dates (new transaction dates entered will have to be later than the "closed" dates and before or on the "future" dates). The purpose of these "date locks" is to prevent inadvertent entry of wrong dates, e.g. wrong year.
Accounts Receivable closed accounting period date
Operators will not be allowed to enter invoice dates with or earlier than, this date.
Accounts Receivable future date limit
Operators will not be allowed to enter invoice dates later than this date.
Cash receipts closed accounting period date
Operators will not be allowed to enter cash posting dates with or earlier than this date.
Cash receipts future date limit
Operators will not be allowed to enter cash postings dated later than this date.
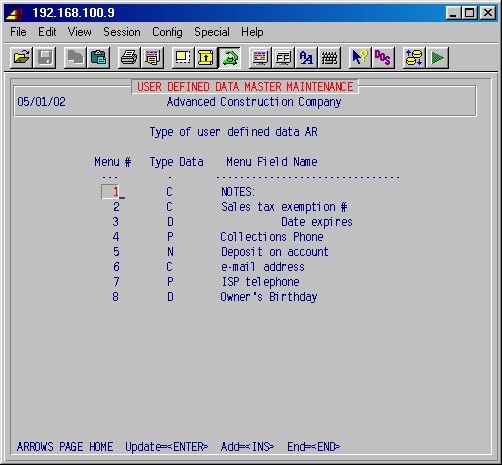
This setup area allows you to specify custom user-defined data entry fields for each module which are accessed from the field called "Custom data" in each module. You may enter up to 17 lines of user-defined data which may be in the format of characters, numbers, phone numbers or dates. For example, on the 1-1-1 Customer Maintenance screen, choosing field #23, Custom data, will take you to a new screen where you may access the custom fields which you define here.
Type of user defined data
Enter the abbreviation for the module you wish to define custom fields for:AR - Accounts Receivable, 1-1-1, Customer Maintenance, #23
AP - Accounts Payable, 4-1-1, Vendor Maintenance, #18
PR - Payroll, 5-1-1, Employee Maintenance, 3rd screen #7
JC - Job Cost Control, 7-1-1, Job Description Maintenance, 2nd screen #11
IN - Inventory, 8-1, Item Maintenance, #11 or 23Menu #Enter the number of the field; 1 - 17. This determines the sequence in which the fields are shown.Type Data
Enter one of:
Character (any letters, numbers or symbols can be types in such a field)
Phone (only allows format of ###/###-#### ####, where # is any number)
Date (only allows dates to be entered)
Number (only allows numbers to be entered)Menu Field Name
Enter the label of this field as you wish it to appear.
Press END when done.
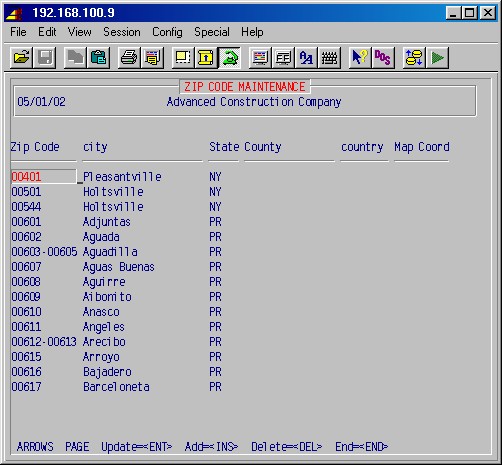
Zip Code
This is the standard 5 digit US postal zip code or zip code range.
City
This is the city for this zip code.
State
This is the state for this zip code.
County
The county is generally not used.
Country
The country is generally not used.
Map Coord
Map coordinates for this zip code is generally not used.
Press END when done.
Optional. Is used in 1-9: UPS Shipping. This selection allows you to set up a table to translate the first 3 digits of a zip code to the corresponding UPS zone.
TopOptional. Is used in 1-9: UPS Shipping. This selection allows you to set up a table of UPS charges for each UPS zone, for each type of UPS shipping (Ground, Second Day, etc.) for various weights.
This procedure is used to update and add customer information to the system. Customer information must be entered first before you may enter invoices. This selection will display the following input screen :
Enter Customer ID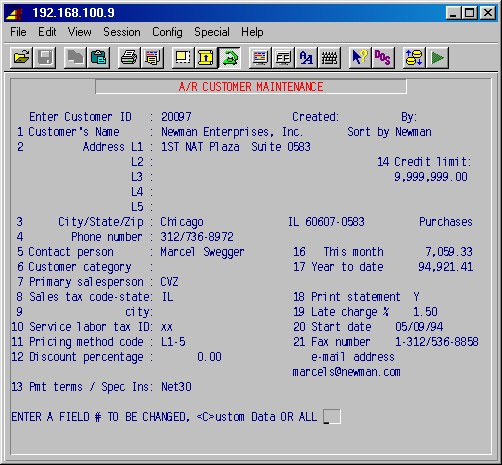
This is a unique identifier which may be up to 12 characters, numeric or letter. You may use the same customer codes in the new system as you used in your old system if you prefer.
The new system can be set to automatically number each new customer for you. Optionally, the operator adding the customer may assign a customer Code/ID which might be a partial name. One good system is to use the first three letters from the first name and the first three letters from the last name of the customer. For example, the identifier for Cox Lumber Co. would be coxlum. You may use all capitals or all lower case letters.
If the identifier (customer ID) has already been used, the information on the customer will appear in the remaining fields on the screen. If this is a new customer ID, the system will prompt:
NO CUSTOMER EXISTS. DO YOU WANT TO CREATE A NEW ONE ? yes
Type NO ENTER to exit this procedure. If you want to continue and enter the customer information for this new customer ID, press just ENTER.
Sort by
The customer sort (or search) field is used to make looking up customers easier. For instance, customer Dr. Frank Smith would have Dr. Frank Smith in the name field so that invoices printed for him look nice. In the sort (search) field, you should put something like Smith, Frank so that you may easily look him up.
1. Customer's name
2. Address
3. City/State/Zip
Type your customer's complete name (up to 30 characters) and address (up to 2 lines of 30 characters each, plus a fourth line for city, state, and zip) as you wish it to appear on invoices. Note that after you first enter the zip code, the city and state will automatically be filled in for you (as defined in 13-5: City/Zip Maintenance).
4. Phone number
Type your customer's complete area code and phone number. There is also room for up to a five digit extension number.
5. Contact person
Optional. Specify the name of your contact person (up to 20 characters) here if you wish.
6. Customer category
Optional. This is an optional code (up to 5 characters) which may be used to sort customers, such as RES for residential and COM for commercial.
7. Primary salesperson:
This required code is used to automatically enter the normal salesman for this customer during order entry. The code MISC may be used if no salesman is assigned to a customer. This ID must first be set up in selection 1-4-6: Salesperson Maintenance, prior to use here.
8. Sales tax code-state:
This is a required state sales tax code, used to compute sales tax during order entry. XX is used for tax exempt customers. These codes must first be entered into selection 1-4-7: Sales Tax Maintenance, prior to use here.
9. Sales tax code-city:
Optional. This is an optional city sales tax code, used to compute sales tax during order entry. These codes must first be entered into selection 1-4-7: Sales Tax Maintenance, prior to use here.
10. Service labor tax ID:
This is a labor tax code, used in service order billing. These codes must first be entered into selection 1-7 Sales Tax Information, prior to use here.
11. Pricing method code:
This required code (up to 10 characters) is used to calculate the material price to be used during billing and order entry for this customer. Even if a code is entered here, you will be given the option of overriding this during order entry.
Some possible codes are:
L1-10 List price column 1, minus 10%
C+20 Cost plus 20%
L1 Straight list price column 1
C Straight cost
12. Discount percentage:
Not currently used.
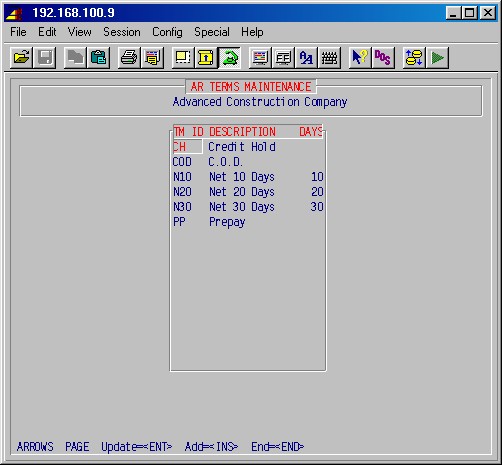
13. Pmt terms / Spec Ins:
Optional. For payment terms, if you enter the number of days, e.g. N10, N30 or Net 10, the due date will be automatically set on invoicing.
Spec Ins is a place for you to enter special instructions such as COD.
14. Credit limit:
Specify the maximum amount of credit allowed for this customer.
16. This month (purchases)
17. Year to date (purchases)
Values in these fields are normally only entered on initial system set-up, and are otherwise automatically added to by the system as invoices are created.
Note that these fields are not automatically being reset to zero. This has to be done through 1-18: Period End Processing, which lets you selectively clear This month, or This month and Year to date.
18. Print statement
Enter Y to print statements for this customer, or N not to print statements.
19. Late charge %
Optional. If you wish a late charge to be added on the statement for past due invoices, enter the percentage, as a decimal, of that late charge here (Example: 1.5% late charge is entered 1.5).
20. Start date
Optional. This is the date this customer opened this account.
21. Fax number
Optional. Enter the customer's fax number if you wish to record it here.
22. Status
Specify the current status of this customer as follows:
A = active
X = inactive
H = credit hold
23. Custom data
This gives you access to used defined notational fields as set up in 13-8-16: User Defined Data Maintenance.TopNote: In order to ease the task of entering new customers, the above entry screen looks for a customer with the ID SETUP and uses it as a template for default tax codes, payment terms, pricing method, discount percentage, etc. To use this feature, create a customer with an ID of SETUP and enter applicable default items for future new customers. New customers entered after creating the customer SETUP will assume those defaults, all of which may be overridden. If you later want to change the default values that appear on the above screen when entering new customers, simply change the values for the customer SETUP.
ENTER A FIELD TO BE CHANGED OR ALL:
If you need to make changes, specify a field number, press ENTER, and update just that field. If you want to update several or all of the fields, type all, press ENTER, and make the required changes, pressing ENTER to move through the fields. When you are ready to continue, press ENTER.
The system will prompt:
Update Misc no
The information entered thus far in 1-1-1: AR Customer Maintenance is the basic information required to set up a new customer. Additional customer information may now be entered is step 1-1-2 Miscellaneous Customer Data.
This prompt gives you immediate access to step 1-1-2. If you do not want to enter additional information now, press just ENTER and you will return to the 1-1 Customer Information menu. If you with to input additional customer data now, type the customer ID and press ENTER. This step is explained in 1-1-2 Miscellaneous Customer Data.
This step allows you to enter or view additional information about your customer. The system uses only the customer status information and the labor code and Map Coord for service. All other fields are entered by the user and are not updated by the system. This selection will display the following input screen :
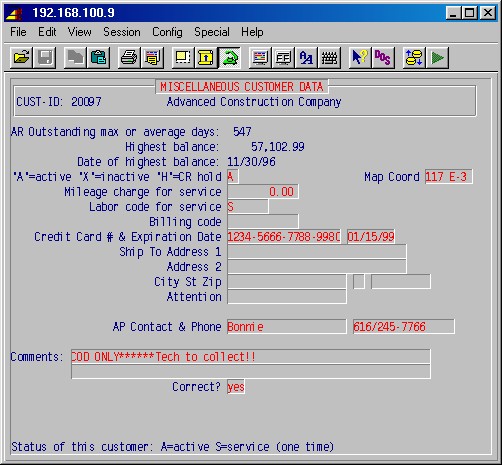
TopThe following three fields are calculated by running 1-18: Period End Processing, answering Yes to "Calculate customer payment statistics?":
AR Outstanding max or average days:
Either the highest number of days this customer had an unpaid invoice, or the average number of days before full payments, depending on how you answered the options when you calculated payment statistics in 1-18: Period End Processing.
Highest balance:
The highest outstanding balance this customer had, if calculated.
Date of highest balance:
The (earliest) date of the highest outstanding balance, if calculated.
'A'=active 'X'=inactive 'H'=CR hold
The status of this customer may be updated on this screen as well as the one in step 1-1-1. You may specify the current status of this customer as follows:
A = active
X = inactive
H = credit holdMileage charge for service
If you charge a per mile rate on service calls, enter the charge per mile here. This is currently notational, and is not used in any processing step.
Labor code for service
If you use the service order module, enter the labor class ID for service and T&M billings here. These labor class codes are set up in the service order module, step 2-12 Labor Rate Maintenance. The normal labor class ID is "S".
Billing code
This is a special code not applicable for most companies.
Credit card # & expiration date
Enter the customer's credit card number and expiration date for your records, if you wish.
Ship to address 1
Address 2
City St zip
Attention
If the shipping address is different from the customer's address, enter the "ship to" address here.AP Contact & Phone:
Here you may enter the name of the person to contact when collecting on outstanding invoices for this company. This is also accessible in 1-12: Collections Processing, and is printed on the agings produced in 1-17-1.
Comments:
Two lines have been provided for any brief comments you wish to record about this account.Correct? YES
Type NO ENTER if you want to go back and make changes. When you are ready to continue, press just ENTER and the system will prompt you for another customer ID.
This procedure will print a list of all specified customers alphabetically by customer name. This may be either a one line report or a longer report with the complete address. The one line report shows the customer ID, name, phone number, contact, tax ID, price code, labor code and billing code. The long report shows the customer ID, name and address, phone number, contact, last activity, tax code, purchases MTD, and purchases YTD.
This selection will display the following input screen:
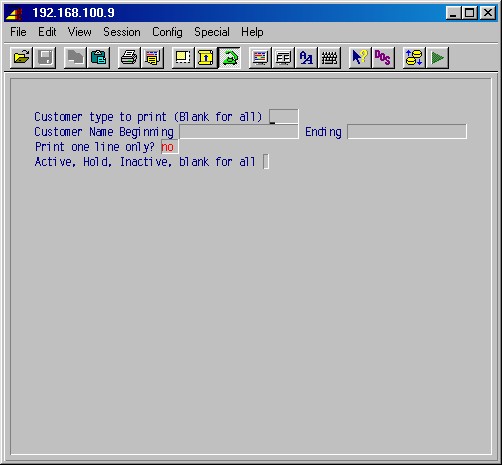
Customer type to print (Blank for all)
This corresponds to Customer category (field #6) in 1-1-1: AR Customer Maintenance. If you wish to limit the list to just one customer category, enter it here. Otherwise leave blank; press ENTER.
Print one line only? NO
Press just ENTER to specify the long report. Type YES ENTER for the one line report.
Active/Inactive/Both B
Press just ENTER (both is the default) if you want a report showing all customers. Specify A for a list of all active customers or I for a list of all inactive customers.
The printer selection screen will now be displayed. Type the printer number and the number of copies and press ENTER. Your report will now be printed and the system will return to the 1-1: Customer Information menu.
This procedure is similar to 1-1-3 above, but will list customers in order of customer ID, rather than by customer name.
Branch designations are not applicable for most companies. Branches may be designated by special coding of the customer ID when the customer IDs are first set up. Basically, the last three characters of the customer ID may be designated as the branch code.
This procedure is similar to 1-1-3 above, but will list customers in order of branch, rather than by customer name.
If addition to the input screen shown in 1-1-3 above, this procedure will also prompt:
Branch to print or blank for all
If you wish to limit the list to just one branch, enter it here. Otherwise leave blank; press ENTER.
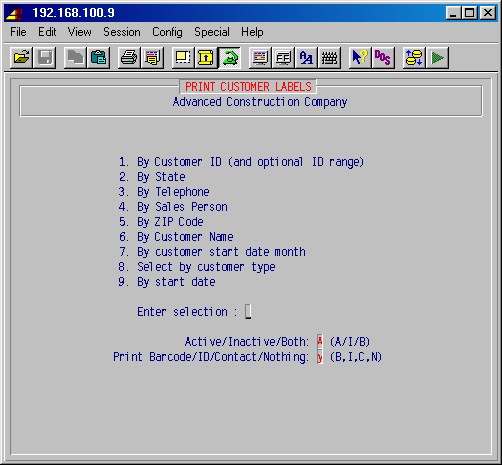
This procedure prints mailing labels for specified customers, which may
be sorted in a variety of different ways as you specify. This selection
will display the following input screen:
Top
Enter selection:
Enter the method, number 1-9 shown on this menu, by which you want your customers sorted for the labels you are about to print.
(#8, By customer type, corresponds to Customer category (field #6) in 1-1-1: AR Customer Maintenance.)Active/Inactive/Both A (A/I/B):
Specify which customers you wish to print: Active, Inactive, or Both and press ENTER.
Print Barcode or ID: Barcode (B/I)
If your printer is capable of printing the postal barcode as part of the address (and has been set up for it in 13-3), answer B here. Otherwise enter I.
Print ID:
If you want your customer ID to print on the label, press just ENTER. If you don't want the customer ID to appear, type NO ENTER.
The printer selection screen will now be displayed. Type the printer number and the number of copies and press ENTER. Your labels will now be printed and the system will return to the 1-1: Customer Information menu.
This procedure is similar to 1-1-3 above, but will list customers in order of salesman, rather than by customer name.
If addition to the input screen shown in 1-1-3 above, this procedure will also prompt:
Beginning salesman
Ending salesman
Specify the range of salesman IDs for which you wish to print this customer list. If you want a report for just one salesman, enter that salesman ID in both fields. If you want a report for all salesmen, press just ENTER for both fields.
This procedure is similar to 1-1-3 above, but will list customers in order of zip code, rather than by customer name.
If addition to the input screen shown in 1-1-3 above, this procedure will also prompt:
Beginning ZIP
Ending ZIP
Specify the range of zip codes for which you wish to print this customer list. If you want a report for just zip code, enter that zip code in both fields. If you want a report for all zip codes, press just ENTER for both fields.
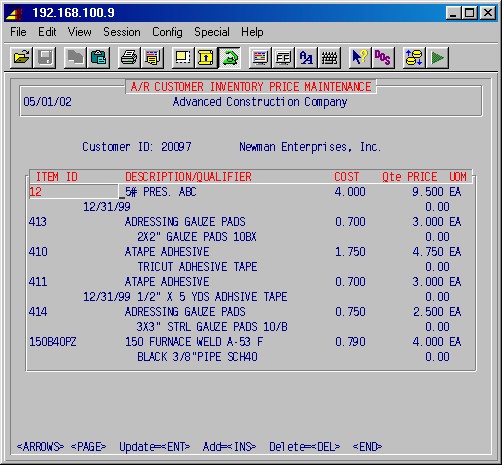
TopCustomer ID:
Enter the ID [H] of the customer you want and press ENTER.Use the INS, DEL and ENTER keys to add, delete and update entries as needed.
ITEM ID
Enter the ID [H] of the item you want and press ENTER.Qte PRICE
Enter the price for this item the customer has been quoted.Press END when done with quoted prices for this customer. Press ENTER to return to the A/R Customer Maintenance menu.
This procedure allows entering one or more job addresses for a customer to facilitate writing a service order in step 2-1 Service Order Entry. This procedure is generally used in situations where you write numerous service orders for one customer for work to be done at numerous different addresses.
This feature allows the person entering the service order to press F2 at the work address field and select from the previously entered addresses. Also, work addresses entered in 2-1 Service Order Entry, are automatically incorporated into the address list in this step.
This procedure allows you to add, delete, and update these addresses. This selection will first prompt:
Enter customer ID:
Type the customer ID [H]. If this is a valid ID the system will display the customer name. Press ENTER and the following menu screen will be displayed:
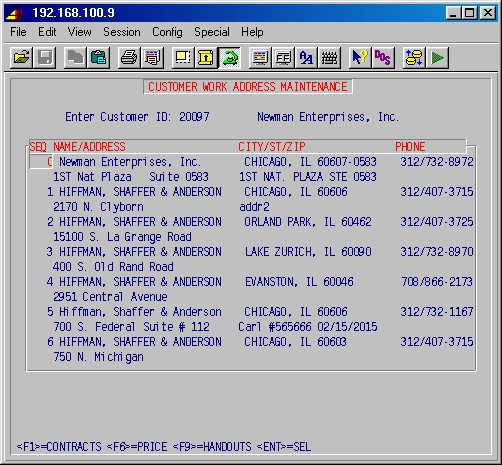
All previously entered work addresses for this customer will be displayed in numbered line entries. You may view all of the entries by using a combination of the ARROW, PAGE and HOME keys. If you want to update or delete a line, highlight the line number, and press ENTER or DELETE.
To add a new address press INSERT and complete the name, address, and phone number fields as prompted.
Note that the F1, F4, F6 and F9 keys give access to the contracts, service history, price book and handouts for the work address, as covered in detail in the Service Order manual under 2-16-1: Contract Maintenance.
When you are finished with this area press END and the system will return to the A/R Customer Maintenance menu.
This procedure allows you print work addresses, as entered in 1-1-10 above. This selection will first prompt:
Enter customer ID:
Type the customer ID [H]. If this is a valid ID the system will display the customer name. Press ENTER and the following input screen will be displayed:

Enter beginning customer ID:
Enter ending customer ID:Type the range of customer ID's you wish to print, or leave both fields blank to print a lost with all customers' addresses.
Print in small print:
As the report prints 4 work addresses across the page you will need to either use wide paper or use small (compressed) print. If you are not using a wide carriage printer, type Yes and press ENTER.Print miscellaneous data:
Type Yes if you also want the Tax IDs, Labor Codes and Price Codes printed for each work address.Correct (Y/N/E):
Type Y to start printing, N to go back and correct the above or E to abandon printing, then press ENTER.The printer selection screen will now be displayed. Type the printer number and the number of copies and press ENTER. Your report will be printed and the system will return to the A/R Customer Maintenance menu.
This selection allows copying the service history for one work address (customer ID/work address number) to another. You'll be prompted :
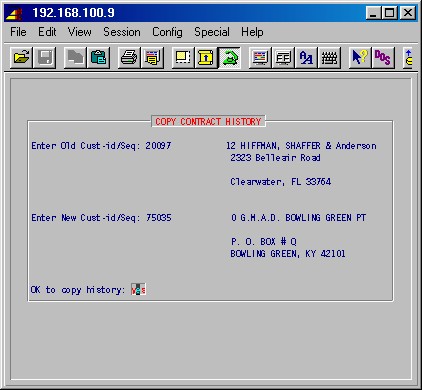
TopEnter Old Cust-id/Seq:
Type the customer ID and work address number from which you want to copy service history.Enter New Cust-id/Seq:
Type the customer ID and work address number to which you want to copy service history.OK to copy history:
When you are sure you have entered correct customer IDs and work address numbers, answer Yes and press ENTER.To exit this procedure, leave customer ID blank and press ENTER.
This selection is similar to 1-10-12 above, but it also copies any equipment from the specified work address.
At least two types should be set up:
requisitions
contract sales
You may wish to set up two or more departments with department IDs that start with the same characters in order to group common sales types. This is most valuable when you run step 1-1: Print Sales Journal, where you may specify the sales department to print - if you specify the starting common characters as you have grouped the common sales types, the report will print all departments that start with those common characters.
For example: You may have several categories of service department income which you want to group together. You could create department IDs such as:
ser-comm (service-commercial)
ser-res (service-residential)
In printing the sales journal, you could specify department "ser" and it would print all of the departments grouped together with department ID's beginning with "ser".
This selection will display the following input screen :
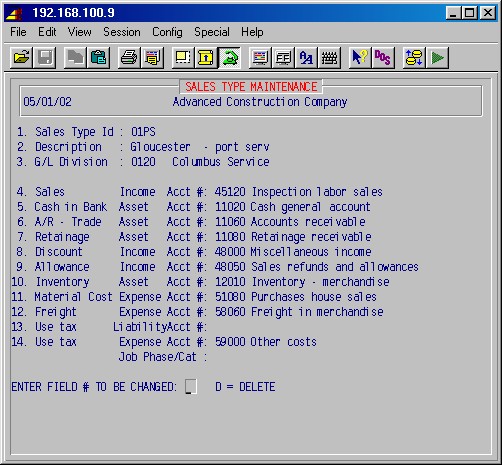
The entries above in bold type are examples; use the appropriate accounts for your company.
Sales type ID:
If you are setting up a new sales type, enter the sales type ID and press ENTER. Next, enter a description (up to 20 characters) for this sales type and press ENTER.
Next, enter the G/L Division if applicable.
At least two sales types should be set up: 1) requisitions 2) contract sales.If you have previously entered a sales type and you wish to view or edit the general ledger entries, type the sales ID [H] and press ENTER; the description, division, and previously entered GL numbers will now be displayed.
4. Sales Income acct #:
5. Cash in bank Asset acct #:
6. A/R - Trade Asset acct #:
7. Retainage Asset acct #:
8. Discount Income acct #:
9. Allowance Income acct #:
10. Inventory Asset acct #:
11. Material cost Expense acct #:
12. Freight Expense acct #:Enter the appropriate general ledger account number for each of these ledger categories. Each category used must have a general ledger number. The general ledger number must have been previously entered into the system or you will see a message "coa record not on file" and you will not be able to continue until you enter an existing GL number.
The following fields are used in 8-16-1 and 8-16-3 (after printing the requisition), as well as Accounts Payable in the automatic accrual of use tax, if the automatic accrual is turned on.
Automatic accrual of use tax will be activated if the job is NOT use tax exempt (7-1-1, second screen, #4 Miscellaneous information, field #3 use tax exempt), and if a valid sales/use tax code is entered in 7-1-1, Field #15 county. After use tax is activated, in requisitions, use tax will always be accrued.
Accounts payable will automatically accrue use tax if the PO for the job shows no purchase tax.
13. Use Tax Liability Acct
Normally left blank. If filled in, use tax will be posted to this account.
If left blank use tax will be posted to the sales-tax account.14. Use tax Expense Acct
Use tax will be posted to this expense account. (Mandatory)
Job Phase/Cat
If filled in, use tax will post to this Job Cost phase and category. If left blank, use tax will post to the same phase and category as the material.ENTER FIELD # TO BE CHANGED: __ D = DELETE
When the above entries are correct, press ENTER, and the next screen will appear:
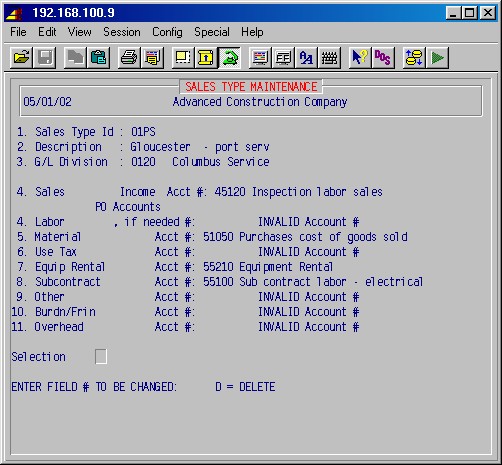
TopPO Accounts
4. Labor if needed #:
5. Material Acct #:
6. Maintenance Acct #:
7. Equipment Acct #:
8. Subcontract Acct #:
9. Other Acct #:
10. Burdn/Frin Acct #:
11. Overhead Acct #:
In 3-1 PO Entry, the system will fill in the general ledger number for the operator, if these are entered here. (The names of fields 4 through 11 above come from the phase expense categories from the job "OH".)Enter GL numbers for the categories you use on POs, (typically only "material" and "subcontract") leaving the others blank. After completing these setups, when an operator is entering a PO, the system will look at the sales type from the job for the PO and the category code, and select the appropriate GL number.
ENTER FIELD # TO BE CHANGED: D = DELETE
Type the number of the field you wish to change and press ENTER.
When you are ready to continue, just press ENTER.The system will now prompt you for another sales type ID. To exit this procedure, press ENTER again and you will return to the 1-4 AR Master File Maintenance menu.
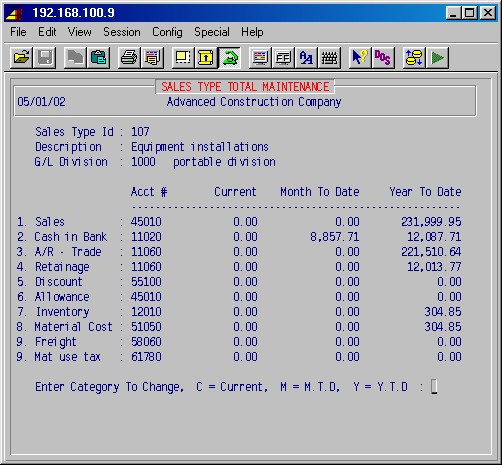
The system will display current, month-to-date, and year-to date totals for each GL number based on the work processed.
This selection will display the following input screen :
Sales type ID
Description
GL divisionSpecify the sales type ID [H] and press ENTER. The description and GL division designated with that sales type ID will be displayed.
The system will display the GL account numbers and the current, MTD, and YTD totals for each of the nine categories under this sales type ID. These totals may be updated as follows: First, type the category c (current), m (month-to-date), or y (year-to-date), and press ENTER. Second, type the field number of the ledger category (1 through 9) to be changed and press ENTER. Next, type the new dollar value you wish that field to equal and press ENTER.
CAUTION: Changing the figures in the current field may affect your GL balances and should not be done here. The MTD and YTD fields also should not be changed after the initial setup.
When you are finished updating fields, press ENTER and the system will prompt you for another sales type ID. To exit this area, press ENTER again and the system will return to the 1-4 AR Master File Maintenance menu.
This procedure will print a list of all sales types, as they were set up in step 1-4-1 Sales type maintenance, showing the sales type ID, description, division, and the general ledger numbers for each of the eleven ledger categories and optional PO account numbers.
Selecting this procedure will display the printer selection screen. Type the printer number and the number of copies and press ENTER. Your report will be printed and the system will return to the 1-4 Sales type information menu.
Note: Used in 1-10-4.
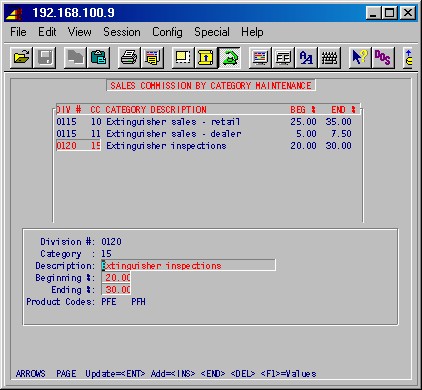
DIV # - Division #:
Enter the division number [H].CC - Category:
Enter a category code (up to two characters).CATEGORY DESCRIPTION - Description:
Enter a description for this category.BEG % - Beginning %:
Enter the beginning profit percentage for this category.END % - Ending %:
Enter the ending profit percentage for this category.Product Codes:
Enter up to 15 product codes (as set up in 8-18: Product Code Maintenance).To add an entry press INS. Use the ARROW, PAGE and ENTER keys to update an entry. Press DEL to delete an entry.
Press F1 to set up volumes for the category. You'll first be prompted:
Enter Cat Type:
Type either C for city or R for rural. Press ENTER, and the following maintenance screen will appear : (Press F1 twice to get through product codes):
SQ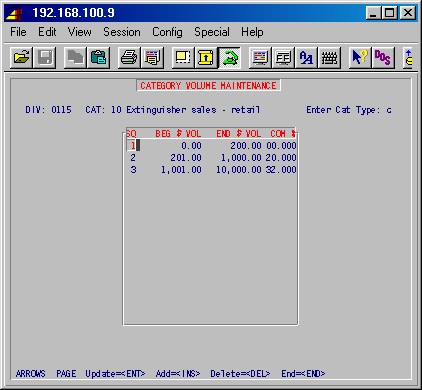
This number is automatically assigned by the system.BEG $ VOL
Enter the beginning dollar amount for this bracket.END $ VOL
Enter the ending dollar amount for this bracket.COM %
Enter the commission percentage for this bracket.To add an entry press INS. Use the ARROW, PAGE and ENTER keys to update an entry. Press DEL to delete an entry. Press END when done, and you'll be returned to the previous screen.
Press END when done.
This allows you to enter or correct information about the salesmen, using the screen below. The figures shown here are what will be printed on the 1-13-3 Salesman report. The system will update these totals through normal processing. This selection will display the following input screen:
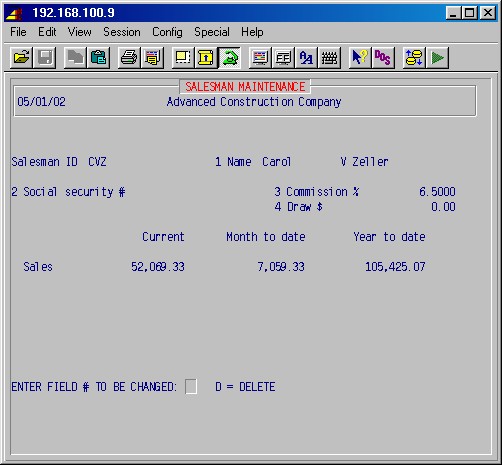
Salesman ID
Specify the salesman ID [H]. If this is a valid ID, the system will display all information available for the rest of the fields. If this is a new salesman ID, the system will prompt;NO SALESMAN EXISTS. DO YOU WANT TO CREATE A NEW ONE ? YES
To exit this area, type NO ENTER. If you want to create a new salesman file, press just ENTER.
1 Name
Type the salesman's full name, first name, middle initial, last name.2 Social security #
Type the complete social number.3 Commission %
Type the commission for this salesman as a percentage.4 Draw $
If this salesman is eligible for a draw against commissions, enter that amount here.ENTER FIELD # TO BE CHANGED: D = DELETE
You may now update any of these four fields by entering the field number and making the change. If you want to delete a salesman record, type "d" and press enter. Answer the next prompt YES to delete the record.
1-4-7 Sales Tax Maintenance
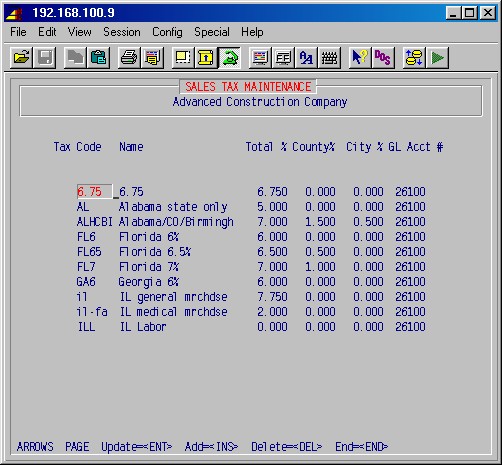
This allows you to enter Sales Tax Information to be used to calculate tax on sales invoices. Tax codes set up in this procedure are entered in the 1-1-1 Customer information setup; sales tax will then be automatically calculated in the various billing areas of the system for the specified customer. This selection will display the following input screen (items in bold are examples):
Top
Use the INS, DEL and ENTER keys to add, delete and update entries in this area.Tax code
Specify a tax code for this sales tax authority. This may be of your choosing but usually consists of the state, county, or city designation plus any other characteristics. Example: FL6 might be a designation for 6% Florida state sales tax.Name
Type a short description of the tax authority (up to 20 characters).Total %
Specify the sales tax percentage for this authority.County %
City %
Currently not used.GL Acct #
Specify the general ledger liability account for this sales tax.Press END to return to the 1-4 AR Master File Maintenance menu.
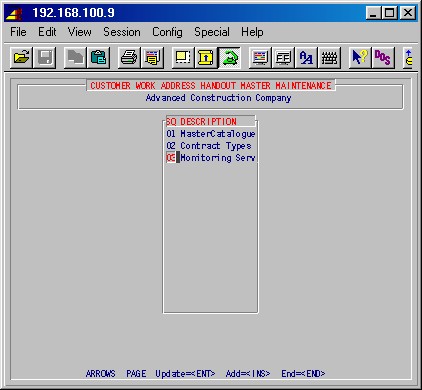
TopSQ
This is a number automatically assigned by the system for this handout.DESCRIPTION
Type the description of this handout.To add an entry press INS. Use the ARROW, PAGE and ENTER keys to update an entry. Press END when done.
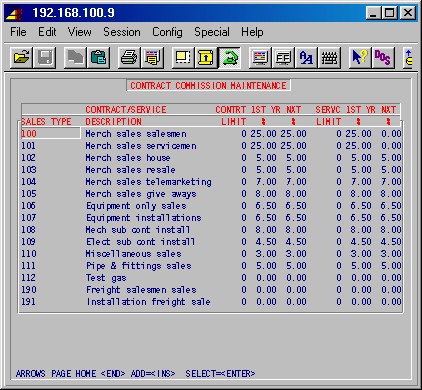
TopSALES TYPE
Enter the ID [H] of the sales type for which you want to set up commission percentages and limits.CONTRACT/SERVICE
DESCRIPTION
The description of the sales type (department), as set up in 1-4-1, will automatically be displayed.CONTRT
LIMIT
Enter the limit in whole dollars on which the commission will be paid on a contract.1ST YR %
Enter the commission % for the first year for contracts.NXT YR %
Enter the commission % for subsequent years for contracts.SERV
LIMIT
Enter the limit in whole dollars on which the commission will be paid on service.1ST YR %
Enter the commission % for the first year for service.NXT YR %
Enter the commission % for subsequent years for service.To add an entry press INS. Use the ARROW, PAGE and ENTER keys to update an entry. Press END when done.
This selection allows setting up and maintaining types of work address service histories. When looking up or printing the service history for a work address you may limit the list to one of these history types.

CD
Enter a one digit or letter code (the letter E must not be used) for this type of history.DESCRIPTION
Enter the description for this type of history.AGE
Enter the number of years that this type history is to be kept.To add an entry press INS. Use the ARROW, PAGE and ENTER keys to update an entry. Press END when done.
These procedures allow you to view and update invoices, review balance outstanding and payments posted against invoices. This selection will display the following menu:
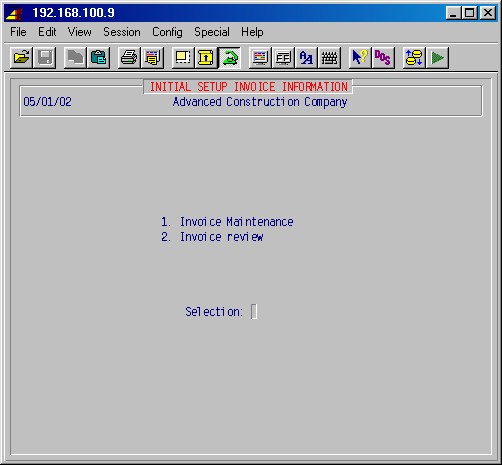
This procedure will allow you to view and update invoice information. This is primarily used to input outstanding invoice information when setting up the system for the first time. This makes these invoices available to print on the sales journal and to post payments against. You may also look at the payment history for the invoice, as well as add payments. General ledger is not updated by this function and must not be used to input new invoices and their payments.
CAUTION: Adding or updating invoices and payments in this area will not update general ledger or job cost. This area is normally only used to enter invoices when first setting up the system.
This selection will display the following input screen :
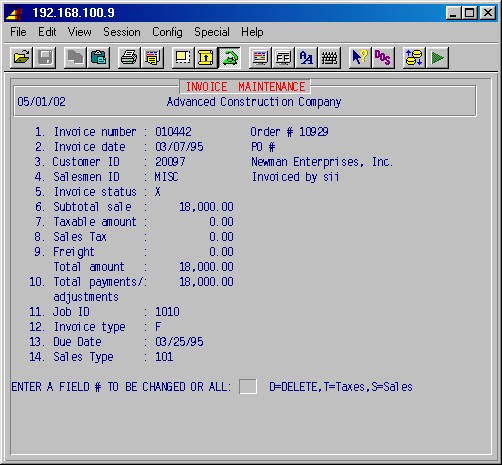
Top1. Invoice number
Specify the invoice number and press ENTER.
If this invoice number is not in the database, the system will prompt:NO INVOICE EXISTS. DO YOU WANT TO CREATE ONE ? YES
Type NO ENTER if you want to exit this area. Press just ENTER to create a new invoice with this invoice number.
If this invoice was created previously, the system will display information from this invoice.
Order #
Specify an order number or just press ENTER and the system will assign and order number.PO #
Enter the customer's PO number for this purchase, if applicable.2. Invoice date
Specify the date of the invoice.3. Customer ID
Specify the customer ID [H]. The system will display the name of the customer.4. Salesman ID
Optional. Specify a salesman ID here.5. Invoice status
Press just ENTER for the default X (completely processed). If this invoice was previously entered, the system will display the current status of this invoice.6. Subtotal sale
7. Taxable amount
8. Sales tax
9. Freight
Enter the dollar amounts of each field for this invoice, as applicable.Total amount
The system will total the four previous fields and display the total here.10. Total payments/adjustments
This shows the total of any payments/adjustments.
Select this field (type 10 and press ENTER) to see any payments: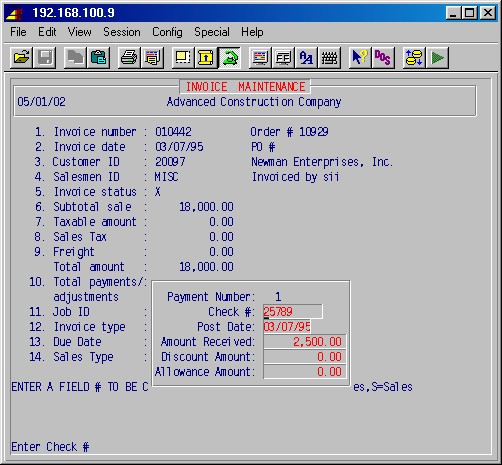
To just look through each of the payments/adjustments without changing any numbers, just press F1.
When entering an invoice (e.g. when first setting up the system) you'll be asked if you wish to create a payment for it. This would be advisable as some AR reports look at payments for an invoice to determine if it has been paid.
11. Job ID
If this invoice is job related, enter the job ID here. Otherwise, leave blank.12. Invoice type
Leave blank for normal invoices. Enter R for a retainage invoice, S for a service order invoice, F for a free form invoice, or J for a job cost invoice.13. Due date
Enter the due date here.14. Sales type
Specify the sales type ID [H] for this invoice.
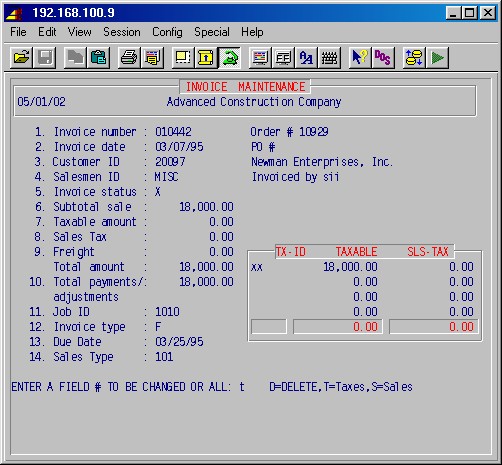
Select T to record Sales Tax breakdown.
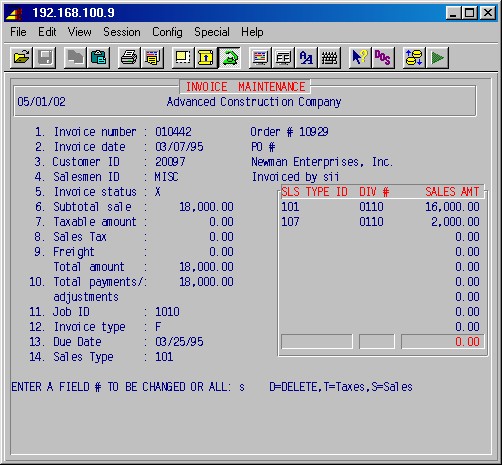
Select S to record Sales Type breakdown.
ENTER A FIELD # TO BE CHANGED OR ALL: ___ D = DELETE INVOICE
You may specify a field number to change of type "D" to delete this invoice.If you are ready to continue, press just ENTER. The system will prompt you for another invoice number. Press just ENTER to exit this area and return to the 1-5 Invoice Information menu.
This procedure allows you to review a specified invoice for the balance outstanding and all payments posted against that invoice as well as various other information as shown in the example below. This selection will first prompt:
Enter invoice #
Specify the invoice number [H] you wish to review and press ENTER.
If the invoice number is valid, you'll see the following screen:
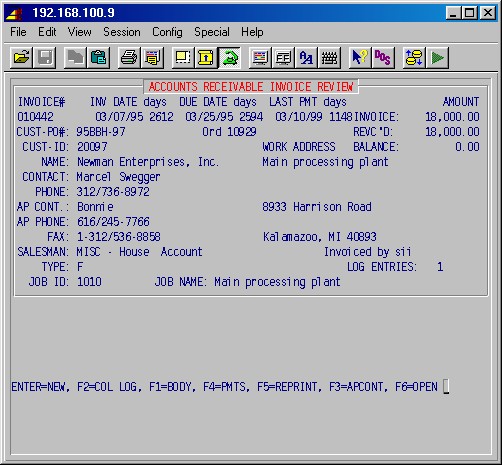
Press ENTER when done viewing the invoice. The F1, F2, F3, F4 and F5 keys lets you view the body of the invoice, access the collections log, change the AP contact name and phone, view payments and reprint the invoice, as shown below.
Press F1 to see the body of the invoice:
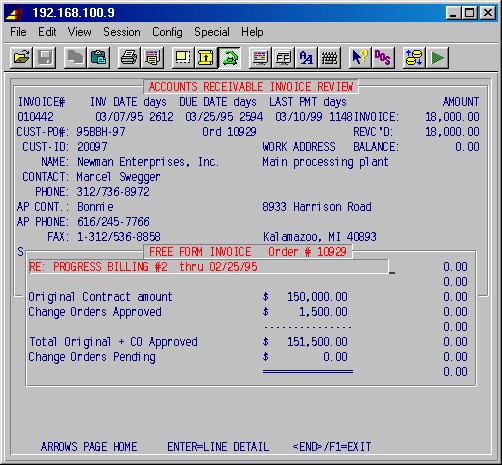
Use the ARROW, PAGE and HOME keys to view different parts of the body. Press END when done.
Press F2 to access the collections log:
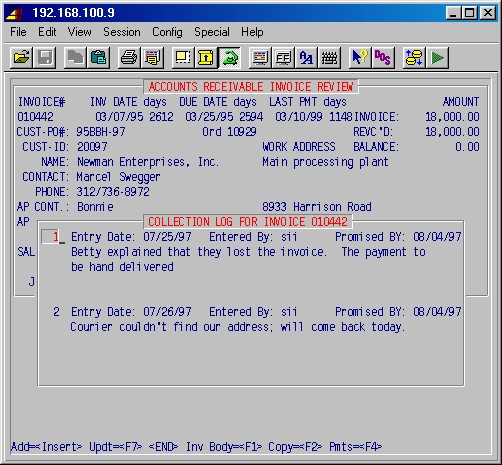
TopUse the INS key to add entries. Use ENTER or F7 to update entries.
Press END when done.
Press F4 if you wish to see the payments on this invoice: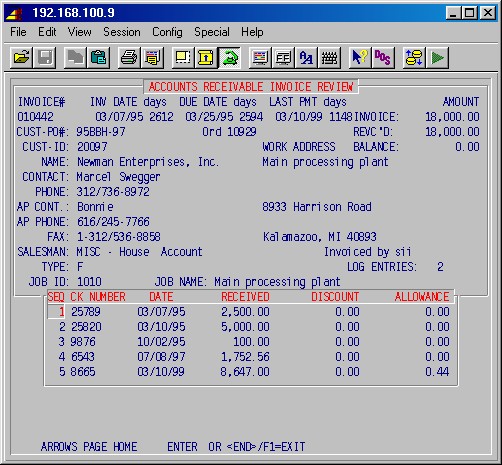
Use the ARROW, PAGE and HOME keys to look through payments if there are more than will fit on the screen. Press END, F1 or ENTER when done.
When you are finished viewing the invoice, press ENTER and you will be prompted for another invoice number. To exit this area, press ENTER again and you will return to the 1-5 Initial Setup Invoice Information menu.
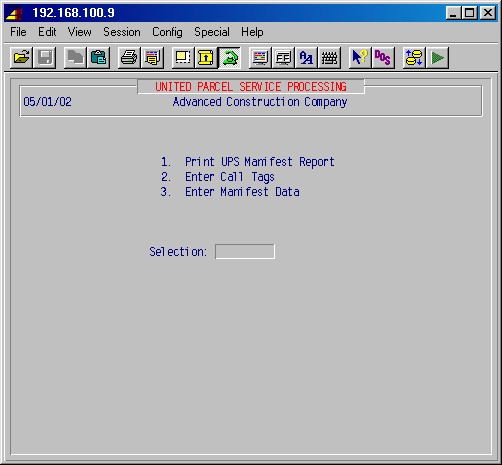
These procedures allow you to print a UPS manifest report for all orders taken through order entry and enter and print call tags for UPS pickup at one of your customers. This selection will display the following menu:
This procedure will print a UPS manifest report for all orders taken through order entry since the last time this report was printed. This report will show the date, customer, order number, weight, and charges, as well as summary information regarding the shipping categories and totals, declared value summary, and daily zone summary. This selection will first prompt:
Enter Pickup Ticket Number GS: Enter Pickup Ticket Number IS:
Type the UPS pickup record number and press ENTER. The printer selection screen will now be displayed. Type the printer number and the number of copies and press ENTER. Your report will be printed and the system will prompt:
Did Report Print OK? Enter <YES> to Clear File: NO
If you need to reprint for any reason, press just ENTER. If the report printed ok, type YES ENTER. The file that holds this information will be cleared and the system will return to the 1-9 UPS Shipping menu.
This procedure will print CALL tags for UPS pickup at one of your customers. This selection will display the following input screen :
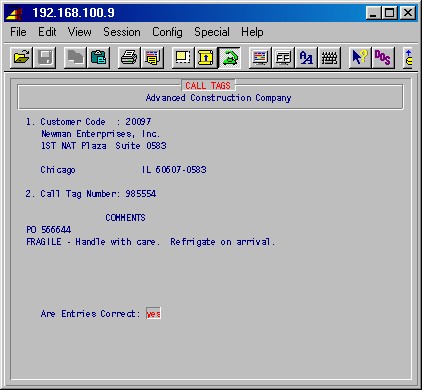
Simply enter your customer ID, changing the address if necessary, the call tag number, and any comments. If entries are correct, press just ENTER. The system will next display the following input screen:
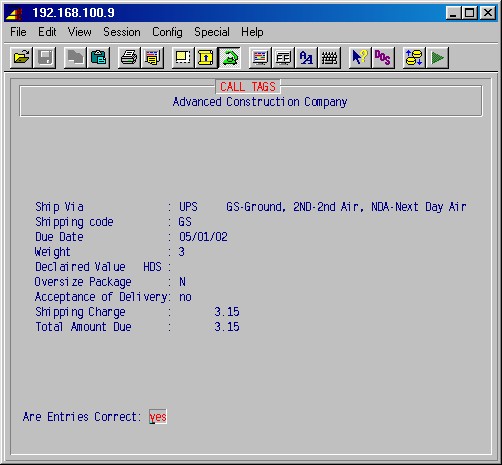
TopComplete this screen. Shipping charges will be automatically calculated. If this information is correct, press ENTER and the printer selection screen will be displayed. Type the printer number and the number of copies and press ENTER. The call tag will be printed and the system will prompt:
Did call tag print correctly: YES
If the call tag did not print correctly, it may be reprinted now or press just ENTER and the system will prompt for another customer code. Press ENTER again to return to the 1-9 UPS Shipping menu.
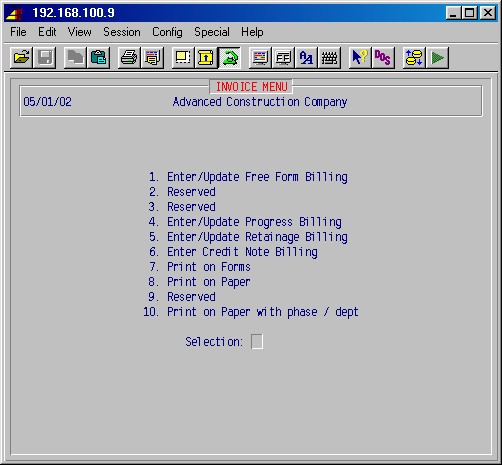
The procedures in this area allow you to create, print, and re-print sales orders and invoices in three different ways:
(1) Order Entry (one step)
This is generally used in the case of orders (at the counter, by phone or by mail) where the order is entered into the system, a picking ticket is generated, and the warehouse ships and prints invoices. The customer may pay now or later and one or more invoices may be produced as material is shipped and billed, as in the situation where not all materials are immediately in stock.(2) Counter Sales
This is used for your typical counter sale situation where the customer walks up, buys material you have on hand and takes it with him. The material is keyed in by hand or with a bar code reader, an invoice is printed, and the customer pays for the material or it is put on account.(3) Free Form Invoicing
This area may be used for any type of invoicing. It is the most flexible in that you may type descriptions of almost any length, apply various sales taxes, and deduct retainage.
This selection will display the following menu screen:
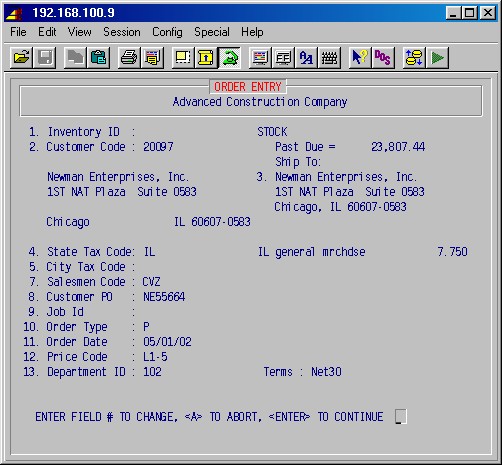
This procedure is generally used for phone, mail, or written orders that go through a shipping cycle of entering an order, printing a picking ticket, and shipping the material and producing invoices (as opposed to counter sales where the product is generally delivered on the spot. Each order may have one or more invoices as material is shipped and billed as in the situation where all materials are not immediately in stock. This selection will display the following input screen :
1. Inventory ID
Normally press just ENTER, which specifies the main stock inventory. Specify another inventory ID as required.2. Customer code
Specify the customer ID [H] of the customer to receive this invoice.If the customer is not in the database, the system will prompt:
CUSTOMER NOT FOUND ADD? YES
If you want to continue with this order, you must enter the customer. Press just ENTER and the system will reveal an abbreviated customer entry screen where you may input the essential customer information to process this order. When that screen is completed, the system will return you to this area and you may proceed with the order.
If the customer is in the database, the customer information will be displayed and the system will prompt:
YES CORRECT CUSTOMER (Use F2 to see order history) ?
If you want to see the order history (all orders except counter sales), press b. If you want to change the customer, type NO and make the change. If you press F2, the following screen will be displayed :
Press F1 to exit this screen. The system will prompt:
YES CORRECT CUSTOMER (Use F2 to see service history) ?
This gives you a chance to correct the customer code, if you specified the wrong one; just answer NO and put in the correct one. Otherwise, press just ENTER to continue.
3. Ship to
Press just ENTER if the "ship to" address is the same as the customer's normal address. Otherwise, fill in the correct shipping address.4. State tax code
Mandatory. This defaults to the customer's tax code, but may be changed as required.5. City tax code
Optional. Specify a valid sales tax code or press just ENTER.7. Salesman code
Mandatory. Normally press just ENTER and your customers's salesman will be entered. If salesmen are not used, then select misc.8. Customer PO
Optional. Specify your customer's purchase order number for this invoice or leave blank.9. Job ID
Optional. If this is job related, specify the job ID; otherwise, just press ENTER.10. Order type
Specify one of the following:
c = Counter sales - to produce an immediate invoice
b = Bill later - to record the list of materials with the invoice printed later
p = Picking ticket - to produce a picking list with later update of the items shipped with the invoice printed later11. Order date
This is normally today's date which is filled in by the system. This may be changed as required.12. Price code
This is normally the price code specified for this customer in the customer information set up area. This may be changed to any other valid code as required.13. Department ID
Required. The appropriate sales department [H] must be entered here. - this controls the accounting.Terms
Specify the terms of this sale with one of the following;C = Cash
N10 = Net 10
N30 = Net 30You may now enter a field number to change anything on this screen, press A to abort this order, or press ENTER to continue. The next screen allows specifying the item numbers and quantities for the materials to be sold and invoiced as follows :
Top
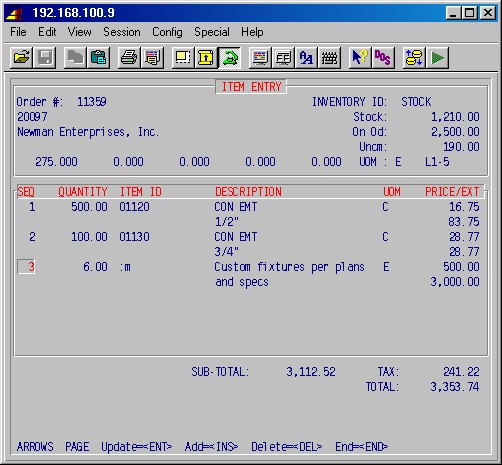
Quantity
Specify the quantity ordered. Use a minus quantity for credit memos.Item number
Enter the item number, DCI number, or local part number, or press F4 to end. If the item ID is not known, type the first part of the item's description (Example: CON EMT) and press F2 to display a list of all items that begin with the specified description. Select the correct item and press ENTER.If the needed item is not in the inventory, use an ID of :M for manual. Then fill in the description as needed, as well as the price and cost.
When the item number is entered, the system will display in the box at the top, from the inventory item maintenance database, five dollar values in the box at the top of the screen. These values are:
Unit Cost Sell Price 1 Sell Price 2 Sell Price 3 Sell Price 4
In addition, some other pieces of information are displayed in this box to aid you in making this order:
Stock: - The number of this item in inventory
On Od: - The number of this item on order
Uncm: - The number of this item uncommitted. This number is immediately updated when anyone requisitions material or enters an order.
UOM: - Unit of measure for this item
The pricing code for the customerDescription
The description for this item previously entered into inventory will be displayed. For :M entries, type in the description.Price
The price displayed is a result of the price code. If it is not as needed for this sale, manually change it. For :M entries you'll be prompted to first enter cost, then price.Extended
The extension is displayed.Note the running totals at the bottom of the screen.
Keep adding entries, as needed. When done and there are no corrections to be made, press END.
If you do have corrections to make, press any of the HOME, ARROW or PAGE keys, then use ENTER, INS, DEL keys to update, add or delete entries.
Press END when done.The printer selection screen will then be displayed. Type the printer number and the number of copies and press ENTER. Your order will be printed and the system will prompt for another inventory ID. If you want to leave the procedure here, just press ENTER.
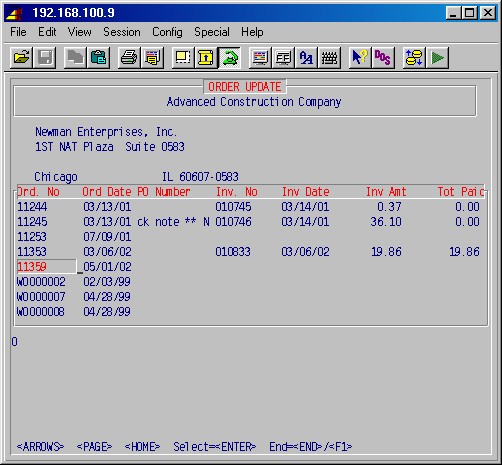
This procedure is usually used to ship part or all of the order and produce an invoice for one-step orders. In addition, any of the billing information may be changed as well as the items added to or deleted, quantities changed, etc. as required. This selection displays the following input screen :

TopTo pull the correct order use one or the other of the following two fields (order number or customer code. If you want to pull through the customer code, press just ENTER in the order number field and then enter your customer code. If you want to pull with the order number, enter it in the order number field.
Order number
Enter the order number you wish to update and press ENTER. If this is a valid order number, the system will display the information as it was entered in step 1-10-1 Order Entry. The system will prompt:CORRECT ORDER? YES
If this is not correct, type NO ENTER and specify the correct order number, or press just ENTER through this field and go to the customer code to pull a list of orders.
2. Customer code
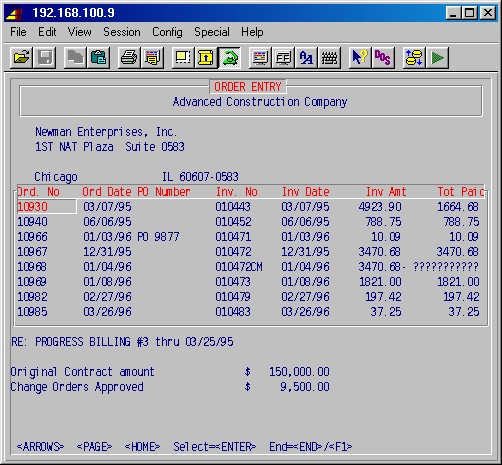
Specify the customer ID [H] of the customer to receive this invoice. The system will display the order history (all orders except counter sales) which you may view by using combinations of the ARROW, PAGE and HOME keys. An example of the order history is shown below :
Press F1 or END if you want to exit this procedure. Otherwise, highlight the correct order and press ENTER. The system will display the order and prompt:
CORRECT ORDER? YES
Answer NO ENTER to exit this area and start over. If this is the correct order, press just ENTER and the system will allow you to update each field. When you have reached the bottom (press F1 at any time to ship over the remaining fields) the system will prompt:
ENTER A FIELD NUMBER TO CHANGE, <A> TO ABORT, <D> TO DELETE
If you need to make corrections, enter a field number to change and make the changes; you may exit this area now by pressing "A" to abort; or you may delete this order by pressing "D" to delete. Press ENTER to continue.
You'll then be allowed to update, add and delete items on the order.
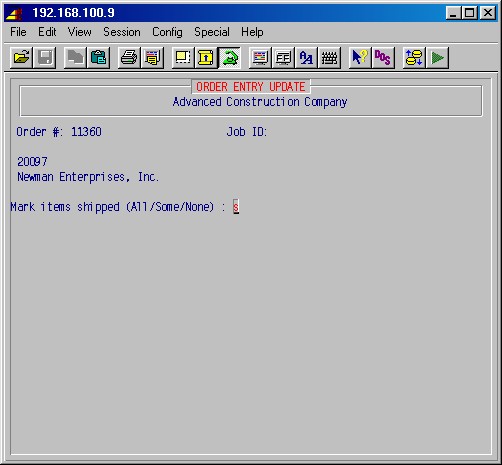
Next, the following screen will be displayed :

If you are shipping all items, press A and ENTER to mark all items as shipped.
If you are not shipping any item, press ENTER.
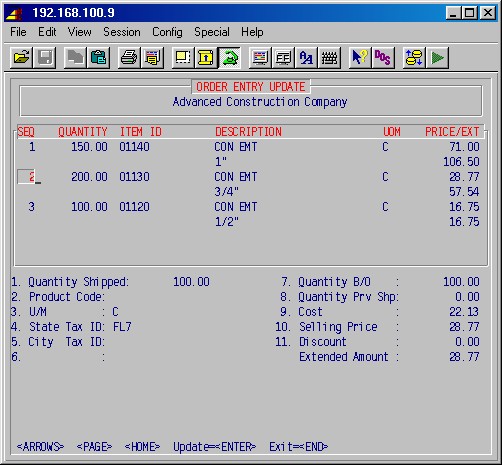
If you are shipping only some items, type S and press ENTER to select the items. The following is an example of this screen :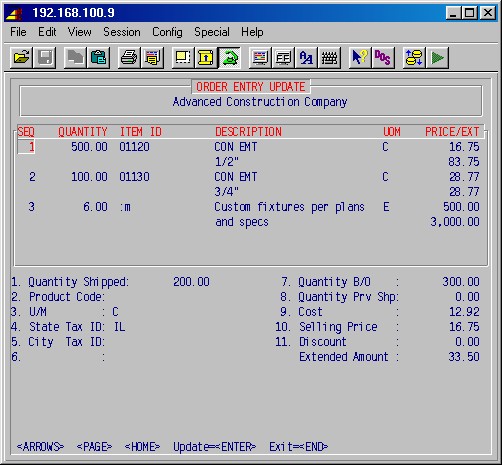
Highlight the item by using the arrow keys and select the item by pressing ENTER. You are primarily marking the quantity shipped on this screen for each item on the order. Other fields may be updated as required. Use your F1 key to accept the current values in the remaining fields and skip to the bottom. In a similar manner, select each item as required to mark the quantity shipped.
When you are finished, press END to exit. The following input screen will be displayed, a portion at-a-time as follows :
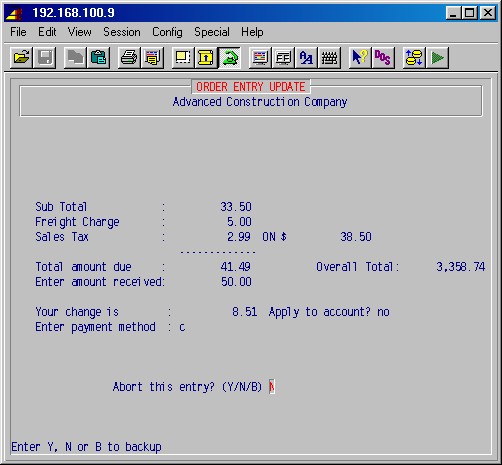
The system will first display the sub-total, prompt for the freight charge and then display the sales tax.
Freight charge
Enter the cost of shipping as applicable and press ENTER.Amount received
Enter the amount received and press ENTER.Enter payment method
Specify how payment is being made and press ENTER.C = cash
CK = check
CC = credit cardThe system will then prompt:
Abort this entry (Y,N,B) N
If you specify B for back, the system will move you back to the item screen where you may make changes. Press Yes to exit without processing this order, and press just ENTER to continue.
The printer selection screen will now be displayed. Specify the printer number and the number of copies and press ENTER. You'll then be prompted:
Print $ amounts:
Answer Yes if you want unit of measure, cost and price for each item; press ENTER.
A shipping/picking ticket will be printed detailing the order as you have marked it in this procedure.
This procedure is used for counter sales where the customer walks up, buys material you have on hand and takes it with him. The material is keyed in by hand or with a bar code reader, an invoice is printed, and the customer pays for the material or it is put on account.
This procedure will first prompt:
Enter default counter sales tax ID:
Enter the sales tax ID for counter sales and press ENTER. The following entry screen will be displayed :
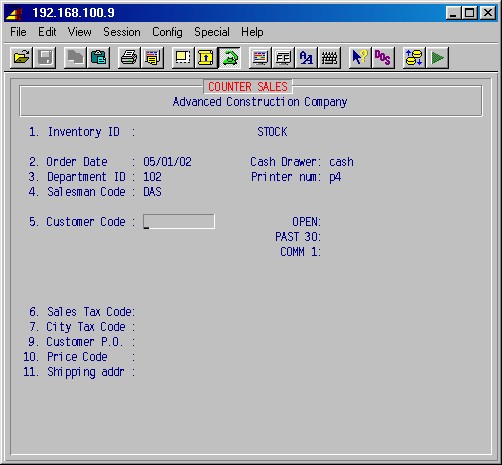
Items 1 through 3 below, plus the default counter sales tax ID above, are set up once each morning for the day as is shown on the screen above.
1. Inventory ID
Normally just press ENTER and the system will default to the main stock inventory. Specify another inventory ID as required.
2. Order date
Today's date is filled in by the system.
Cash drawer
Specify the cash drawer [H] you are using.
3. Department ID
Mandatory. Specify the sales department for this sale.
Printer number
Specify the printer number to print this sales receipt.NOTE: For expediency, the first three fields are filled in for you as you completed the last order. To exit this area, enter the salesman code and press just ENTER for the customer code.
The following fields are then completed for each sale:
4. Salesman code
Mandatory. Specify the salesman's code [H].
5. Customer code
Mandatory. Specify your customer ID number [H] for this transaction. The system will fill in the name and address, the balance of open unpaid invoices, the balance of late invoices past 30 days, and any comments (comm 1) entered in the customer miscellaneous screen. The system will prompt:CORRECT CUSTOMER (Use F2 to see order history) ? YES
Press F2 to see the order history for this customer (counter sales only. The following is an example of this screen ;
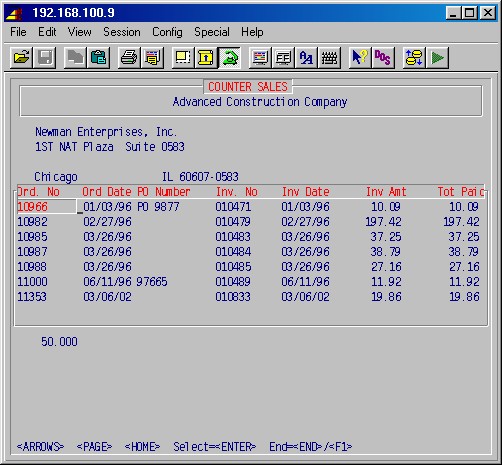
This screen is used for viewing only. Press END or F1 to exit and the system will again prompt:
CORRECT CUSTOMER (Use F2 to see order history) ? YES
Press NO ENTER to exit and start over. If this is the correct customer, press just ENTER to continue and you'll be prompted:
FIELD TO CHANGE, <A> TO ABORT, <U> Update customer, RETURN TO CONTINUE
If you want to change any information on the screen, type its field number
and press ENTER.
To abandon this order, type A and press ENTER.
If you need to correct the customer information, e.g. address, press U
and you'll be allowed to update basic information about the customer.
Press ENTER when you are ready to continue and the system will display the following input screen to enter stock items for the sale invoice :

Seq
This is a computer generated sequence number to number each line.
Quantity
Enter the quantity of this item and press ENTER.
Item ID
Type the item ID of this item and press ENTER. If this is a valid item ID, the system will display the description, the unit of measure, and the price and extension. In addition, the values of the various cost and selling prices for this item will be displayed in 5 fields across the bottom of the top box on the screen. These values are:Unit Cost Sell Price 1 Sell Price 2 Sell Price 3 Sell Price 4
If you are entering a :M item, you will also be able to fill in the unit cost and price for this item.
NOTE: If you are scanning items with a bar code reader, the quantity of one (1) and the item description will be entered by the bar code reader as you scan each item.
Description
The description for this item form the inventory record will be displayed here. If this is a :M item, you may enter a two line description.
UOM
The unit of measure for this item will be filled in by the inventory records. If this is a :M item, you may enter the unit of measure.
Price/Ext
These fields are the selling price and the extension amount (quantity x price). A :M item will allow you to enter the cost value and the selling price.
As you are entering items, the system will display a running total of the order, including tax, at the bottom of the screen. When you are finished entering items, press E to end at the next item ID prompt. The system will show you the total of the invoice and allow you to update any of the items if necessary. If required, use the INS, DEL or ENTER keys to add, delete or update any line. When you are finished, press END, and the system will prompt:
If you are shipping all items, press A and ENTER to mark
all items as shipped.
If you are not shipping any item, press ENTER.
If you are shipping only some items, type S and press ENTER
to select the items. The following is an example of this screen :
Mark each item for the quantity shipped and press END to exit. The system will now prompt:
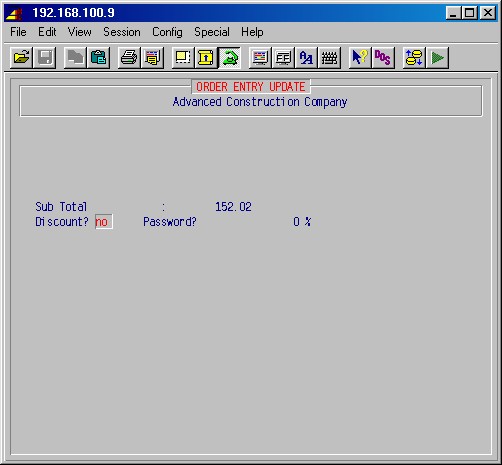
If there is no discount, press just ENTER. If you want to give an immediate discount, type YES ENTER. The system will then prompt for a password, which is required to give discounts. The password is tied to each cash drawer and is set in the control records for cash drawers in 13-8-13 Cash Drawers. Enter the password and press ENTER. The system will then prompt for the percentage discount. Enter the percentage in whole numbers (decimals are not allowed) and press ENTER. The screen will now look something like this :
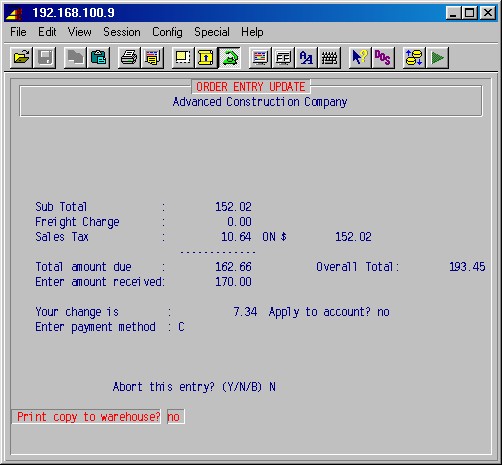
TopSales tax
Sales tax is entered automatically from the default counter sales tax ID specified at the start of this counter sale.Enter freight charge
Type the amount of the freight charge, if any.Enter amount received
Type the amount of funds (cash, check, or credit card) received from the customer.Enter payment method
Specify the payment method as follows:
C = cash
CK = check
CC = credit cardAbort this entry? (Y/N/B) N
Answer YES to abort this counter sale as if it had not happened. Answer Backup to go back to the item entry screen to make changes and then finish the order from that point. Answer No, by just pressing ENTER to continue. The system will prompt:Print copy to warehouse? NO
Here you may print a copy of this order on the printer in the warehouse if your procedures are designed for the warehouse to pull the order. The printer number for the warehouse is tied to each cash drawer and is set in the control records for cash drawers in 13-8-13 Cash Drawers.
Answer YES if required or press just ENTER. Your order will be printed (and the warehouse copy as well, if you answered YES) and you will return to the first screen ready to enter another order.
This selection allows deletion of old counter sale orders. It will not delete the accompanying AR invoice(s) for an order. You'll be prompted:
Enter Beginning Date: 01/01/01
Enter Ending Date: 12/31/88
OK TO START DELETE: no
Enter the first and last dates through which you wish to delete counter orders, and answer Yes.
This procedure allows you to reprint order invoices generated from 1-10-1, 1-10-2, and 1-10-3. The system first prompts:
Enter invoice # of Order:
Specify the invoice number of the invoice you wish to reprint.
This procedure allows you to reprint an invoice created in free form.
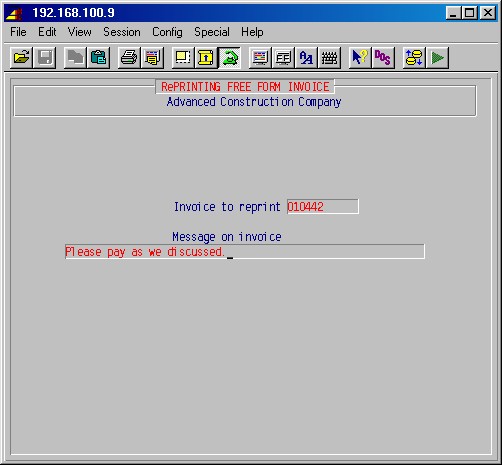
TopThe printer selection screen will next be displayed. Type the printer number and the number of copies and press ENTER.
1-10-8-1 Enter/Update Free Form Billing
FREE FORM ENTRY
This entry/update area allows you to do accounts receivable invoicing in a free-form entry area where you may make descriptions as long or as short as you wish. This procedure provides ways to produce invoices both related to jobs and not related to jobs. There is little forced structure, allowing whatever words of description and dollar amounts are needed to be entered on the invoices. Provision is made for sales taxes and for retainage. Either manual or computer assigned invoice numbers are allowed.
This selection will first display the following input screen:
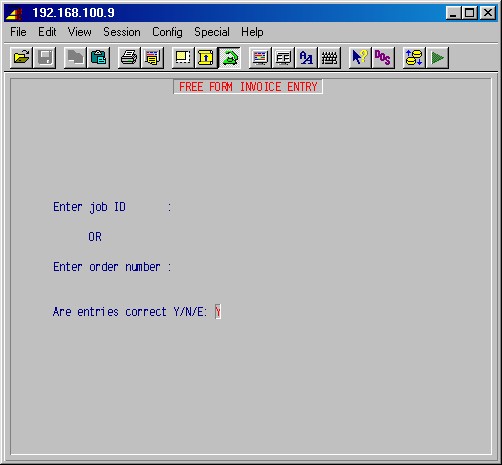
Enter job ID
blockquote> Optional. If this invoice is job related specify a valid job ID, or leave blank.<.blockquote>Enter order number
If you are creating a new free form invoice leave blank, or specify a SO number as discussed in "1)" below. If you are updating a previously entered free form invoice which has not been printed in final form, enter the order number as discussed in number "2)" below.This order number field is used here for two different functions:
1) Service Order tied to this invoice
Enter a valid SO number (must start with "SO" and 5 or 6 digits) for a service order which you intend to bill through free form. This will cause information previously entered when that service order was created to be entered into the first free form entry screen. On the second screen, after the date and the invoice number are entered, the system will prompt, "Merge work description into invoice". Answering YES will merge the work description only into the invoice. The dollar amounts will need to be entered like a regular free form invoice.2) Updating previously entered free form invoices
At the time an invoice is entered, an order number is assigned by the system. At any time before this invoice is printed in final form, it may be updated and changed by specifying its order number here any making changes. Enter the 5 digit order number which appeared on a preliminary printing, or press F2 to see a list of all invoices by order number, and select the invoice you wish to update by highlighting it with the arrow keys and pressing enter.Are entries correct Y/N/E:
Press N ENTER to correct the job ID or the order number field, or E ENTER to exit this procedure. Press Y ENTER to continue. The following input screen will be displayed :
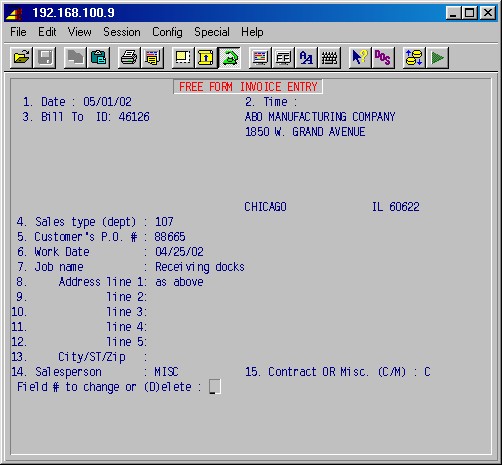
1 Date
Specify the invoice date; the default is today's date.
2 Time
Not being used at present.
3 Customer ID
If a job was specified, the customer ID associated with that job will be displayed. Otherwise, specify a customer ID and press ENTER. If a valid customer ID was specified, the customer's name and address will be displayed as well as a prompt "yes". If you have chosen the wrong customer, you may now answer NO and change it. As the screen prompts, you may also press F2 to see a list of service orders. Press ENTER to continue.
4 Sales type (dept)
If a job was specified, the sales type associated with that job will be displayed. Otherwise, specify the sales department [H] for this invoice.
5 Customer PO
Optional. You may insert a memo entry of your customer's PO number if you wish.
Fields 6 through 12 are job related and will be filled in by the system if a job was specified. You may complete or update any of these fields as required, or press F1 to skip over them.
6 Work date
Optional. Specify the date the work was done.
7 - 13
Job name and address. This information will already be known if a job was specified.
14 Salesman
Mandatory. Usually this is known from the customer.
15 Contract OR Misc. (C/M):
If you have entered a job ID above, this answer determines whether the billing amount is to be added into the "Billed" totals for the job, or to the separate "Misc Billed" total for the job ("Misc Billed" is not included in the "Job Billed" totals in job cost reports.) This is a way of keeping for example subcontractor work on a job out of the job cost and job profit calculations.
Enter field to change, (D)elete, or <RETURN>
You may now update any of these fields or press D to abort this invoice and return to the previous screen. Press just ENTER to continue to the next screen.
The next screen prompts first for the due date and the invoice number.
Due date
Specify the correct due date as required. If you did not specify a payment terms option in the customer set up, the system will display a due date the same as the invoice date. If you specified terms, the correct due date for this customer will be displayed.
Invoice number
Specify an invoice number or leave blank and the system will provide a unique sequential invoice number.
Order number
System code for this transaction; not user updatable. This is a unique number generated by the system to label this preliminary invoice before it is printed in final form.
If a job was not specified at the beginning of this procedure, you'll go directly to the item entry screen. If a job ID was specified and Residential was specified in 13-8-4, Free Form Setups, the system will next prompt for the type of billing. The screen will look similar to this :

Next select the type of billing. Except for residential applications, always select "G" - general.
Are entries correct : YES
Answer NO to change the billing type or press just ENTER to continue. The system will prompt:
MERGE JOB SCOPE INTO INVOICE:
If you want the words you entered into the job scope area of the job setup to be printed on the invoice, answer Yes here.
CREATE T&M INVOICE:
This is an alternate way of billing a job, rather than using AIA (stage) or Unit billing in the job cost module. This step allows you to create an invoice based on actual job cost detail lines (e.g. labor and material and manual cost postings to a job, as shown on 7-12: Job Cost History Report). If you answer No here, you'll go directly to the item entry screen. Answering Yes here displays the following screen:
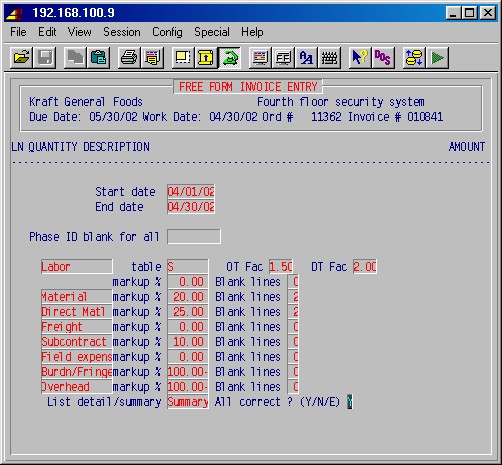
Start date:
End date:
Enter the date range you wish to bill. Job cost lines will be marked as having been billed, so you would typically leave the start date blank to pick up the earliest unbilled job cost line.
Phase ID blank for all:
If you wish to bill just one phase, enter its ID here.
Otherwise leave blank to bill all phases.Labor table
This table determines the billing rate for labor, and is set up in 2-13: Labor Rate Maintenance. Make sure that you have an entry for each work class used on the job in the table chosen, or the billing rate will be zero!
OT Fac
Enter the overtime factor to be used in billing labor on this invoice.
DT Fac
Enter the doubletime factor to be used in billing labor on this invoice.
Labor markup %
If you want to add an additional percentage to the billing rate in your labor rate table, enter it here, e.g. 30%
Note: A markup % of -100 means that the expense category (Labor, Material, etc.) will be disregarded.
Blank lines
Enter the number of blank lines you want added on your free form invoice, between this category (Labor) and the next category (e.g. to allow for manual additions to the invoice).
Material markup %
Maintenance markup %
Equipment markup %
Subcontract markup %
Other markup %
The names of these phase expense categories may vary from job to job and are set up in 7-1-1 -5: Phase Expense Categories, and may be changed here for the purpose of the text on the invoice.
List detail/summary
Type D if you want each single job cost line listed on the invoice.
Otherwise type S to just have one summary line for each phase expense category.All correct ? (Y/N/E)
Y to proceed.
N to go back and correct the above entries.
E to abandon automatic creation of lines on the invoice.If you answered Yes you will next see:
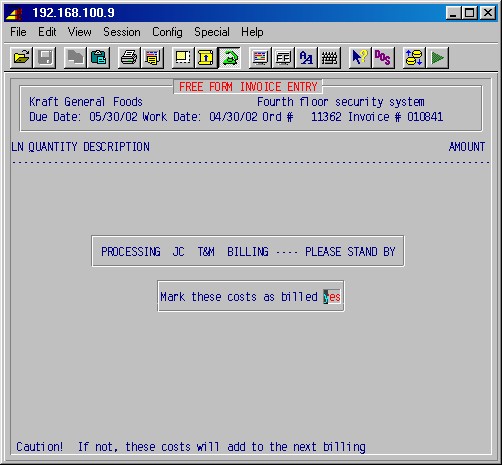
Mark these costs as billed
You would normally answer Yes here.
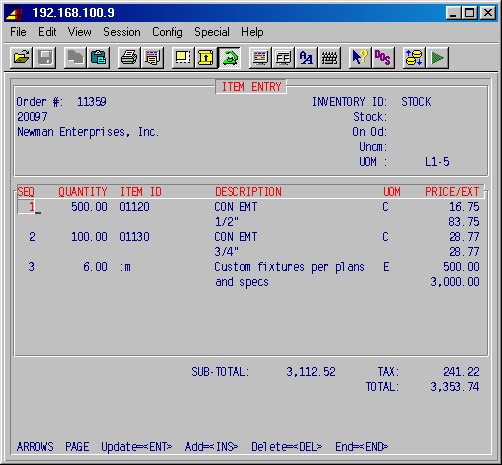
The item entry screen where you specify the item descriptions and the charges is next displayed as follows :
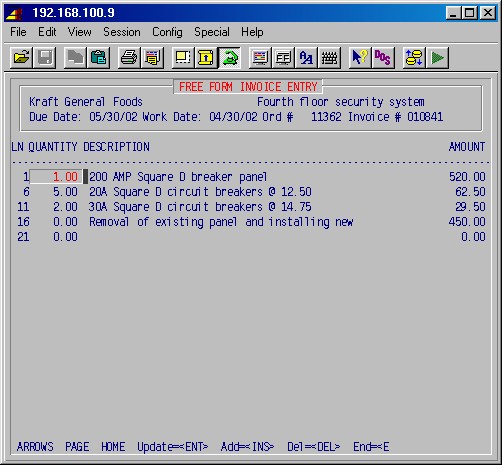
Ln
This is the line number numerically numbered by the system.
Quantity
The quantity is optional. If specified, it can be used to extend a unit price using the "@" sign and the dollar amount per item as in the example above.Description
The description is any words you want to use to describe the work that was done. If you need two or more lines, press ENTER through the amount on this line and move down to the description part of the next line and continue. This description area can also be used to show a unit price which will be extended.To accomplish the extension, use the format "@ NN.NN" where the NN.NN represents the unit price. This unit price must be to the right of any other text on its line. After the extension, if any, the result may be updated manually.
Amount
The amount must be specified here or updated as required.You may update any line as needed by using the ARROW, PAGE and HOME keys to move to that item and press ENTER.
Use the INS and DEL keys to add and delete lines, as needed.When all lines are finished, press END. The system will display the "sub total" and prompt:
Enter retainage % OR <RET> when done :
If this is job related and a retainage percentage is to be deducted from this invoice, enter that percentage here. The "less retainage" will be displayed and may be updated if required.
Next, the "amount due" will be drawn and sales taxes requested.
Enter tax ID code OR <RET> when done :
Mandatory. You must specify a valid sales tax code [H] and press ENTER. The system will suggest the sales tax code entered for this customer in your customer setup, but you can override it here. The system will prompt:
Enter adjusted taxable amount OR <RET>:
Mandatory. The system requires you to apply a sales tax code to all monies in the "amount due" and it won't let you leave this area until you do; however, you may enter multiple lines of sales tax with different amounts as long as the total of the amounts equals the "amount due". The system will suggest for each line of tax the balance left which you may override as required.
NOTE: This feature is generally used when part of the invoice is taxable and part is not. For example, shipping charges are not subject to sales tax in Florida. Specify your normal tax code for the amount due less the shipping, and then XX for the shipping charges. (Note that you can specify if freight is taxable in 13-8-3: Accounts Receivable Customer setup.)
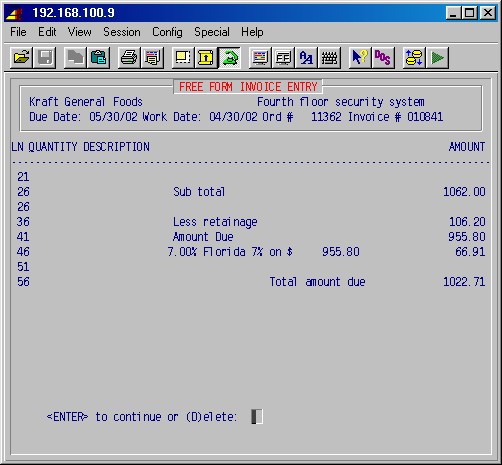
Press RETURN to continue or (D)elete:
You may abort this entire invoice at this point by pressing Delete, or press ENTER to continue and you will return to the first screen to enter another invoice.
FREE FORM UPDATE
This entry/update area allows you to update and make changes to preliminary invoices before they are printed in final form. After they are printed in final form they are not available for update and any changes must be done through additional invoices and/or credit invoices.
You need the invoice order number to access the preliminary invoice for updating. This order number was printed on the invoice if it was printed in preliminary form or may be obtained using the F2 key to display current orders as shown below.
The 1-10-8-1: Enter/Update Free Form Billing selection displays the following input screen:
Press ENTER for the job ID and go directly to the order number.
Enter order number
If the order number is known from a preliminary invoice printing, type the number and press ENTER. Otherwise, press F2 to see a list of all invoices by order number, and select the invoice you wish to update by highlighting it with the arrow keys and pressing enter. The following is a sample of what the screen looks like when you press F2:

Are entries correct Y/N/E:
Press N ENTER to make corrections, or E ENTER to exit this procedure. Press Y ENTER to continue.
From this point on, the update function works the same as the original free form invoice entry procedures as explained in detail on page 95 above. Specifically, on the first entry screen, note that you may update any field that you had access to when the original invoice was created and you may void the whole invoice using the Delete function. On the item entry screen, lines may be updated or deleted, and new lines added. The system will then require you to go through the same totaling procedures for retainage, and sales tax.
This update function may be performed as required until the invoice is printed in final form, after which it is not available for update.
1-10-8-2 Enter/Update Overhead Billing
This procedure is similar to 1-10-8-1 above but this step allows a user to bill for service rendered and to apply overhead charges to the bill which are visible to the customer.
First, the system allows you up to four lines of text which will appear on this invoice, starting with "Re:" where you may type any special message you wish for this billing. It is suggested that you start with "Re: Overhead Billing", but you may type anything, or leave blank as required. On the next screen enter the voucher # (or service order #), the amount of labor incurred, and the amount of material used. The program will extend the labor and material values to a total for that line. You may enter as many lines as required. When done entering lines, press END to end. The system will sub-total the lines and then ask for a percentage burden amount. It will default to the percentage burden specified on the job you are billing.
If there is no job, it will default to zero. You may override the default. Next it will ask for the percentage overhead to apply. The default will come from the job again which the user may override. Finally, the system will ask for the percentage fee to apply. The default comes from the job and may be overridden. As the system prompts for the percentages, it applies the percentage on the current running total. So, for example, the overhead percentage will be applied to the sub-total amount plus the burden amount. Next, enter the percentage of retainage. The system will prompt for tax which is applied and then the final amount due displayed.If you want to update this invoice, simply call it up using the order number and walk through it again. This time the numbers will be filled in from the existing invoice and it will allow you to update them.
1-10-8-3Enter/Update No Overhead Billing
This procedure is exactly the same as 1-10-8-2 Overhead billing except this will not ask for the percentages for burden, overhead and fee. Thus, no overhead is billed.
1-10-8-4 Enter/Update Progress Billing
This procedure is similar to 1-10-8-1 above but this step allows you to bill a customer for progress billings while the job is on-going.
First, the system allows you up to four lines of text which will appear on this invoice, starting with "Re:" where you may type any special message you wish for this billing. It is suggested that you start with "Re: Progress Billing", but you may type anything, or leave blank as required. On the next screen, type in the original contract amount, the change orders approved amount, and the change orders pending amount. These will all default from the corresponding fields from the job. You will then be asked to enter the amount that has been completed for the job. Enter the amount that has been previously billed to this customer which will then calculate the current amount for this billing. Next, enter the percentage of retainage. The system will calculate the amount due and prompt for the tax to apply and then display the total amount due including tax.
If you want to update this invoice, simply call it up using the order number and walk through it again. This time the numbers will be filled in from the existing invoice and it will allow you to update them.
1-10-8-5 Enter/Update Retainage Billing
This procedure is similar to 1-10-8-1 above but this step allows you to bill a customer for retainage that has been taken out by either free form or progress billing.
First, the system allows you up to four lines of text which will appear on this invoice, starting with "Re:" where you may type any special message you wish for this billing. It is suggested that you start with "Re: Retainage Billing", but you may type anything, or leave blank as required. The system then displays all the retainage invoices for that customer on the invoice and allows you to add, change or delete from that list. When you are done with the list, a subtotal of invoices is displayed. The system then prompts for the tax to apply and displays the total including tax for the bill.
If you want to update this invoice, simply call it up using the order number and walk through it again. This time the numbers will be filled in from the existing invoice and it will allow you to update them.
1-10-8-6 Enter Credit Note Billing
This procedure allows you to easily create a credit invoice to cancel an existing invoice. First enter the original invoice number. The system will display some descriptive information from the invoice so that you can verify this is the correct invoice. If it is, you are prompted for the date to use for the credit invoice. You may enter up to four lines of text which will appear at the bottom of the invoice. Note that only the remaining balance of the original invoice will be credited.
1-10-8-7 Print on Forms
NOTE: The billing address to be printed on the invoice will come from one of two places. The system will look first at the at the job billing address. If field #12 is filled in, in step 7-1-1-2 Job Billing Address Maintenance, that address will be used. If field #12 is blank, it will default to the customer address.
This step is used to print free form invoices on invoice forms. If desired, invoices may be first printed in a preliminary run, although this is generally done on plain paper in the next step. Invoices printed in preliminary form may be updated as required and then printed in final form. This selection will display the following input screen :
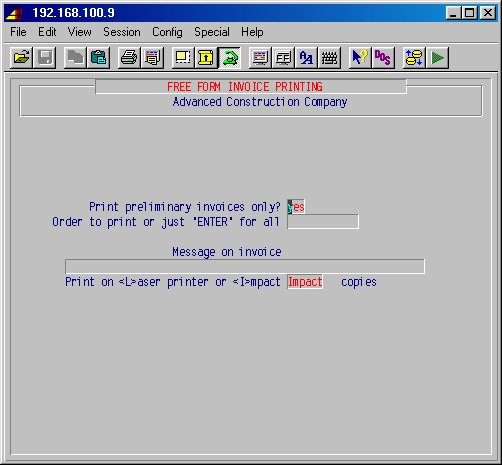
Print preliminary invoices only? YES
The default is YES and if you press just ENTER the invoices will be printed in preliminary form. In this preliminary form, the accounting has not been updated and the invoices may be updated as required; when printed in final form the accounting is updated and the invoices are not available for update. When you are sure you are ready to print in final form, press NO ENTER.
Order to print or just 'ENTER' for all
You may specify an order number here if you just want to print one invoice or press just ENTER to print all free form invoices which you have not previously printed.NOTE: Each user owns his group of invoices and can only print his work. Should it become necessary to print the invoices of an operator who is not available, it is necessary for a supervisor to log on the system with that operator's user name and run this step.
Message on invoice
Here you may type any message which you wish to appear on each invoice.The printer selection screen will now be displayed. Type the printer number and the number of copies and press ENTER. Your invoices will now be printed as specified.
If you answered YES to "print preliminary invoices only", the preliminary invoices will be printed; however, sales and GL will not be updated.
If you answered NO to that question, meaning to print the invoices in final form, your final invoices will be printed and the system will prompt:
Did invoices print correctly : YES
This question is there only if the printer did not print correctly to allow you to re-print. Answer NO if you need to reprint, When you are sure the printing is correct, press YES ENTER. At that point sales and data for the GL will be updated and these invoices become part of the accounting, aging, and sales journals.
1-10-8-8 Print on Paper
NOTE: The billing address to be printed on the invoice will come from one of two places. The system will look first at the at the job billing address. If field #12 is filled in, in step 7-1-1-2 Job Billing Address Maintenance, that address will be used. If field #12 is blank, it will default to the customer address.
This step is used to print free form invoices on plain paper. If desired, invoices may be first printed in a preliminary run. Invoices printed in preliminary form may be updated as required and then printed in final form. This selection will display the following input screen :
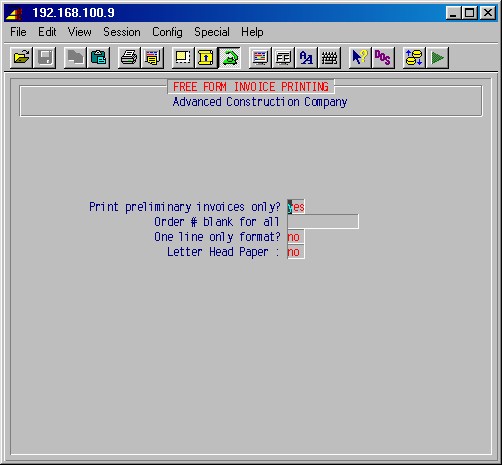
TopPrint preliminary invoices only? YES
The default is YES and if you press just ENTER the invoices will be printed in preliminary form. In this preliminary form, the accounting has not been updated and the invoices may be updated as required; when printed in final form the accounting is updated and the invoices are not available for update. When you are sure you are ready to print in final form, press NO ENTER.Order # blank for all
You may specify an order number here if you just want to print one invoice or press just ENTER to print all free form invoices which have not previously been printed.NOTE: Each user owns his group of invoices and can only print his work. Should it become necessary to print the invoices of an operator who is not available, it is necessary for a supervisor to log on the system with that operator's user name and run this step.
One line only format? NO
If you answer YES the system will print a concise report of all unprinted invoices, one line per invoice, with a total page. The default NO will print all of each invoice.Letter Head Paper : NO
If you answer YES here, the invoices will be spaced down on the paper, allowing room for the letterhead.The printer selection screen will now be displayed. Type the printer number and the number of copies and press ENTER. Your invoices will now be printed as specified.
If you answered YES to "print preliminary invoices only", the preliminary invoices will be printed and sales and GL will not be updated.
If you answered NO to that question meaning to print the invoices in final form, your final invoices will be printed and the system will prompt:
Did invoices print correctly : YES
This question is there only if the printer did not print correctly to allow you to re-print. Answer NO if you need to reprint, When you are sure the printing is correct, press YES ENTER. At that point sales and data for the GL will be updated and these invoices become part of the accounting, aging, and sales journals.
This procedure allows you to split the amount of the invoice printed to be posted to different phases and departments for the purpose of posting billing amounts to the JC module.
With this selection you always have to enter an invoice number and always print in final form.
This selection first prompts:
Print on forms or plain paper:
Type F if you want to print on forms rather than on plain paper; press ENTER.
Printing on plain paper, you'll next be prompted:
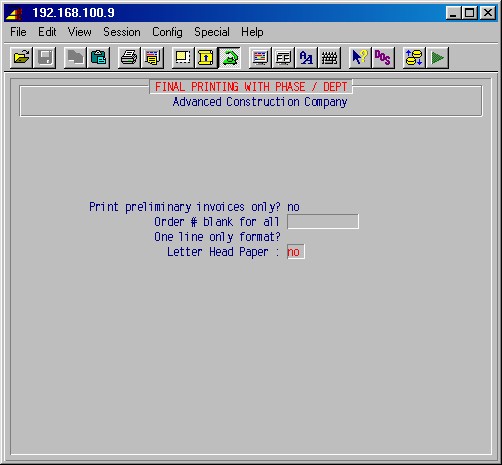
Print preliminary invoices only? NO
This is always no for this selection.Order # blank for all
You must specify an order number here.One line only format?
This option is not available here.Letter Head Paper : NO
If you answer YES here, the invoices will be spaced down on the paper, allowing room for the letterhead.Printing on forms, you'll instead be prompted:

Print preliminary invoices only? NO
This is always no for this selection.Order to print or just 'ENTER' for all
Here you must specify an order number.Message on invoice
Here you may type any message which you wish to appear on the invoice.The printer selection screen will now be displayed. Type the printer number and the number of copies and press ENTER. Your invoices will now be printed as specified.
You'll next be prompted:
Did invoices print correctly : YES
This question is there only if the printer did not print correctly to allow you to re-print. Answer NO if you need to reprint, When you are sure the printing is correct, press YES ENTER. At that point sales and data for the GL will be updated and these invoices become part of the accounting, aging, and sales journals.
Next you'll be allowed to split the amount of the invoice between phases and departments, for the purpose of posting billing amounts to the JC module.
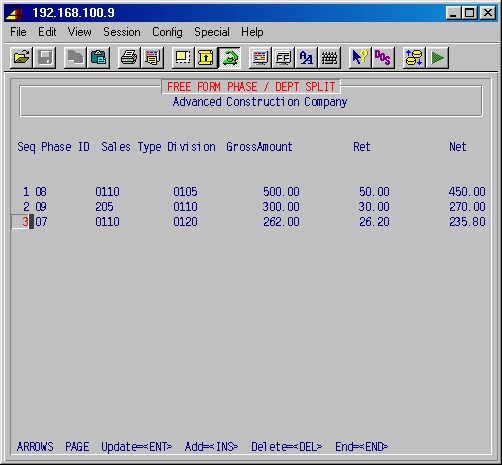
TopSeq
This is an arbitrary number assigned each line by the system.Phase ID
Enter the ID [H] of the phase you want the billing amount on this line to be posted to.Sales Type
Enter the department [H] you wish the billing amount on this line to be posted to.Division
If you GL is divisionalized, enter the division [H] you wish the billing amount on this line to be posted to.Amount
The amount will show the balance to be split. Enter the amount you want for this line.Continue entering lines until you have split the whole invoice amount.
You will not be allowed to leave this screen until the split amounts add up to the invoice total amount, and will get the message (balance) still left, if you attempt to do so.
Use the ARROW, PAGE, HOME, INS, DEL and ENTER keys to correct the entries, as needed.
Press END when done.
This selection will print a list of voided invoices to be used for audit
purposes.
You'll be prompted:
Top
Enter the date range you want, the printer to be used, number of copies, and the list will print.
Top
This report prints a sales journal for all AR invoices dated within the range
specified. This journal should be run for each day that billing is done and
balanced with the day's invoices. It should also be printed for each month in
its entirety. These reports are part of the necessary audit trail.
Selecting this procedure will display the printer selection screen. Type the
printer number and the number of copies and press ENTER. The system will
then display the following input screen :
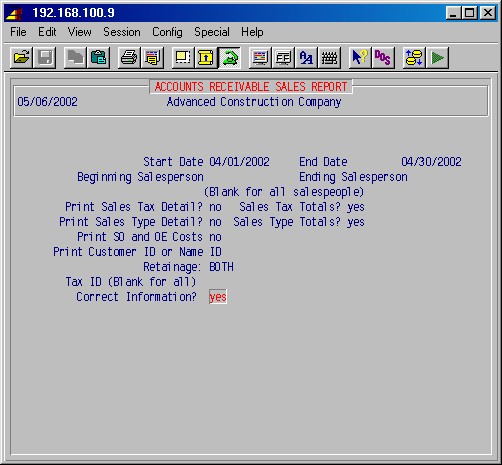
Choose YES to print invoices grouped by Sales Type. Choose NO to print invoies by number order.
If YES is chosen, fill in the following choices:
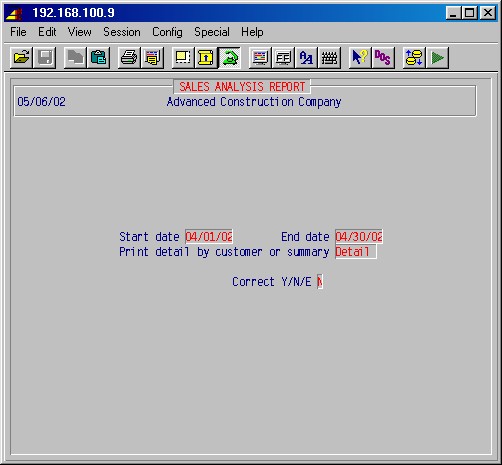
If NO is chosen, fill in the following:
Start date
End date
Specify the date range for which you want to list invoices.
The start date must be the same as or earlier than the end date.NOTE: If you are doing a daily sales journal, both dates would be today's date. If you are doing the monthly sales journal, the end date would be the last day of the month, and the start date would be the first day of the month.
Beginning salesperson
Ending salesperson
If you want to limit the report to just one salesperson, or a range of salespeople, enter beginning and ending IDs (as set up in 1-4-6) here.
Sales dept
This is normally left blank and sales for all departments (sales types) will be printed. If you want a report of a single sales department, specify that department ID here.
Print sales tax ID (no costs)
If you want the sale tax ID of invoices printed in the last column, answer Yes here. This will not be printed if you answer Yes to Print SO and OE costs below.
Print SO and OE costs
Answer YES here if you want costs and profit figures listed.
Print customer ID or name
If you want the customer's name listed instead of customer ID, answer Yes here.
Print retainage
You may print retainage invoices only, regular invoices only, or both. Normally you would print both and just press ENTER here for the default of BOTH. Specify what invoices you wish to print on the report as follows:
Retainage - RET
Regular - REG
Both - BOTH
Tax ID (blank for all)
If you answered Yes to Print sales tax ID above, you'll be allowed to enter a sales tax ID here and thus limit the report to that ID.
Correct information? YES
Answer NO to go back and make any changes or press just ENTER to continue. Your report will be printed and you will return to the previous menu.
Sales Type
Select any number or all sales types to include.

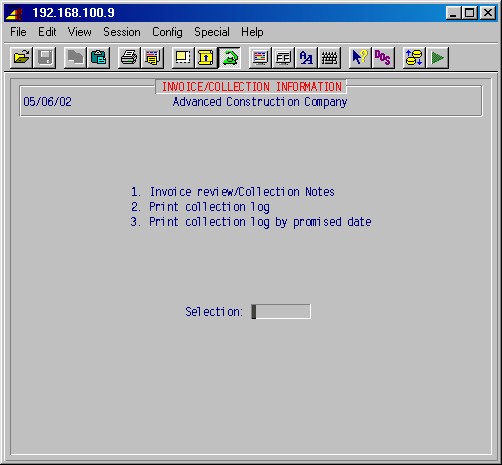
Enter invoice #
Specify the invoice number [H] you wish to review and press ENTER.
If the invoice number is valid, you'll see the following screen (items in bold are examples):
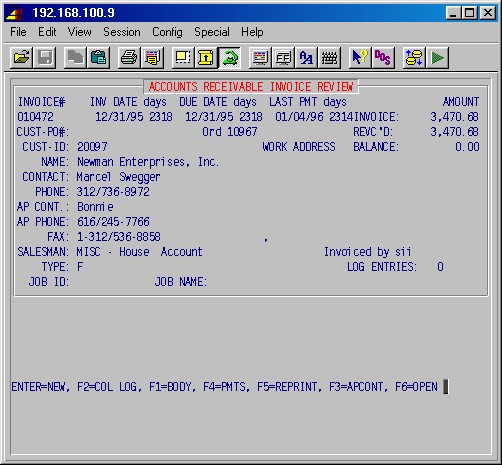
Use the ARROW, PAGE and HOME keys to view different parts of the body. Press END when done.
Press F2 to access the collections log:
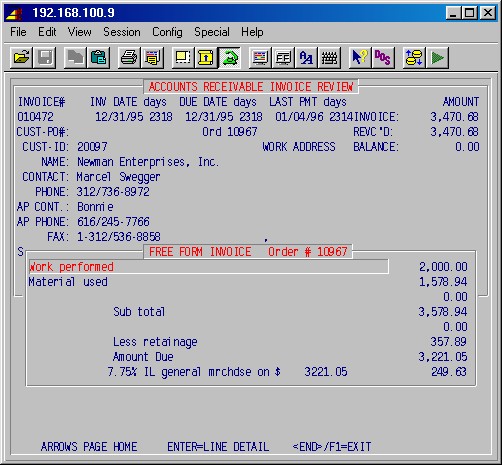
Entry date
This is the date this entry was made.Entered by
The user name for the person who made this entry.Promised by
Enter the date the customer promised to pay this invoice, or leave blank if not applicable (to blank out an existing date press ?).You may now enter up to four lines of text per log entry. Press F1 when done entering text.
Use the ARROW, PAGE and HOME keys to move up and down through the log entries for this invoice, as needed.Use the INS key to add entries. Use ENTER or F7 to update entries.
Here you may also use F1 to view the body of the invoice and F4 to view the payment history of the invoice.
If you wish to copy the log entries for this invoice to another invoice, press F2, select the invoice you want to copy to from the list of invoices that appear, and press ENTER to copy. You can do this repeatedly for the invoices on the list. Press F1 when done.
Press END when done with the collection log for this invoice.
Press F4 if you wish to see the payments on this invoice:
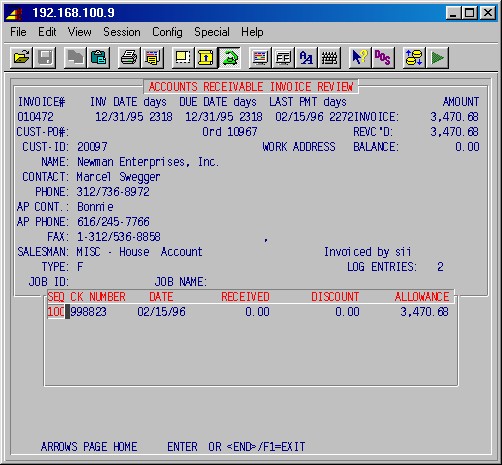
TopUse the ARROW, PAGE and HOME keys to look through payments if there are more than will fit on the screen. Press END, F1 or ENTER when done.
When you are finished viewing the invoice, press ENTER and you will be prompted for another invoice number. To exit this area, press ENTER again and you will return to the 1-12 Collections Processing menu.
These procedures print AR sales reports for a specified range of dates of sales tax, sales/product type, and salesman's activity. This selection will display the following menu:
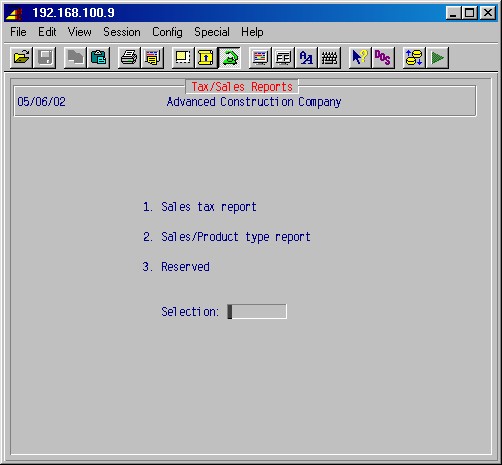
This step prints sales tax totals for each of the various tax authorities for which you have had sales during the period specified. If sales tax is collected from resale, this report is the basis for the amounts needed on the tax returns. This report may be run at any time for any date range. Normally, it is run and saved at least monthly, but you may wish to run it daily or at the same time you run your sales journal.
Selecting this procedure will display the printer selection screen. Type the printer number and the number of copies and press ENTER. The following input screen will then be displayed :
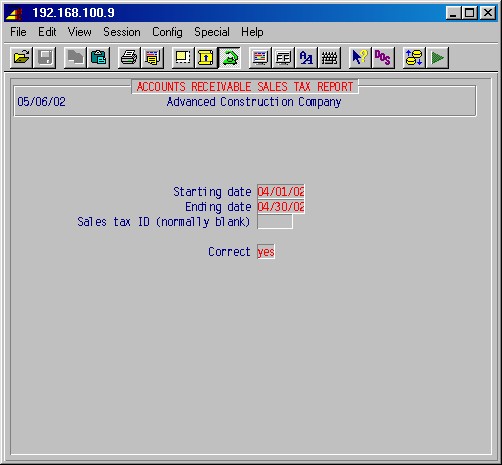
TopStarting date
Ending date
Specify the range of dates you wish to print on this report. If this is for one day, specify the same date for both fields. If the is a monthly report, specify the first day of the month for the start day and the last day of the month for the ending date.Sales tax ID (normally blank)
You may print a report of one sales tax authority if you wish by specifying the sales tax ID here. If you leave this field blank, your report will show all tax authorities for which you had sales during the period specified, grouped alphabetically by sales tax ID.Correct YES
Answer NO to go back and make any changes or press just ENTER to continue. Your report will be printed and you will return to the previous menu.
This step prints sales department totals for each of the various sales departments (sales types set up in 1-4-1 Sales Type Maintenance) which have had sales, for the date range specified. This report may be run at any time for any date range specified; however, this is a management report which should be run at least monthly and preserved.
Selecting this procedure will display the printer selection screen. Type the printer number and the number of copies and press ENTER.
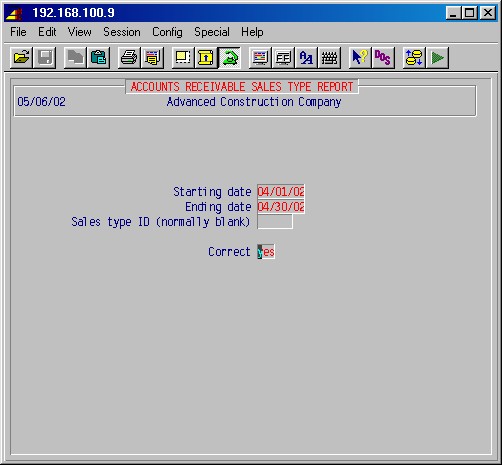
Starting date
Ending date
Specify the range of dates you wish to print on this report. If this is for one day, specify the same date for both fields. If the is a monthly report, specify the first day of the month for the start day and the last day of the month for the ending date.
Sales type ID (normally blank)
You may print a report of one sales type if you wish by specifying the sales type ID here. If you leave this field blank, your report will show all sales types for which you had sales during the period specified, grouped alphabetically by sales type ID.
Correct YES
Answer NO to go back and make any changes or press just ENTER to continue. Your report will be printed and you will return to the previous menu.Top
This report prints the items which have been ordered in step 1-8-1 and have not been delivered or shipped. If counter type sales are not used, then this report is not needed.
Selecting this procedure will display the printer selection screen. Type the printer number and the number of copies and press ENTER.
This report shows item description, order number, order date, customer, quantity.
TopThese procedures provide for posting cash to AR invoices and producing various reports to reconcile and balance these cash postings. Procedures are also included to reconcile your cash drawers if you are using counter sales, and to clear retainage for a job. This selection will display the following menu:
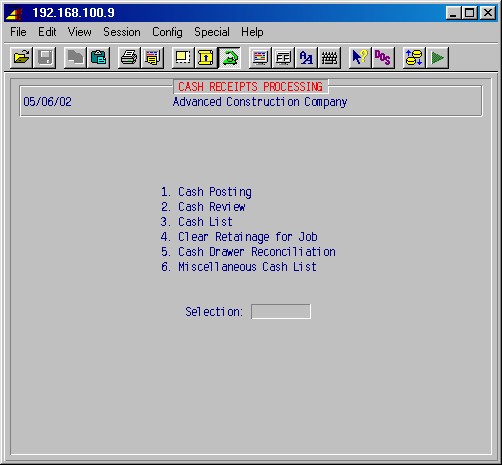
These procedures provide three ways to post cash to invoices. The first is a convenient method to post multiple invoices from one check. The second allows single or multiple posting using invoice numbers; "lump sum" posting wherein a receipt is applied to as many invoices as able, starting with the oldest invoice; and corrections. The third allows postings of miscellaneous cash. This selection will display the following menu:
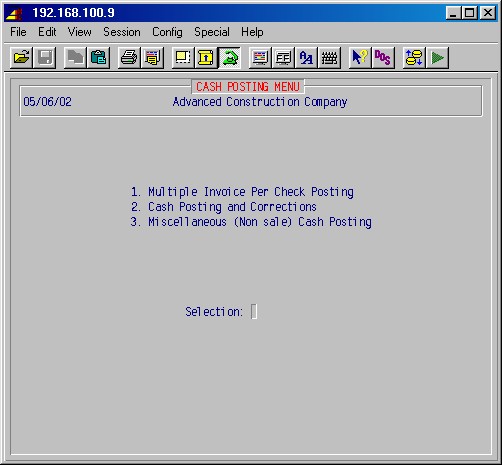
Top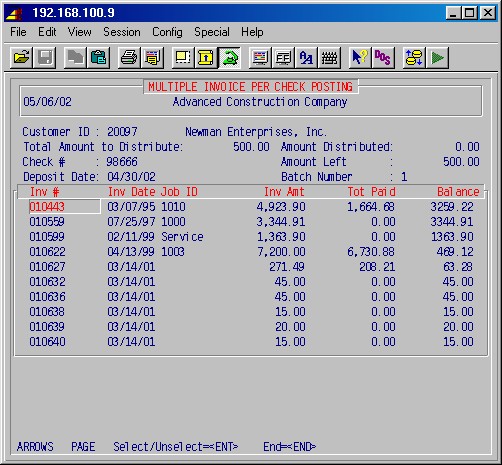
Customer IDSpecify the customer you whose check you are posting by typing the customer ID [H], the entire customer phone number or the local phone number if the customer happens to be in the same area code as you.
Total Amount to Distribute
Check number
Enter the amount of the check and the check number. The system will not let you leave the check number field blank.
Deposit date
Type the date of this deposit, NOT the date on the check. The system will not let you leave this field blank.
The system will now display in a window, a screenfull at time, all open unpaid invoices for this customer. The system displays the invoice number (in numerical order), invoice date, job ID, invoice amount, total paid and the outstanding balance. Invoices are selected to pay by cursoring up/down to the appropriate invoice (or just type its number on the keyboard) and pressing ENTER. The system will then prompt Amount to apply _____, suggesting the full balance due on the invoice. If the amount left to distribute is less than the suggested amount or you don't want to apply it all to this invoice, change the suggested amount and press ENTER. If you do apply more than is left, the system will warn: Exceeding amount available, but apply it anyway, resulting in a negative amount left.
Note that an asterisk (*) appears in front of each invoice which you have applied payments to here. You can "un-apply" the amount applied to an invoice, simply by highlighting the invoice and pressing ENTER.
As you apply amounts to invoices, a running total of how much of the check has been distributed and how much is left is displayed in the upper right corner.When done, press END to end. If you have some money left when you try to exit, the system will prompt:
You still have $xx.xx left.
Please apply this towards an invoice.The system will not let you leave this procedure until you have applied the entire amount to distribute. If you should get into the situation where there are more money on the check than total owed on all invoices for the customer, simply apply the balance to some invoice (on newer system there is a "credit invoice" with invoice number C + customer ID for each customer).
If you needed to enter a new invoice, you can do so after leaving this procedure, then go back into this procedure in order to move the amount you temporarily applied to the existing invoice over to the new invoice, by entering the same check number, and a zero amount to be distributed. You can then apply a negative amount to the existing invoice, and a positive amount to the new invoice.
If you mistakenly selected the wrong customer, apply the amount to some invoice, exit, go back in and enter the same check number with the same, but negative, amount and apply it to that same invoice. Then you can select the correct customer and apply the check to those invoices.
This step is used to post cash receipts for AR billings and add, delete, and update cash postings. As many payments may be posted for each invoice as required and the system will maintain records of all payments, amounts, dates, and check numbers for future reference. This posting area allows for posting sales discounts taken by customers, and allowances for differences between payments and billing amounts in order to close out an invoice.
Invoices may be selected for payment by specifying the invoice number, by specifying the customer ID and displaying all unpaid invoices for that customer for selection, and by specifying "lump sum" which will apply the cash to as many invoices as able, starting with the oldest invoice. Press ENTER and the following input screen will be displayed :
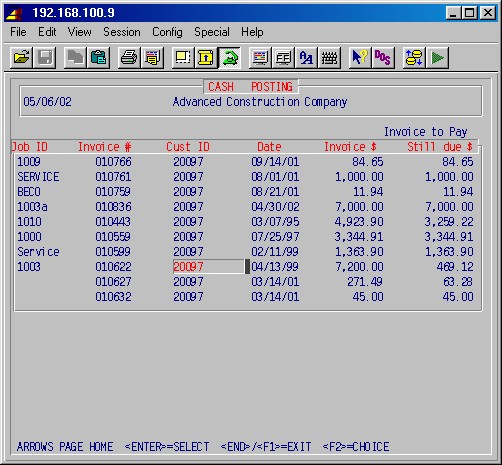
Invoice to pay
If you know the invoice number, you may enter it directly and that invoice will be displayed, available for posting the cash, as shown on the next screen below.
The F2 help screen is available here which will display all invoices to choose from in customer ID order. Type in the customer ID and press F2 for a list to choose from which shows the amount still due (not shown in the examples).
You may also leave this field blank and specify the customer ID in the next field which will display a list as shown in the example above.
Customer ID
Specify the customer ID [H] and press ENTER. A list of outstanding invoices for this customer will be displayed as in the example above and the cursor will be positioned in "invoice to pay" for you to specify the invoice number.
Invoice to pay
To post a lump sum amount
If you want to post a lump sum amount to the oldest invoices first, type in an "*" and press ENTER. The screen will display the following entry area :
TopEnter the lump sum amount, the receipt date, and the check number and press ENTER. The system will post this lump sum to as many invoices as possible starting with the oldest one and return you to the first screen, prompting you for another invoice number to post the next check.
To post to a specific invoice
Type the correct invoice number from the list and press ENTER and the following input screen will be displayed :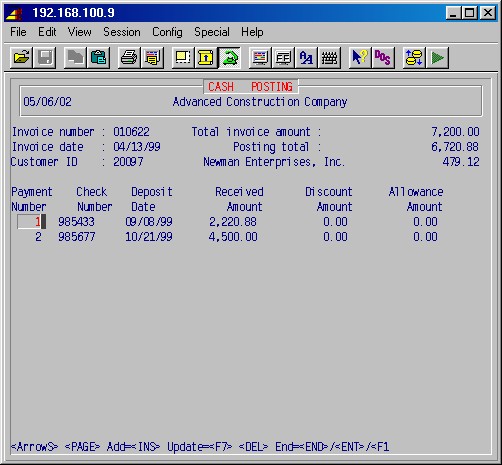
Check number
Specify the check number, or type a very brief description.
Deposit date
Type the date of this deposit, NOT the date on the check.
Received amount
Specify the amount of this payment toward this invoice. If one check is used to pay several invoices, specify only the amount which applies to this invoice.
Discount amount
Specify the discount, if any, taken by the customer.
Allowance amount
If applicable, specify the amount, plus or minus, which is to be applied with this payment in order to close out this invoice. If the customer is expected to pay the remainder of the invoice later, leave the allowance zero.
The header of this screen provides you with a summary of this invoice information, including the total amount of the invoice and the total of all postings against this invoice. When you are finished, press END and the system will return you to the first screen and prompt you for another invoice number to pay.
If you are posting one check which is paying multiple invoices, each invoice is posted separately using the same check number and date. When you have finished posting, run a cash list in 1-15-3 and verify that the list balances with your checks.
The system gives you the flexibility to delete a line of cash posting which will add the total of the line you deleted back to the invoice as a cash outgo as of the date you delete the cash posting. However, the system will not allow changing or deleting of postings with a deposit date that is more than seven days old, in order to avoid erroneous postings to prior accounting periods, to provide an audit trail and as it is expected that cash postings are done on a daily basis.
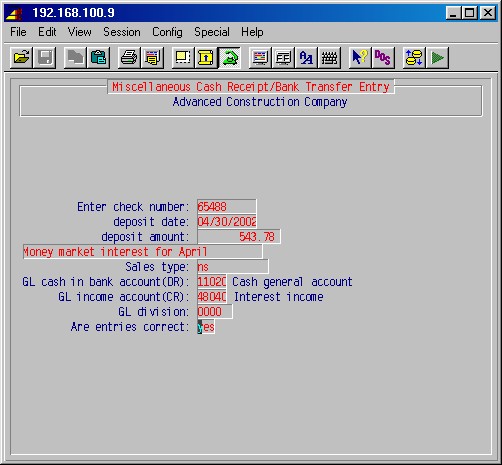
TopEnter check number:
Enter a check number or some other identifying number for this posting.
If you want to exit this procedure, leave this blank and just press ENTER.Deposit date:
Enter the date of this deposit or posting.Deposit amount:
Enter the amount of this deposit or posting and a brief description of the posting.Sales type:
Even though the posting is not for a sale, you still have to enter a valid department ID for this posting.GL cash in bank account:
Enter the GL account number of the account this amount is deposited to.GL income account:
Enter the GL income account number.GL division:
Enter the GL division, if applicable.Are entries correct:
No to go back and make corrections to the above entries.
YES to proceed and make this posting.
Press ENTER.You will then be prompted for another check number. Leave this blank and press F1 to exit this procedure.
This procedure allows you to review a specified invoice for the balance outstanding and all payments posted against that invoice as shown in the example below. This selection will first prompt:
Enter invoice #
Specify the number of the invoice to display and press ENTER. The
F2 help screen is available here which will display all invoices to
choose from in customer ID order. Type in the customer ID and press F2
for a list to choose from which shows the amount still due. Below is a sample
of the display :
Press ENTER when done viewing the invoice. The F1 key lets you view the body of the invoice and the F4 key lets you view payments.
Press F1 to see the body of the invoice (for certain types of invoices):
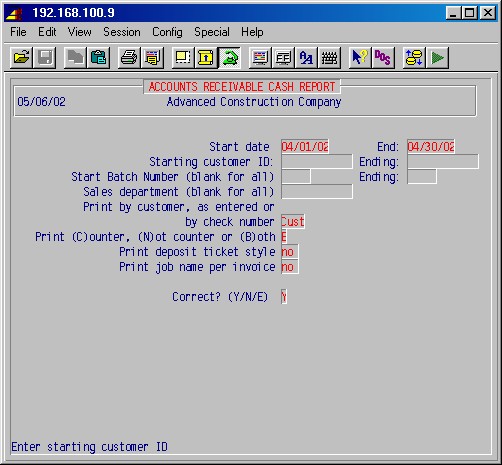
TopUse the ARROW, PAGE and HOME keys to look through payments if there are more than will fit on the screen. Press END, F1 or ENTER when done.
When you are finished viewing the invoice, press ENTER and you will be prompted for another invoice number. To exit this area, press ENTER again.
This report prints all the cash receipts posted within the date range specified, and can show the cash received by customer by invoice, or as entered (same order as the deposit slip). It will print customer ID and name, invoice number, check number, the date each cash payment was received, amount received, and any discounts and allowances. This report should be printed daily and should match the total of the deposit slips for the bank. This report should also be printed monthly for the entire month at the end of each month.
The report may be printed for a specified sales department, for counter sales, non counter sales, or both, and for all cash postings or only credit card charges. This allows you the flexibility to print reports for separate sales areas to balance to if they are posting cash and making out deposits.
Selecting this procedure will display the printer selection screen. Type the printer number and the number of copies and press ENTER. The system will next display the following input screen :
TopDate for this report
This is the cutoff date or the ending date for the period of time you wish this report to print. The system will insert today's date by default. Specify your cutoff date or just press ENTER to accept today's date.Start date
This date must be the same as or earlier than the cutoff date.NOTE: These two dates are the range of dates for this report. If you are doing a daily cash report, both dates would be today's date. If you are doing the monthly cash report, the cutoff date would be the last day of the month, and the start date would be the first day of the month.
Sales department (blank for all)
This is normally left blank and sales for all departments will be printed. If you want a report of a single sales department, specify that department ID here.
Specify a sales department [H] or press just ENTER for all departments.Print by customer (or as entered) NO
Type YES and this report will be organized by customer, by invoice. This will group all postings for that customer together with a sub-total, by check, which may aid you in balancing to the check(s) received from that customer.Type NO and this report will be organized "as entered", meaning the same order as you originally entered the cash receipts from the deposit slip.
Print (C)counter, (N)ot counter, or (B)oth B
Specify whether to print cash receipts from the sales counter, non-counter sales, or both.Print (C)harges only or (A)ll
Normally All. Press C if you only want charges cash postings printed.Correct? (Y/N/E) Y
If you want to exit without running this report, press "E" ENTER. Press NO ENTER to go back and make changes. When you are ready to continue, press YES ENTER and you report will be printed.Correct ? YES
Type NO ENTER to go back and make any changes or press just ENTER to continue. your report will be printed and you will return to the 1-5 Invoice Information menu.
CAUTION: Your accounting policy may require keeping this information until after the fiscal year is closed.
This procedure clears the retainage entries for the specified job if there is a net zero retainage. The retainage entries can not be cleared until the retainage has been billed. This selection will display the following input screen :
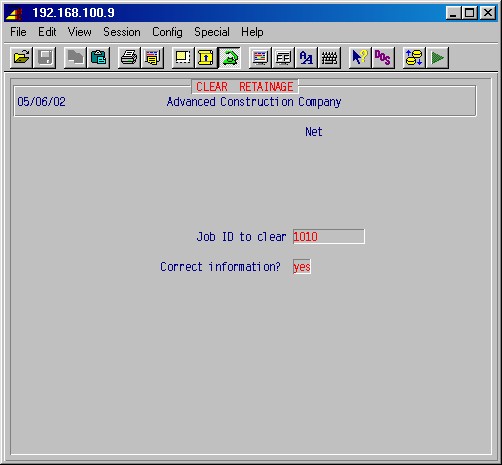
Job ID to clear
Specify the job ID [H] and press ENTER.Correct information? YES
Answer NO and correct if necessary or press just ENTER to run the procedure.
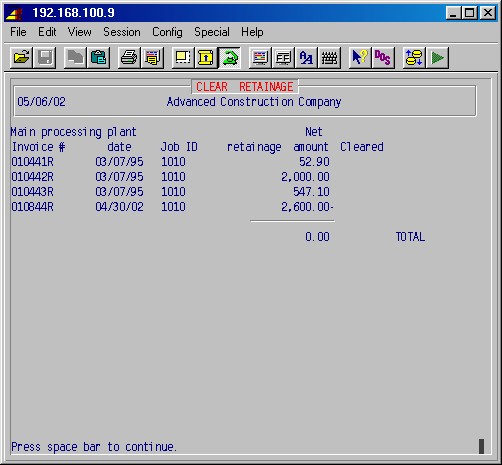
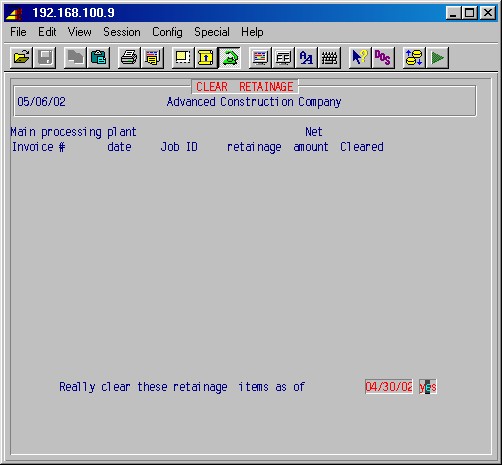
This procedure is a reconciliation aid to balance your cash drawers each day (or as required by your company). This selection will first prompt:
Reconcile which cash drawer?:
Specify the cash drawer [H] you wish to reconcile and press ENTER. The system will display the following input screen:
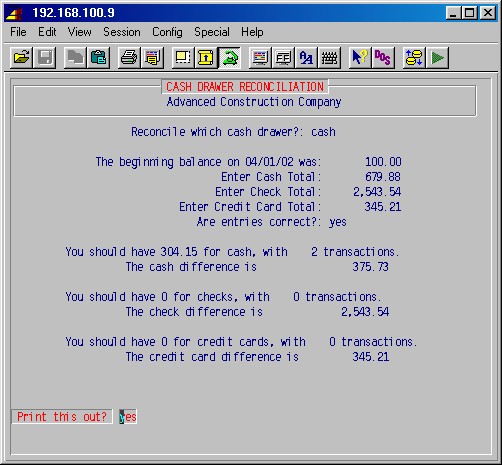
Enter cash total
Enter check total
Enter the credit card total
Enter the total of the cash in the drawer, the check total, and the total of the credit card slips as requested.
Are entries correct?: YES
Answer NO and correct if necessary or press just ENTER to continue.
If all three items are in balance with the day's work, the
system will display the message:
Congradulations! All values match with the computer.
Print this out? YES
If all items are not in balance with the day's work, the system will display the amount you are out of balance as shown in the first screen above.
Print this out? YES
You cannot close out this drawer until a report is printed. If you miscounted the cash or other items you would answer NO and re-enter the figures. If you are ready to proceed press YES ENTER. The printer selection screen will next be displayed. Type the printer number and the number of copies and press ENTER. Your report will be printed, and the system will prompt:
Printing Complete.
Do you want to clear the drawer's
totals and reset the beginning balance?
YES
This allows you to clear out the checks, credit card slips, and the extra cash, leaving a specified amount of cash for the next day or the next person. Press just ENTER to continue and the system will prompt:
Beginning balance for drawer 1: 100.00
Specify the amount of cash you are leaving in the drawer and press ENTER. The system will give you one last chance to change your mind and prompt:
Are you sure you want to clear and reset? NO
Press YES ENTER to continue and complete this procedure.
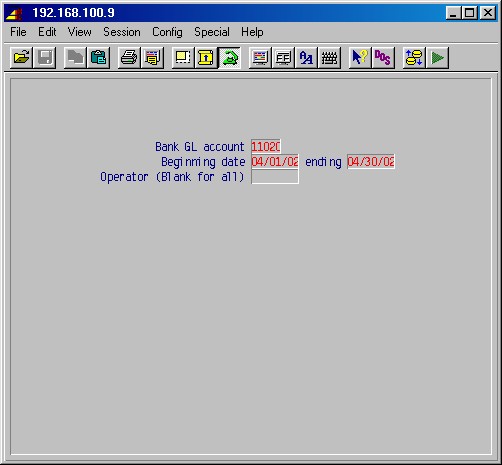
TopEnter the GL account number that was entered when posting miscellaneous cash in 1-15-1-3, the date range for which you wish cash postings printed, printer number and number of copies, and the report will print.
These procedures distribute sales, costs and cash receipts to the general ledger journal. The postings created will affect the ledger accounts specified in the sales departments set up in 1-4-1 Sales Type Maintenance. The postings are printed in summary and may be reprinted if desired. This selection will display the following menu:
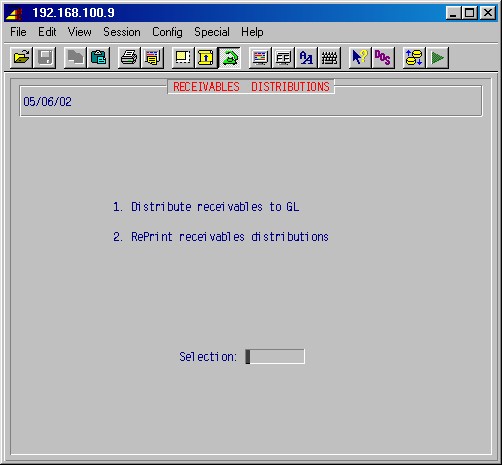
This distribution should normally be run every day or two, and must be run at least monthly before the ledger is updated and statements are run. The procedure allows you to distribute cash only, and in fact, has to be run twice - once for cash and again for sales and costs. The final part of this procedure prints a distribution report which should be reviewed and preserved. This selection will display the following input screen :
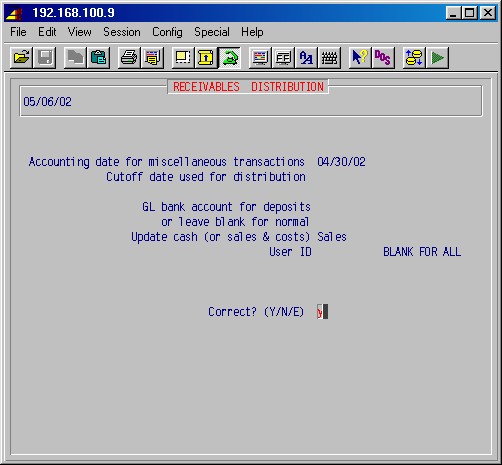
Accounting date for miscellaneous transactions
The date of the invoice or cash receipt governs the accounting date. You must provide this date for any miscellaneous transactions that may not be dated for any reason. The system will suggest today's date, which may be changed as required or press just ENTER.Cutoff date used for distribution
Normally, leave the cutoff date blank to distribute all receivables which have not previously been distributed. All the sales, costs and cash receipts generated since the last distribution and through the cutoff date (if entered, otherwise for all dates) will be sent to the ledger journal.GL bank account for deposits or leave blank for normal
Normally, just press ENTER here. Specifying a GL account here will override the cash account in the sales departments. Do not do it unless there is an accounting reason for this exception.Update cash only (or sales & costs) NO
As described above, answering NO here will distribute sales and costs, and answering YES will distribute cash only. If you have both cash postings and sales (invoicing), you must run this step twice to distribute all entries.Correct? (Y/N/E) N
Type NO ENTER to go back and make changes or type "E" to exit this procedure. If you are ready to continue press YES ENTER. Your receivables will be distributed and the system will prompt for printing format as follows:
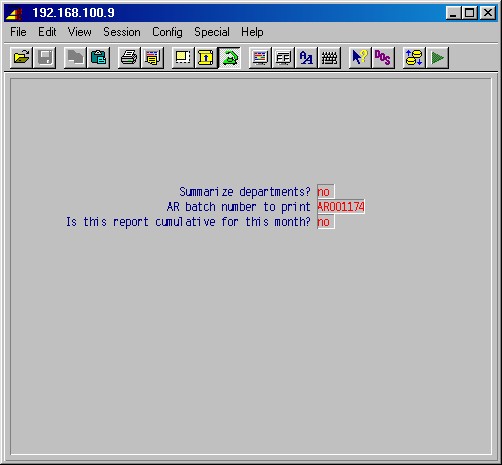
Top
Summarize departments NO
Answer NO by pressing just ENTER if you want the detail of these postings by sales departments. If you do not need the detail, press YES ENTER.AR cycle number to print
This is a machine generated "batch number" for these postings and will be printed on the report.Is this report cumulative for this month? NO
If you are printing just the current postings (which is almost always the case in this step), press just ENTER here. You may also run a cumulative report for the month by pressing YES ENTER.The printer selection screen will now be displayed. Type the printer number and the number of copies and press ENTER and your distribution will be printed.
This step is used to reprint the postings distributed to the ledger journal in 1-16-1 above. This selection will display the following input screens :
TopAccounting date for miscellaneous transactions
Select the date for which you want to print AR transactions (or any date in the month, if you select cumulative for the month below). The system will suggest today's date, which may be changed as required or press just ENTER.Cutoff date used for distribution
This date is not being used in this step and can be left blank.Correct? (Y/N/E) N
Type NO ENTER to go back and make changes or type "E" to exit this procedure. If you are ready to continue press YES ENTER and the system will prompt for printing format as follows:Summarize departments NO
Answer NO by pressing just ENTER if you want the detail of these postings by sales departments. If you do not need the detail, press YES ENTER.AR cycle number to print
This is a machine generated "batch number" for these postings and will be printed on the report. The previous posting's batch number will be suggested. If you want to re-print any other batch, you must specify the cycle number.Is this report cumulative for this month? NO
If you are printing just the current postings (which is almost always the case in this step), press just ENTER here. You may also run a cumulative report for the month by pressing YES ENTER.The printer selection screen will now be displayed. Type the printer number and the number of copies and press ENTER and your distribution will be printed.
These procedures provide a number of standard and specialized AR aging and analysis reports for accounting subsidiary journals and for management purposes. This selection will display the following menu:
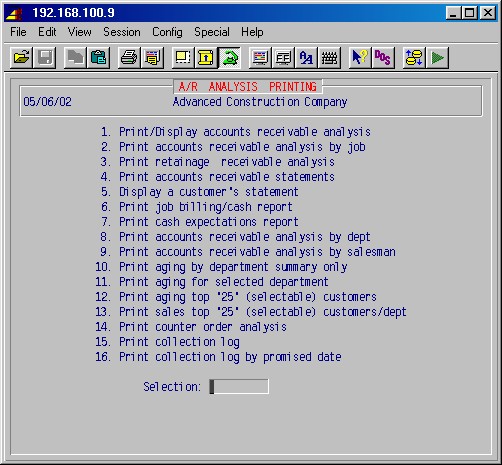
TopPlease note: Two asterisks (**) may appear at the far right on aging reports. ** indicates the aged amount is OVER 120 days due.
This procedure prints an AR aging report showing the unpaid balance of specified invoices dated through the aging date, subtotaled by customer. The report will age your receivables by invoice date or by due date into four aging categories: 1-30 days, 31-60 days, 61-90 days, and over 90 days. You may customize your report by branch, customer, sales type, and division, summarize by customer, and sort by customer ID or customer name. You may also display a summary of the AR aging showing the totals for each aging category and a total of all outstanding invoices per your aging criteria. This selection will first prompt:
Has cash already been applied to invoices
which should be on this aging? NO
Answering this question YES will produce an aging that shows all invoices dated through a specified date even though payments have subsequently been posted to the invoices.
Example: If this is the 10th of the month, you can answer this question YES and print an AR aging report as of the last day of the previous month which shows all invoices with balances still due at the previous month's end, even though payments have been made on some of those invoices since the end of the month.
Press just ENTER to produce a report of invoices still due which does not add back subsequent payments. The system will display the following input screen:
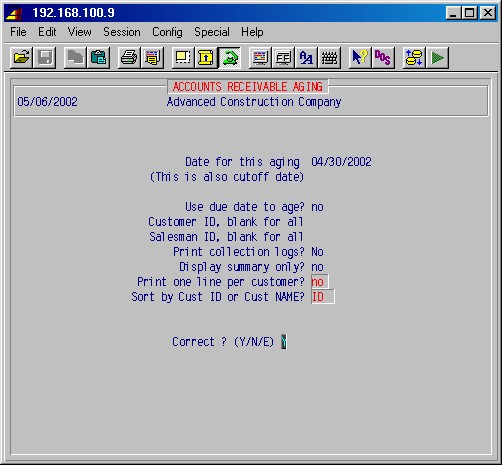
Top
Date for this aging (This is also cutoff date)
Press ENTER for today's date or specify the date and press ENTER. This date will appear on the report and is also a cutoff date.Use due date to age? NO
Press just ENTER to age the receivables for this report by the date of the invoice. Press YES ENTER to age the receivables by the due date.Customer ID, blank for all
If you want a report for just one customer, specify the customer ID; otherwise, leave blank to print all customers with outstanding invoices.Next select the Sales Type(s) to include:
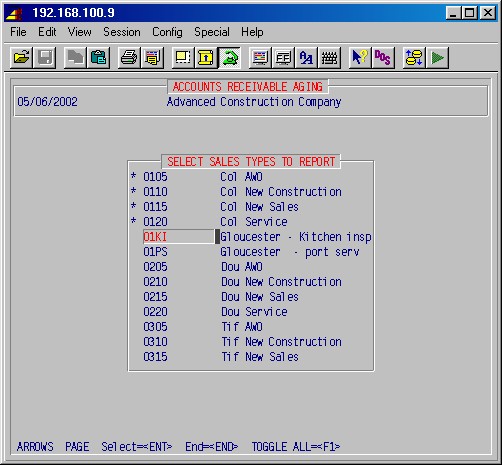
Next select the division(s) to include:
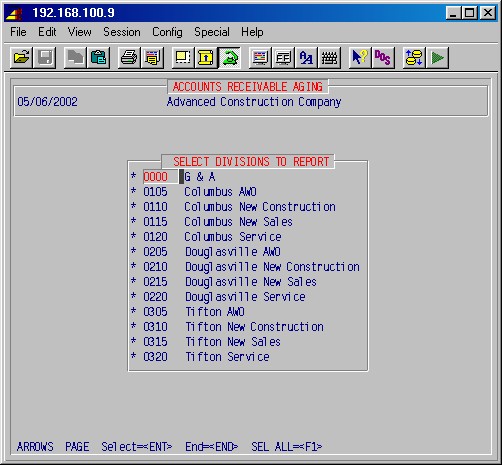
Sales type, blank for all
If you want a report for just one sales type, specify the sales type ID; otherwise, leave blank to print all sales types.Salesman ID, blank for all
If you want a report for just one salesman, specify the salesman's ID; otherwise, leave blank to print invoices for all salesmen.Division ID, blank for all
If you want a report for just one division, specify the division ID; otherwise, leave blank to print all divisions.Display summary only NO
If you want to just display on the screen (without printing) a summary of all AR invoices per the criteria you have selected, answer YES. The screen will show you a summary of totals by aging category and total balance.Print one line per customer
Type Yes if you want a summary, showing only the totals line for each customer.Sort by customer ID or customer NAME? ID
Press just ENTER to sort by customer ID or type "N" for name to sort by customer name.Correct ? (Y/N/E) Y
Type NO ENTER to go back and make changes or type "E" to exit this procedure. If you are ready to continue press YES ENTER.The printer selection screen will next be displayed. Type the printer number and the number of copies and press ENTER. Your report will be printed and you will return to the previous menu.
This procedure prints an AR aging report by job showing the unpaid balance of specified invoices dated through the aging date. The report will age your receivables by invoice date or by due date into four aging categories: 1-30 days, 31-60 days, 61-90 days, and over 90 days. You may also display a summary of the AR aging for a job or all jobs, showing the totals for each aging category and a total of all outstanding invoices per your aging criteria. This selection will display the following input screen :
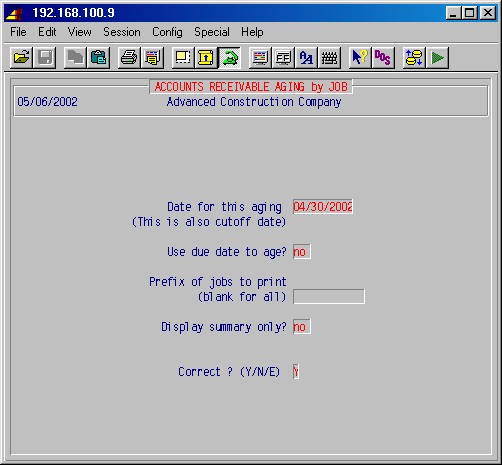
Top
Date for this aging (This is a cutoff date)
Press ENTER for today's date or specify the date and press ENTER. This date will appear on the report and is also a cutoff date.Use due date to age? NO
Press just ENTER to age the receivables for this report by the date of the invoice. Press YES ENTER to age the receivables by the due date.
Prefix of jobs to print (blank for all)
If you want to print an aging for just one job, specify the job ID [H]; otherwise, leave blank to print an aging for all jobs.
Display summary only NO
If you want to just display on the screen (without printing) a summary of all AR invoices per the criteria you have selected, answer YES. The screen will show you a summary of totals by aging category and total balance.
Correct ? (Y/N/E) Y
Type NO ENTER to go back and make changes or type "E" to exit this procedure. If you are ready to continue press YES ENTER.
The printer selection screen will next be displayed. Type the printer number and the number of copies and press ENTER. Your report will be printed and the system will return to the previous menu.
This procedure prints a report of the balance of all AR retainage invoices dated through the cutoff date, subtotaled by customer. This selection will display the following input screen :
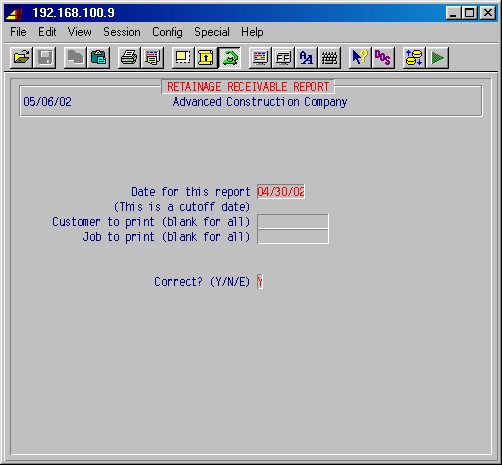
TopDate for this report (This is a cutoff date)
Press ENTER for today's date or specify the date and press ENTER. This date will appear on the report and is also a cutoff date.Customer to print (blank for all)
If you want a report for just one customer, specify the customer ID; otherwise, leave blank to print all customers with outstanding retainage invoices.Job to print (blank for all)
If you want to print a retainage receivable report for just one job, specify the job ID [H]; otherwise, leave blank to print a report for all jobs.Correct ? (Y/N/E) Y
Type NO ENTER to go back and make changes or type "E" to exit this procedure. If you are ready to continue press YES ENTER.The printer selection screen will next be displayed. Type the printer number and the number of copies and press ENTER. Your report will be printed and the system will return to the previous menu.
This procedure prints customer AR statements showing the unpaid balance of all invoices dated through the statement date. Options are available to show paid invoices and payments, and you may type a special message to be printed on the statements if desired.
If you have specified a late charge percentage for a customer in 1-1-1 Customer Maintenance, late charges will be calculated and show on the statement as "finance charges". Interest is compounded for finance charges from the date of the invoice. There are two options for these finance charges which are set in the control records in 13-8-3. The default setting will show the finance charge as a memo entry each month for that month only, and the amount will not be part of the accounting and will not carry over from month-to-month. You have the option of creating monthly finance charge invoices for these amounts which the system handles just like invoices created any other way and show as invoices outstanding on the customer's statement and in the accounting. Prompts for "Print on plain paper"?
This selection will display the following input screen :
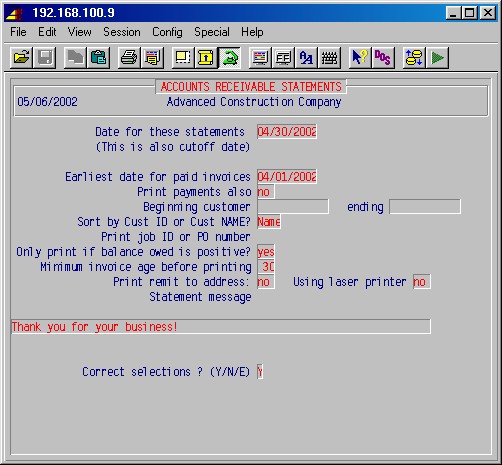
Top
Date for these statements (This is also a cutoff date)
Press ENTER for today's date or specify the date and press ENTER. This date will appear on the statement and is also a cutoff date.Earliest date for paid invoices
This allows you to specify whether the report should include paid invoices and for what period of time. If you don't want to show any paid invoices, specify NO to print payments.Print payments also NO
If you want to print payments on the statement, generally for just the last month, press YES ENTER; if not press just ENTER.
Customer to print or RET for all
If you want to print a statement for one customer only, specify the customer ID; otherwise, leave blank to print a statement for all customers.Sort by Cust ID or Cust NAME? ID
Press just ENTER to sort by customer ID or type "N" for name to sort by customer name.Only print if balance owed is positive?
Answer YES to only print customers who owes money.Print Remit To Address:
Answer YES to print the "Remit to" address (your company name and address).Statement message
Here you have the option of typing any one-line message which you want to appear on the statement(s). The system suggests a message, "Thank you for your business!" which you can use by just pressing ENTER. To type your own message, just start typing and the suggested message will disappear leaving only your message. For no message, blank out the suggested message with the space bar and press ENTER.Correct selections ? (Y/N/E) Y
Type NO ENTER to go back and make changes or type "E" to exit this procedure. If you are ready to continue press YES ENTER.The printer selection screen will next be displayed. Type the printer number and the number of copies and press ENTER. Your report will be printed and you will return to the previous menu.
This procedure allows you to display a customer's statement on the screen according to invoice dates and jobs you select, with or without payments. The last screen will show you an aging summary which you may age by the due date or the invoice date. This selection will display the following input screen :
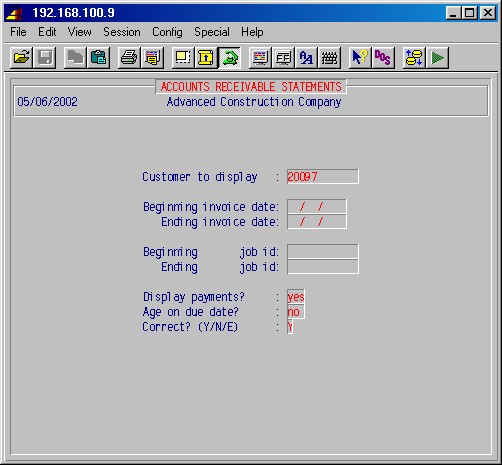
Customer to display
Specify the customer ID [H] for the customer's statement you wish to display. Leave blank to exit this step.Beginning invoice date: / /
Ending invoice date: / /
Specify the range of invoice dates you wish to view.Beginning job ID
Ending job ID
Specify the range of jobs, by job ID's you wish to view or just press ENTER to include all jobs. If you want to view all invoices for one job, put that job ID in both fields.Display payments? YES
If you want to display paid invoices with their payments, press YES ENTER; if not press just ENTER.Age on due date? NO
Press just ENTER to age the receivables for this report by the date of the invoice. Press YES ENTER to age the receivables by the due date.Correct ? (Y/N/E) Y
Type NO ENTER to go back and make changes or type "E" to exit this procedure. If you are ready to continue press YES ENTER.The system will display the statement as you have specified, one page at-a-time. Below is a sample of what this screen looks like :
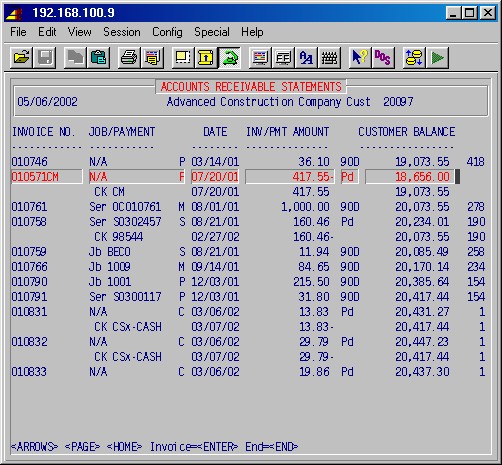
Use the ARROW, PAGE and HOME (first/last) keys to move to the invoice you wish to see. Press ENTER on a highlighted invoice to see details of that invoice (there you can press F1 to see the body of the invoice, F4 to see payments, etc.).
Press END when done, and you'll be prompted:Answer YES if you want to print what you've just seen. Press ENTER.
You'll then see an aging summary of the balance of all invoices you selected to view. The following is a sample of what this last summary screen looks like :
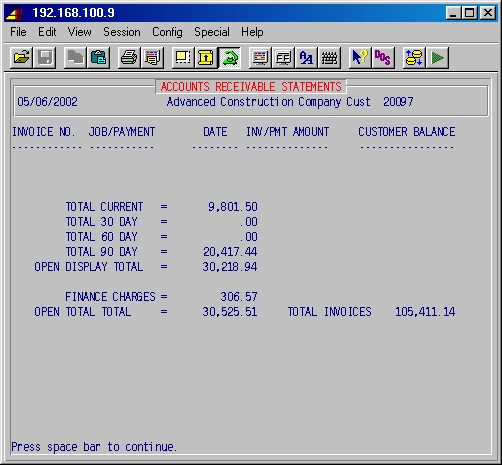
TopPressing the space bar again will take you back to the input screen where you may specify another customer ID. Notice that the original criteria are still shown in the fields to facilitate viewing other customers. If you wish to leave the criteria the same, simply type another customer ID and press F1. To exit this area, leave the customer ID field blank and press F1.
This procedure prints an AR report for a specified job showing all invoices, sorted by invoice number, and payments against those invoices. The date and invoice amount is listed, as well as all cash posted against each invoice, check numbers, discounts, allowances, and balance open. Totals are provided for each category.
Selecting this procedure will display the printer selection screen. Type the printer number and the number of copies and press ENTER. The following input screen will then be displayed :
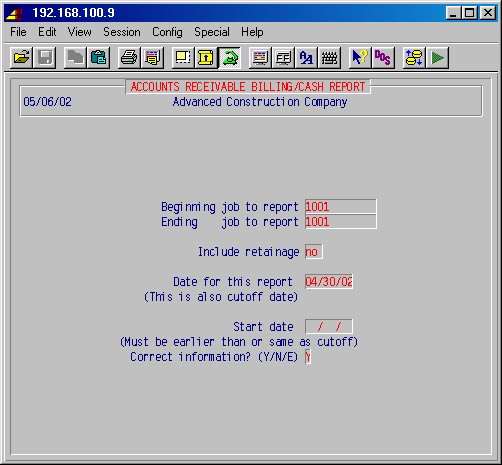
Top
Job to report
Specify the job ID [H].Include retainage
Answer Yes to include retainage invoices. Press ENTER.Date for this report (This is also a cutoff date)
Press ENTER for today's date or specify the date and press ENTER. This date will appear on the report and is also a cutoff date.Start date (Must be earlier than or same as cutoff)
This date and the cutoff date provide the range of dates for this report.Correct information? (Y/N/E) Y
Type NO ENTER to go back and make changes or type "E" to exit this procedure. If you are ready to continue press YES ENTER. The system will print the report and return to the previous menu.
This procedure will print an AR cash expectations report which presents how much cash can be expected to be received to if all invoices due at four user defined future dates are paid by the due date. The report is organized by customer ID showing all invoices by job and any invoice amounts due by the four specified dates and totals by date.
Selecting this procedure will display the printer selection screen. Type the printer number and the number of copies and press ENTER. The following input screen will then be displayed :
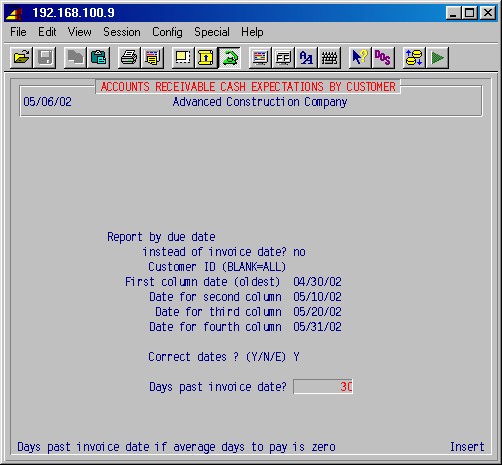
TopReport by due date instead of invoice date? YES
Press just ENTER to use the due date for this report. Type NO ENTER to use the invoice date.First column date (oldest)
Date for second column
Date for third column
Date for fourth column
Four dates are required for this report to run. Specify four dates starting with the oldest. For example: You might choose four weekly dates starting one week into the future.Correct dates ? (Y/N/E) Y
Type NO ENTER to go back and make changes. If you are ready to continue, press YES ENTER. Your report will be printed and the system will return to the previous menu.
This procedure prints an AR aging report, by department, showing the unpaid balance of specified invoices dated through the aging date, subtotaled by customer. The report will age your receivables by invoice date or by due date into four aging categories: 1-30 days, 31-60 days, 61-90 days, and over 90 days. You may also display a summary of the AR aging showing the totals for each aging category and a total of all outstanding invoices per your aging criteria. This selection will display the following input screen :

Top
Date for this aging (This is also a cutoff date)
Press ENTER for today's date or specify the date and press ENTER. This date will appear on the report and is also a cutoff date.Use due date to age? NO
Press just ENTER to age the receivables for this report by the date of the invoice. Press YES ENTER to age the receivables by the due date.Display summary only? NO
If you want to just display on the screen (without printing) a summary of all AR invoices per the criteria you have selected, answer YES. The screen will show you a summary of totals by aging category and total balance.
Correct ? (Y/N/E) Y
Type NO ENTER to go back and make changes or type "E" to exit this procedure. If you are ready to continue press YES ENTER.The printer selection screen will now be displayed. Type the printer number and the number of copies and press ENTER. Your report will be printed and the system will return to the previous menu.
This procedure will print an AR aging report, by salesman, showing the unpaid balance of specified invoices dated through the aging date, subtotaled by customer. The report will age your receivables by invoice date or by due date into four aging categories: 1-30 days, 31-60 days, 61-90 days, and over 90 days. You may also display a summary of the AR aging showing the totals for each aging category and a total of all outstanding invoices per your aging criteria. This selection will display the following input screen :
Top
Date for this aging (This is also a cutoff date)
Press ENTER for today's date or specify the date and press ENTER. This date will appear on the report and is also a cutoff date.Use due date to age? NO
Press just ENTER to age the receivables for this report by the date of the invoice. Press YES ENTER to age the receivables by the due date.Display summary only? NO
If you want to just display on the screen (without printing) a summary of all AR invoices per the criteria you have selected, answer YES. The screen will show you a summary of totals by aging category and total balance.Correct ? (Y/N/E) Y
Type NO ENTER to go back and make changes or type "E" to exit this procedure. If you are ready to continue press YES ENTER.The printer selection screen will now be displayed. Type the printer number and the number of copies and press ENTER. Your report will be printed and the system will return to the previous menu.
This procedure will print a summary AR aging report, by department for all departments, showing the total past due invoice balances of all invoices that are 30 days or more past due, aged in five previous monthly categories, a category of "over 180 days", and a total column. This selection will display the printer selection screen. Type the printer number and the number of copies and press ENTER.
This procedure will print a detailed AR aging report for a selected department showing all past due invoices and balances of invoices 30 days or more past due, aged in five previous monthly categories, a category of "over 180 days", a total for each category and a grand total at the bottom. This selection will first prompt:
Enter Sales Type To Print:
Specify the sales department for this report by department ID [H] and press ENTER. The printer selection screen will then be displayed. Type the printer number and the number of copies and press ENTER. Your report will be printed and the system will return to the previous menu.
This procedure will print an AR aging of the total of all invoices for the top 25 customers with the highest total balances. This report is sorted by customer name and shows the total invoices for each customer, current, 31-60 days, 61-90 days, over 90, and retainage. You also have the option of printing all customers if you wish.
You may change 25 to any number you wish, e.g. top 10.
This selection will display the following input screen :
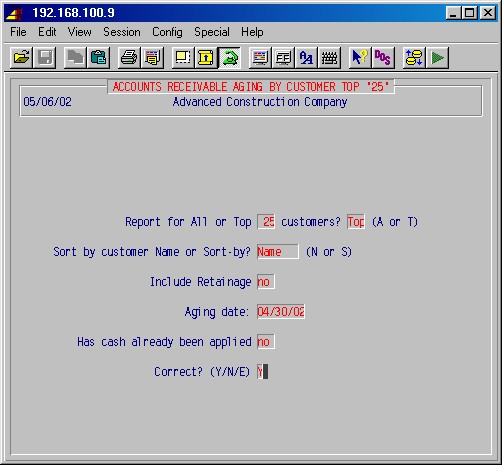
Top
Select the printer number and the number of copies and press ENTER to display the next prompt.
Report for All or Top 25 customers? Top (A or T)
Change 25 to any number you wish; press ENTER.
Type A if you want all customers listed; press ENTER.Sort by customer Name or Sort-by? Sort-by (N or S)
If you want customers listed in order of customer name rather than the value in their "Sort by" field, type N here; press ENTER.Include retainage
Answer YES to include retainage invoices. Press ENTER.Aging date
Specify the cutoff date for this aging. The report will show both today's date and the cutoff aging date.Has cash already been applied
Answer YES if you want an aging that shows all invoices dated through the aging date even though payments have subsequently been posted to the invoices.Correct? (Y/N/E) N
Type NO ENTER to go back and make changes or type "E" to exit this procedure. If you are ready to continue press YES ENTER.
This procedure will print an AR sales analysis report for the 25 (selectable) customers with the highest total invoices with the five sales departments of your choice. This report compares the percentage of business, measured in outstanding invoices, for each of these customers for each sales department category you have selected.
This report will display the following input screen :
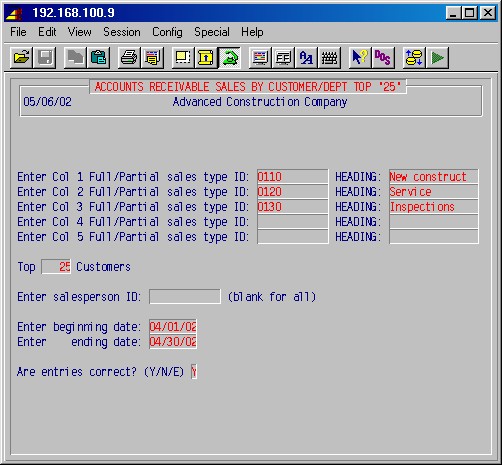
TopEnter Col 1-5 Beginning department ID
Heading
Specify up to 5 department IDs and the headings you want on this report.Top 25 Customers
Change this number to as many or few customers as you wish; press ENTER.Salesman ID
If you want to limit the report to just one salesman, enter his ID here; press ENTER.Enter beginning date
Enter ending date
Specify the range of dates for this report.Are entries correct? (Y/N/E) Y
Type NO ENTER to go back and make changes or type "E" to exit this procedure. If you are ready to continue press YES ENTER.The printer selection screen will now be displayed. Type the printer number and the number of copies and press ENTER. Your report will be printed and the system will return to the previous menu.
This report will display the following input screen :
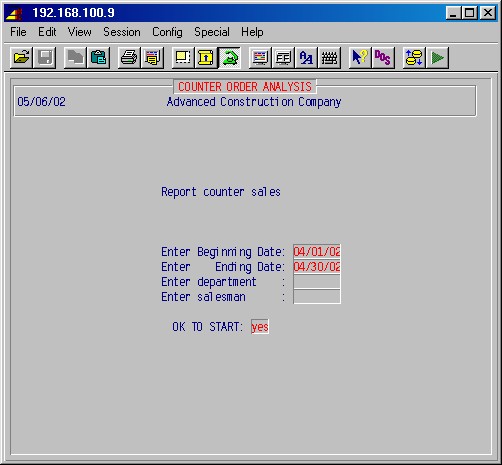
TopEnter Beginning Date:
Enter Ending Date:
Specify the range of dates for this report.Enter department:
If you want to limit the report to just one department, enter it here.Enter salesman:
If you want to limit the report to just one salesman, enter his ID here.OK TO START:
Just press ENTER to start printing.
This selection will print the entries in the collection log for a range of customers in a date range of collection log notes, with an option to print only unpaid invoices or all invoices.
NOTE: These totals are not used for any accounting purpose and clearing them will not affect general ledger or job cost.
This procedure will selectively clear the totals for MTD and optionally YTD purchases from the customer records (viewed in 1-1-1 AR Customer Maintenance), salesmen totals (viewed in 1-4-7 Salesmen Maintenance, and sales types (viewed in 1-4-2 Sales Type Totals). It also allows you to calculate customer payment statistics. This step is generally run monthly. This selection will display the following input screen :
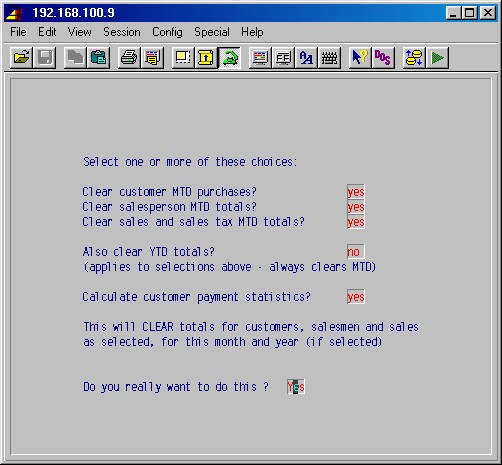
Clear customer MTD/YTD purchases? NO
Answer Yes if you want to clear month-to-date (MTD) and optionally year-to-date (YTD) customer purchase totals (as viewed in 1-1-1 AR Customer Maintenance).
Clear salesman totals? NO
Answer Yes if you want to clear month-to-date (MTD) and optionally year-to-date (YTD) salesman totals (as viewed in 1-4-6 Salesperson Maintenance).
Clear sales and sales tax totals? NO
Answer YES if you want to clear month-to-date (MTD) and optionally year-to-date (YTD) sales type and sales tax totals (as viewed in 1-4-2 Sales Type Totals).
Clear year to date totals? NO
This question applies only to those items above which you answered YES to.
Answer this Yes only if you are clearing the totals at the end of the year. This could be your fiscal year end (FYE) or the calendar year end, depending on how you do your accounting. This step needs to be done before any new invoices are entered for the new period.
Calculate customer payment statistics?
Answering YES to this will calculate customer payment statistics with the following options:
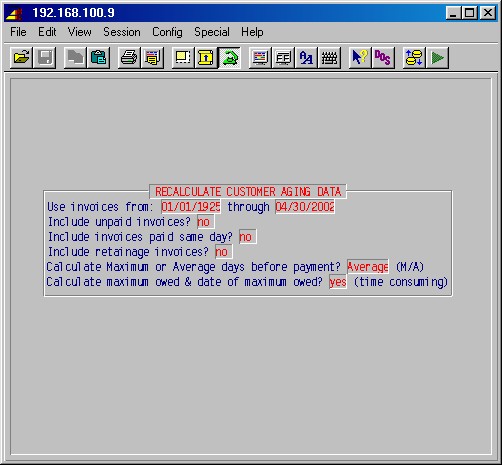
Use invoices from: through
Enter the date range for invoices you want to be used in the calculations.
Include unpaid invoices?
If you answer YES here, then currently unpaid invoices will be included in the calculations, using the last date above to calculate number of days open (unpaid).
Include invoices paid same day?
Answering YES to this will reduce the number of average days.
Include retainage invoices?
If you answer YES here, then retainage invoices will be included in the calculations.
Calculate Maximum or Average days before payment?
You may either calculate the number of days of longest outstanding invoice (Maximum) or the Average days before payment of invoices. This number will be shown on customer aging reports and on the 1-1-2: Miscellaneous Customer Data screen.
Calculate maximum owed & date of maximum owed?
This will increase the time it takes to run this step and can be answered NO if you don't need this. If calculated, this information can be seen on the 1-1-2: Miscellaneous Customer Data screen as Highest balance and Date of highest balance. For each invoice date for a customer, the system will calculate the balance outstanding as of that date in order to arrive at the date and amount of the highest amount owed by the customer.
Do you really want to do this ? NO
Press just NO ENTER if you are not sure or you want to abort this procedure and exit. If you are ready to go ahead, press YES ENTER.
The selected totals will be cleared and/or payment statistics calculated and the system will return to the previous menu.
TopThis selection displays the following menu:
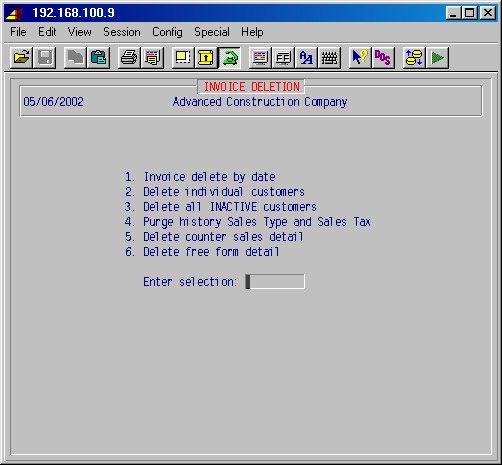
NOTE: Since this step can take some time to run, selecting dates which delete only a part of the invoices at a time may be desirable.
This procedure frees up space on your computer and should be performed at least yearly in accordance with your policies, generally after the fiscal year is closed.
CAUTION! As some job cost reports look to AR invoices to determine the billed amounts for a job, do not delete invoices closer to present time than the starting date of your earliest open job.
The system will first prompt:
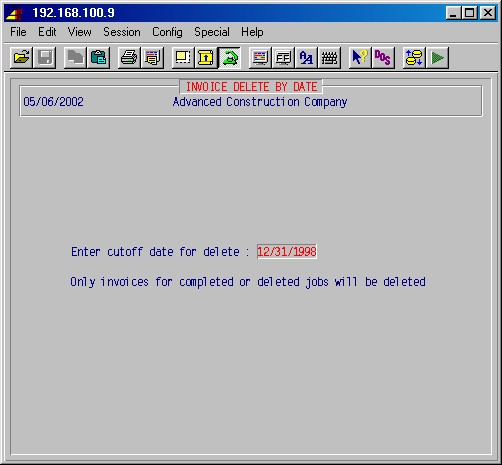
TopEnter cut-off date for delete : / /
Specify the cut-off date for those paid invoices you wish to delete. This date should be prior to the beginning of the fiscal year. Typically, this date is one year prior to today's date, or earlier, and its choice will delete all paid invoices through that date. The system will then prompt:Are you sure you want to delete invoices thru / / NO
If you are not sure, press just ENTER to abort this procedure. If you have checked the date and are ready to proceed, press YES ENTER. The invoices will be deleted and the system will return to the previous menu.
You will not be allowed to delete a customer if the customer has:
* any job
* any open (unpaid) or recent (60 days) AR invoice
* any unbilled service order
All AR invoice detail and service orders for the customer will also be
deleted.
The system will prompt:
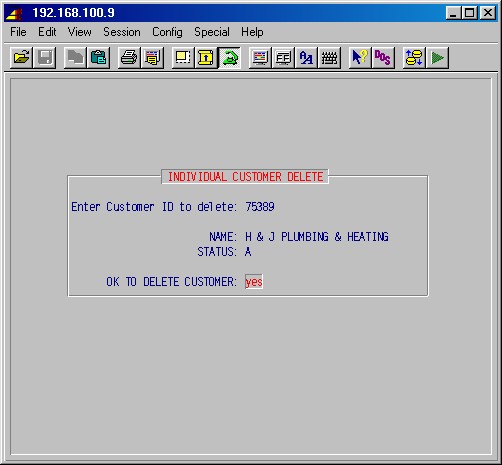
Enter Customer ID to Delete:
Enter the ID [H] of the customer you wish to delete.
If you entered a valid customer ID, the customer's name and status will be displayed.
Leave blank and press ENTER to leave this procedure.
OK TO DELETE CUSTOMER:
If you are sure that you really want to delete the customer, type YES here and press ENTER. The computer will work for a while and you will again be prompted for a customer ID.
This procedure will delete all customers with a status of I (inactive).
The same rules apply as in 1-19-2.
CAUTION! This procedure starts deleting inactive customers immediately when selected from the 1-19 Delete Processing menu - there are no prompts to confirm that you really want to run this procedure.
© 2002 SI Systems, Inc.
2323 Belleair Road
Clearwater, FL 33764
800/422-2277, 727/531-0669
Fax: 727/536-8858