The Service Billing / Time and Materials system allows you to quote, write, change, and invoice orders for time and materials. This selection is designed for those times when you send out a service person without knowing exactly what time and materials will be required. The billing may or may not be related to a job ID set up in the job cost portion of the system.
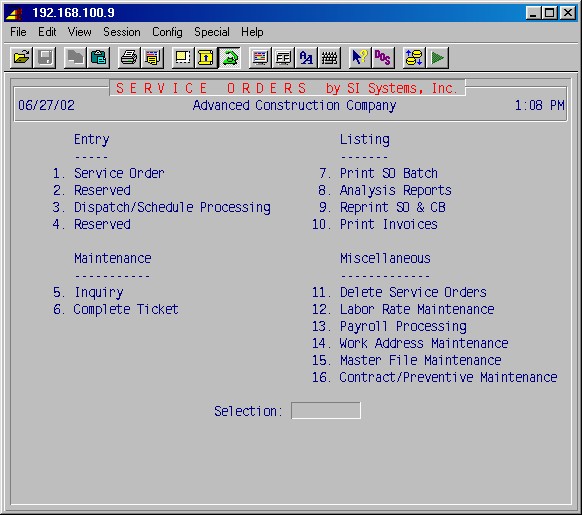
From the main menu, selecting #2 Service Billing (T & M) will display the Service Orders Main Menu. The selections on this menu are divided into four groups.
Service orders are originated and charges added with these procedures. A new service order is created in 2-1: Service Order, where detailed information is entered concerning the customer, the job, description of work, and special instructions. The SO may be printed immediately or later in a batch.
Selection 2-3: Dispatch/Schedule Processing, (when purchased) gives access to a Dispatch Board that allows you to schedule and keep track of service orders until they have been completed.
Selection 2-4 is used by fire protection companies to bill service orders.
Selection 2-5: Inquiry, allows listing and viewing service orders in various ways.
Selection 2-6: Complete Ticket, allows you to change the status of the SO as it goes through the various stages from starting date to the final billing and add the charges for material, labor, and miscellaneous expenses, as well as view the invoice total.
These procedures are used for printing service orders and the final invoices. Selection 2-7: Print SO Batch will print all service orders that were not printed in step 2-1: Service Order Entry. Selection 2-8 contains various reports to review and analyze the gross profit on service orders by job and by technician.
Selection 2-9: Reprint SO & CB will reprint any service order or call back order if needed.
Selection 2-10 prints invoices on your choice of plain paper, letterhead, or standard invoice forms. You may also print an invoice on plain paper to review before you print the actual invoice to send to your customer.
Selection 2-11: Delete Service Orders allows you to delete closed SOs by customer or by date and close billed service orders.
Selection 2-12: Labor Rate Maintenance allows you to set up and maintain labor class tables with specified labor rates for billing service orders.
Selection 2-13: Payroll Processing allows printing time card edit reports for the service order time cards and transferring that time to the payroll system.
Selection 2-14 allows entering multiple work addresses for each customer to facilitate writing service orders for customers with multiple work site addresses.
In 2-15: Master File Maintenance, you may set up a list of Problem Codes for each entry of service orders, Lead Codes which allow you to keep a record of the sources of your service orders, Dispatch Boards, Trucks, Map Coordinates, Price Books, and Pager numbers for employees for automatic or manual paging.
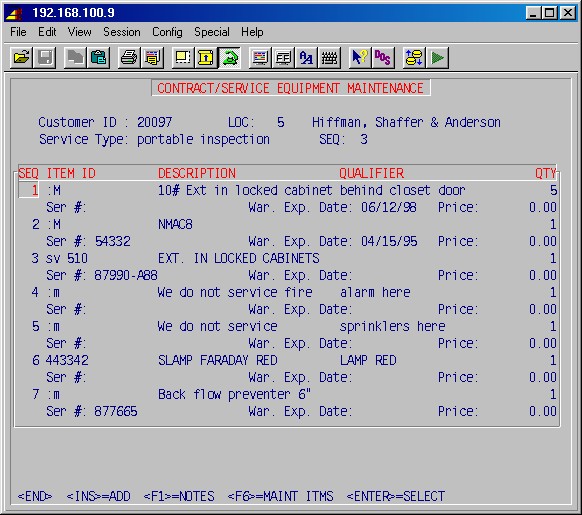
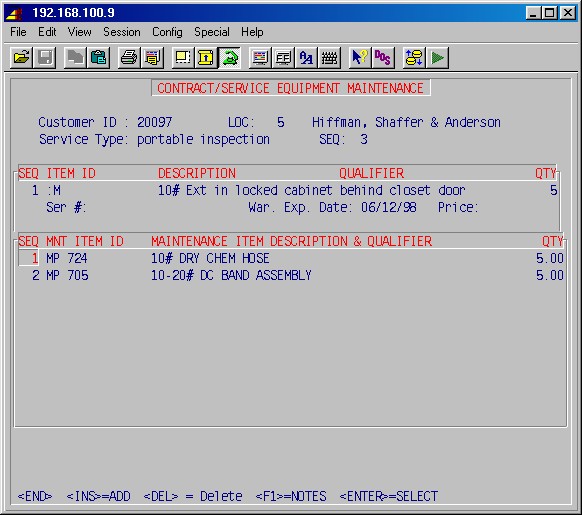
Selection 2-16: Contract/Preventive Maintenance, (when purchased) gives access to setting up service contracts, allowing for an unlimited number of service contracts per work address, with inspection schedule, notes, service history and lists of equipment (with lists of needed maintenance items from inventory for each piece of equipment) for each contact. This area also lets you automatically generate the service orders to be done per the service contracts.
There are several service order areas that must be set up before you can use the service order module. The following setups should be completed in order:
General Setup
The following areas should already have been set up with printers, sales types, employees and payroll departments to be used in the following setups as noted:
13-3: Printer Designation & Codes, used in 13-8-6 below.
1-4-1 Sales Type Maintenance, used in 2-15-3 and 2-15-8 below.
5-1-1: Employee Maintenance, used in 2-15-7 below.
5-5-1: Department Maintenance, used in 13-8-6 below.
The job service should already have been set up in 7-1-1: Job Description Maintenance.
The item with ID :M should already have been set up in 8-1: Inventory Maintenance.
Selecting 13-8-6: Service Orders from the Main Menu presents this input screen :
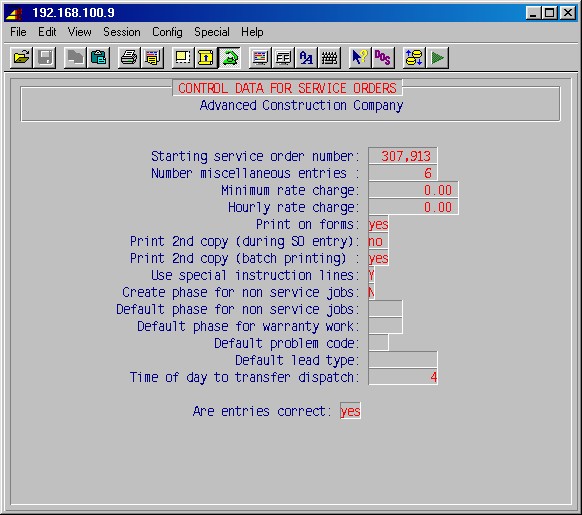
Starting service order number:
This is used in the automatic numbering of service orders during entry. Enter the first number to be used, e.g. 300,000 will number the first service order entered as SO300000, thus establishing 6 digit service order numbers.
Number miscellaneous entries:
This determines the number of available miscellaneous charges you can set up to choose from during service order billing (see the second screen following this). Enter a number from 0 to 8.
Minimum rate charge:
Not used.
Hourly rate charge:
Not used.
Print on forms:
Enter YES if you want service orders to be printed in a format that fits our standard form, or enter NO to have them print on plain paper.
Print 2nd copy (during SO entry):
If you are printing service orders on plain paper, you may want 2 copies printed. If so enter YES here to have 2 copies printed when you ask to have a service order printed immediately following entry.
Print 2nd copy (batch printing):
Same as above, but when printing service orders after entering a batch of them (2-7).
Use special instruction lines:
While entering a service order you may have four lines available to enter special instructions in addition to the standard six lines for "work description". Enter Yes here if you want these printed on service orders.
Create phase for non service jobs:
The default job for service orders is normally "Service" and when entering a service order a phase is created for the job "Service" with the phase ID of the service order number, e.g. "300001". If you also want phases created for jobs where the job ID is not "Service", enter Yes here.
Default phase for non service jobs:
If you have entered Yes above, you may enter the default phase ID here. If this is left blank, then the SO number will be the phase ID.
Default phase for warranty work:
Enter the phase ID for service orders done under warranty.
Default problem code:
Enter the problem code you want to automatically fill in when entering new service orders in 2-1 or leave blank to require operator input. (Problem codes must be set up in 2-15-1: Problem Code Maintenance.)
Default lead type:
Enter the lead type code you want to automatically fill in when entering new service orders in 2-1 or leave blank to require operator input. (Lead codes must be set up in 2-15-2: Lead Code Maintenance.)
Are entries correct:
If the above entries are correct, press ENTER to go to the next screen. Otherwise enter No to go back and correct one or more of the above.

% Labor burden:
Enter the labor burden in percent to be used in service order profit analysis reports. (Actual burden is calculated and posted to jobs during payroll processing, as determined by setups in 13-8-5: Payroll to Job Cost Burden/Fringe/Overhead, and as set up for individual jobs in 7-1-1, second screen #2, Billing information, fields #8, $/hour OH for payroll, and field #9, % Burden.)
Form Length Setting:
This is normally 30 for our standard form, but can be changed to match forms with fewer or more than 66 lines per form.
Alignment Adjustment:
Normally 8. Determines where the first line is printed on the form.
Default Job ID:
Normally "Service". However, see 2-15-3.
Default Payroll Dept:
Enter the payroll department to be automatically filled in (in the phase created for the service order, if any) when entering a new service order in 2-1.
Cost % Markup :M Item:
The item with ID ":M" is a special item set up in 8-1 (Inventory) and is used for material charges for items that are not in any inventory, i.e. miscellaneous material items. Enter the percentage you want the customer to be charged over your entered cost.
Post :M item costs to GL?
If you want the costs of ":M" items (see above) posted to the General Ledger, enter Yes here.
Are entries correct:
If the above entries are correct, press ENTER to go to the next screen. Otherwise enter No to go back and correct one or more of the above.
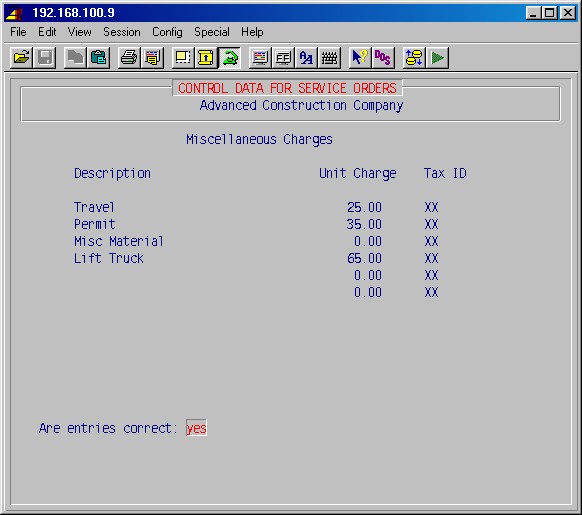
Here you set up the miscellaneous charges you can choose from when billing a service order.
Description
Enter the description of the charge.
Unit Charge
Enter the amount of this charge.
Tax ID
Enter the tax ID for this charge, use XX for exempt.
Are entries correct:
If the above entries are correct, press ENTER to go to the next screen. Otherwise enter No to go back and correct one or more of the above.
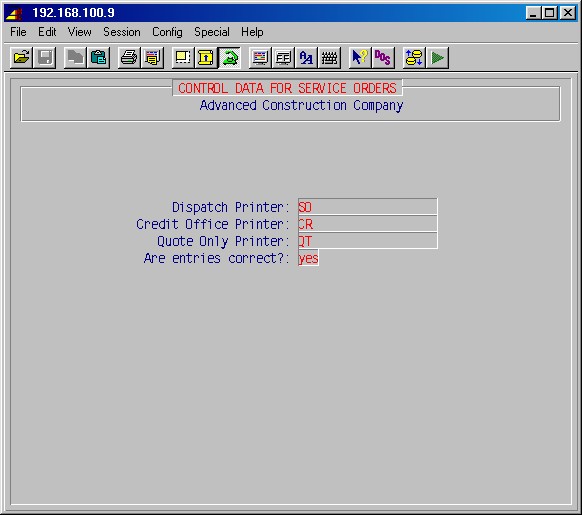
TopHere you may enter the printer numbers of printers as set up in 13-3: Printer Designation & Codes. If any of these are left blank, you'll be asked for the printer number each time you print.
Dispatch Printer:
Enter the number of the printer on which to print newly entered service orders.
Credit Office Printer:
Enter the number of the printer where service orders for new customers or old customers with past due invoices are to be printed.
Quote Only Printer:
If particular printer is used to print service order quotes, enter its number here.
Are entries correct?:
If the above entries are correct, press ENTER to go to the next screen. Otherwise enter No to go back and correct one or more of the above.
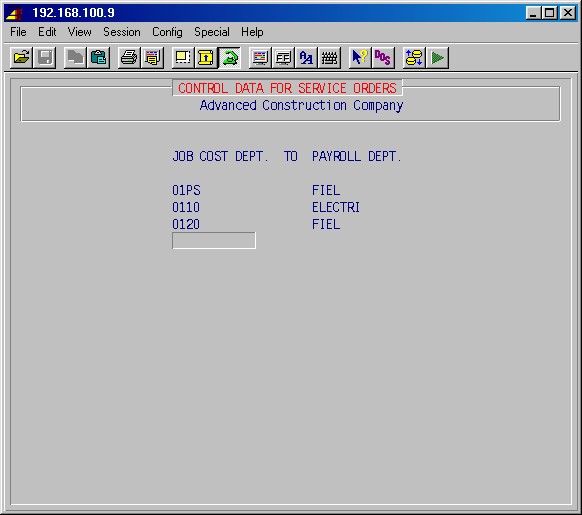
Here you may set up relations between sales types (departments) as set up in 1-4-1: Sales Type Maintenance, and payroll departments as set up in 5-5-1: Department Maintenance. Up to seven such relations may be defined. This is used when transferring labor from service orders into payroll (5-8-9).
JOB COST DEPT.
Enter a sales type ID as set up in 1-4-1.
TO PAYROLL DEPT.
Enter the payroll department, as set up in 5-5-1, which is to receive the cost of the above sales type.
Press ENTER till you get back to the main menu.
Next, select the following procedures, as applicable, in the sequence listed:
2-12: Labor Rate Maintenance (Mandatory)
2-15-8: Service Type Maintenance (Mandatory)
2-15-3: Setup Dispatch Boards (Mandatory, also do 13-2-10, as detailed below.)
2-15-1: Problem Code Maintenance (Mandatory)
2-15-2: Lead Code Maintenance (Mandatory)
2-15-4: Setup Trucks (Mandatory)
2-15-5: Map Coordinate Maintenance (Optional)
2-15-6: Price book Maintenance (Optional)
2-15-7: Pager Maintenance (Optional)Press ENTER till you get to the main menu, then select 13-2-10: Dispatch Board User Maintenance.
Here you must give permission to each user who will be entering service calls (service orders) and (optionally) access the dispatch board for scheduling. If a user does not have permission to a dispatch board he or she will not be allowed to enter service orders for that board.
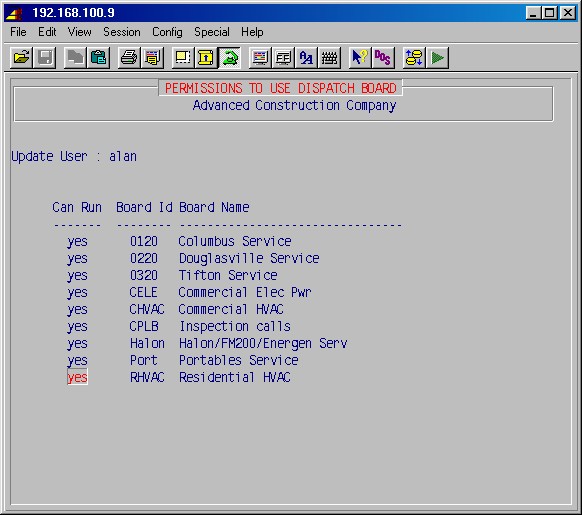
Update User:
Enter the user ID of the person to whom you wish to give access.Can Run
Enter Yes or No as applicable, as each dispatch board is presented.When done with all applicable users, simply press ENTER when prompted for User, and press ENTER till you get back to the main menu.
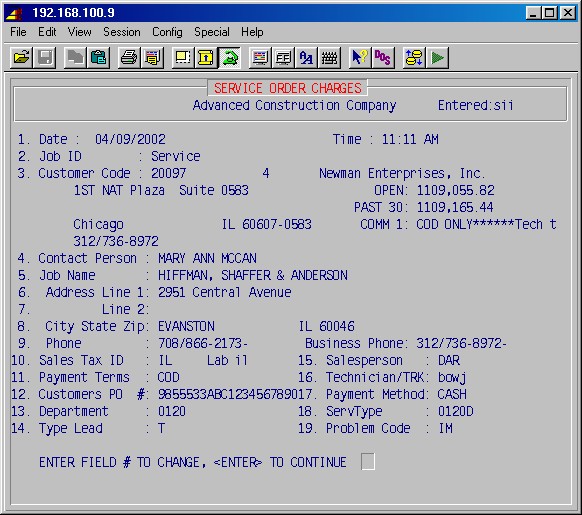
This procedure allows you to write the initial service order. This selection will display the following input screen :
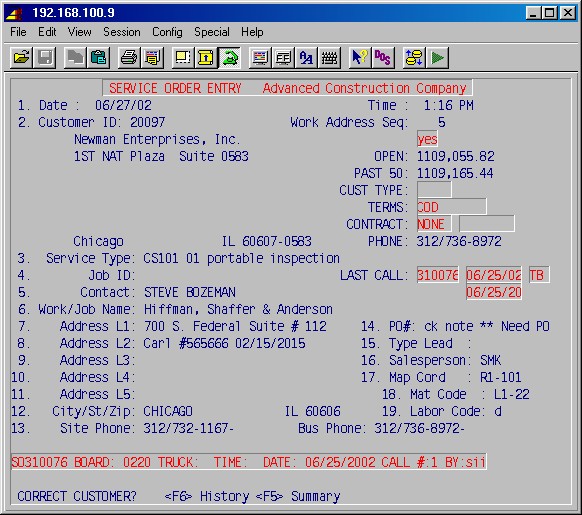
1.Date:
Time:
The entry date and time for the service order is automatically filled in by the system.
2.Customer ID:
Type a customer ID. If this is a new customer or the customer ID is not already on file, the system will prompt:CUSTOMER NOT FOUND ADD no
If you're sure the customer does not exist in the system and that you have typed the ID correctly, type Yes and press ENTER. To continue, you need to complete the basic customer information in this area for this new customer. When you exit the AR customer maintenance area, the system will return you to the next field in service order entry.If you do not know the customer ID, type in the phone number of the customer, or preferably of the work address and hit ENTER. If the customer or work address is found, the customer's bill-to name and address will be displayed.If the phone number is unknown, hit F2 to search for the customer by partial name or search code.
(Optionally, you can leave the Customer ID blank and press ENTER and you'll be prompter for the Job ID instead, as covered under field #15 below.)
If the customer is found, you will next be prompted:
WA SEQ: 0
If the work address you want is not the main address for the customer, enter the number of the work address, or press F2 for a list of work addresses for this customer to select from.The name and address of this customer and work address will then be displayed as well as additional data about the customer. You'll be prompted:
Yes
Here you may press F2 to see the service history for this customer/work address.
If this is the work address you want, just press ENTER. Otherwise, type No and press ENTER.
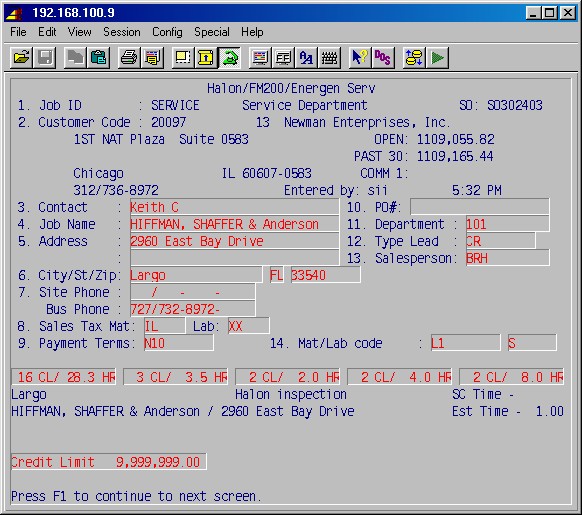
Fields 3 through 7 will be filled in with data from the work address record or may be completed with data pertaining to a specific job name, address, etc. and may be changed as needed.
16. Service Type:
Enter the service type [H] for this service order. This will automatically fill in field #15, Job ID, and the sales type (department) for the service order, as set up in 2-15-8: Service Type Maintenance. If you do press F2 here, you'll see a list to choose from of service types for any contracts for the selected work address. Press F2 again to see the full list of service types to choose from.
3. Contact:
Optional. Enter the contact person for this service call.
4. Job name:
Optional. Enter the name for this work site.
5. Address: [H]
6. City/St/Zip:
7. Site Phone:
Bus Phone:
Addresses and phone for this job name which you have previously entered here or entered in 2-14: Work Address Maintenance, are now available to select for input [H]. Press F2 to display a list of previously entered work addresses for this customer to choose from, highlight the correct address, and press ENTER. If this is the first time you have written a service order for this work address, type the complete address and phone number for the location where the work is to be performed.
8. Dispatch ID:
Enter ID of the dispatch board [H] on which this service call is to go (if you don't have the optional dispatch board module simply enter your one default ID, e.g. "NA").
9. Problem Code:
Enter the problem code [H] for this service call.
10. Map Coord:
Enter the (optional) map coordinates [H] for this work site.
11. Assigned to TRK:
Enter the truck [H] if you want to assign this service call to a truck at this time. If entered, this will automatically fill in the Technician field. Normally the dispatcher will assign service orders to technicians.
Technician:
Enter the technician [H] if you are assigning a technician to this service call at this time. If the Truck field above was left blank, it will automatically be filled in if you enter a technician here. Normally the dispatcher will assign service orders to technicians.
12. Customers PO#:
Optional. Leave blank or type your customer's purchase order number.
13. Type Lead:
Specify the source of this service order from the list of available lead codes [H]. (For example: yp = yellow pages). These codes are entered in 2-15-2: Lead Code Maintenance.
14. Salesperson:
Enter or change the ID of the salesperson [H] for this service order. Use misc if there is no actual salesperson.
15. Job ID:
This is automatically filled in when you enter the dispatch ID. If you left the Customer ID blank above, you may enter a job ID [H] here, and the customer, etc. will be automatically filled in and you'll next be able to enter or change #3, Contact, etc. as above. Only jobs that have not been marked as completed are allowed. Leaving both Customer ID and Job ID blank lets you exit this entry screen.
After completing these fields, the system will give you the option to change any incorrect fields by entering the field number, or pressing A to abort this service order and clear the screen for another set of entries. Pressing U lets you update the information on the selected customer. When you are ready press just ENTER to continue. The system will display the second input screen as follows :
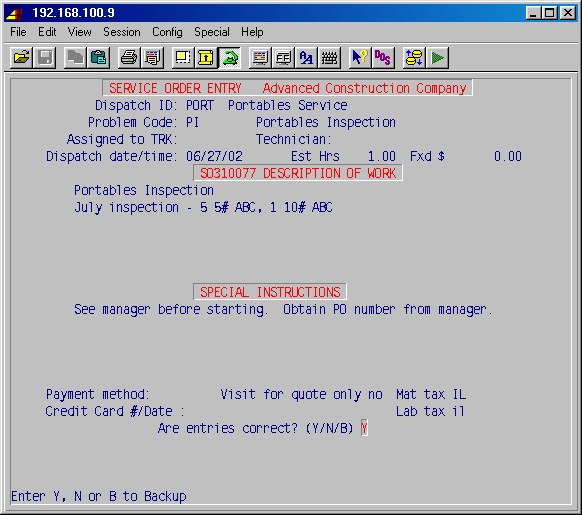
This screen displays in the heading the service order number (assigned consecutively by the system).
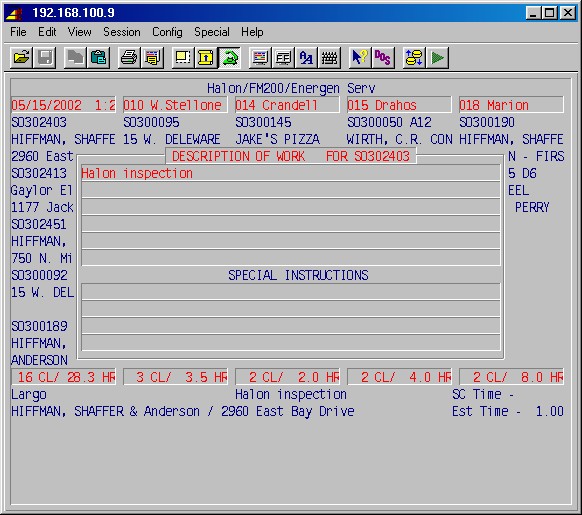
Description of Work
The first line is automatically filled in by the selected problem code (#9 on the previous screen), as set up in 2-15-1: Problem Code Maintenance, description.
Type a detailed description of the work to be performed on the six lines provided for the description of work. You may press F2 for additional description lines.
Special Instructions
If a previous service order exist for this work address, the system automatically copies the special instructions from that service order.Enter any special instructions for this service call which you wish to have appear on the printed service order, on the four lines provided.
Payment Method:
Optional. Leave blank or note the method of payment. C for COD, B for bill later or CC for credit card payment.
Visit for Quote Only:
Answer Yes if this service call is for a quote only and not to be billed. Press just ENTER if this is a firm order for service.
Credit Card #/Date:
Optional. Leave blank or if you specified a credit card as the method of payment, you may note the credit card number and expiration date here.
Dispatch Date/Time:
The date is automatically filled in with today's date. You may blank it out by entering a question mark (?) if you do not wish to schedule this service call now.Otherwise, enter the date and time for this service call to be done. Pressing F5 lets you see the scheduled service calls for the entered date.
Qte $:
Only if the total billing has been quoted to this customer, enter the quoted (flat rate) amount for this service call.
Est Hours:
If entered in 2-15-1: Problem Code Maintenance, for the selected problem code, this field is automatically filled in.
You may override the estimated duration of this service call.
Are entries correct?(Y/N/B)
Enter N to go back to the top of this screen and correct your entries.
Enter B to go back to the previous screen to make corrections there.
If all entries are correct, simply press ENTER and the system will prompt:
Print Service Order <Y>es, <B>atch :
This allows you to select whether the service order is printed immediately or at a later time in a group with other service orders. Type B ENTER if you wish to print this service order in a batch printing at a later time. The system will return you to the first input screen in service order entry and prompt you for another customer ID.Otherwise, press Y ENTER to print the service order now and you'll be prompted:
Print Equipment:
Enter Y if this is a service call on a preventive maintenance contract and you want a list of the equipment on the contract printed on the service order.
When you have selected the printer and number of copies you will be returned to the first input screen in service order entry and prompted for another customer ID.
These procedures are used to facilitate scheduling of all service order tickets on one or more dispatch boards with assigned Trucks/Technicians and allows you to keep track of service orders until they have been completed.
This selection will display the following menu:
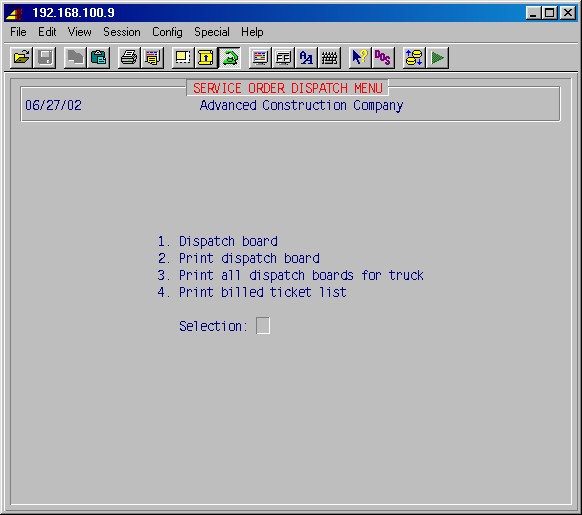
NOTE: SOs are added automatically to the schedule when the SO start date/time is filled in.
This procedure allows you to view, update, and print a daily schedule for service orders.
This selection will first prompt:
Enter dispatch board type
Enter the ID [H] of the dispatch board you want.Next you will be prompted:
Enter Schedule Date: / /
Type the date you wish to view/update the schedule and press ENTER.The system will then display the following summary screen :
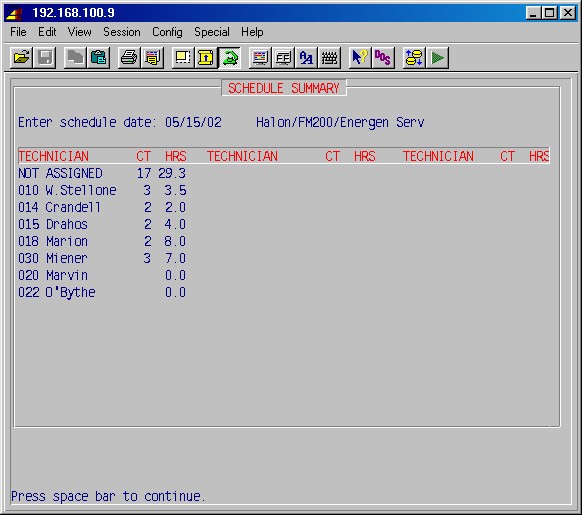
TECHNICIAN
This column shows the truck and technician or NOT ASSIGNED for unassigned calls.CT
This is the number of service calls (count) for the technician.HOURS
This is the estimated numbers of hours to complete these service calls.Pressing the space bar will present the dispatch board:
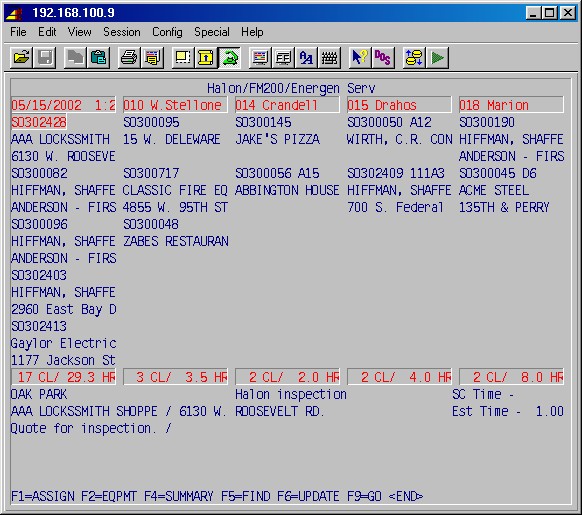
In the leftmost column (headed by todays date and current time) all unassigned calls for today are listed. While in this column you may use the Page Up, Page Down, Up and Down arrows, as well as the HOME key to jump to first/last, to select a call you want to assign. As you highlight a service call you'll notice the 2 last lines displaying the city, phone number, work description line, scheduled time, name, and estimated time for the service call.
To assign a service call to a truck/technician press F1. This will prompt:
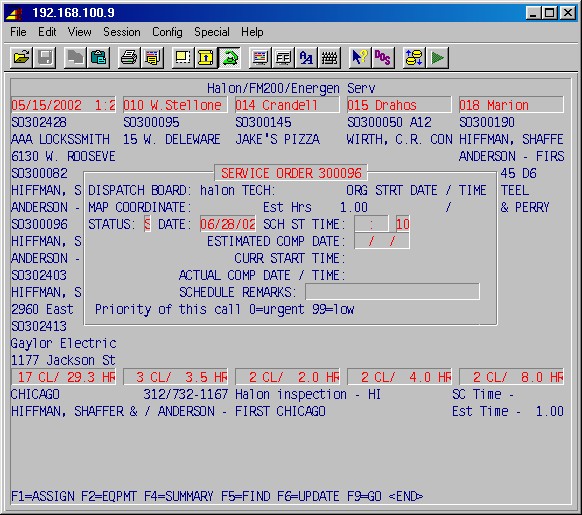
DISPATCH BOARD:
Press just ENTER if this service order is to be assigned to a truck/technician on this board, or enter the name of another board to assign it to that board and press ENTER.TECH:
Enter the truck ID [H] of the truck/technician to whom you want to assign this call to.MAP COORDINATES:
Enter the map coordinates for the work address for this service call as per your technicians' street maps, if applicable; or leave blank. Est Hrs
Enter or change the number of hours estimated to complete this service call, as needed, and press ENTER.STATUS:
Enter the status, as applicable, for this service call.DATE:
Change the date, if needed, and press ENTER. If the date is changed, the service order will be removed from today's schedule and moved to the schedule for that date.TIME:
Change the scheduled time, if needed, and press ENTER.
Note that time is entered in military format:
11:00 = 11 AM
12:00 = 12 noon
13:00 = 1 PM
etc.This service call will now appear in the column for the truck/tech to whom you assigned it.
Below each Truck/Tech column you'll see the total number of calls assigned to the Truck/Tech as well as estimated hours to complete those calls.
Use the Right/Left Arrows to move to the truck/tech column you want to work with, or press F9 and enter the truck ID of the column you want to see.
You can press F5 and type in an SO number or a customer ID to locate an SO on a board.
Pressing F4 will display the summary screen for the selected board. On a highlighted (selected) service order, press F2 to see the listed equipment for the service call. (Equipment can only be displayed for contract service calls, i.e. where the customer has a preventive maintenance service contract.)
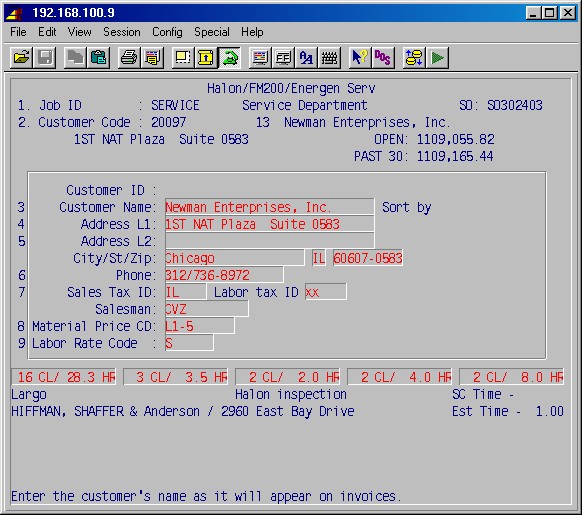
Pressing F6 lets you update information for a service order:
3. Contact:
Enter or change the contact person for this service call.4. Job name:
Enter or change the name for this work site.5. Address:
6. City/St/Zip:
Enter or change the address of the work site for this service call.7. Site Phone:
Enter or change the work site phone number.
Bus Phone:
Enter or change the customer's phone number. Addresses and phone for this job name which you have previously entered here or entered in 2-14: Work Address Maintenance, are now available to select for input [H]. Press F2 to display a list of previously entered addresses for this customer to choose from, highlight the correct address, and press ENTER. If this is the first time you have written a service order for this work address, type the complete address and phone number for the location where the work is to be performed.8. Sales Tax Mat: Lab:
Enter or change the sales tax codes for material and labor (XX for exempt).9. Payment Terms:
Enter the payment terms for this service order, e.g. N30 or COD.10. Customers PO#:
Leave blank or type your customer's purchase order number.11. Department:
Enter or change the department (sales type) for this service order.12. Type Lead:
Specify the source of this service order from the list of available lead codes [H]. (For example: yp = yellow pages). These codes are entered in 2-15-2: Lead Code Maintenance.13. Salesperson:
Enter or change the ID of the salesperson [H] for this service order. Use misc if there is no actual salesperson.14. Mat/Lab code:
Enter or change the material and labor codes.FIELD TO CHANGE, <U> Update customer, RETURN TO CONTINUE
Type the number of the field you want to change. Pressing U lets you change customer information:
Change the customer data as needed. When back to the previous screen, leave FIELD TO CHANGE blank and press ENTER and this screen will appear:
Enter or change the work description and special instructions as needed. Press F1 or ENTER when done and you'll be returned to the dispatch board.
When the status of a service call changes, e.g. a tech calls in and says he has completed a service call, use the arrow keys etc. to select the service order, press ENTER till you get to STATUS: and type in the appropriate letter for the status.
On a terminal set up for dispatch, you'll see the color of the service call change as the status changes, e.g. white for not started, green for started, brown for incomplete and red for late.
If you have the needed alphanumeric paging software and hardware installed, changing the status of a service order to S (started) will send a page to the assigned technician.If you enter C for complete you'll be prompted:
Enter Billing Information:
Answering Yes to this you'll next be prompted:Work Completion Date:
Enter the date (usually todays date) the work was completed and press ENTER. You can then enter charges by selecting the appropriate work codes, as set up in 2-15-6: Price Book Maintenance:You will then be prompted:
Control #:
Enter the number of the invoice on which payment was received or leave blank.Amount:
Change the amount as needed and press ENTER.Payment Type:
Enter the type of payment (e.g. NC, C, CC, CK or B).Are entries correct:
Press ENTER if the above entries are correct, and you'll be prompted:Enter Work Description:
Enter Yes if you want to change or add to the work description and press F1 when done.You'll then be prompted:
Enter Recommendations:
Enter No if you don't want to, otherwise press ENTER and type in the recommendations and press F1 when done.You are then returned to the dispatch board and will notice that this service order is no longer on the board.
Press END to exit from the dispatch board.
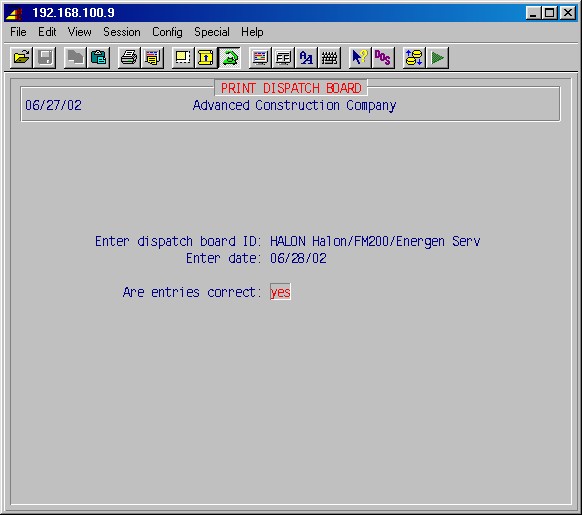
This procedure allows you to print a list of all services orders on a dispatch board on a selected date. Selecting this will prompt:
Enter Dispatch Board ID:
Enter the ID [H] of the board you want to print.Enter Date:
Enter the date you want.Are Entries Correct:
If the above is connect, press ENTER and you'll be prompted for the printer and number of copies.
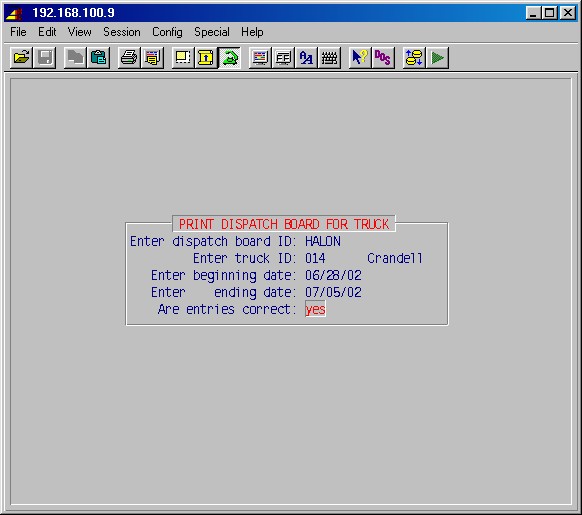
This procedure allows you to print a list of all services orders for a truck/tech in a selected range of dates on all dispatch boards. Selecting this will prompt:
Enter Truck ID:
Enter the ID [H] of the truck/tech you want.Enter Beginning Date:
Enter Ending Date:
Enter the beginning and ending dates or leave blank for all dates.Are Entries Correct:
If the above is correct press ENTER and you will be prompted for the printer and number of copies.
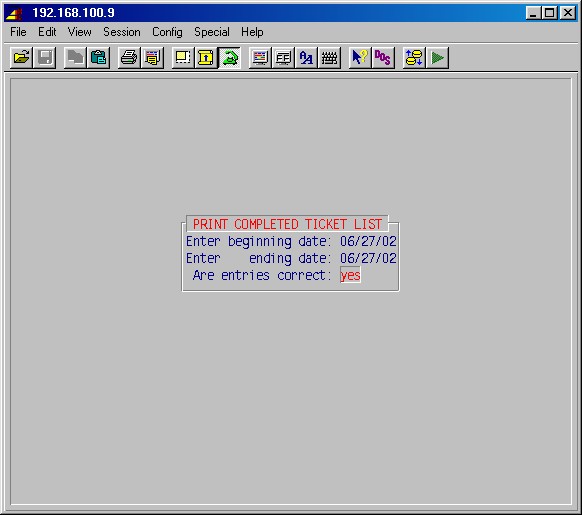
This procedure allows you to print a list of all completed and billed services
orders in a selected range of dates, listing invoice number, date, customer
ID, service order number and amount. Selecting this will prompt:
Enter Beginning Date:
Enter Ending Date:
Enter the beginning and ending dates for this list.Are Entries Correct:
If the above is correct press ENTER and you will be prompted for the printer and number of copies.
This selection will display the following input screen :
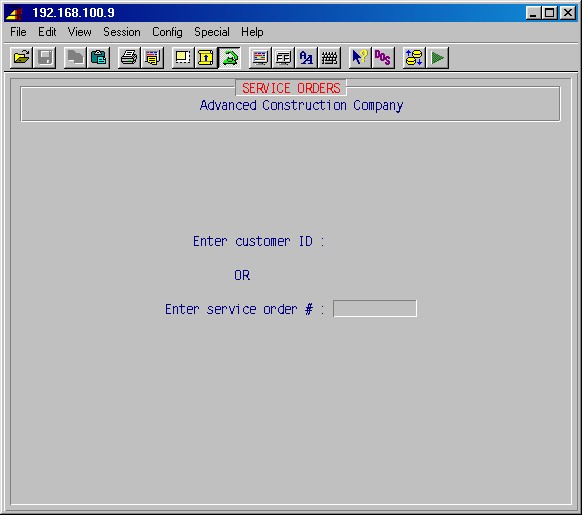
This screen allows you to select the service order by number, if you already know it, or by looking at all service orders for a customer and then specifying the service order number you wish to deal with.
Enter customer ID:
Type the customer ID [H] and press ENTER to display all service orders for a customer. If you know the SO number and wish to enter it directly on the next line, press just ENTER.
Enter service order #:
Type the service order number and press ENTER.
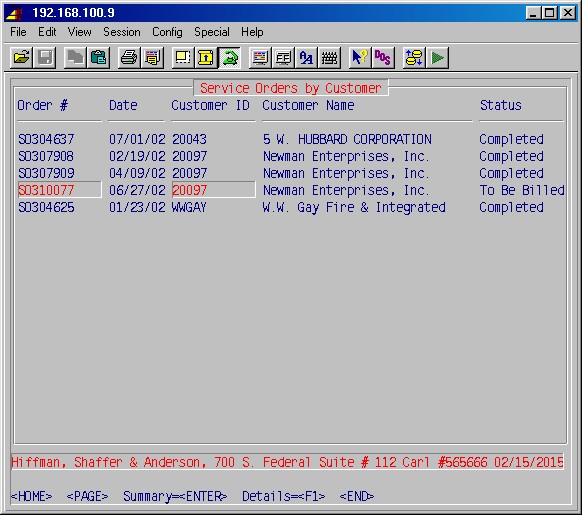
If you enter the customer ID, the system will display the following screen :
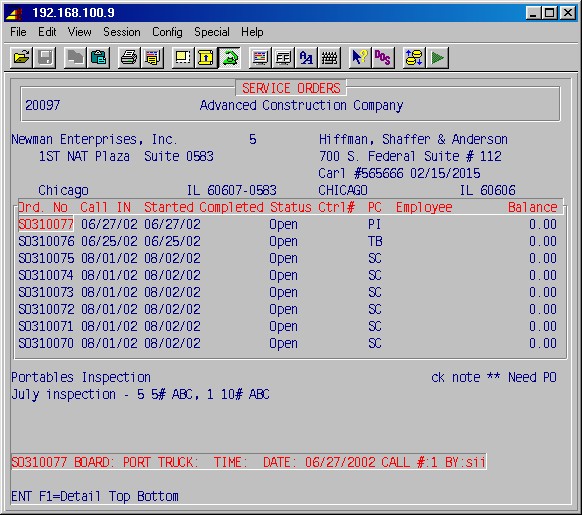
This screen displays in the heading the customer ID and the customer's name
and address to the left and the work address for the highlighted service order
to the right. At the bottom part of the screen the work description for the
highlighted service order is displayed. In the center part of the screen, all
service orders for that customer, which have not been deleted from the system,
are listed as shown above. The Ctrl# column shows the invoice number for the
service order, if any. The PC column show the problem code for the service
order. The Employee column shows which employee (technician) the service
has been assigned to, if any. The Balance column show any unpaid balance
on the service order, as applicable.
You may use the ARROW, PAGE and HOME keys to highlight the service order you want, then press ENTER to select it. If the service order you want is not listed under this customer, just press END. Specifying or selecting a service order number will display the following screen and menu :
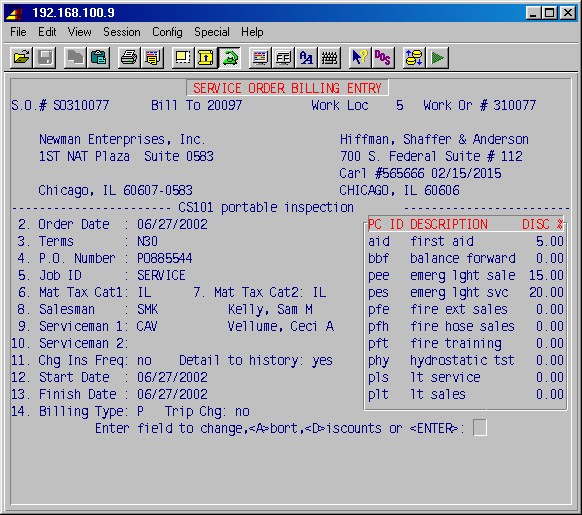
S.O. #:
The number of the service order being billed.
Bill To:
The ID of the customer to be billed, as entered when the service order was entered in 2-1.
Work Location:
The number of the work address for this service call.
Work Order #:
Enter the number on the work order (field invoice) turned in by the tech.
The bill-to address, work address, service type description and order date are displayed.
3. Terms
This defaults from the chosen work address. Change as needed. Be sure that the choice has been set up in 1-4-4: Terms Maintenance.
4. P.O. Number
Enter the customer's PO number, if applicable.
5. Job ID
Enter or change the job which this invoice will be posted to.
6. Mat Tax Cat1:
Enter or change material tax ID for category 1.
7. Mat Tax Cat2:
Enter or change the material tax ID for category 2.
8. Salesman:
Enter the ID [H] of the salesman. The full name will then be displayed.
9. Serviceman 1:
Enter the ID [H] of the first serviceman, if applicable. The full name will then be displayed.
10. Serviceman 2:
Enter the ID [H] of the second serviceman, if applicable. The full name will then be displayed.
11. Chg Ins Freq:
Answer Yes if the service call being invoiced is to change the month of the next inspection for the selected work address.Detail to history:
Answer Yes if the service call being invoiced should be part of the service history for the selected work address.
12. Start Date:
Enter the date the work was started.
13. Finish Date:
Enter the date the work was finished.
Enter field to change,<A>bort,<D>iscounts or <ENTER>:
Enter the number of the field you wish to change, or type A to abort entry of this invoice (or delete it, if previously entered), D to update the discount percentages, or just ENTER to continue.
DISCOUNTS
If you press D above you may now use the ARROW, PAGE and ENTER keys to update the discount percentages for the product codes, as listed in the box on the right hand side of the screen. Press END when done.
You will next be prompted:
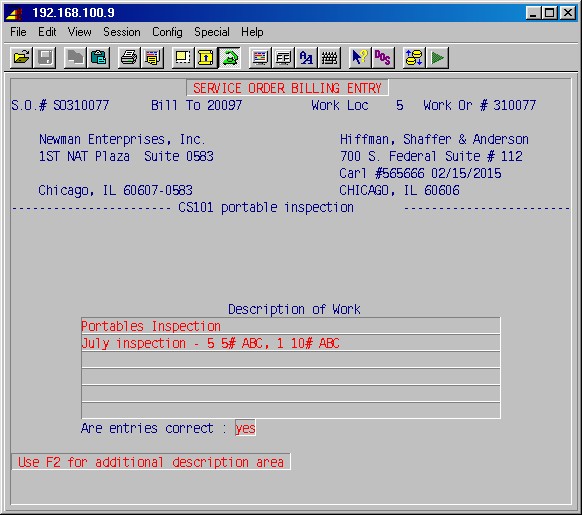
Description of Work
Add to or change the original description of work to be done, as needed.
Are entries correct:
Answer Yes when you are ready to go to the next screen:
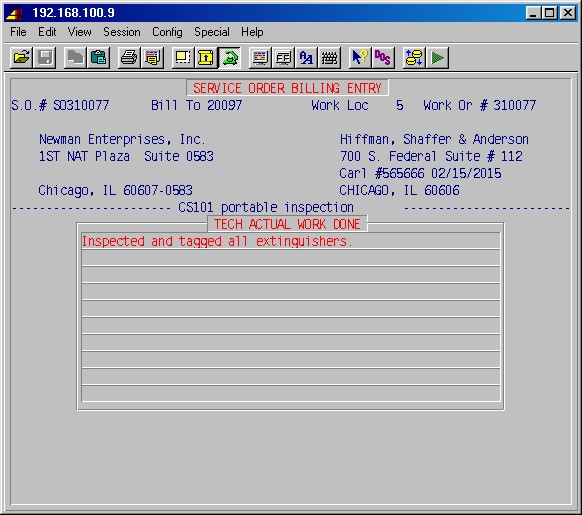
TECH ACTUAL WORK DONE
Enter the tech's description of the work actually done. Press F1 when done and the item entry screen will appear:
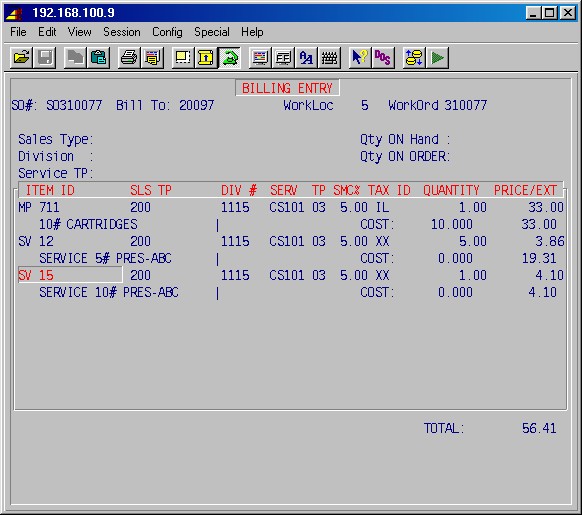
SEQ
A line sequence number is automatically assigned by the system.
ITEM ID
Enter the ID [H] of the item and press ENTER. This will automatically fill in most of the following fields.
SLS TP
The sales type of this item.
DIV #
The division number of this item.
SERV
The service type for this item. A list of contracts by service types for the selected work address will be displayed to choose from. Use the ARROW keys to select the one you want and press ENTER.
TP
The contract number for the selected work address and service type that this item was used on.
SMC%
The salesman commission percentage for this item.
TAX ID
The tax ID for this item.
QUANTITY
Enter the quantity of this item.
PRICE
The price of this item charged the customer.
COST:
The cost of this item.
EXT
The extended price for this line will be calculated and displayed.
Press INS to add lines. Use the ARROW, PAGE and ENTER keys to update a line. Press DEL to delete a line.
When done entering items, press END, and you'll be shown the invoice totals.
Press the space bar to continue and you'll be prompted for a new customer ID or service order number.
Use one of the selections 2-10 to print the invoices. Before
you select to print invoices in batches (2-10-3 or 2-10-4),
be sure that all the invoices you have entered in 2-4 have
been completely entered (all items added, etc.), as no change will be allowed
once printed there.
Top
These procedures allows listing and viewing service orders in various ways:
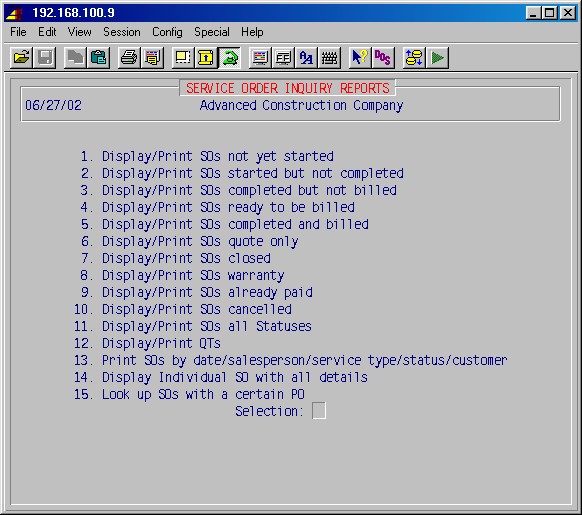
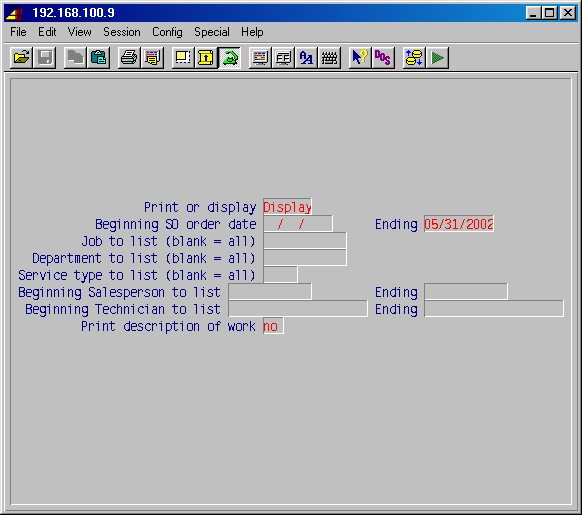
Print or Display
Type P to print this report or D display it on the screen, then press ENTER.Beginning date
Ending date
Enter the dates for the period you want.Job to list (blank for all)
If you want to limit the list to service orders for just one job, enter its ID [H] here. Otherwise just press ENTER.
Department to list (blank for all)
If you want to limit the list to service orders for just one department, enter it here. Otherwise just press ENTER. Service type to list (blank for all)
If you want to limit the list to service orders to just one service type, enter its ID [H] here. Otherwise just press ENTER.Salesman to list -Beginning Ending
If you want to limit the list to service orders for a range of salesmen, enter the ID of the first and last salesman. Otherwise just press ENTER twice.Print description of work
Type Yes if you want the service order work description printed, otherwise just press ENTER.If you selected Print above, you'll next be asked for printer number and number of copies and the report will print.
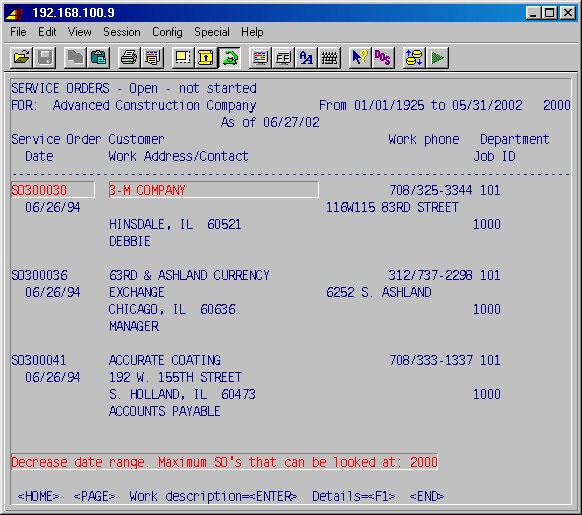
If you selected Display above, the selected service orders will show on the screen and may use the ARROW, PAGE and HOME keys to scroll up and down to view the different service orders. If you press ENTER on a highlighted service order, you'll see the work description for it. Pressing F1 gives access to the same information of a service order as in 2-5-14: Display Individual SO with All Details, as described below. Press END when done.
Each of these selections will display or print service orders with the selected status, just like 2-5-1: Display/Print SOs Not Yet Dtarted, above.
Selecting this procedure will prompt:
Type P to print this report or D display it on the screen, then press ENTER.
Beginning date
Ending date
Enter the dates for the period you want.
Job to list (blank for all)
If you want to limit the list to service orders for just one job, enter its ID [H] here. Otherwise just press ENTER.
Department to list (blank for all)
If you want to limit the list to service orders for just one department, enter it here. Otherwise just press ENTER.
Service type to list (blank for all)
If you want to limit the list to service orders to just one service type, enter its ID [H] here. Otherwise just press ENTER.
Print description of work
Type Yes if you want the service order work description printed, otherwise just press ENTER.
Correct (Y/N/E):
If the selection above are correct press Y, press N to go back and correct one or more of the entries, or press E exit (leave) this procedure.
If you selected Print above, you'll next be asked for printer number and number of copies and the report will print.
If you selected Display above, the selected service orders will show on the screen and may use the ARROW, PAGE and HOME keys to scroll up and down to view the different service orders. If you press ENTER on a highlighted service order, you'll see the work description for it. Pressing F1 gives access to the same information of a service order as in 2-5-14: Display Individual SO with All Details, as described below. Press END when done.
This selections will display or print orders with numbers beginning with "QT".
Selecting this procedure will first prompt:
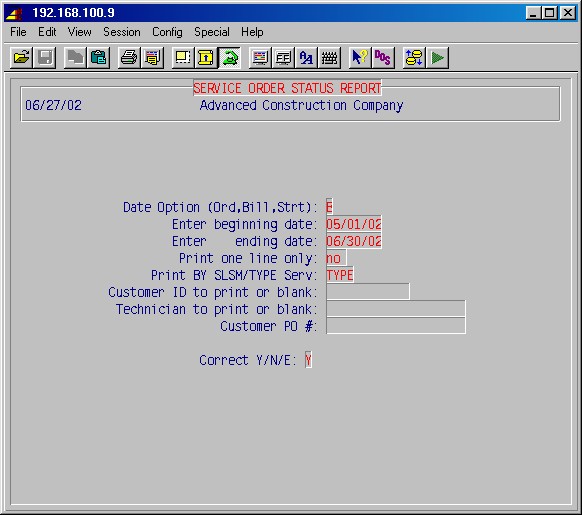
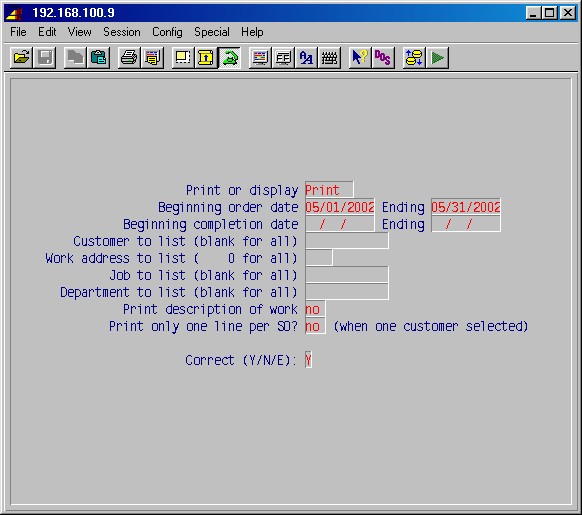
Date Option (Ord,Bill,Strt):
Specify for which date the below date range is to apply:
O = service order entry date
B = service order billing date
S = service order work started dateEnter Beginning Date:
Enter Ending Date:
If you want to limit the service orders to be included on the report to a certain time period, enter the date range here. This date range will be applied to the type of date selected above.Print one line only:
Answer Yes if you only want one line per service order printed.Print BY SLSM/TYPE Serv:
If you want the service orders printed in groups for each salesman, type S.
If you want the service orders printed in groups for each sales type, type T.Correct Y/N/E:
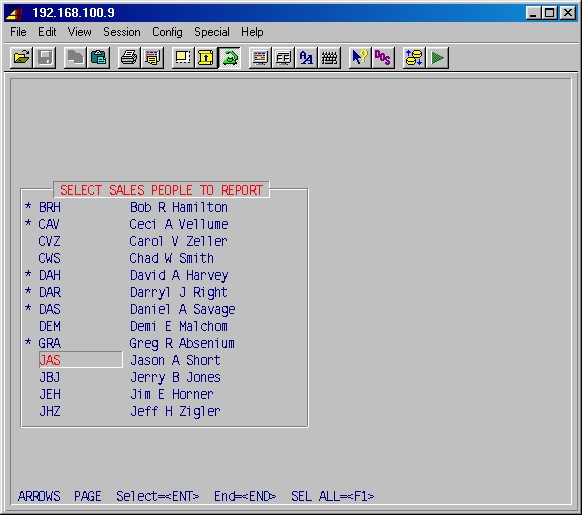
If the above is correct, answer Y. Next you'll be prompted:SELECT SALESMAN TO REPORT
Select to print service orders for one or more or all salesmen. An asterisk (*) in front of a listed salesman means he is selected. Press F1 to select all. Use the ARROW or PAGE keys to highlight a salesman and press ENTER to selectSELECT SERVICE TYPES TO REPORT
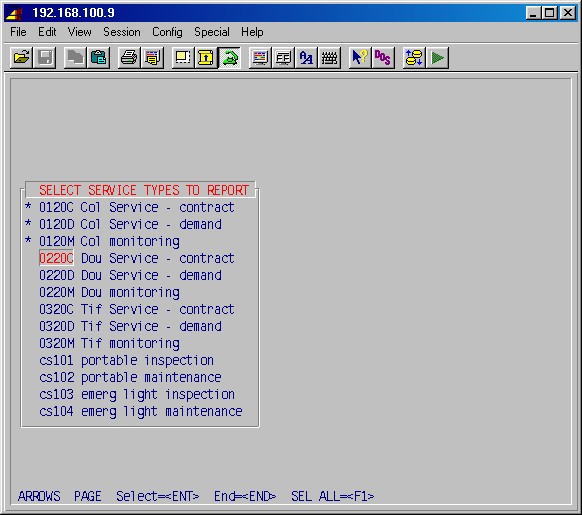
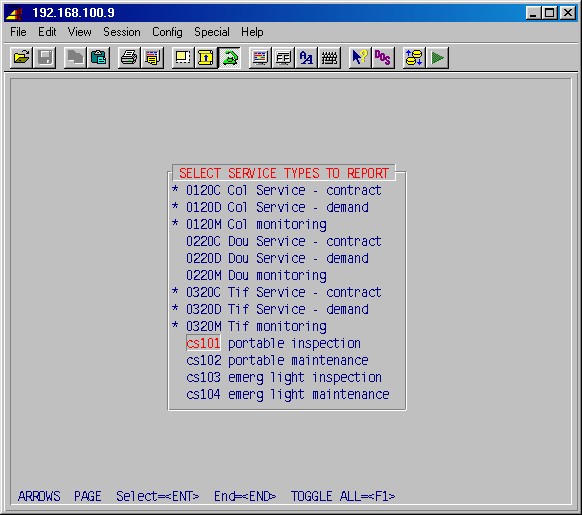
Select to print service orders for one or more or all service types. An asterisk (*) in front of a listed service type means it's selected. Press F1 to select all. Use the ARROW or PAGE keys to highlight a service type and press ENTER to select or deselect the service type. When done press END, and you'll be prompted:SELECT STATUS TO REPORT
Select to print service orders for one or more or all statuses. An asterisk (*) in front of a listed status means it's selected. Press F1 to select all. Use the ARROW keys to highlight a status and press ENTER to select or deselect the status. When done press END, and you'll be prompted with the printer selection screen and when entered the report will print.
This screen allows you to select the service order by number, if you already know it, or by looking at all service orders for a customer and then specifying the service order number you wish to see.
Enter customer ID:
Type the customer ID [H] and press ENTER to display all service orders for a customer. If you know the SO number and wish to enter it directly on the next line, press just ENTER.Enter Service Order #:
Type the service order number and press ENTER. If you enter the customer ID, the system will display the following screen :This screen displays in the heading the customer ID and the customer's name and address to the left and the work address for the highlighted service order to the right. At the bottom part of the screen the work description for the highlighted service order is displayed. In the center part of the screen, all service orders for that customer, which have not been deleted from the system, are listed as shown above. The Ctrl# column shows the invoice number for the service order, if any. The PC column shows the problem code for the service order. The Employee column shows to which employee (technician) the service has been assigned, if any. The Balance column show any unpaid balance on the service order, as applicable.
You may use the ARROW, PAGE and HOME keys to highlight the service order you want, then press ENTER to select it. If the service order you want is not listed under this customer, just press END.
Specifying or selecting a service order number will display the following screen and menu :
Use the ARROW, PAGE and HOME keys to highlight the part of the service order you want to view, then press ENTER. When an invoice has been selected, additional information about that invoice becomes available: invoice body, collection log and payments.
Press END when done viewing details and when done viewing the service order.
Press ENTER twice when again prompted for Customer ID and Service order #, to get back to the menu.
This selection allows you to change the status and other information on a service order, as well as to enter charges against a service order as they are reported to you by the service personnel. You may select the service order directly by entering the SO number or by specifying the customer ID and then choosing the SO number from a listing of all service orders for that customer.
This selection will display the following input screen :
This screen allows you to select the service order by number, if you already know it, or by looking at all service orders for a customer and then specifying the service order number you wish to deal with.
Enter customer ID:
Type the customer ID [H] and press ENTER to display all service orders for a customer. If you know the SO number and wish to enter it directly on the next line, press just ENTER.
Enter service order #:
Type the service order number and press ENTER. If you enter the customer ID, the system will display the following screen :
This screen displays in the heading the customer ID and the customer's name and address to the left and the work address for the highlighted service order to the right. At the bottom part of the screen the work description for the highlighted service order is displayed. In the center part of the screen, all service orders for that customer, which have not been deleted from the system, are listed as shown above. The Ctrl# column shows the invoice number for the service order, if any. The PC column show the problem code for the service order. The Employee column shows which employee (technician) the service has been assigned to, if any. The Balance column show any unpaid balance on the service order, as applicable.
You may use the ARROW, PAGE and HOME keys to highlight the service order you want, then press ENTER to select it. If the service order you want is not listed under this customer, just press END.
Specifying or selecting a service order number will display the following screen and menu :
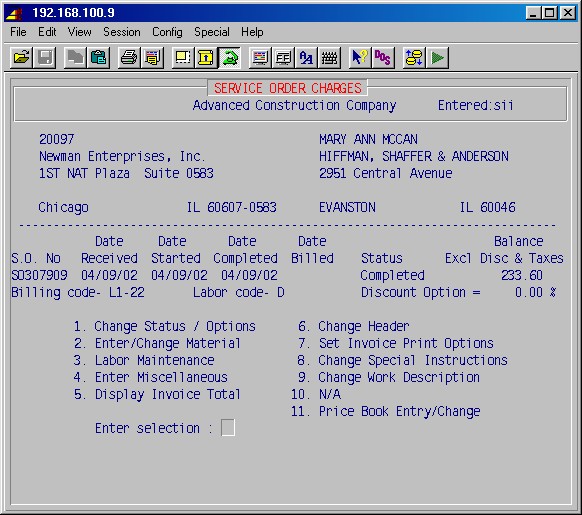
This screen displays in the heading the customer ID and the customer's name and address and the work address and the contact person for the job, as well as dates, status, billing and labor codes for the service order.
Select one or more of the following actions:
This procedure allows you to change the status of the service order from open to, to-be-billed, warranty only, or quote only. In addition, other fields may be changed as is shown on the following input screen:
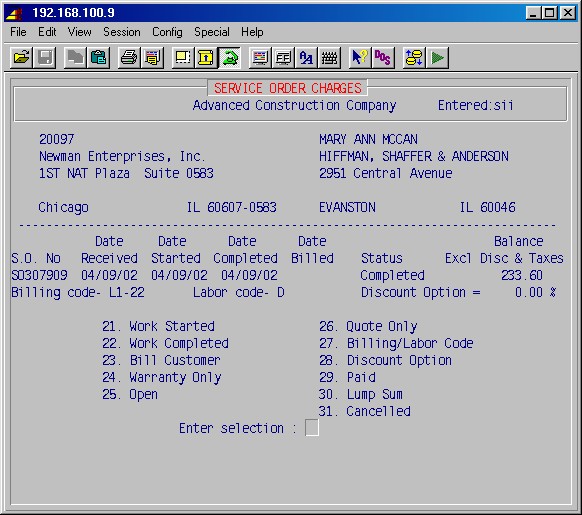
This screen displays in the heading the customer ID and the customer's name and address and the work address and the contact person for the job. Below the heading, the specified service order is displayed with the following choices:
21. Work started
This allows you to change the "date started" date. Press 1 ENTER, type the new date, and press ENTER again.22. Work completed
This allows you to change the "date completed" date. Press 2 ENTER, type the new date, and press ENTER again.23. Bill customer
This changes the status of the SO to "to be billed".24. Warranty only
This changes the status of the SO to "warranty".25. Open
This changes the status of the SO to "open", generally from "quote only" status.26. Quote only
This changes the status of the SO to "quote only".27. Billing/labor code
For each field, specify a new code for this service order only and press ENTER or press just ENTER to leave unchanged.The billing code is the material pricing code set up for this customer work address in 1-1-10: AR Customer Work Address Maintenance in field #9. If the material pricing code was not entered in customer work address maintenance, or if it was entered and you wish to change it for this service order, you may type a code for this service order only.
Possible codes are:
L1+% = List 1 plus or minus a percent (Example: L1-10)
L2+% = List 2 plus or minus a percent
L3+% = List 3 plus or minus a percent
L4+% = List 4 plus or minus a percent
C+% = Cost plus or minus a percent (Example: C+25)The labor code is the labor class ID for the labor class table which you wish to use for billing the labor rates for this job. This labor code for service is entered in 1-1-10: AR Customer Work Address Maintenance. If the labor code was not specifically entered in customer work address maintenance, the system will enter a default code of S (for standard). You may now type another code for this service order only if you wish. The labor class tables are user-defined and are set up in 2-12: Labor Rate Maintenance.
28. Discount option
Not currently used.29. Paid
This may be used when the customer pays for the service call at the time of service before an invoice has been produced. Selecting this "paid" status will create a dummy invoice with the normal GL entries and the cash entry so that you don't have to post the cash separately. This specifies that you have already collected the charges and this will be marked in receivables as paid.Selecting this, you will be prompted:

Enter payment type:
Enter cash for cash, CC for credit card or CK for check.Enter Receipt Date:
Enter the date the payment was received.Enter check #:
If paid by check, enter the check number.Credit Card #/Date:
If paid by credit card, enter the credit card number and expiration date.Enter amount received:
Enter the dollar amount received.Are entries correct:
If correct just press ENTER. To go back and correct an entry type N and press ENTER.30. Lump sum
This specifies that the billing amount for this purchase order will be in one lump sum regardless of the amount of the labor and materials. This selection will prompt:Enter lump sum amount: 0.00
Type the lump sum amount you wish to bill and press ENTER.31. Cancelled
This changes the status to "cancelled".
NOTE: This area is generally used to enter material in SOs in addition to materials from requisitions and purchase orders. The technique of using POs and requisitions to enter material on SOs, as the material is physically moved, generally provides more security that material used will not inadvertently be left off the SO invoice.
This selection allows entry and change of materials used on a service call.
You'll first be prompted:
Enter date for costs
This date will be noted on each material line, and is the accounting date for the GL entries for the material usage.
Inventory? (Blank=main)
If materials come from the main inventory, leave blank and press ENTER. Otherwise, type the ID of the inventory and press ENTER.
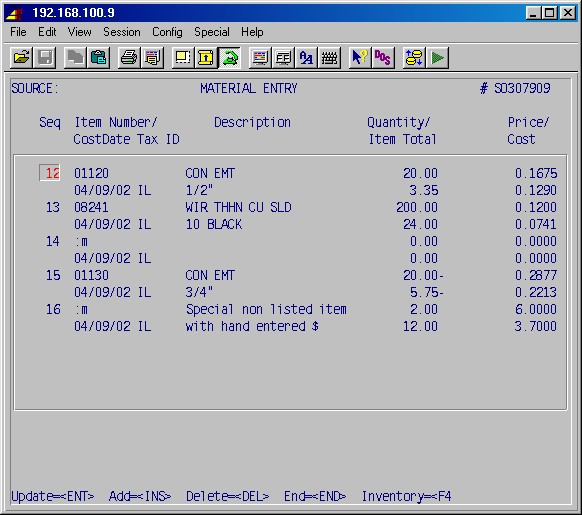
The following screen is used to enter materials :
NO ENTRIES ADD:
This prompt will appear when no material has been entered for the service order. Just press ENTER.
Seq
The system automatically numbers each line with a sequence number.
Item number
Type the item ID [H] for a standard inventory item or :M to manually enter an item not in inventory. If the item ID is a valid ID of an inventory item, the system will display the description, unit price (determined by price code), and unit cost for this item from the database.
Description
If this is an item in inventory, the system will display the description. If you are manually entering an item with a :M ID, type the description here.
Quantity
Specify the quantity of this item.
Price
If this is an item in inventory, the system will display the unit price (determined by price code), if it is in the database. If you are manually entering an item, type the unit price here.
Cost
If this is an inventory item, the system will display the unit cost, if it is in the database. If you are manually entering an item, type the unit cost here.
State tax
Specify the state tax ID if this work is subject to state or local taxes, or specify the tax exempt code if it is tax exempt.
Item total
Will display total charge for this line.
Keep entering items. When done press HOME to get out of the add/insert mode.
Using the bottom line menu, you may now go back and update (change), add (insert), or delete entries as necessary. When you are finished, press END and the system will return to the previous menu.
This selection allows entry of labor used on a service call. The following screen is used to enter labor :
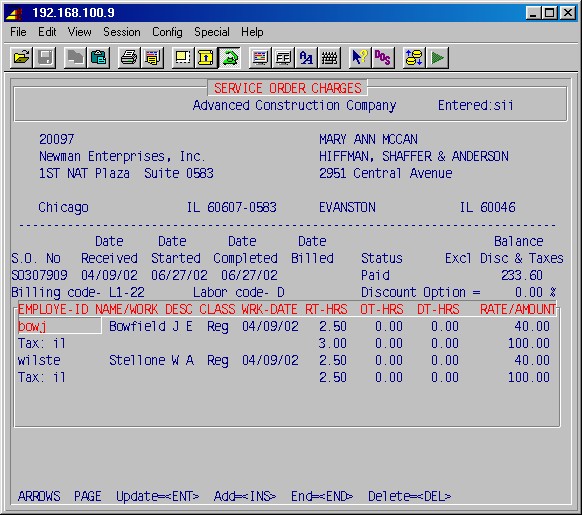
NO ENTRIES ADD:
This prompt will appear when no labor has been entered for the service order. Just press ENTER.This screen displays in the heading the customer ID and the customer's name and address and the work address and the contact person for the job. Below the heading, the specified service order is displayed with the following input fields to enter labor used on the job.
EMPLOYE-ID
Type the employee ID for the employee whose time is being entered for this service call. If this is a valid not terminated, not confidential employee ID, the system will display the employee's name and work class.CLASS
Change the work class (as set up in 2-12: Labor Rate Maintenance), if needed. This work class determines the billing rate per hour.WRK-DATE
Type the date on which the work was performed.The next three fields for hours will be entered twice - once for the number of hours to charged for the work (first line), and once for the number of hours the employee actually worked (second line). The payroll hours may optionally be transferred directly to payroll time entry. This accommodates service order policies relating to minimum charges.
EXAMPLE: As in the example above, if your policy is to charge to the next quarter hour, an employee who worked 2.75 hours on a job would have 2.75 time charged to payroll, and the service order would bill the customer for 3.00 hours.
RT-HRS
Type the number of regular pay hours.OT-HRS
Type the number of overtime hours.DT-HRS
Type the number of double time hours.RATE
This is the hourly billing rate which is derived from the work class of this employee and the labor code for the labor table used on this service order. The system will look at the labor table for the labor code you have entered and select the labor rate from the table for the work class of this employee.If you are using a simplified labor table with labor classes of Reg for regular time work, OT for overtime work, and DT for double time work, the system will display the hourly rate for the Reg labor class.
This hourly rate may now be changed (for this entry only) if required.
WORK DESC
You may enter a short description of the work performed. That can be printed on the invoice for the service order.AMOUNT
The system will calculate and display this total labor charge from the hours and hourly rate for this employee.Keep entering items. When done press HOME to get out of the add/insert mode.
Using the bottom line menu, you may now go back and update (change), add (insert), or delete entries as necessary. When you are finished, press END and the system will return to the previous menu.
This selection allows entering miscellaneous charges applicable to the service call. This selection will display the following input screen :
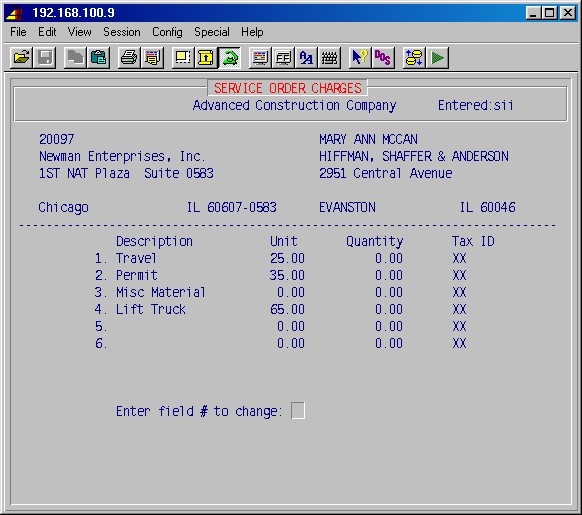
This screen displays in the heading the customer ID and the customer's name and address and the work address and the contact person for the job. Below the heading, the specified service order is displayed with several input fields to enter miscellaneous expenses and charges for this job.
NOTE: Some or all of these fields, as well as the number of fields, may be customized for your business so that the description and unit amount do not have to be typed in each time. This is done by selecting from the main menu 13-8-6: Control Record for Service Orders.
Description
Unit
The description and unit charge for a miscellaneous item previously entered in 13-8-6: Control Record for Service Orders, will be displayed in these two fields.If you want to add a new line item for this service call only, when prompted, you may type a field number for an unused line, (or replace one of the already used lines) press ENTER, and then type in the description and the unit charge.
Quantity
Type the quantity for each applicable line item here.Tax ID
If this item is subject to any state or local taxes, type the tax ID here.You may now go back and change any entries if necessary by entering the field number, and making the change. Note that if you change a line item previously entered in 13-8-6 Control Record for Service Orders, you are only changing it for this service order. When you are completely finished entering the miscellaneous charges, press ENTER again and the system will return you to the 2-6: Complete Ticket Menu.
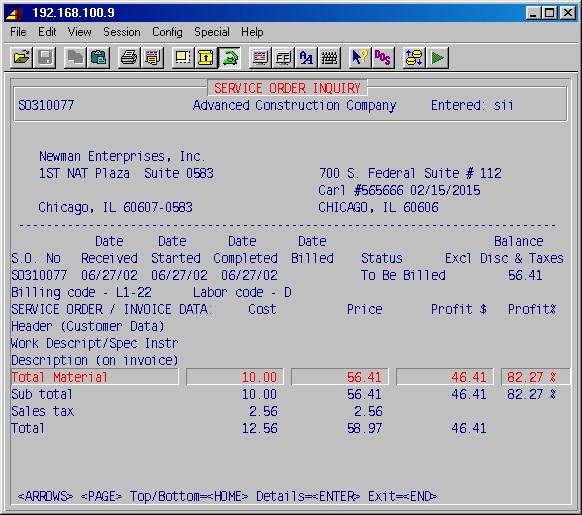
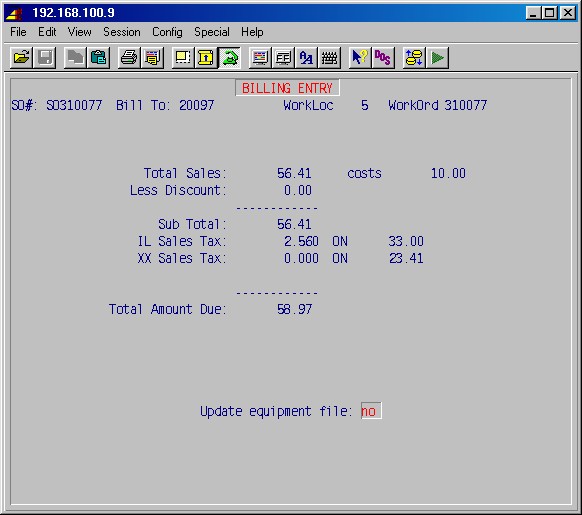
This selection will display the invoice total, subtotaling material, labor and miscellaneous expenses, and adding sales tax if required. This selection will display the following screen:
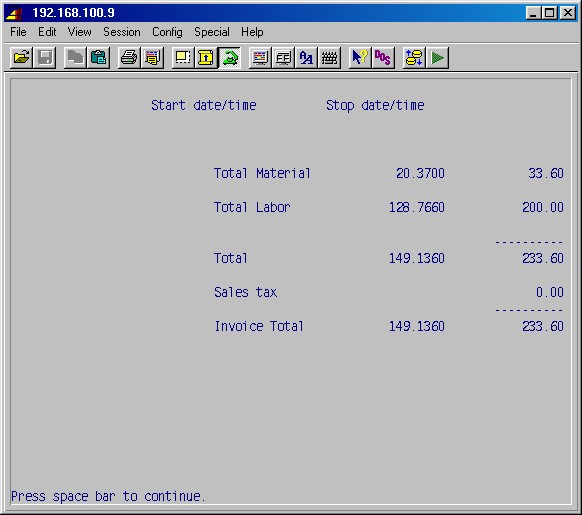
The first column is cost and the second column is what the customer is charged.
The totals on this screen may only be changed by going back to the service order charges input screens for material, labor, and miscellaneous and updating or adding to the charges in those areas. This total screen will be automatically updated with the new sub-totals, sales tax, and invoice total, and may be viewed as often as necessary.
When you are finished viewing this screen, press just ENTER and the system will return you to the 2-6: Complete Ticket Menu.
When you are finished adding charges to this service order, press ENTER again and the system will return you to the 2-6 Service Order Charges first input screen and prompt you for another customer ID or service order number.
You may now add charges to another service order, or press just ENTER and the system will return you to the #2 Service orders main menu.
This selection allows you to make changes to the service order setup information
(header).
ENTER FIELD # TO CHANGE, RETURN TO CONTINUE
Type the number of the field you wish to change and press ENTER.When finished with changes, just press ENTER.
This selection allows you to specify the invoice date and the due date for the service order invoice as well whether or not to detail labor, material, and miscellaneous on the invoice.
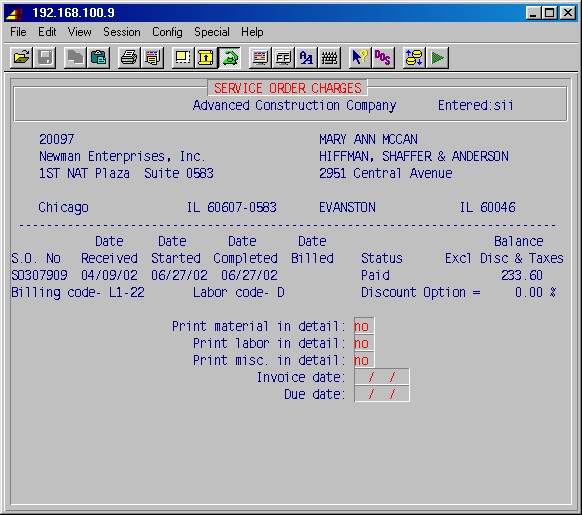
Print material in detail
Print labor in detail
Print misc. in detail
Type YES after the appropriate line or lines if you want the invoice to print a detail of material, labor, or miscellaneous.Invoice date:
Specify the date you wish to appear on this invoice. Normally blank.Due date:
Specify the due date for this invoice. Normally blank.
This selection will display the "special instructions" entry area, as originally entered in 2-1: Service Order Entry, and allow you to edit this text as required.
This selection will display the "description of work" entry area, as originally entered in 2-1 Service Order Entry, and allow you to edit this text as required.
Not used.
This procedure allows billing of a service order against a flat rate price book as set up in 2-15-6: Price Book Maintenance.
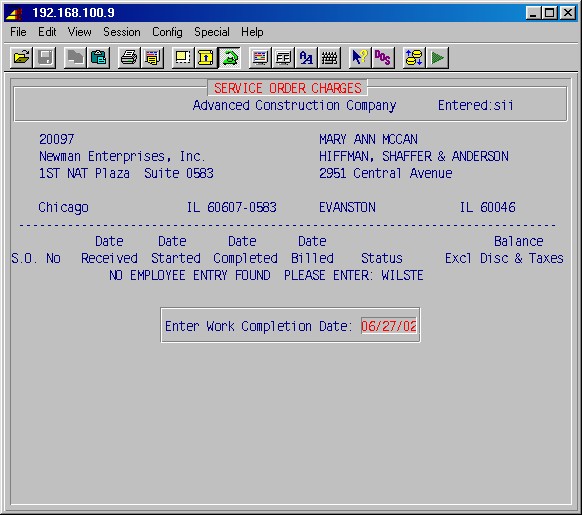
NO EMPLOYEE ENTRY FOUND PLEASE ENTER:
If not previous entries have been made, you'll be asked to enter the ID [H] of the employee (technician) who did the work on this service order here.Enter Work Completion Date:
Enter the date the work was completed on this service order.If no previous entries have been made from the price book, you'll be prompted:
NO PRICE BOOK ENTRIES ADD:
Simply press ENTER to proceed.

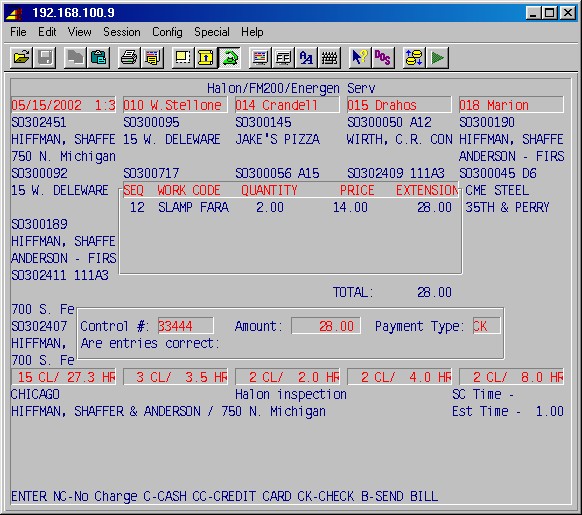
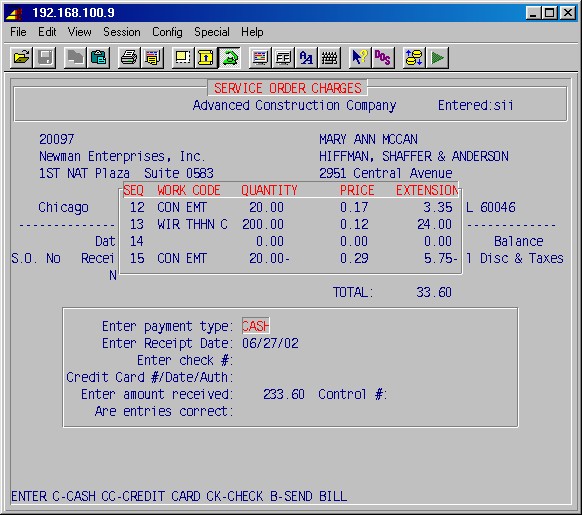
SEQ
The system will automatically number the lines, starting with12. WORK CODE
Enter the code [H] for the work done.QUANTITY
Enter the quantity. You'll be shown the valid prices from which to choose for this work code.PRICE
You must type one of the valid prices here (or 0).EXTENSION
The system calculates and displays the total for this line, as well as the total.Keep entering work done on this service order. Press HOME to get out of the add/insert mode.
You can now use the ENTER, INSERT and DELETE keys to update, add or delete lines.
Press END when you are finished entering work, and you'll be prompted:
Enter payment type:
Enter C for cash, CC for credit card, CK for check or B if an invoice is to be printed and sent to the customer.Enter Receipt Date:
Enter the date payment was received.Enter check #:
Enter the check number, if paid by check.Credit Card #/Date/Auth:
Enter the credit card number, expiration date and authorization code received for the amount.Enter amount received:
Enter the amount received or called in on the credit card.Control #:
Enter the number of the receipt (invoice) given to the customer when payment was received.Are entries correct:
If the above entries are correct, just press ENTER. Otherwise type N and ENTER to go back and correct entries.
This selection prints all service orders for the current operator, which have not been previously printed.
Selecting this procedure will first prompt:
Print equipment:
If the customer has a preventive maintenance or service contract for the work address on this service order, enter YES here if you want any equipment listed for the contract printed on the service order. Otherwise just press ENTER.
Next you will see the printer selection screen. Type the printer number and the number of copies and press ENTER. The system will prompt:
Did Service Orders Print OK :
NO If you want to reprint the SOs for any reason, press just ENTER. If you are through printing, type YES ENTER and the system will return you to the #2 Service order main menu.
These procedures allow you to view and analyze your service orders in various ways, including gross profit on service orders by job and by technician. This selection will display the following menu screen:
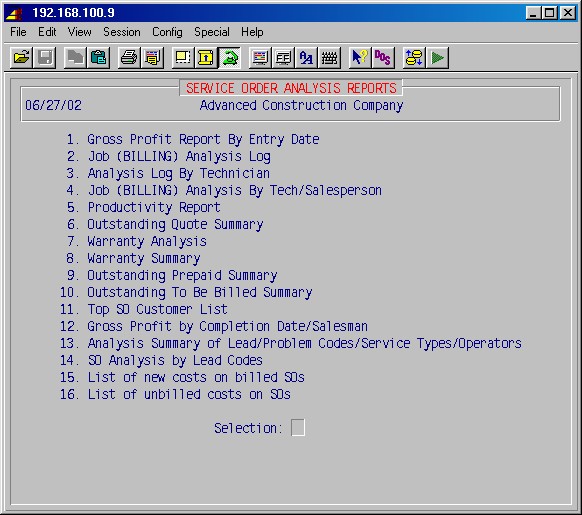
This procedure will produce a one line gross profit report of each service order for a specified range of service order entry dates. This report shows the SO number, order date, total materials, total miscellaneous, total labor, total tax, material and labor cost, gross profit, and the amount billed. Lines are listed in order of SO number.
This selection will display the following menu screen :
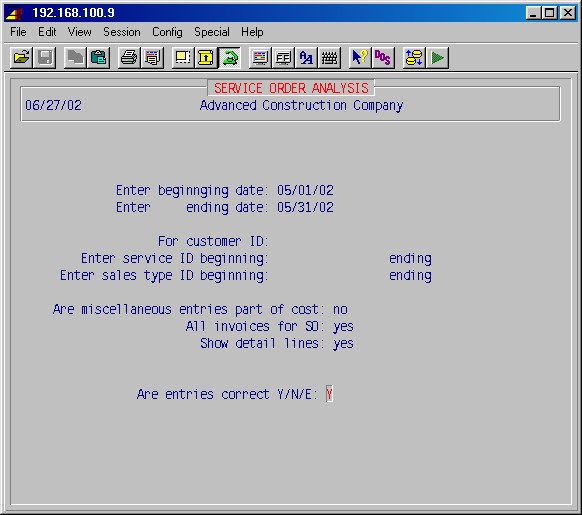
Enter beginning date:
Enter ending date:
Type the range of dates for the service orders you wish to print. Leave these fields blank if you want to print all billed service orders.For Customer ID:
If you want to limit the report to only service orders for a specific customer, enter the customer ID here.Are Miscellaneous entries part of cost:
If you don't want the amounts charged for miscellaneous entries (as entered in 2-6-4) to be included in costs, just press ENTER. Otherwise type Yes and press ENTER.All invoices for SO:
If you answer No here, only invoices in the above date range will be included in the calculations.Are entries correct: NO
Type YES ENTER if the above entries are correct.The printer selection screen will now be displayed. Type the printer number and the number of copies and press ENTER. Your report will be printed and the system will return you to the 2-8: Analysis Reports Menu.
This procedure will print a one line cost analysis report for billed service orders for a specified range of billing dates, all invoices or just invoices in the selected billing date range. This report shows the SO number, customer ID or name, billed amount, material cost, labor cost, miscellaneous cost, total cost, gross profit, gross profit %, payroll hours, billing hours, and labor and material percentages of total cost, listed in order of service order number.
This selection will display the following input screen :
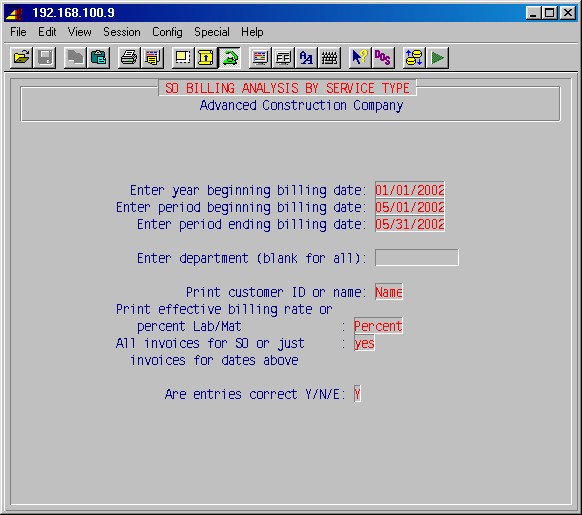
Enter beginning billing date:
Enter ending billing date:
Type the range of dates for the service orders you wish to print. Leave these fields blank if you want to print all billed service orders.Enter department (blank for all):
If you want to limit the report to just service orders for one department (sales type), enter its ID here.Print customer ID or name:
You can choose between having the customer's ID or Name printed on the report.All invoices for SO or just
invoices for dates above:
If you answer No here, only invoices in the above date range will be included in the calculations. The printer selection screen will now be displayed. Type the printer number and the number of copies and press ENTER.Your report will be printed and the system will return you to the 2-8: Analysis Reports Menu.
This procedure will print a one line cost analysis report for billed service orders for a specified range of billing dates and a specified technician or all technicians. This report shows the SO number, customer ID, technician, amount billed, material and labor cost, material and labor billed, and material, burdened labor and total profit percentages, sorted in groups of technicians, and listed by customer ID.
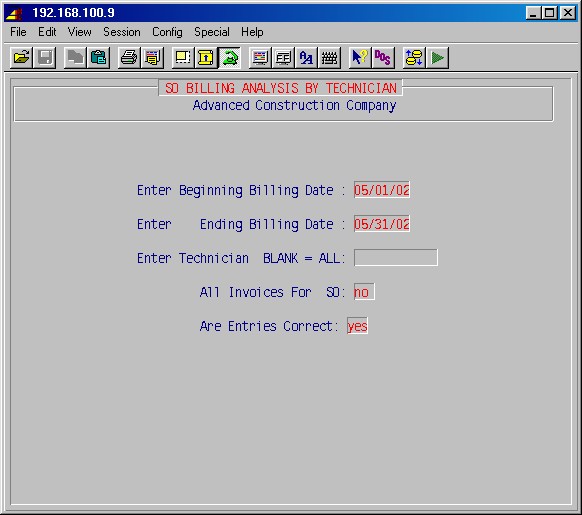
Enter Beginning Billing date:
Enter Ending Billing date:
Type the range of dates for the service orders you wish to print. Leave these fields blank if you want to print all billed service orders.Enter technician BLANK = ALL:
Type the technician's ID or press just ENTER to print a report with all technicians.All invoices for SO:
If you answer No here, only invoices in the above date range will be included in the calculations.Are entries correct: NO
Type YES ENTER if the entries are correct.The printer selection screen will now be displayed. Type the printer number and the number of copies and press ENTER. Your report will be printed and the system will return you to the 2-8: Analysis Reports Menu.
This procedure will print a one line cost analysis report for billed service orders for a specified range of billing dates and a specified technician or all technicians. This report shows the SO number, technician, billed amount, material cost, labor cost, miscellaneous cost, total cost, the gross profit, gross profit %, payroll hours, billing hours, and labor and material percentages of total cost, sorted in groups of technicians, and listed by service order number.
This procedure will print a list of technicians (employees) for a selected period (week), showing employee ID and name, regular, overtime and doubletime hours, SO and shop time, % SO time, % shop time and % of SO and shop time versus total hours paid the employee for the period.
This report will print a list of service orders with status of "quote" in a selected date range, showing date, service order number, work address, work description, payroll hours and quoted amount.
This procedure will print a one line cost analysis report for billed service
orders with status of "warranty" for a specified range of billing
dates, all invoices or just invoices in the selected billing date range.
This report shows the SO number, customer ID, billed amount, material cost,
labor cost, miscellaneous cost, total cost, gross profit, gross profit %,
payroll hours, billing hours, and labor and material percentages of total
cost, listed in order of service order number.
This report will print a list of service orders of status "warranty" with order dates in a selected date range, showing order date, service order number, customer ID, work address, work description and total cost, listed in order of service order number.
This report will print a list of prepaid service orders with order dates in a selected date range, showing order date, service order number, customer ID, work address, work description and amount paid, listed in order of service order number.
This report will print a list of service orders ready to be billed with order dates in a selected date range, showing order date, service order number, customer ID, work address, work description and amount to be billed, listed in order of service order number.
This report will either print mailing labels or a summary for a selected number (1 - 999) of top customers, with service orders in a selected order date range, for all or a selected labor code, with the summary showing customer ID, name, number of service orders and amount billed, listed in order of number of service orders per customer.
This report will print a profit analysis of all service order invoices in a selected date range, listed in order of salesman. It will show the SO number billed on the invoice, total material, total miscellaneous, total labor, total tax, total to be billed, material cost, labor cost, gross profit (with an option to include the miscellaneous billed in the cost) and amount billed.
This will display a count of service orders for each type lead code or each Service Type in a selected date range, and optionally also print these summaries.
This procedure will print a one line cost analysis report for billed service
orders for a specified range of billing dates or entry dates, grouped and
subtotaled by lead code. This report shows the SO number, customer ID or
name, billed amount, material cost, labor cost, miscellaneous cost, and
total cost, gross profit, gross profit %, payroll hours, billing hours,
labor and material percentage of total cost.
This selection will first prompt:
Service order analysis by Lead or Service type?
Press ENTER for analysis by lead type or press S and ENTER for analysis by service type.
Selecting analysis by lead type will display the following input screen :
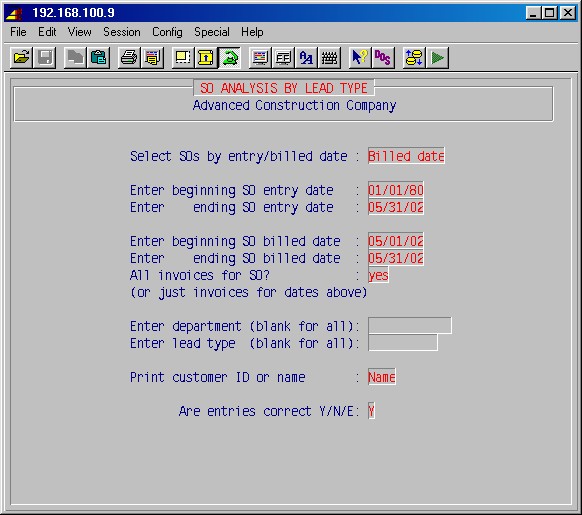
Select SOs by Entry date or Billed date?
You may select the service orders either by their entry date or the date they were marked as billed.Enter Beginning SO entry date:
Enter Ending SO entry date:
Enter a date range for service order entry dates (or leave blank for unlimited).Enter Beginning SO Billed date:
Enter Ending SO Billed date:
Enter a date range for service order billed dates (or leave blank for unlimited).All invoices for SO?
(or just invoices for dates above)
If you answer No here, only invoices in the above billing date range will be included in the calculations.Enter department (blank for all):
If you want to limit the report to just service orders for one department (sales type), enter its ID here.Print customer ID or name:
You can choose between having the customer's ID or Name printed on the report.Are entries correct?
Type No to go back and correct the above entries, otherwise just press ENTER.
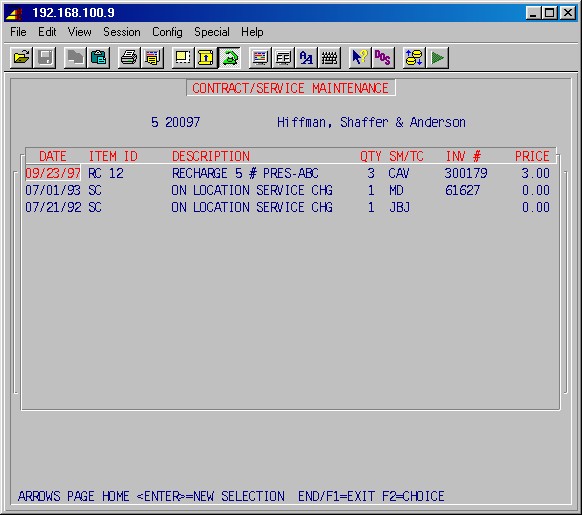
This is a list of costs in a selected cost date range, charged to a service
order after it has been billed. It shows the SO number, customer
ID, order date, cost date, amount and whether it's labor or material. These
costs are listed in order of service order number.
This is a list of costs in a selected cost date range, yet to be billed on unbilled service orders. It shows the SO number, customer ID, order date, material, labor and total cost, and the billable amount.
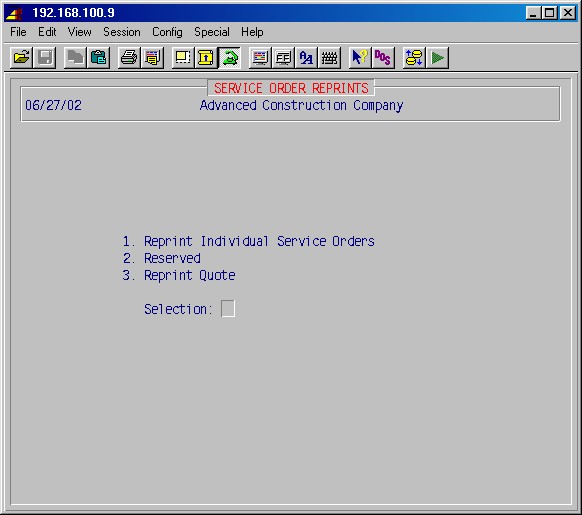
This selection permits reprinting subsequent copies of service orders, so that, for example, service personnel can turn in one copy at the end of one day and take a fresh copy with them the next day for continued work. You may also reprint a quote if desired. This selection will display the following menu:
This procedure reprints a specified service/call back order on plain paper. This procedure will prompt:
Service/call back order to reprint______________
Type in the service order number and press ENTER. You'll be prompted:
Print equipment:
If the customer has a preventive maintenance or service contract for the work address on this service order, enter YES here if you want any equipment listed for the contract printed on the service order. Otherwise just press ENTER.Next you will see the printer selection screen. Type the printer number and the number of copies and press ENTER.
The system will reprint this service order and prompt you for another number. When you are through with this area, press ENTER again and the system will return you to the 2-9:Reprint SO & CB Menu.
No longer used. Use 2-9-1 above instead.
The first four procedures in this selection allow printing of invoices for service orders for which the status has been changed to "to be billed". This will print the service order on plain paper or a service order form and will automatically change the status of the SO to "billed".
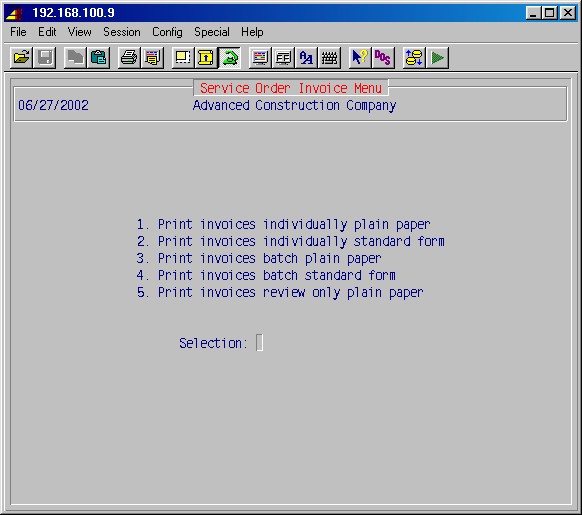
The fifth procedure, selection 2-10-5, allows printing review invoices for service orders of any status. This selection will display the following menu:
This selection will print service order invoices individually on plain paper or letterhead. The system will first prompt:
The system will display the following screen, for you to confirm you have selected the right service order:
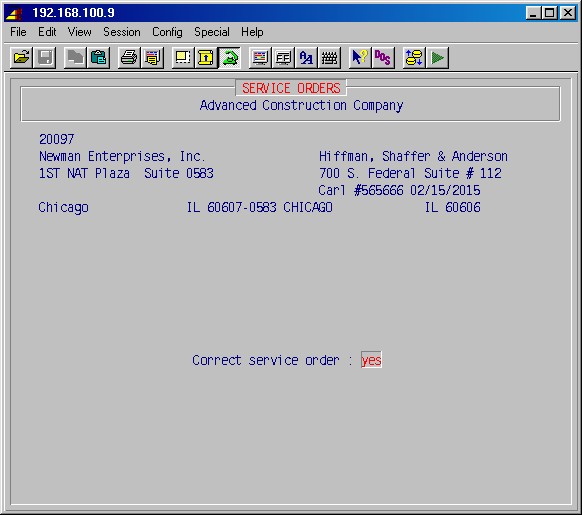
If right, just press ENTER. Otherwise type No and press ENTER to go back and select another service order.
Next, you will be prompted to specify the invoice date and the due date and other options allows you to specify the degree of detail you wish to include on your service order invoice. Specifying the default No to any of these items will print only the total for that item on the invoice.
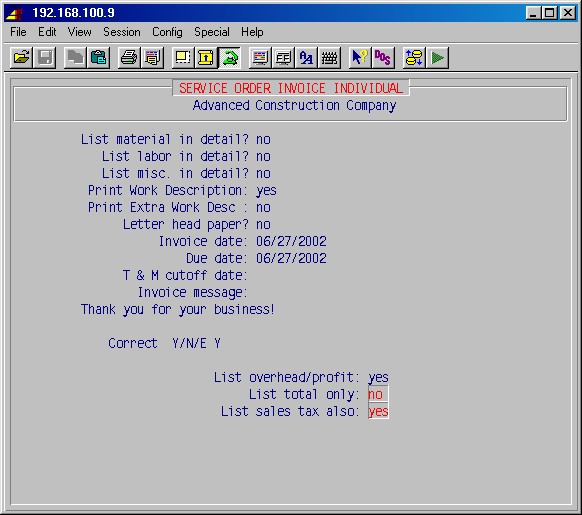
List material in detail:
Answer YES to print a complete list of material, unit cost, and sub-totals, plus the overhead and profit if these percentages were added to the labor classes in 2-12: Labor Rate Maintenance.
List labor in detail:
Answer YES to print a complete list of labor hours including the date worked, number of hours of straight, overtime, and doubletime, the description of work or work class, and the hourly rate.
List misc. in detail:
Answer YES to print a complete list of miscellaneous charges and the amounts.
Print Work Description:
Type No if you don't want to work description from the service order printed on the invoice.
Letter head paper?
If you answer NO, the system will print the name, address, and phone number of your company on the top of the paper.
If you answer YES, the system will leave a space at the top for your letterhead and will not print the name of your company at the top.
Invoice date:
Type the date you wish to appear on this invoice and press ENTER.
Due date:
Type the due date for this invoice and press ENTER. This default will be overridden by each customer's terms.
T & M cutoff date:
If you only want to include labor and material up to a certain date, enter this date here.
Invoice message:
Enter an (optional) message to print on the invoice.
Are entries correct:
Answer NO if you need to go back and make any changes. Answer YES to continue.
List overhead/profit:
Answer YES if you want the overhead and profit to show as separate
line items. If you answer NO, the overhead and profit items will
not show on the invoice, but the dollar amounts for these items will be
included in the material sub-total.
NOTE: If you answered YES to list material in detail, the profit and overhead will show as separate line items under material anyway.
List total only:
Answer YES if you want only a total before tax with no subtotals for material, labor, or miscellaneous.
List sales tax also:
Answer YES if you want the applicable sales tax to be shown as a separate item.
The printer selection screen will now be displayed. Type the printer number and the number of copies and press ENTER. The invoices will now be printed.
Did invoice print correctly : YES
Check to see that the invoice printed correctly. This is your last chance to reprint them if necessary. If you answer NO, you may go back and reprint them, making changes in the specifications for detail if necessary. If you answer YES, the status of the SOs will be changed to "billed" and you will not be allowed to print them again.
This procedure works exactly like 2-10-1: Print Invoices Individually on Plain Paper, except the printing will be formatted for standard service order invoice forms. To run this procedure, follow the instructions HERE.
This procedure will print in one batch, on plain paper or letterhead, all service order invoices with the status "to be billed" which were entered by this operator.
Answer the options as in 2-10-1: Print Invoices Individually Plain Paper, above.
Did invoices print correctly : YES
Check to see that the invoices printed correctly. This is your last chance to reprint them if necessary. If you answer NO, you may go back and reprint them. If you answer YES, the status of the SOs will be changed to "billed" and you will not be allowed to print them again.
This procedure works exactly like 2-10-3: Print Iinvoices Batch Plain Paper, except the printing will be formatted for standard service order invoice forms. To run this procedure, follow the instructions starting HERE.
This procedure allows you to print a review invoice for a specified service order or all service orders in various status categories. Selecting this procedure will display the following menu:
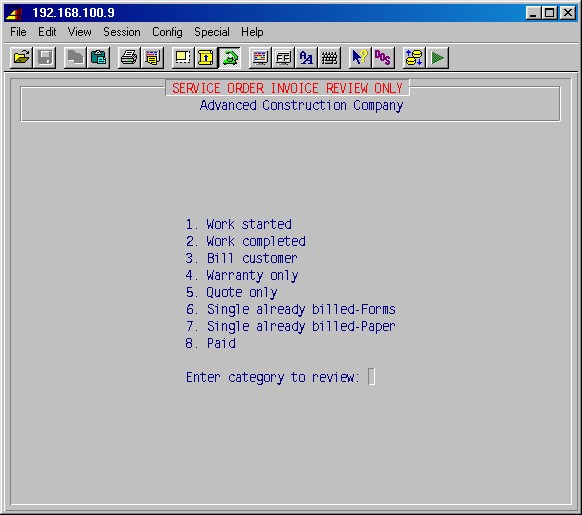
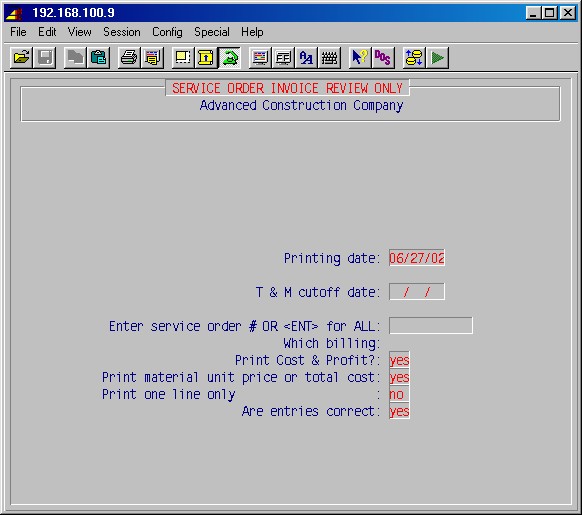
Printing date:
Type the date which you wish to appear on the top of these invoices. This date has no other purpose.
T & M cutoff date:
If you only want to include labor and material up to a certain date, enter this date here.
Enter service order # or <RET> for ALL:
Specify a service order number or press ENTER to print all SOs in this status category.
Which billing:
For choices 6 and 7 (Single already billed-Forms/Paper), if you specified a service order above, you can specify here for which billing you want the invoice printed. Enter 1 for the first billing of the service order, 2 for the second, etc., or you may leave it blank to include all billings for the service order.
Are entries correct:
Answer NO if you need to go back and make any changes. Answer YES to continue. The printer selection screen will now be displayed. Type the printer number and the number of copies and press ENTER. The review invoices will now be printed.
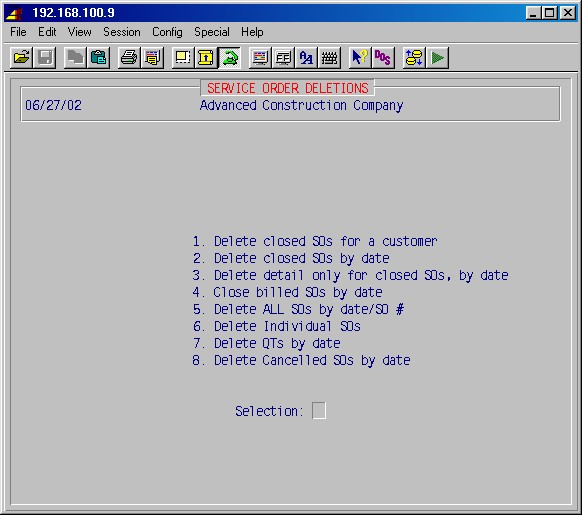
The first three procedures in this section allow the deletion of closed service orders. The fourth procedure allows the closing of billed service orders. Service orders may only be deleted if they are closed. You must use step 2-11-4 to close the service orders before steps #1, #2, or #3 will work. This selection will display the following menu:
This procedure allows you to delete closed service orders by customer ID for a specified range of dates. This selection will display the following input screen :
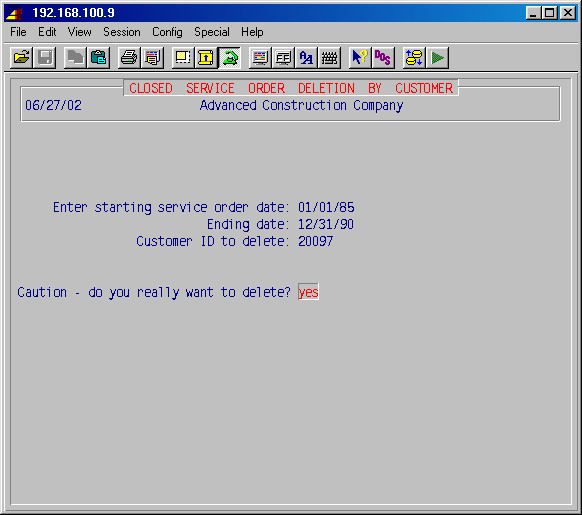
Enter starting service order date:
Ending date:
Type the range of dates of closed service orders you wish to delete for this particular customer. If you want to delete only one day, enter that date in both fields.Customer ID to delete:
Type the customer ID for the SOs you wish to delete.Caution - do you really want to delete? NO
This is your last chance. If you are not sure of the dates, press just ENTER to get out of this procedure and go back to the 2-11: Delete Service Orders Menu. If you are ready, type YES ENTER, and the specified SOs will be deleted from the system.
This procedure will delete closed service orders for all customers for a specified range of dates. This selection will display the following input screen :
Enter starting service order date:
Ending date:
Type the range of dates of closed service orders you wish to delete for all customers. If you want to delete only one day, enter that date in both fields.Caution - do you really want to delete? NO
This is your last chance. If you are not sure of the dates, press just ENTER to get out of this procedure and go back to the 2-11: Delete Service Orders Menu. If you are ready, type YES ENTER, and the specified SOs will be deleted from the system.
This is a custom program not applicable for most situations.
This procedure will force a change in the status of a specified group (by date) of service orders from "billed" to "closed". This would normally be used in preparation for steps 2-11-1 through 2-11-3 above. This selection will display the following input screen :
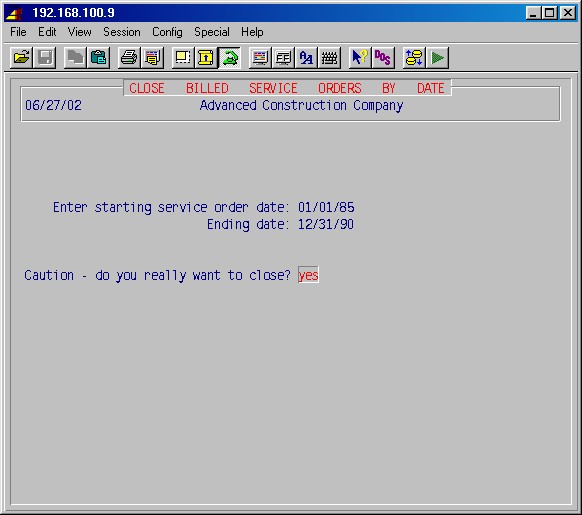
Enter starting service order date:
Ending date:
Type the range of dates of closed service orders you wish to delete for all customers. If you want to delete only one day, enter that date in both fields.Caution - do you really want to close? NO
This is your last chance. If you are not sure of the dates, press just ENTER to get out of this procedure and go back to the 2-11: Delete Service Orders Menu. If you are ready, type YES ENTER, and the specified SOs will be deleted from the system.
CAUTION: THIS PROCEDURE SHOULD BE USED ONLY WITH EXTREME CAUTION. IMPROPER ENTRY OF DATES CAN DELETE ALL SOs INCLUDING CURRENT ONES YOU DO NOT INTEND TO DELETE.
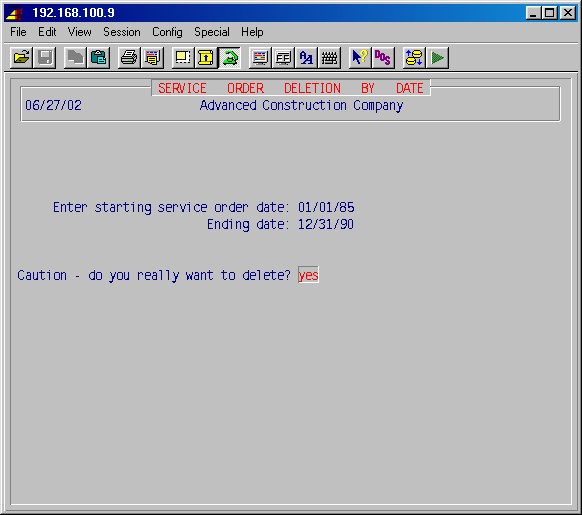
This procedure will delete all service orders by date, regardless of their status. This procedure should be used with extreme caution and is normally used only to delete very old service orders without first having to change their status to "closed".
This selection will prompt:
Enter starting service order date: / /
Ending date: / /
Type the range of dates for the service orders you wish to delete and press ENTER. The system will prompt:
Caution - do you really want to delete? NO
Press just ENTER to abort this procedure. If you are sure and are ready to proceed, type YES ENTER. The specified service orders will be deleted and the system will return you to the 2-11: Delete Service Orders Menu.
This procedure allows you to delete individual service orders by number, regardless of their status. This selection first prompts:
Enter service order number to delete:________
Enter the complete service order number (so + 5 digits) and press ENTER. The system will prompt:
Are you sure you want to delete_______ NO
The system will display the SO number you entered for verification. If this is correct, and you really want to proceed, type YES ENTER and the specified service order will be deleted from the system.
This procedure will delete quotes (order numbers beginning with QT) for all customers for a specified range of dates. This selection will display the following input screen :
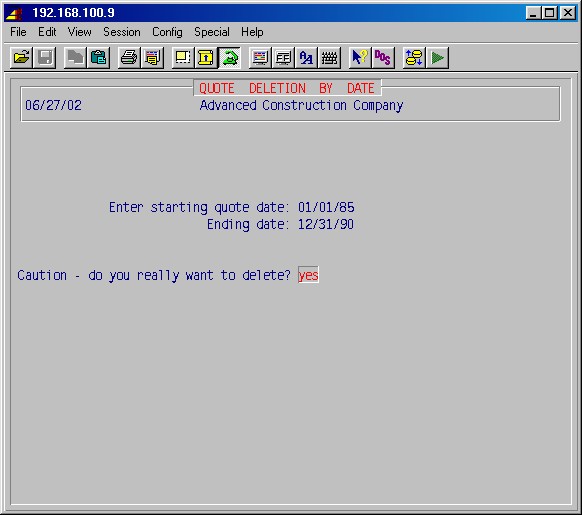
Enter starting quote date:
Ending date:
Type the range of dates of quotes you wish to delete for all customers. If you want to delete only one day, enter that date in both fields.Caution - do you really want to delete? NO
This is your last chance. If you are not sure of the dates, press just ENTER to get out of this procedure and go back to the 2-11: Delete Service Orders Menu. If you are ready, type YES ENTER, and the specified quotes will be deleted from the system.
This procedure allows you to set up and maintain labor class tables with specified
labor rates for billing service orders. These are user-defined tables which
facilitate billing different labor rates for different classes of employees
and different customers. These tables are assigned "Labor class IDs"
which may be entered for each customer (7-1-2: Miscellaneous
Customer Data) or for each work address for a customer (1-1-10
or 2-14: Work Address Maintenance) in the field Labor code.
During service order entry (2-1), the system will use the
code set up for the selected work address or customer. The default of S
is set up for each work address and customer. Thus the table S must be
set up.
Each table is assigned an ID such as S = standard, R = retail,
P = preferred, or any code of your choosing. Then, you build a table
by work class, assigning the hourly rate you wish to charge.
If there is no need to bill a different labor rate for journeyman versus foreman, versus helper, then a simplified labor rate table may be constructed with labor classes of Reg for regular work, OT for overtime work, and DT for doubletime work. Otherwise, the work class for each employee, such as J, A65, A45, must be entered in the table with its appropriate billing rates.
In order for the work class to automatically fill in when billing time for an employee on a service order, the work class codes should correspond to the codes entered for employees (5-1-1 #20). If you have different trades, you should set up different work classes for each trade, e.g. JP Journeyman - Plumber, A45P Helper - Plumber, JE Journeyman - Electrician, A45E Helper - Electrician, etc.
This selection will display the following input screen :
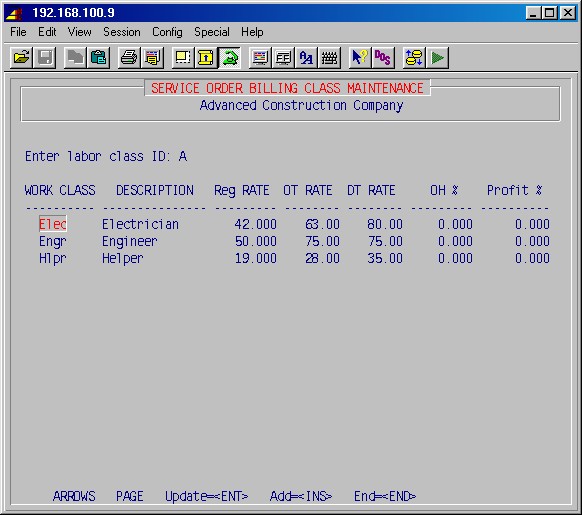
Enter labor class ID:
If you are creating a new table, type an ID (up to four characters) of your choice and press ENTER. When prompted NO ENTRIES ADD: Yes, just press ENTER.If you are updating an existing table, type the labor class ID [H] and press ENTER. If this is a valid ID, the system will display the work classes previously entered. Use the ARROW, PAGE, ENTER and INSERT keys as needed to select, update and add entries, as needed.
WORK CLASS
Type the work classification code [H] and press ENTER.
DESCRIPTION
Type the description for this work class and press ENTER.
Reg RATE
Enter the rate in dollars/hour a customer is charged for regular time.
OT RATE
Enter the rate in dollars/hour a customer is charged for overtime.
DT RATE
Enter the rate in dollars/hour a customer is charged for double time.
OH %
Not currently used.
Profit %
Not currently used.
When done with entering work classes for this labor class, press END. Enter another labor class to set up, or leave blank and press ENTER to return to the service order menu.
These procedures are an alternate for payroll 5-8-2: Time Card Entry by Employee, payroll 5-9-1 Time Card Edit by Job, and payroll 5-9-3 Time Card Edit by Employee. Employee time entered in service orders may be transferred to payroll and is treated in payroll as if it had been entered in payroll step 5-8-2. Time card edit reports may then be printed for this service order time by job or by employee. This selection displays the following menu:

To transfer time to payroll, select 5-8-9: Transfer Service Order Time to Payroll.
This procedure is an alternate for payroll 5-9-1 Time Card Edit by Job and will print a time card edit report by job for all service order time cards which were previously transferred to payroll using 5-8-9. This selection will first prompt:
One line per employee NO
If you want a detailed report with each time line subtotaled by job, press just ENTER. If you want a report with one line per employee with that employee's total hours, subtotaled by job, type YES ENTER.
The printer selection screen will now be displayed. Type the printer number and the number of copies and press ENTER.
Your report will now be printed and the system will return you to the 2-13: Payroll Processing Menu.
This procedure is an alternate for payroll 5-9-3: Time Card Edit by Employee and will print a time card edit report by employee subtotaled by employee, by job, for all service order time cards previously transferred to payroll in step 5-8-9.
Selecting this procedure will display the printer selection screen. Type the printer number and the number of copies and press ENTER.
Your report will now be printed and the system will return you to the 2-13: Payroll Processing Menu.
This procedure allows you to enter labor on service orders. This procedure provides a faster way of entering just labor on one or more service orders. In this procedure you simply enter the service order number, employee ID, date, hours and rates.
This selection will display the following input screen :
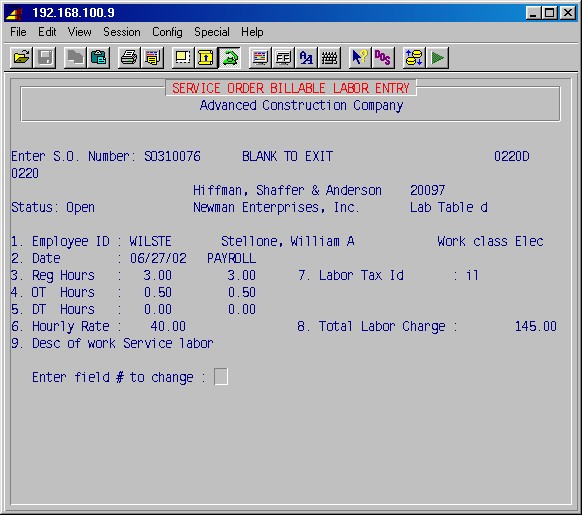
Enter S.O. Number:
Type the service order number here. Note - for speed, the "SO" prefix has been dropped from this field.1. Employee ID
Type the employee ID [H] for the employee whose time is being entered for this service call. If this is a valid employee ID, the system will display the employee's name and work class.Work class
If this is the correct work class, just press ENTER, otherwise type the correct work class and press ENTER.2. Date
Type the date on which the work was performed. The next three fields for hours will be entered twice - once for the number of hours to be billed for the job, and once (under the PAYROLL heading) for the number of hours the employee actually worked. The payroll hours may optionally be transferred directly to payroll time entry, using 5-8-9. This accommodates service order policies relating to minimum charges.EXAMPLE: If your policy is to charge to the next half hour, an employee who worked 2.60 hours on a job would have 2.60 time charged to payroll, and the service order would bill the customer for 3.00 hours.
3. Reg hours
Type the number of regular pay hours.4. OT hours
Type the number of overtime hours.5. DT hours
Type the number of double time hours.6. Hourly Rate
This is the hourly billing rate which is derived from the work class of this employee and the labor code for the labor table used on this service order. The system will look at the labor table for the labor code you have entered and select the labor rate from the table for the work class of this employee.If you are using a simplified labor table with labor classes of Reg for regular time work, OT for overtime work, and DT for double time work, the system will display the hourly rate for the Reg labor class.
This hourly rate may now be changed (for this entry only) if required.
7. Labor Tax ID
The labor tax ID (for labor sales tax) will be displayed from the customer or work address file or may be typed here as applicable.8. Total Labor Charge
The system will calculate and display this total labor charge from the hours and hourly billing rate for this employee.9. Desc of work
Optional. Type a description of work performed. Press ENTER.You may now go back and change any entries if necessary by entering the field number, and making the change. When you are completely finished entering this employee's hours, press ENTER again and the screen will prompt for the SO number. If entering more time for the same service order, just press ENTER. If done entering time for all service orders, press the space bar or the F8 key and press ENTER. If entering time for another service order, enter its number and continue as above.
This procedure allows you to print a pre-edit report of your time entries in step 2-13-4: SO Labor Speed Entry, as well as 2-6: Complete Ticket, before they are transferred to payroll for a specified range of dates. This report is organized by Employee ID, and shows the service order number, date, employee ID, employee name, and the regular, overtime, and doubletime hours for both the billing time and the payroll time.
This selection will display the following input screen :
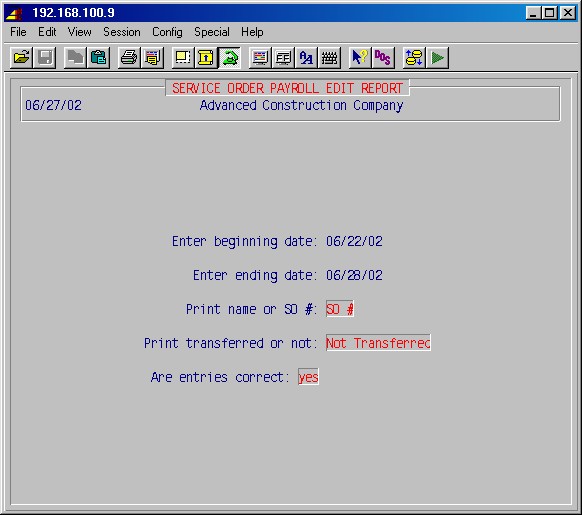
Enter Beginning Date:
Enter Ending Date:
Type the range of dates for the payroll entries you wish to edit. If you want to print one day only, you must enter that date in both fields.Print name or SO #:
If you also want the customers' name printed on the report, press N and ENTER.Are entries correct:
If these dates are correct, type YES and press ENTER. Your report will be printed and the system will return you to the 2-13: Payroll Processing Menu.
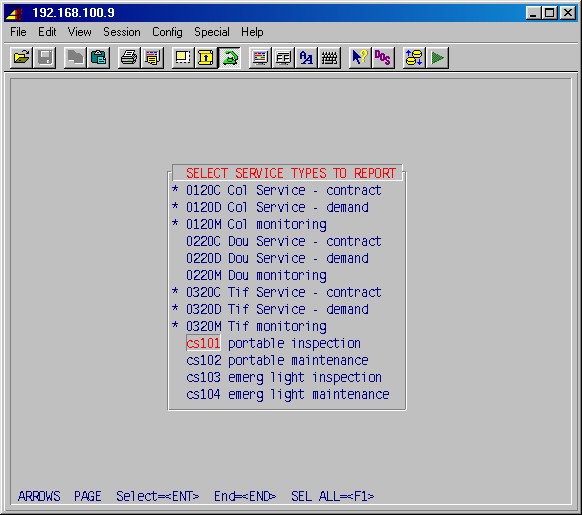
This procedure allows entering one or more job addresses for a customer to facilitate writing a service order in step 2-1: Service Order Entry. This procedure is generally used in situations where you write numerous service orders for one customer for work to be done at numerous different addresses.
This feature allows the person entering the service order to press F2 at the work address field and select from the previously entered addresses. Also, work addresses entered in 2-1: Service Order Entry, are automatically incorporated into the address list in this step.
This procedure allows you to add, delete, and update these addresses, as well as print a list of the addresses in this file. This selection will first prompt:
Enter customer ID:
Type the customer ID [H]. If this is a valid ID the system will display the customer name. Press ENTER and the following menu screen will be displayed :
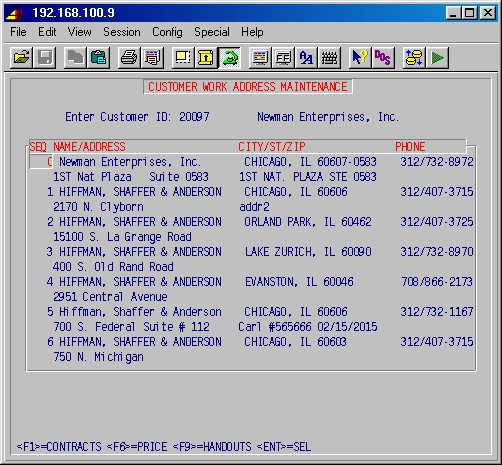
All previously entered work addresses for this customer will be displayed in numbered line entries. You may view all of the entries by using a combination of the ARROW, PAGE and HOME keys. If you want to update or delete a line, highlight the line number, and press ENTER or DELETE.
To add a new address press INSERT and complete the name, address, and phone number fields as prompted.
Note that the F1, F4, F6 and F9 keys give access to the contracts, service history, price book and handouts for the work address, as covered in detail below under 2-16-1: Contract Maintenance.
When you are finished with this area press END and the system will prompt:
Print Work Address List: NO
Type YES and press ENTER if you want to print the list. The system will prompt:
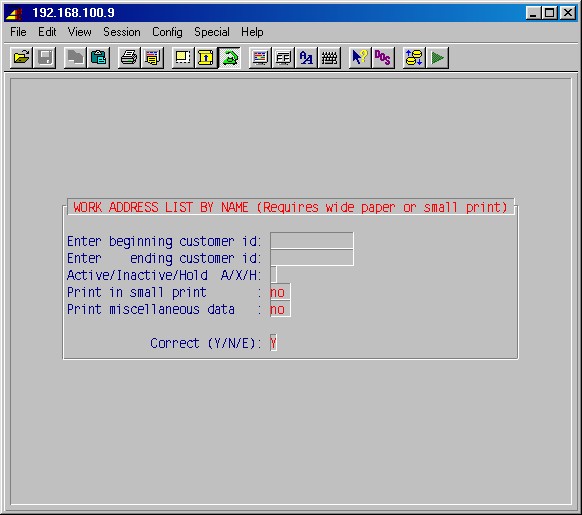
Type the range of customer ID's you wish to print, or leave both fields blank to print a lost with all customers' addresses.
Print in small print:
As the report prints 4 work addresses across the page you will need to either use wide paper or use small (compressed) print. If you are not using a wide carriage printer, type Yes and press ENTER.
Print miscellaneous data:
Type Yes if you also want the Tax IDs, Labor Codes and Price Codes printed for each work address.
Correct (Y/N/E):
Type Y to start printing, N to go back and correct the above or E to abandon printing, then press ENTER.
The printer selection screen will now be displayed. Type the printer number and the number of copies and press ENTER. Your report will be printed and the system will return to the Service Order main menu.
See Also: 1-1-11: Design Your Own.
The sequence in which to these procedures are to be done for initial setup are covered earlier in this manual under SERVICE ORDER SETUPS.
Problem codes allow an operator entering a service call to specify with just a few letters the nature of the service call.
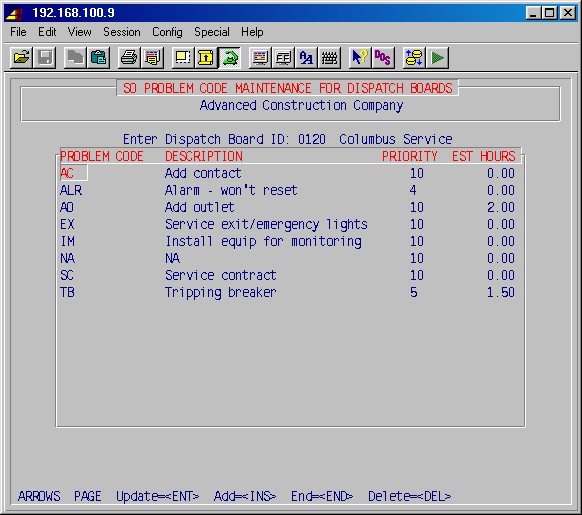
Enter Dispatch Board ID:
Enter the ID [H] of the dispatch board (as set up in 2-15-3: Setup Dispatch Boards) for which you'll be setting up problem codes.
PROBLEM CODE
Enter a problem code (maximum three characters).
DESCRIPTION
Enter your description of this problem code.
PRIORITY
Enter the relative priority of service calls with this problem code. Priorities range from 1 to 99 where 1 is the highest priority.
EST HOURS
Enter the normal estimated hours to complete this type of call.
Enter at least one problem code for each dispatch board you have set up in 2-15-3: Setup Dispatch Boards. This could be just a cc for check equipment, or at least an na if you don't want to use this feature.
Press END when done with a dispatch board. When done with all dispatch boards, simply press ENTER when prompted for dispatch board ID.
Lead codes allow you to analyze service orders against their sources, e.g. yellow pages, newspaper ads, customer referral.
Enter at least one lead code, e.g. na.
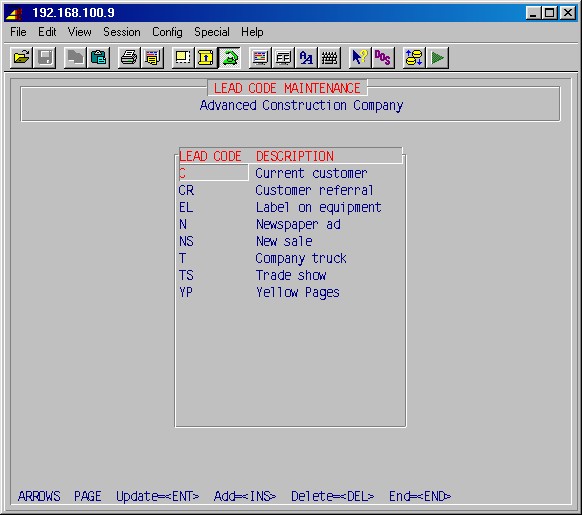
LEAD CODE
Enter the code for this kind of lead.DESCRIPTION
Enter a description for this kind of lead.When done press END.
The purpose of a dispatch board is to be able to collect service calls into groups (which we call dispatch boards) for the purpose of dispatching different types of service calls. You need to set up at least one board.
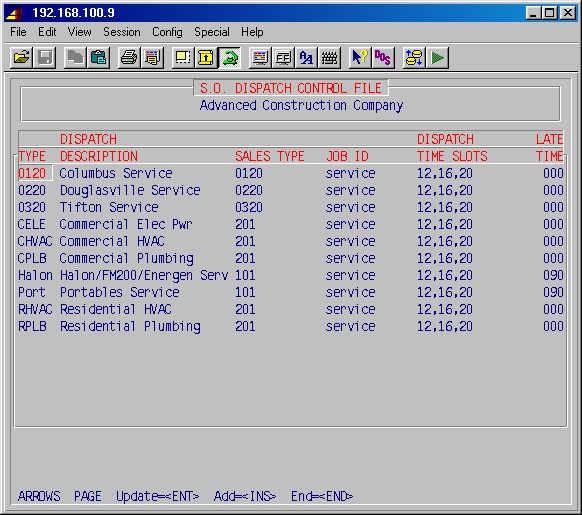
TYPE
Enter the ID for the dispatch board (maximum 5 characters).DISPATCH
DESCRIPTION
Enter a description for this dispatch board.SALES TYPE
Enter a sales type (as set up in 1-4-1: Sales Type Maintenance).JOB ID
Normally service. This is the job ID that will automatically be filled in when entering new service orders in 2-1.DISPATCH
TIME SLOTS
When entering a truck or tech during entering a new service order in 2-1, you may press F5 to get a summary of calls in each of these time slots. Enter dispatch time slots cut-off times to define these slots - e.g. 12 (= 12 noon), 16 (= 4 pm), 20 (= 8 pm).LATE
TIME
If you have the Dispatch Board module, enter the period (in minutes) after which a service call is considered late (the call will turn red on the dispatch board if not called in before this number of minutes after scheduled time).Press END when done.
Note: Make sure to also give permission, in 13-2-10: Dispatch Board User Maintenance, to each operator who will be using a dispatch board. If a user does not have permission to run a dispatch board, he will not be able to enter the dispatch board ID during Service Order Entry (2-1).
Setting up "trucks" is the only way to make a person and truck available for the dispatch board. You need one or more entries in this list before a dispatch board will work. If you have people only, make up a truck number (truck numbers must be unique - don't duplicate). This is a cross reference between a real employee and a truck.
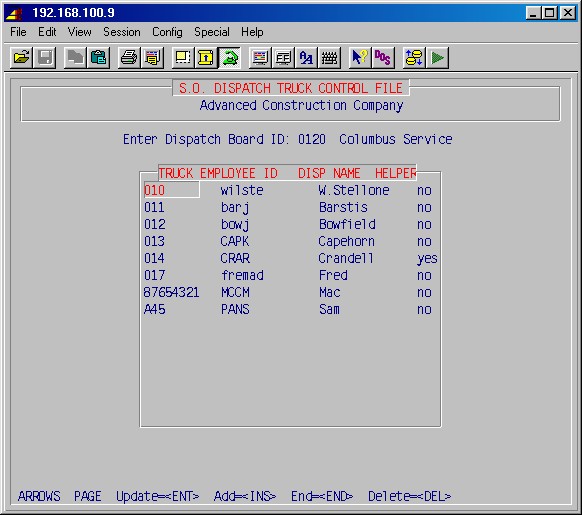
Enter Dispatch Board ID:
Enter the ID [H] of the dispatch board (as set up in 2-15-3: Setup Dispatch Boards) for which you'll be setting up trucks/employees.TRUCK
Enter the number of the truck (or just an arbitrary number).EMPLOYEE ID
Enter the ID [H] of the employee (as entered in 5-1-1: Employee Maintenance) associated with this truck.DISP NAME
Enter a name for this employee/truck as you wish it to appear on the dispatch board.HELPER
Enter Yes if this truck has a helper (multiple man truck). Enter a truck (whether real or just a number) for each service employee, for each dispatch board. Press END when done with a dispatch board. When done with all dispatch boards, simply press ENTER when prompted for dispatch board ID.
If you wish to enter map-coordinates for customers and work addresses, select this procedure to set up and maintain a table of map coordinates.
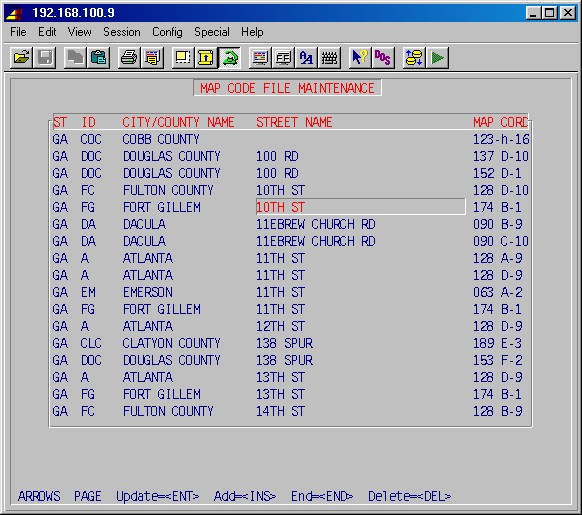
ST
Enter the two letter state abbreviation for this location.
ID
Enter a shorthand code for this city/county (maximum 5 characters).
CITY/COUNTY NAME
Enter the name of this city or county.
STREET NAME
Enter the name of the street of this location.
MAP CORD
Enter the map coordinates for this location.
When done with entering coordinates, press END.
If you will be billing service calls against a flat rate price book, use this procedure to set it up and maintain it.

WORK CODE
Enter the code for this work.
DESCRIPTION
Enter the description for this work.
TIME
Enter the standard time for this work.
L.RATE
Enter the labor rate for this work.
For each service order billing line you enter against the price book, you'll be allowed to choose from one of the below charges:
PRI REP
Enter the primary repair charge.
ADL REP
Enter the charge for additional repair.
AFH PRI
Enter the charge for after hours primary repair.
AFH ADL
Enter the charge for after hours additional repair.
SVC PRI
Enter the charge for primary service.
SVC ADL
Enter the charge for additional service.
When done entering the price book, press END.
This procedure is used to set up pagers for employees, if you are using
the paging system based on the optional fax software.
Set up each employee who has an alpha-numeric pager.

EMP ID
Enter the ID [H] of the employee (as set up in 5-1-1: Employee Maintenance).EMPLOYEE NAME
The name of the employee will show when you have entered the employee ID.PAGER ID
Enter the ID of the employees pager (usually found on the pager itself).PAGER #
Currently not used. (The paging service's phone number is set elsewhere when setting up the TruFax paging software.)Press END when done setting up all pagers.
Service types parallel AR sales types (as set up in 1-4-1: Sales Type Maintenance) and controls your accounting in service, but this feature allows you to have multiple service types without having to set up an AR sales type for each. You need to have one service type for each sales type, but you may have multiple service types pointing toward the same sales type. If desired, you may just set up one service type for each sales type with the service type ID the same as the sales type ID.
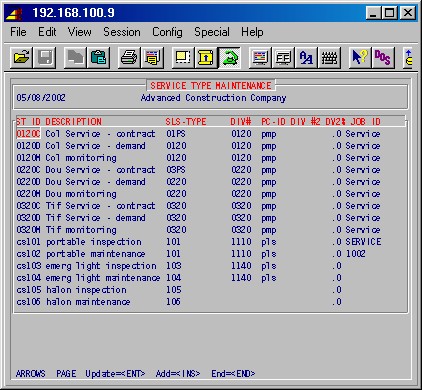
ST ID
Enter the ID for this service type, maximum five characters.DESCRIPTION
Enter the description for this service type.SLS-TYPE
Enter a valid sales type as set up in 1-4-1: Sales Type Maintenance.DIV#
Enter the division number, if applicable.PC-ID
This allows you to associate this service type with a product code, as set up in 8-18: Product Code Maintenance.DIV #2
Enter a division number for the second division if this service type is to be split between two division.DV2%
If you entered a division in DIV #2 above, enter the percentage that is to go to this division.JOB ID
When entering a service order in 2-1, the default job normally comes from the entered dispatch board, as set up in 2-15-3. However, if you enter a job ID here, then that job ID will be used instead when the service type is entered in 2-1.Use the ARROW, PAGE and ENTER keys to update a line. Press INS to add lines. Press END when you are done.
Selecting 2-16 presents the following menu:
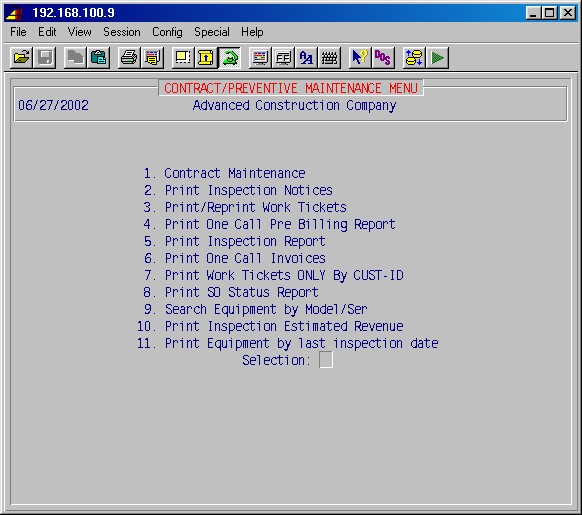
This procedure allows you to add, delete, and update preventive maintenance/service contracts, look at the service history, access the price book and update the handout records for each of a customer's work addresses, as well as adding or updating work addresses for a customer. This selection will first prompt:
Enter customer ID:
Type the customer ID [H]. If this is a valid ID the system will display the customer name. Press ENTER and the following menu screen will be displayed :
Work addresses for this customer will be displayed in numbered line entries. You may view all of the entries by using a combination of the ARROW, PAGE and HOME keys.
To update a work address, highlight the line number, and press ENTER.
To delete a work address, highlight the line number, and press DELETE. To add a new address press INSERT and complete the name, address, and phone number fields as covered earlier in 2-14: Work Address Maintenance.
The F1, F4, F6 and F9 keys give access to the contracts, service history, price book and handouts for the work address, as follows:
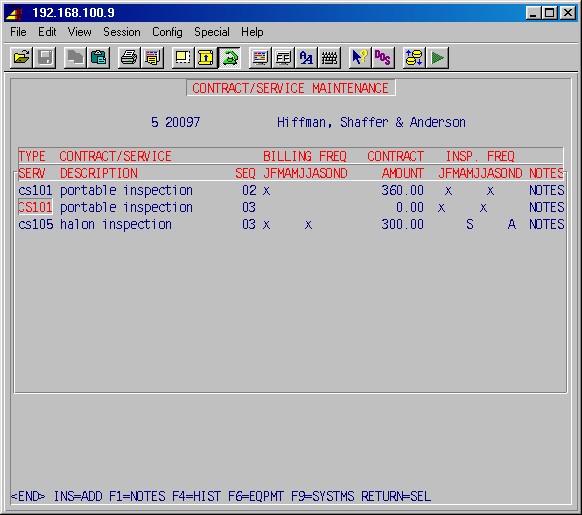
TYPE
SERV
This is the service type for this contract or service.
CONTRACT/SERVICE
DESCRIPTION
This is the description of the service type for this contract or service.
SEQ
This is a number of the contract for the selected work address which is automatically assigned by the system.
BILLING FREQ
JFMAMJJASOND
An X or a number under the month(s) shows when this contract is to be billed.
(J - January, F - February, M - March, etc.)CONTRACT
AMOUNT
This is the contract amount which will be billed each time.
INSP. FREQ
JFMAMJJASOND
An X or a number under the month(s) shows when the service is to be performed.
(J - January, F - February, M - March, etc.)NOTES
If there are notes for this contract the word NOTES will appear in this column.
Press the INSERT key to enter a new contract, or press the ENTER key to update an existing contract, and the following maintenance screen will appear:
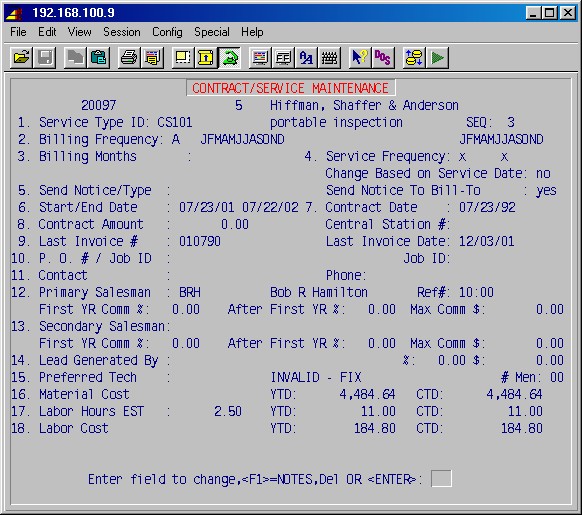
1. Service Type ID:
Enter the service type [H] for the contract you are entering (as set up in 2-15-8: Service Type Maintenance).
SEQ:
This number is automatically assigned by the system (you may have several contracts of the same service type for a work address).
2. Billing Frequency:
Enter how often this contract is to be billed:
W = weekly
B = bi-Weekly (every two weeks)
M = monthly
S = semi-monthly (two times a month)
Q = quarterly
A = annually
or leave blank to have it billed in the billing months as explained below.JFMAMJJASOND
3. Billing Months:
Put an X or a number (1, 2, 3 or 4) under the letter for the month(s) when this contract is to be billed. If using a number, it indicates how many billings are to be done for this contract in the month.
(J - January, F - February, M - March, A - April, M - May, etc.).JFMAMJJASOND
4. Service Frequency:
Put an X or a number (1, 2, 3 or 4) under the letter for the month(s) when the service or maintenance for this contract is to be performed. If using a number, it indicates how many service calls are to be done on this contract in the month.
(J - January, F - February, M - March, A - April, M - May, etc.).Change Based on Service Date:
If answered Yes, the inspection frequency months above will automatically be changed after the invoice for an inspection has been printed, according to these rules:
If there is one, two or four inspection month(s) per year, the new inspection month(s) will fall on the same month that the service order for the last inspection was completed and billed (with subsequent six or three months intervals). This automatically adjusts the inspection months forward when an inspection was delayed a month or more. For other than one, two and four inspection month(s) per year, the inspection months will be left unchanged.5. Send Notice/Type:
If a purchase order is needed before an inspection may be performed, enter a P here, and a notice to send a PO will be printed for this contract when selecting 2-16-2: Print Inspection Notices.Send Notice To Bill-To:
If answered Yes, the inspection notice will be sent to the "Bill to" address, rather than the work address.6. Start Date:
Enter the date this contract is to start. This will proportionate the first billing when the contract date is earlier than the start date.7. Contract Date:
Enter the beginning date of the period for which the contract normally runs.8. Contract Amount:
Enter the amount to be billed for this contract each billing.Central Station #:
Enter the customer's account number with a central monitoring service, if any.9. Last Invoice #:
Normally filled in by the system.Last Invoice Date:
Normally filled in by the system.10. Purchase Order #:
Enter the customer's purchase number for this contract, if any.
11. Contact:
Enter the name or title of the person normally contacted.
12. Primary Salesman:
Enter the ID [H] of the primary salesman for this contract.
First YR Comm %:
Enter the commission percentage the primary salesman gets during the first year of this contract.
After First YR %:
Enter the commission percentage the primary salesman gets after the first year of this contract.
Max Comm $:
Enter the maximum commission amount the primary salesman can get for this contract.13. Secondary Salesman:
Enter the ID [H] of the secondary salesman for this contract, or leave blank.
First YR Comm %:
Enter the commission percentage the secondary salesman gets during the first year of this contract.
After First YR %:
Enter the commission percentage the secondary salesman gets after the first year of this contract.
Max Comm $:
Enter the maximum commission amount the secondary salesman can get for this contract.
14. Lead Generated By:
Enter the ID of the person who provided the lead for this contract, if any.
%:
Enter the commission percentage that the person who provided the lead gets.
or
$:
Enter the commission amount that the person who provided the lead gets.
15. Preferred Tech:
Enter the ID [H] of the technician preferred by the customer for this contract, if any.
16. Material Cost
YTD: The year to date cost of materials for this contract (normally provided by the system). CTD: The contract to date cost of materials (normally provided by the system).17. Labor Hours EST:
Enter the estimated hours of labor needed for this contract.YTD: The year to date labor hours for this contract (normally provided by the system).
CTD: The contract to date labor hours (normally provided by the system).18. Labor Cost
YTD: The year to date labor cost for this contract (normally provided by the system).
CTD: The contract to date labor cost (normally provided by the system).
Enter field to change,<F1>=NOTES OR <RETURN>:
Type the number of the field you wish to change on the contract entry screen, or just ENTER when done, and you will be returned to the Contract/Service Maintenance selection screen.
If you want to enter or see notes for this contract, press F1, and proceed as described below.
Pressing F1 gives you access to notes for the selected (highlighted) contract. If no notes have previously been entered for this contract, you will first be prompted:NO ENTRIES - Do you want to add?
Just hit ENTER and the follow screen will appear:
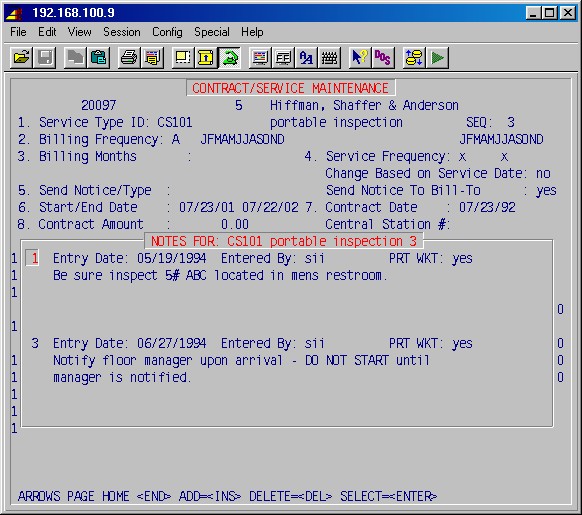
Entry Date:
Change this note date if needed.PRT WKT:
If you do not want this note printed on the service ticket, change it to No.Type in you notes (up to four lines per entry).
When done, press HOME to get out of note add/insert mode.
Press END when done entering notes and you will be returned to the contract/service maintenance selection screen.F4 - HISTORY
To see a history of service calls for a selected (highlighted) contract, press F4, and the following screen appears:
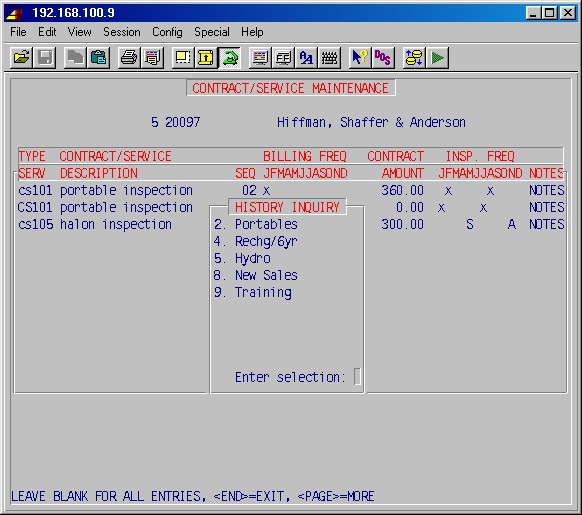
Enter selection:
Enter one of the given choices (E to exit) or leave blank to see all history for this contract and press ENTER.
The choices above corresponds to the entries entered in the HS-TP column in 8-18: Product Code Maintenance.Enter one of the given choices (E to exit) or leave blank to see all history for this contract and press ENTER.
This will display a screen similar to this:
Use the ARROWS and PAGE keys to see more entries, if needed.
Press ENTER or F1 to leave this screen.
Pressing F6 on a selected (highlighted) contract lets you enter, update and delete equipment covered by that contract:
Here the F1 key also gives access to the notes for this contract.
Use the INSERT, ENTER and DELETE keys to add, update and delete equipment covered by this contract.
F6 - Equipment maintenance items
Pressing F6 on a selected (highlighted) piece of equipment, lets you enter, update and delete items needed for its maintenance:Here the F1 key also gives access to the notes for this contract.
Use the INSERT, ENTER and DELETE keys to add, update and delete items needed to maintain the selected equipment covered by this contract, and press END when done.
Press END when done with equipment for this contract.
Pressing F9 on a selected contract lets you enter, update and delete systems covered by that contract:System ID:
Enter your ID for this system.Description:
Enter a description of this system (up to 4 lines).
Next, the system components maintenance screen will appear:
Here the F1 key also gives access to the notes for this contract.
Use the INSERT, ENTER and DELETE keys to add, update and delete system components covered by this contract.
SEQ
This number is automatically assigned.
ITEM ID
Enter the item ID [H] for this component. If it is not an inventory item, enter :M, which allows you to enter your own description and qualifier.
DESCRIPTION
Enter a description if this component is not an inventory item.
QUALIFIER
Enter a qualifying description if this component is not an inventory item.
QTY
Enter the quantity.
Ser #:
Enter the serial number of this installed component.
War. Exp. Date:
Enter the warranty expiration date of this component.
Price:
Enter the price of this component.
Pressing F6 on a selected (highlighted) system component, lets you enter, update and delete items needed for its maintenance:
Use the INSERT, ENTER and DELETE keys to add, update and delete items needed to maintain the selected system components covered by this contract, and press END when done.
Press END when done with system components for this contract.
When done with the contract(s) for this work address, press END and you'll be returned to the Customer Work Address Maintenance selection screen.
Pressing F6 here in the Customer Work Address Maintenance selection screen will give you access to the price book for the selected (highlighted) work address:
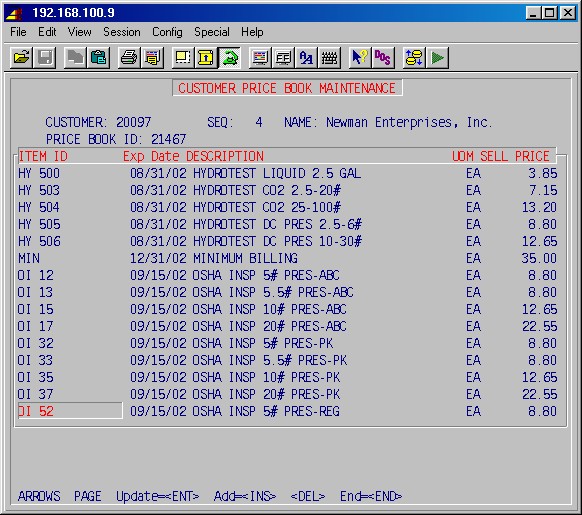
Use the INSERT, ENTER and DELETE keys to add, update and delete entries in the price book for this customer work address, as needed.
SEQ:
The number of the work address you selected.
PRICE BOOK ID:
The price code of the work address you selected (as entered in the CUSTOMER WORK ADDRESS MAINTENANCE entry screen above, field #9, Material Price Code).
ITEM ID:
Enter the inventory item ID [H] you want to have in this price book.
DESCRIPTION:
The description of the item as entered in inventory will be displayed here.SELL PRICE
Enter the price you charge the customer for this item at this work address.
Press END when done.
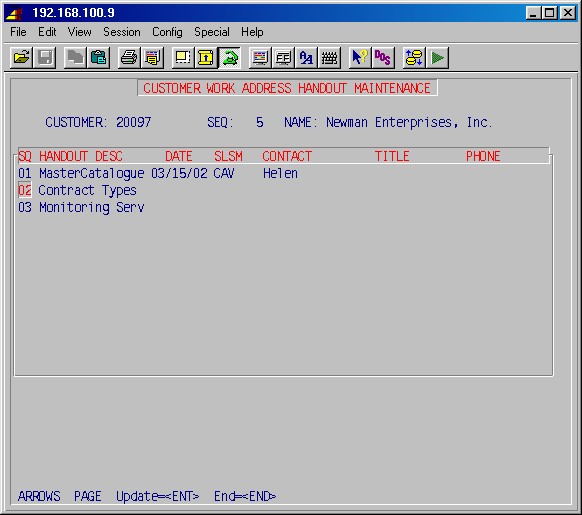
This screen shows each handout set up in 1-4-8: Handout Master Maintenance, and lets you enter when and to whom a handout was given.
Use the ARROW and PAGE keys to select the handout you wish to update and press ENTER.
SQ
The system's number for the handout.
HANDOUT DESC
The description of the handout as set up in 1-4-8: Handout Master Maintenance.
DATE
Enter the date this handout was delivered, if any.
SLSM
Enter the ID of the salesman or person who delivered it.
CONTACT
Enter the name of the person it was given to.
TITLE
Enter the title of the person it was given to.
PHONE
Enter the phone number of the person it was given to.
When done with this screen, press END.
When done with the Customer Work Address Maintenance selection screen, press END, and you'll be prompted for another customer ID. To return to 2-16-1: Contract/Preventive Maintenance, just press ENTER.
This procedure will print inspection notices for a selected month or date,
for all or selected inspection and service types, for contracts where POs
are required or contracts where POs are not required, to be mailed to customers
in order to procure purchase orders for upcoming inspections per the service
contracts, or simply notices of upcoming inspections.
This procedure creates service orders for all contracts with an inspection
due in the selected month. You can limit the contracts to a service type,
a range of customers, a selected salesman and a specific inspection week
in the month, where applicable.
This procedure will print the expected billings for the contracts to be
billed in the selected month, listing the customer ID, work address number,
name, service type, contract number and description, PO number, billing
and inspection frequency and contract amount to be billed.
This procedure will print a list of completed or all inspections in a selected month, listing the customer ID, work address number, name, phone, service type, contract number and description.
This procedure will create and print invoices for contracts to be billed
in a selected month.
This procedure will print the service history or equipment for contracts for a selected range of customers and work addresses and a selection of service types, as well as the notes for the contracts.
This procedure will print a list of service orders with a selected status
in a selected range of order, started or billed dates, for selected salesmen
and service types, printed in order of salesman or service type, and showing
the SO number, customer ID, name and address, service type, status, order
date, started date, projected hours, actual hours, contract amount and billed
amount.
Top