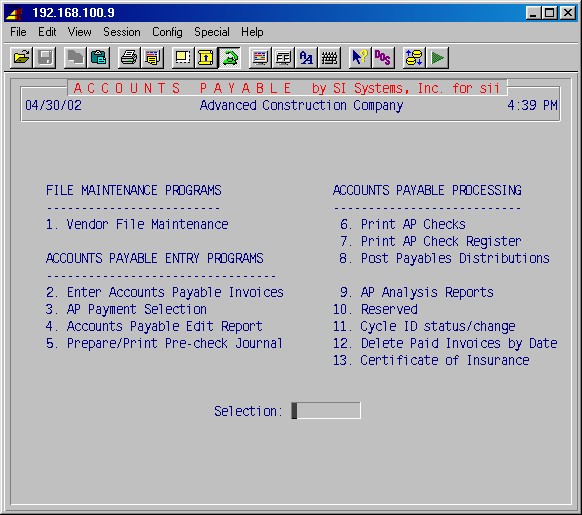
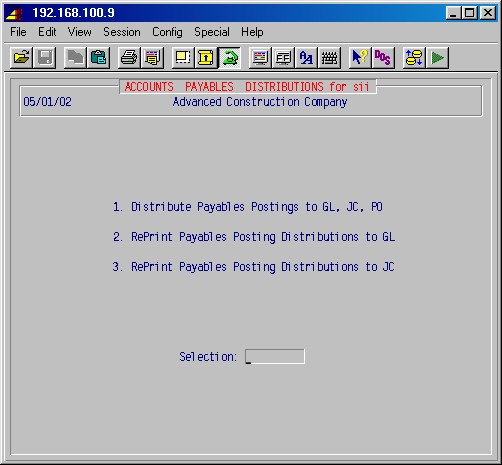
From the main menu, if 4 - Accounts Payable is selected, then this accounts payable menu appears on the screen. The selections on this menu are divided into three groups.
This first group consists of only one selection and is used to set up and list vendors. There are no further entries in this area except to add new vendors or make file maintenance changes such as change of address.
Vendors' names and addresses, account numbers, federal ID numbers for 1099s, and other pertinent information is maintained in this area.
This second group, consisting of selections #2 through #5, is the entry programs group. It is in this area where you, the operator, spend the most time on a routine basis. Very briefly, here's what happens in this area.
4-2 Enter Accounts Payable Invoices
This is where you enter new invoices and look up old ones.
You select invoices for payment here.
4-4 Accounts Payable Edit Report
After entering and/or selecting to pay invoices in #2 and #3 above, you must print this edit report to verify that everything is as you wish. If not, go back to #2 or #3 and make changes as needed, and then print the edit report again.
4-5 Prepare/Print Pre-Check Journal
This prints information, if any, on the checks. Specifically, discounts will be printed. If you find errors here, go back to #2 or #3 above and make changes.
This third group, consisting of selections #6 through #8, is the processing group. These are the steps which process the information as you have posted it in #2 and #3 above and verified in #4 and #5.
This prints the checks selected in step #4-3. Voiding a prior check is also handled here.
This prints a check register for the just-printed checks. Extended stubs are printed for checks needing them. Partial waivers of lien are produced as needed.
4-8 Post Payables Distributions
This step distributes the amounts to general ledger, job cost, and service orders, as applicable.
Included in this area are several management reports that allow you to print a payables aging report or a payables history report by vendor and job. Also included is a cash requirements report that shows you the cash required to pay all invoices by the due date for specified future dates.
These procedures allow you to print and update the check register. A convenient procedure is also included to aid you in doing the monthly reconciliation of the AP bank account.
This selection displays the status of all cycles or allows you to switch cycle IDs. This allows you to work on more than one cycle at a time, if necessary, and to return to a particular cycle for completion. Additionally, step 4-11-3 allows a supervisor to set a closed accounting period date, as well as to take over another operator's cycle if necessary.
4-12 Delete Paid Invoices by Date
This selection allows you to delete paid invoices through a specified date, with cross checks for POs or Jobs.
This selection allows you to record and print certificate of insurance information.
In the 13-8-1 Accounts Payable Control Records Setup, the following three control records must be set:
Update PO receiving at invoice entry?: NO
If you answer YES, the system will allow you to update PO receiving when an invoice is entered into the system. If the same person is responsible for entering both invoices and PO receiving, this can be a convenient way to deal with both in one area. In entering the invoice, you first enter the PO number. If it is a valid PO number, the system initially takes you to the PO receiving screens where you can receive all or part of the PO. When receiving is concluded, you are returned to the AP invoice entry screen.
Require approval on exceeding PO at invoice entry?: NO
If you answer YES, the system will warn you that you are exceeding the PO, and then requires confirmation before allowing you to enter the invoice. If you answer NO (usual answer), it only warns you that you are exceeding the PO, then proceeds with the invoice entry.
Allow user to type audit descriptions?: NO
This switch allows you to relax an area of internal control built into the system if management makes a decision to do so.If you answer NO, the description field, for both general ledger and job cost distributions in step 4-2: Enter Accounts Payable Invoices, is automatically completed by the system. This is a system generated description of this entry (vendor ID and invoice number) for auditing purposes which cannot be changed by the user.
If you answer YES, the system will automatically generate this description but allow the user to change it. Although it can be changed completely, most users simply add to it, preserving the system-generated description to facilitate auditing of this entry later, if required.
In 13-8-15 or 4-11-3, specify the end date of the most recent closed accounting period.
In 13-8-16: User Defined Data Maintenance, you can set up additional notational data fields for vendors, accessible through 4-1-1: AP Vendor Maintenance, field #18, Custom Data.
Vendors are usually set up on the system in step 4-1-1: AP Vendor Maintenance before any invoices are processed. Vendors can be added as needed during step 4-2: Enter Accounts Payable Invoices.
Top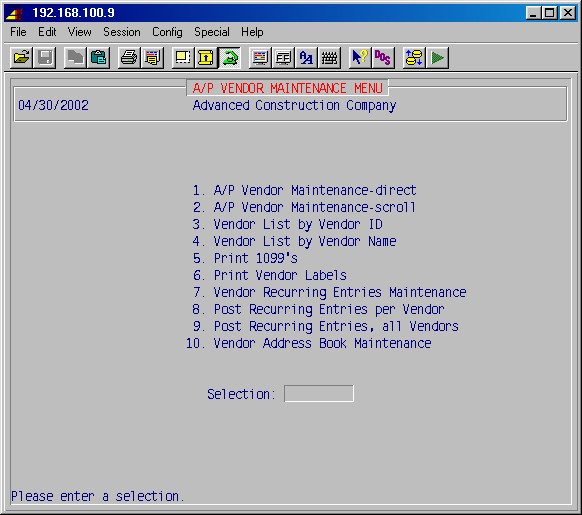
This menu allows adding, modifying, viewing, or deleting accounts payable vendors, and printing various reports.
Enter Vendor ID
You can type up to a twelve-character Vendor ID [H] or press ENTER to exit. If a vendor already exists with this ID, the information for that vendor will be displayed. You can modify the information as desired.
If a vendor does not exist with this ID, you will see this message:
No vendor exists. Do you want to create a new one? YES
If you answer YES, you will be allowed to input information for a new vendor.
If you answer NO, the cursor will return to the top line Enter vendor ID:. It is most efficient at this point to use the [H] F2 help feature to display a list of vendors. When the correct vendor is selected, you will be prompted:
ENTER A FIELD # TO BE CHANGED OR ALL: ___ D = DE-ACTIVATE VENDOR
Any field can be changed or corrected by selecting that field number, typing the correct information, and pressing ENTER. When you are finished, press ENTER again and you'll be prompted:
Update MISC VENDOR INFORMATION:
Type YES and press ENTER to go the miscellaneous information screen for the vendor, or just press ENTER and the cursor will return to the top.
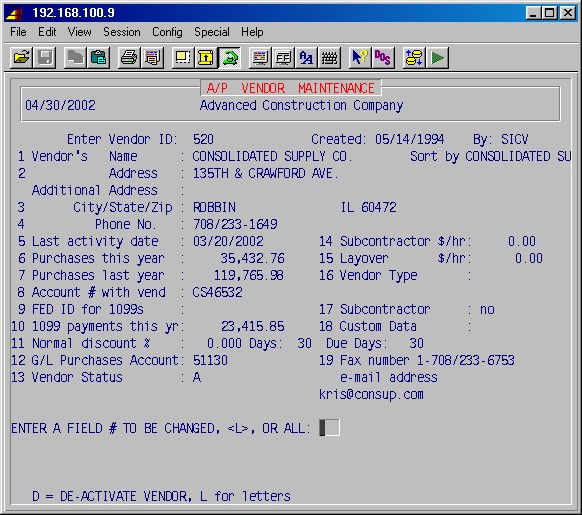
Vendor's name
Enter the name of the vendor (up to 30 characters) as you wish it to appear on checks.
Sort by
The vendor sort (or search) field is used to make looking up vendors easier. For instance, vendor Dr. Frank Smith would have Dr. Frank Smith in the name field so that his printed checks look nice. In the sort (search) field, you should put something like Smith, Frank so that you can easily look him up (up to 15 characters).
Address
Additional address
City/State/Zip
Type the vendor's address (up to 2 lines of 30 characters each, plus a fourth line for city, state, and zip) as you wish it to appear on checks. Note that after you first enter the zip code, the city and state will be filled in automatically (as defined in 13-5: City/Zip Maintenance).
Phone No.
Type the vendor's area code and phone number. Phone numbers must be entered with area code and local number or left entirely blank.
These fields are updated by the system and reflect current information which is not part of the accounting system. These fields are usually modified manually only when setting up the system for the first time.
Account # with vend
This is the account number the vendor has assigned for you.
FED ID for 1099s
This is the vendor's federal ID for 1099s; ENTER if a 1099 is needed. This area can be used to record federal IDs even if a 1099 is not needed.
1099 payments this yr.
The amount of payments to this vendor this year (updated by the system).
Normal discount % Days Due Days
Normal discount % is the normal discount percentage allowed by this vendor for your company expressed as a decimal (example: 2% = 2.00). If this vendor normally has the dollar amount of discount printed on the invoice, leave this entry blank.Discount days are the normal number of days from the invoice date allowed to take the discount.
Due days are the normal number of days before the invoice is due. If the vendor normally shows the actual due date on the invoice, leave this blank.
G/L Purchases Account
This is your general ledger account number [H] and division number [H] (if your company has a divisionalized chart of accounts) to which purchases from this vendor are normally debited. Either or both can be left blank.
Vendor status
The status of a vendor can be A-active or I-inactive.
Subcontractor $/hr
These are special fields not used for most applications.
Vendor type
This is a notational field and can be left blank.
You can change any field by entering the field number and pressing ENTER, making the change, and pressing ENTER again. The status can be changed to inactive by entering a "D" and pressing ENTER.

These fields are mostly self-explanatory. Type the vendor information, pressing ENTER after each line. The vendor name and address for POs are filled in only if the name and/or address for purchase orders are different from the mailing address entered in 4-1-1: AP Vendor Maintenance.
NOTE: If the vendor name and address for POs is left blank, purchase orders will be produced or created using the name and address entered in 4-1-1: AP Vendor Maintenance. If the vendor name and address for POs is completed, purchase orders will be produced or created using the name and address entered in 4-1-2: Miscellaneous Vendor Data.
Print 1099
Answer YES if this vendor is to be processed in 4-1-5: Print 1099s.
Certificate of Insurance Required
If purchases from this vendor require a certificate of insurance, answer YES. If the certificate is expired (see Certificate of Insurance Exp Date), no invoices can be paid for this vendor.
Certificate of insurance exp date
Enter the expiration date of the certificate of insurance for this vendor if you answered YES above.
When all fields are completed, you are prompted: Correct? YES. If all information is correct, press ENTER to return to the 4-1 AP Vendor Maintenance Menu.
This procedure will print a list of all vendors by vendor ID. When 4-1-3: Vendor List by Vendor ID is selected, the system will request the following:
Short List?
Active/Inactive/BothAnswering YES to this question will print a report with brief information, one line about each vendor. Answering NO will print a detailed report of the vendor information. Answering A will include only vendors coded active; I will include only inactive; B will include both active and inactive vendors in the report. The system will then display the printer selection screen. Choose the printer number and the number of copies and press ENTER. You will then see a screen message:
PRINTING - VENDOR LIST BY VENDOR ID
Your report will be printed and the screen will then return to the 4-1 AP Vendor Maintenance Menu.
Short List?
Active/Inactive/Both
The same responses and procedures apply in this area as in 4-1-3: Vendor List by Vendor ID.
Change the cutoff limit as needed. If you change the YES to a NO, the Print 1099 setting in 4-1-1 for vendors will be disregarded.
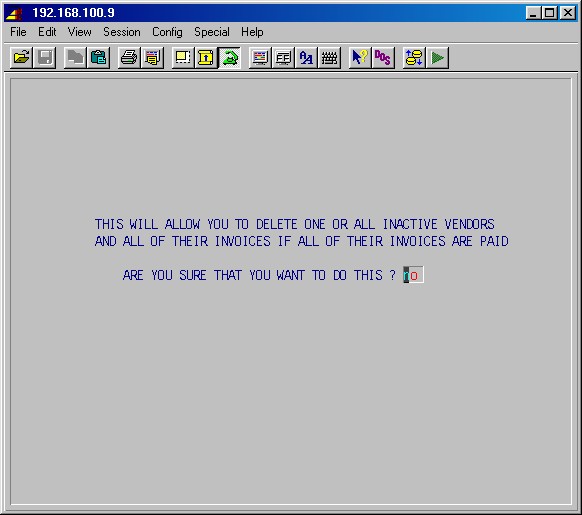
To abandon this action, press ENTER. To proceed, type YES and press ENTER.
NOTE: Although you will be deleting invoice information from the payables section, this information, as it applies to particular jobs, is still available in the job cost area.

You will see the following screen:
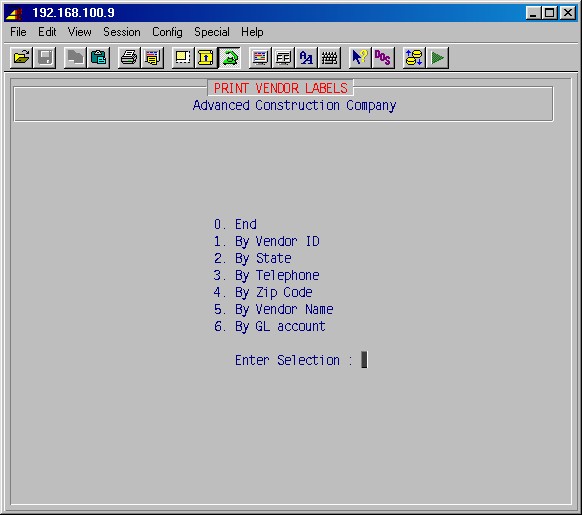
Choose from the menu the order in which you want to print vendor labels, make your selection with the corresponding number, and press ENTER. The system will then display the printer selection screen. Type the printer number and the number of copies and ENTER.
Selection #1 lets you enter beginning and ending vendor IDs, and thus limit printing to a range of vendors. Selections #2, #3, #4 and #6 respectively, shows the following messages:
2. Enter state ID or <ENTER> for all:
3. Enter telephone prefix or <ENTER> for all:
4. Enter ZIP code prefix or <ENTER> for all:
6. Enter GL account or <ENTER> for all:
This allows you to print all or a portion of the vendors according to the selected criteria. When you have made your selection, press ENTER to print. When the job is completed, you will be returned to the 4-1 AP Vendor Maintenance menu.
Press ENTER and the following screen will appear:
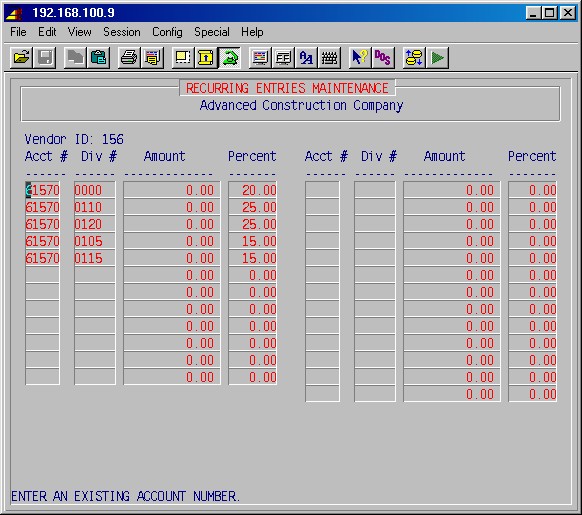
Enter how you want to have the "amount to be paid" distributed to GL accounts/divisions, just like when entering an invoice in 4-2. Here you have the added option of doing it by percentage, rather than by dollar amounts. You cannot use both methods on the same screen. If the percentage method is used, the total of the percentage column must add up to 100 before exiting this screen.
If percentages are used, you'll be asked for a dollar amount each time you run Step 4-1-8, 4-1-9 or 4-2 (recurring entries).
Press ENTER repeatedly to step through each field, or press F1 to accept all values as shown, and you'll be returned to the previous screen.
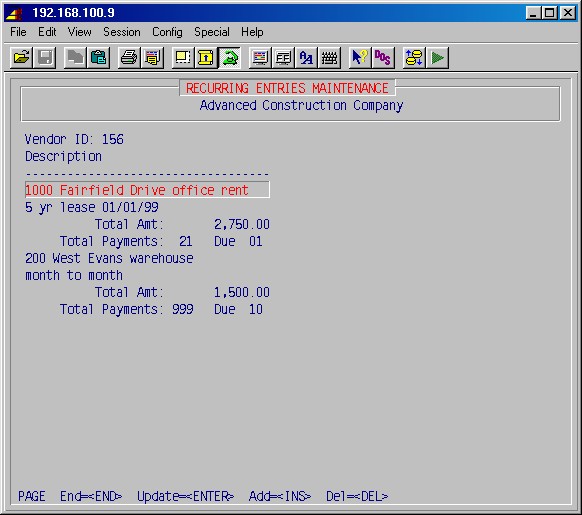
Use the ARROW, PAGE, ENTER, INS and DEL keys to update or add and delete entries, as needed.
Press END when done. You'll be prompted for a vendor ID.
To exit, leave the vendor ID blank and press ENTER.
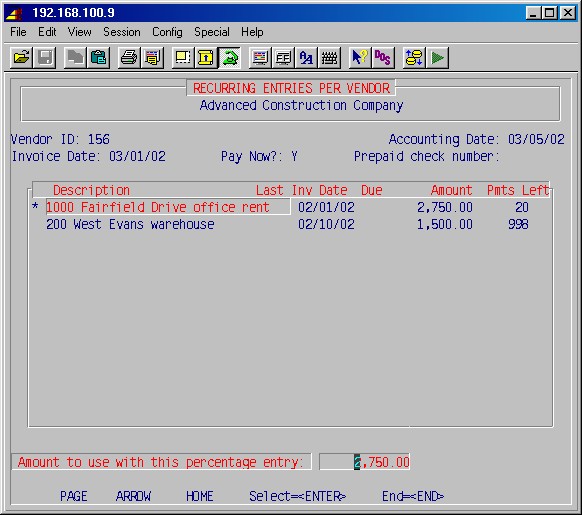
You will see each recurring entry for the vendor. To mark an entry so an invoice will be created, use the ARROW and PAGE keys to highlight it and press ENTER.
If entry is by percentage, you'll be prompted:
Enter the amount and press ENTER.
Note the asterisk (*) in front of entries selected for processing. Press the ENTER key again to de-select a highlighted entry.
When you are satisfied with the entries chosen for processing, press END. The invoices will be created.
WARNING! Any entry with an asterisk in front of it will be processed when you press the END key. Remove asterisks (*) from invoices you do not want created at this time.
Complete the current AP cycle by doing steps 4-5 through 4-8.
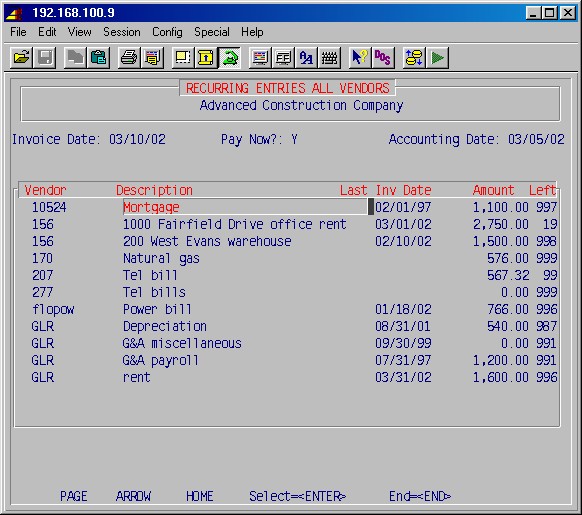
You will see each recurring entry for all vendors. To mark an entry so an invoice will be created, use the ARROW and PAGE keys to highlight it, and press ENTER.
If the entry is by percentage, you'll be prompted:
Enter the amount and press ENTER.
Note the asterisk (*) in front of entries selected for processing. Press the ENTER key again to de-select a highlighted entry.
When you are satisfied with the selected entries, press END, and the invoices will be created.
WARNING! Any entry with an asterisk in front of it will be processed when you press the END key. Remove asterisks from invoices you do not want created at this time.
Be sure to complete the current AP cycle by doing steps 4-5 through 4-8.
Entering, posting, and paying AP invoices is a relatively simple process if you understand the flow of procedures and the significance of the various dates used by the system.
Prepare to do a cycle of payables invoices by carefully separating the invoices into separate stacks by the accounting month in which you want to post these invoices to your books. Each stack is a cycle of invoices to be posted in a particular month.
DO NOT PLACE IN THE SAME STACK INVOICES THAT SHOULD BE POSTED TO TWO DIFFERENT MONTHS (CYCLE).
Although not required, you can further separate payables invoices into groups to be paid now and groups to be paid later, as long as each group is to be posted in one accounting month.
It is possible for one operator to have more than one cycle in process at a time. This is sometimes used at the beginning of a month when you are posting a cycle of invoices in the new month and you receive some invoices that need to be posted immediately to the previous month. Go to step 4-11-2 Change Cycle IDs, start another cycle dated in the previous month, and enter those invoices. Then go to step 4-11-2 Change Cycle IDs again, and change your cycle ID back to the cycle you interrupted, continuing to enter the new month's invoices. Each cycle must be individually processed through step 4-8. Click here for complete instructions for 4-11 Cycle ID Status/Change.
Payables invoices are typically processed by entering invoices in daily or periodic batches or cycles. Payables checks are then processed in weekly, monthly, or periodic check processing cycles. However, an entry cycle can include selecting one or all invoices being entered for immediate payment (or even invoices entered in previous cycles) and processing of checks as a part of the cycle. These procedures are summarized below.
NOTE: You can move back and forth in the AP entry programs, steps 4-2 through 4-5, to make additions or corrections until invoices are entered and payments correctly selected. The 4-4 Edit Report and the 4-5 Pre-Check Journal give you an opportunity to correct your work. As soon as you begin any of the processing programs, steps 4-6 through 4-8, it is too late to change your mind. At that point, changes can only be made with reversing entries.
In step 4-2, be sure to choose the default "N" for the "pay now" field. This puts the invoices on hold for later payment. After step 4-8, the invoices will be included in GL, JC, and POs.
If you are paying only invoices that are a part of this entry cycle, you do not need to do step 4-3 because you will select the invoices to be paid in 4-2 by specifying "Y" in the field "pay now".
If you are starting a cycle, and are entering this step for the first time since the distribution step, 4-8 Post Payables Distributions, the accounting date will be blank. You are required to enter a date in the current period in order to continue. The current period is any date after the "closed accounting period date" set by a supervisor in step 4-11-3 Supervisor Override of Cycle ID.
If you are re-entering this step after starting a cycle, the accounting date previously entered will be displayed a second. This date cannot be changed except by a supervisor in step 4-11-3 Supervisor Override of Cycle ID.
This date will be used later to post this cycle of payables to the general ledger and job cost journals. It is also used on most of the reports in steps 4-2 through 4-8. This date should be thought of as the accounting date to be used for all new invoices and any payments made during this cycle.
NOTE: You must not mix invoices that should be processed in different accounting months in the same cycle of payables. It is imperative that you do not process invoices that should have different accounting months in the same cycle.
Type the appropriate date and press ENTER. The system will then display the following input screen (items in bold type are examples):
Pressing F5 lets you select the GL account number to be used for GL postings. You'll be prompted: Enter JOB-ID:. Type the ID of the job of this invoice and press ENTER. You'll then see listed the account number for each of the eight-phase expense categories for the sales type of the job you selected (as set up in 1-4-1 Sales Type Maintenance, second screen):
Type ID
100
100
100
100
100
100
100
100
100
CAT
B
C
E
H
L
M
N
O
S
ACCT#
55110
52170
51090
5100
DIV
1000
1000
1000
1000
1000
1000
1000
1000
1000
Use the ARROW keys to select the one you want and press ENTER, or if you want the GL account to default to the one on the PO (or the vendor's, if no PO), press F1 or END.
If the purchase order system is installed: The PO number will be looked up and verified at the time you create a new invoice and the remaining money which can be spent on this PO will be displayed as follows, as will the sales tax percentage as entered on the PO and any Use Tax percentage applicable to the job of the PO:
Open PO amount $0.00 (PO %)
Total PO amount $0.00 (Use %)
NOTE: If you need to exit this area, press ENTER without filling in a vendor ID and you will return to the accounts payable menu. If you have typed in a vendor ID and wish to exit at this time, "blank out" the vendor ID and then press ENTER.
Enter misc for the vendor ID if this is a one-time check for which you do not want to set up a vendor.
If the vendor ID is blank, the system will return to 4 Accounts Payable Menu.
If you have typed in a vendor ID that is not found, the following message will be displayed:
If you answer YES, you will be taken to the input screen 4-1-1 AP Vendor Maintenance where you can enter this information.
If you answer NO, blank out the incorrect vendor ID, access the help list [H], scroll through the list of vendors, choose the correct vendor, and press ENTER.
When a valid vendor ID is typed, the system will display the vendor's name and the cursor will highlight the next area requiring input information.
NOTE: If a discount percentage was previously entered for this vendor in 4-1-1 AP Vendor Maintenance, field #11, the discount % field will automatically display that percentage.
Either
Or
If the vendor has been marked as a subcontractor (4-1-1, field #17), the system will prompt:
Enter Retainage Amount 0.00
Type the amount to be retained for later payment.
NOTE: Operation #3 Release All Invoices for Payment, under the AP selection procedures, will not select an invoice for payment that has been coded "H". To pay an invoice coded "H", you must specifically select that invoice for payment using operation #1 Release for Payment, or remove it from "H" status and change it to "N" status using operation #4 Place On/Take Off Indefinite Hold. Select it for payment using operation #1 or #3.
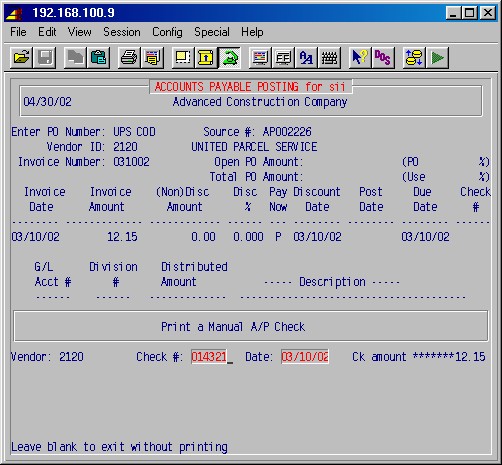
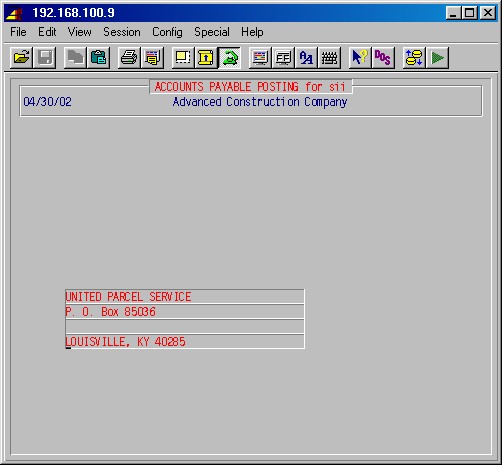
The vendor and date of the check will be shown as entered and the system will prompt you for the check number. Enter it and press ENTER. The system will now display four lines to enter the payee's name and address. Press F1 when finished.
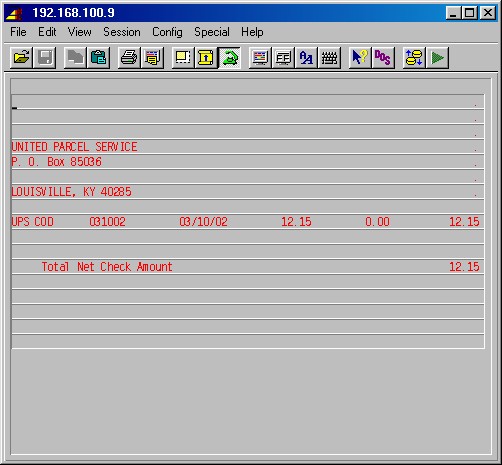
Fill in the check stub as needed.
The printer selection screen will appear. Type the printer number and number of copies. Be sure you have properly positioned the check in the printer and press ENTER. The check will now be printed and the invoice entering procedure will continue with the prompt "Is this information correct?" as shown below.
The system will prompt:
When you have made all corrections, press F1 to accept the remainder of the fields. You will again be prompted:
If the invoice amount is to be distributed to this GL account only, press ENTER, END.
If the invoice amounts will be distributed to two or more GL accounts, you will be typing two or more general ledger distribution lines, the sum of which will equal the total invoice amount. Type the amount to be distributed to this general ledger account and press ENTER.
Press ENTER again (or INS, if applicable) to add another line and make another set of entries to the second ledger line (these lines are numbered to the left of the GL number). Continue this process, adding ledger lines for each general ledger number for which you need to distribute a portion of the invoice. When no more ledger entries are required, press END. The invoice amount and total distribution will be compared.
If the amounts balance, the system will record the transaction and check to see if the ledger accounts used require postings to job cost.
If the ledger account(s) do not require job cost postings, the system will return to PO number for a new entry.
If the ledger account(s) require job cost postings, the system will go to job cost line posting.
If the amounts are not in balance, the system will display an Out of balance message and request the following:
The ledger lines must be balanced with the invoice amount by either changing the amounts in the GL postings or adding or deleting one or more GL posting lines.
NOTE: You will not be able to leave the ledger posting area until the total amount posted to the ledger account(s) equals the total amount of the invoice.
NOTE: Management can allow updating of this description field by changing the control record for this area in 13-8-1, described in the AP Setup Instructions.

From the menu at the bottom of your screen, press INS to add a posting to the job cost, if not already prompted for a job ID.
The job, phase, and category will be requested in a manner similar to the ledger lines. If the PO system is in use, the job, phase, and category will be displayed from information entered with the PO.
| M = material N or C = consumables S = subcontract H = overhead |
E = equipment O = other B = burden L = labor |
NOTE: These category codes are specified by you in 7-1-1 Job Description Maintenance on the fifth screen under this selection, called phase expense categories. The categories listed above are typical, but are user-defined in 7-1-1.
If the invoice represents amounts that need to be distributed to two or more jobs and/or phases, press ENTER or INS to add another line, as applicable. Post another set of entries to the job line. If no more entries are required, press END.
The portion of the invoice amount that must be charged to jobs and the total distribution will be compared.
If amounts are in balance, the system will record the transaction and return you to the first screen in this procedure.
If the amounts are not in balance, the system will display this message:
*** JC DISTRIBUTION AMOUNT IS INCORRECT ***
The job entry lines must be balanced with the invoice amount by either changing the amounts in the job entries, or adding or deleting one or more job posting lines.
NOTE: You will not be able to leave the job entry area until the total amount entered to the job(s) equals the total portion of the invoice that must be charged to jobs.
NOTE: Management can allow updating of this description field by changing the control record for this area in 13-8-1, described in the AP Setup Instructions.
If no more job entries are required, press END. If the job postings are in balance, the system will return you to the first screen in this procedure.
If there are more invoices to input from this vendor, press ENTER.
NOTE: The same vendor ID remains on this screen until you change it. This facilitates entering a group of invoices from one vendor.
If there are invoices to input from a different vendor, type the new vendor ID to continue.
NOTE: To exit this area, "blank out" the vendor ID, and press ENTER.
Type NO ENTER. The system will then prompt:
Type YES ENTER. This invoice has been deleted from the system and can now be entered correctly or set aside for future consideration.
Go to 4-3-1 AP Payment Selection by Vendor, type the vendor number, and press ENTER. The system will display all unpaid invoices for this vendor for the range of dates you specify. Select 5 = prepaid and enter the invoice number.
You need to complete only the invoice amount paid and the check number. Type 00000 for the check number. You will use this same check number in the next step.
Post a credit memo by posting a new invoice for the same vendor (including the GL and job posting entries). It should be the same as the original except for a credit figure as the invoice amount (enter an amount equal to the original invoice with a minus sign). Specify P for prepaid in the pay now field and 00000 for the check number.
The following procedure lets you release invoices for full or partial payment. Selecting 4-3 AP Payment Selection will first prompt:
This is a reminder of the accounting date for the cycle of payables for which you are about to select invoices for payment. If this is not the correct accounting date for the payment of these invoices, press ENTER to exit, and go to step 4-11 to change to another cycle or start a new cycle.
Click here for instructions on how to pay retainage on an invoice.
When ready to continue, press the space bar. The system will display the following screen:
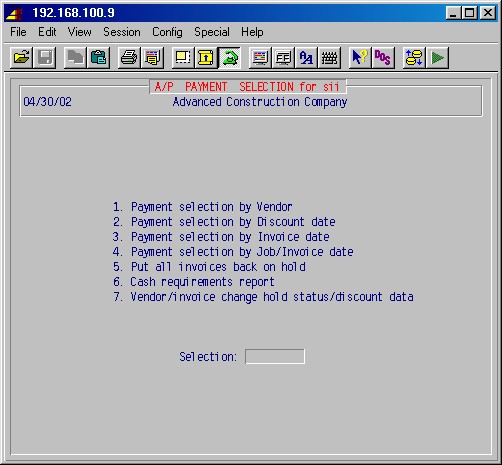
Select one of the following options:
This selection displays the following message:
Type INV for payments to be selected by invoice date, ENTER.
Type DISC for payments to be selected by discount date, ENTER.
An input screen for the selection of invoices to be paid will be displayed:
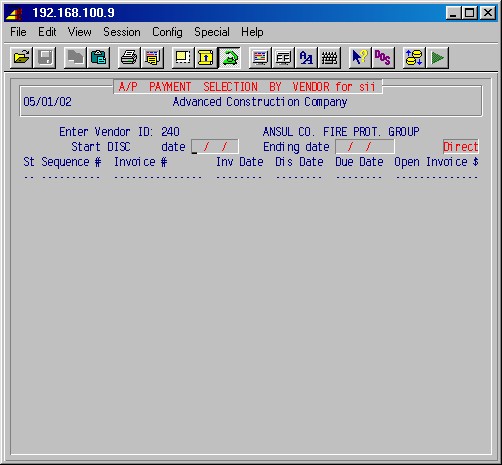
If the vendor ID is invalid, an error message will be displayed and the system will prompt for another vendor ID [H]. When a valid vendor ID is chosen, their full name will be displayed. You will be asked to fill in the start and ending dates:
NOTE: These dates define the range of invoice, discount or due dates (as selected above) you want to pay today. If you want to pay only today's invoices, the start and ending dates are today's date. If you leave the start date blank, all invoices that have not coded H (indefinite hold) or P (prepaid) will be selected through the ending date.
Depending on which mode you select, you'll see one of the two screens below:
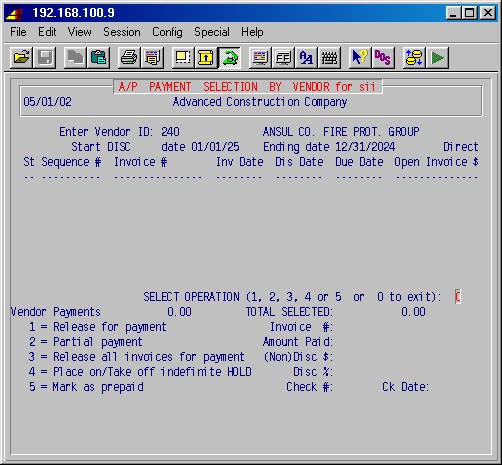

Below is a list of these fields and the action to be taken. In List mode, use F1, F2, F4, F6 and F9 as "shortcut" keys instead of typing in the number of the operation you want to perform.
If you selected List, use the HOME, ARROW or PAGE keys to highlight it. Alternately, type enough of the number of an invoice selected from one of the AP analysis reports generated in #4-9 or #4-3-6. Press F1 to release it for payment, F2 to make a partial payment, F6 to put it on hold, or F9 to mark it as prepaid. Press F4 to release all invoices for payment. (See 1 through 5 below for more detail.)
Alternately, you can press ENTER and type the number of the operation you wish to perform as follows:
This procedure works just as 4-3-1-1 above, except that after a valid invoice number has been typed, the system will prompt:
Paying retainage on an invoice: Use this selection (make partial payment) to pay the retainage portion of an invoice, after the non-retainage portion has been fully paid. Enter the total unpaid balance (the retainage portion) in Amount paid (above). The system will recognize that you have paid the retainage. If you pay less than the full amount of the invoice, the system assumes it is a regular payment on the invoice even if it results in an overpayment of the non-retainage portion of the invoice. In other words: Total payments on an invoice must equal the invoice total for the system to recognize that you have also paid the retainage, and for the system to remove the retainage amount from "retainage payable" in the general ledger.
The cursor will return to the invoice # field for another invoice number. Note that you are still in the #2 Partial Payment operation. Continue to type invoice numbers until you are either through entering partial payments or you need to see more invoices. Pressing ENTER when the invoice # field is blank will prompt you to select an operation.
NOTE: This operation alone of all AP selection procedures will not select an invoice for payment if it has been coded "H". To pay an invoice coded "H," you must specifically select that invoice for payment using operation #1 Release for Payment, or remove it from "H" status and place it on "N" status using operation #4 Place on Hold/Indefinite. Select it for payment using operation #1 or #3.
With this process you can decide to pay all invoices for this vendor which fall between the dates specified except those with a pay code of "H". There will be a delay as the invoices are processed. Then you will be asked:
NOTE: If a vendor has 20 invoices in your system and you wish to pay 17 of them, the easiest way to do this is to select them all for payment and put three back on hold.
Answering NO ENTER will cancel this procedure or change the status of an invoice from H, indefinite hold to N, hold for later payment.
At SELECT OPERATION, choose 0 and press ENTER, or in List mode, press END. You'll be prompted to ENTER another vendor ID.
Press ENTER again and you will return to the 4-3 AP Payment Selection menu.
Selecting this procedure will display the following input screen:
This procedure is similar to 4-3-1 above, except the system will prompt for beginning and ending discount dates, without a vendor ID.
First, type the Starting discount date: and press ENTER. This is the oldest discount date you want included in this cycle of invoices to be paid. If this is left blank, the system will select all invoices older than the ending discount date, no matter how old they are.
Next, type the Ending discount date: and press ENTER. This is the most recent due date you want included in this cycle. You must type a date here; this helps prevent selecting more invoices than you want. Leaving both the starting and ending due dates blank will exit the area.
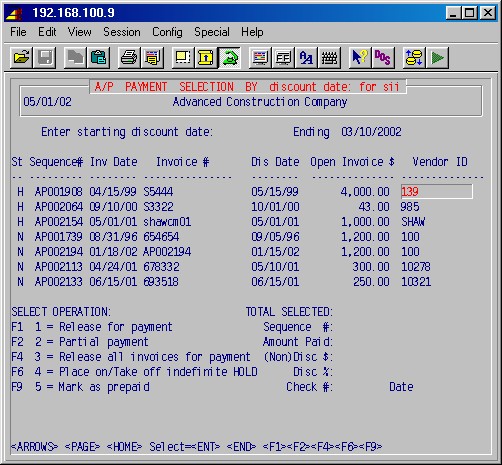
The screen will then display invoices with discount dates in the selected date range.
Invoices are displayed in groups of vendors. To see the invoices for a particular vendor, type in the first part of that vendor's ID.
NOTE: Press the F1, F2, F6 or F9 keys to perform the corresponding operation on the highlighted invoice, or F4 to release all invoices for payment.
Press END ENTER ENTER to exit.
Alternately, highlight an invoice and press ENTER.
The SELECT OPERATION: area essentially works the same way as it does in 4-3-1 Payment Selection by Vendor (above) except invoices are chosen by, and you are prompted for, Sequence # instead of invoice number. The sequence number is uniquely assigned by the computer to identify that particular transaction. It is necessary to use the sequence number in this area because invoice numbers can be duplicated from one vendor to another.
From the SELECT OPERATION: area, choose 0 and press ENTER, and the cursor will return to the Enter starting discount date: field; press ENTER ENTER and you will return to the 4-3 AP Payment Selection menu.
This procedure is similar to 4-3-2 Payment Selection by Discount Date above except you are first prompted to type invoice dates instead of discount dates.
First, type the Starting Invoice Date: and press ENTER. This is the oldest invoice date you want included in this cycle of invoices to be paid. If this is left blank, the system will select all invoices older than the ending due date, no matter how old they are.
Next, type the Ending Invoice Date: and press ENTER. This is the most recent invoice date you want included in this cycle. You must type a date here; this helps prevent selecting more invoices than you want. Leaving both the starting and ending invoice dates blank will exit the area.
The SELECT OPERATION: area works the same as in 4-3-2 (above) using sequence numbers to identify specific invoices. From this area, press END ENTER ENTER and you will return to the 4-3 AP Payment Selection menu.
This procedure will allow you to select for payment invoices for a specified job, by the invoice date.
This procedure is similar to 4-3-3 Payment Selection by Invoice Date (above) except you are first prompted to type invoice dates, and then prompted for a job and vendor ID.
First, type the Starting Invoice Date: and press ENTER. This is the oldest invoice date you want included in this cycle of invoices to be paid. If this is left blank, the system will select all invoices older than the ending invoice date, no matter how old they are.
Next, type the Ending Invoice Date: and press ENTER. This is the most recent invoice date you want included in this cycle. You must type a date here. Leaving both the starting and ending invoice dates blank will exit the area.
Third, type the Job ID: and press ENTER. The Job ID: can be selected using the [H] pop-up menu.
If you want to limit invoices to just one vendor, type the Vendor ID here. Otherwise, leave blank.
The SELECT OPERATION: area works the same as in 4-3-3 above using sequence numbers to identify specific invoices. From this area, press END ENTER ENTER and you will return to 4-3 AP Payment Selection menu.
This procedure will put some or all invoices, previously selected to be paid in this cycle, back on hold. This is generally used to assist in correcting errors in the payment selection. Selecting this procedure will display the following input screen:
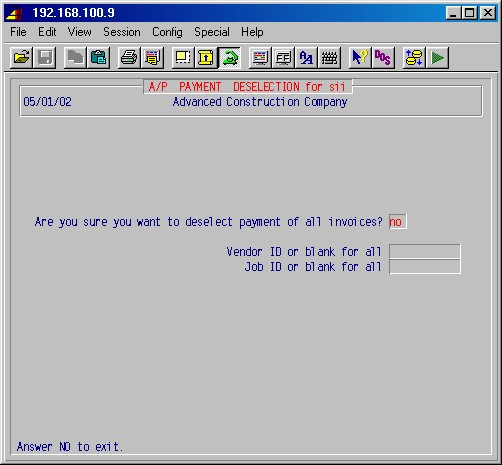
If you are not sure or if you have made a mistake, the default is NO. Press ENTER to return to the 4-3 AP Payment Selection menu.
If you want to put some or all invoices for this cycle back on hold, type YES ENTER. Type the Vendor ID using the [H] pop up menu, if necessary, or press ENTER for all. Type the Job ID or leave blank for all jobs, and press ENTER.
This management report projects the total amount of cash needed to pay all invoices (by discount, due or invoice date) over a specific period of time, to aid in the planning of cash flow over that period.
It will print a report of cash needed to pay invoices at four specified future dates. You choose these dates, but they are typically a week apart. On the printer selection screen, type the printer number and the number of copies, and press ENTER. The following input screen will then be displayed:
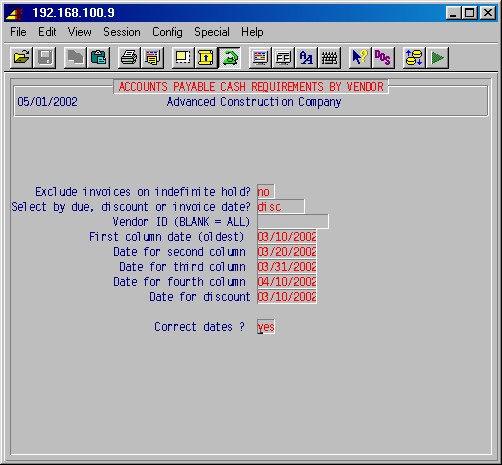
Specify the dates, from the oldest to the most future date on which to print the invoice balances due by those dates. Decide whether the report will be by Discount, Due or Invoice date. Next, type your chosen four dates, pressing ENTER after each. Then type the date for discount. This is the latest date on which you can pay current invoices and still take the discount. After you have typed all the dates, you are asked if they are correct. If YES, press ENTER. The AP Cash Requirements Report will now print, and the system will return to the 4-3 AP Payment Selection menu. Press ENTER again and you will return to the 4 Accounts Payable menu.
This procedure will print all transactions entered via 4-2 Post Accounts Payable Invoices and all invoices selected to be paid this cycle via 4-3 AP Payment Selection. The purpose of this report is to verify the correctness of the entries before continuing.
This report can reflect both "new invoices" (invoices in the current cycle which have not yet been distributed in step #8) and "old invoices" (invoices which were entered in previous cycles that have been distributed in step #8 and were selected to be paid via 4-3). Report totals will reflect sums of new and old invoices as follows:
| Report Total Total invoices to be paid Total invoices prepaid Total invoices put on hold Total new invoice discounts Total new invoice retainage |
Invoices Included in Total Line Sum of both new and old invoices to be paid Sum of both new and old invoices paid manually New invoices with N or H code New invoices only New invoices only |
On the printer selection screen, type the printer number and the number of copies and press ENTER. You will then be prompted:
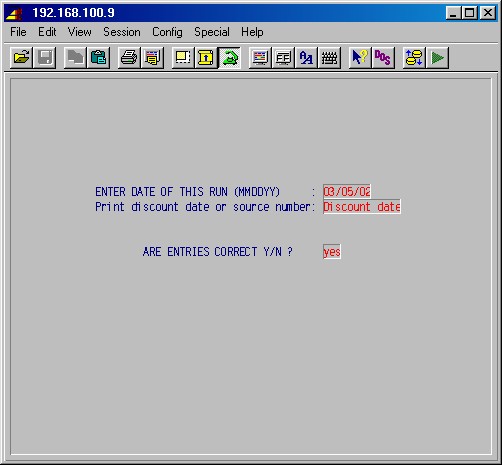
Calculate the discount and net amount for transactions coded to be paid on this cycle. Discounts will be taken if the date given below is before or the same as the discount date of each invoice.
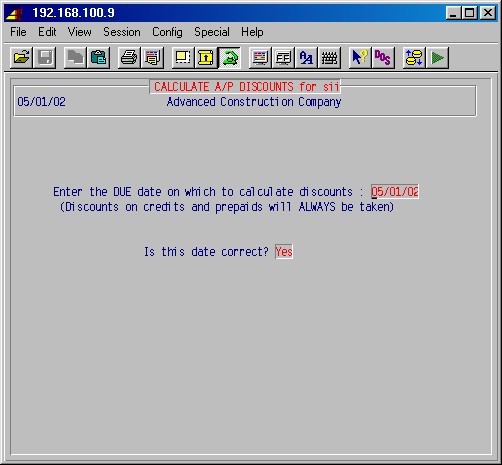
The posted discount date will be compared to the date entered here. Invoices paid on time will have the discounts taken. Type the date and verify its accuracy. If correct, type YES ENTER. The screen will now display this message:
If you selected credit memos to be "paid" in 4-2, and the related job requires a waiver of lien, this can result in a negative check. The system will reclassify the invoices and credit memos on the negative check so that they print as part of the main vendor check, instead of a waiver check.
NOTE: The above steps 4-2 through 4-5 can be performed several times, if necessary. However, make sure the edit report printed in 4-4 and the Pre-Check Journal printed in 4-5 are correct before you continue.
Transactions beyond this point are permanent. Changes will require adjusting entries, not erasure. Check the edit report and the pre-check journal carefully.
If there are checks to be printed, or if there are manual checks in this cycle, then you must do this procedure.
This procedure prints accounts payable checks and prepares the check register. Checks can be re-printed if you experience a paper jam or printer problem.
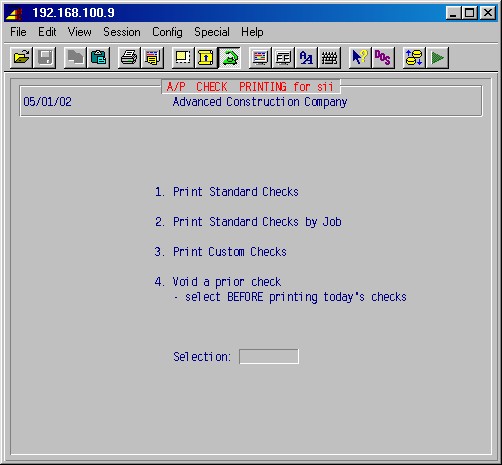

Enter the vendor ID [H], the check number, and press ENTER. The system will print a copy of the original check information for confirmation. If this is the check you want voided, press YES to continue. If not, press NO to re-enter the check information, or E to exit this procedure.
After selecting one of the check printing steps 1, 2, or 3 above, the following input screen will be displayed:
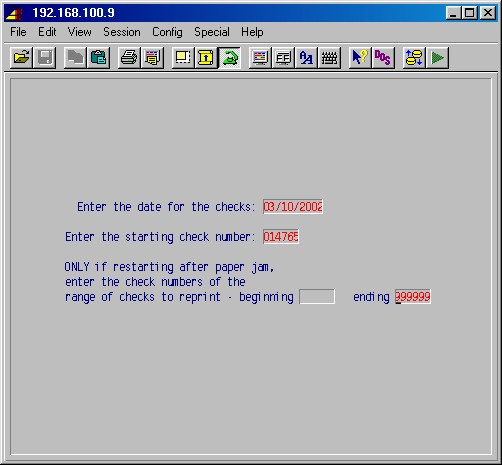
Type the appropriate date (must be in correct accounting period), check number, and press ENTER. On the printer selection screen, type the printer number, the number of copies, and press ENTER. You will then be returned to the 4-6 Print AP Checks. Press ENTER again to return to the 4 Accounts Payable menu.
If you have printed only one or two checks, it is probably easier to start over. If you are in the middle of a large batch of checks and the printer jams, use the procedure below to restart printing in the middle of the batch.
NOTE: If you are in the middle of a large batch, don't straighten the checks or allow the printing to continue. You will not be printing one or more checks in the middle of the batch and it will require several manual entries to correct. Use one of the following two procedures.
NOTE: Physically void these checks by writing void on them. Tell the system the status of those check numbers using 4-2 on the next cycle and by entering an invoice with a -0- amount and showing it prepaid (PO number = void, vendor ID = misc, invoice number = check number, invoice amount = 0, pay now = p), or by way of maintenance on 6-5-4, Enter Manual Checks/Receipts to Register Only, to show the voided checks.
NOTE: If any checks were ruined in this process, void them and inform the system as to their status using one of the procedures outlined in the note above.
The AP check register prints a complete list of all printed and prepaid check entries. On the printer selection screen, choose the printer number, the number of copies, and press ENTER. When printing is complete, the system will return to the 4 Accounts Payable menu.
This procedure processes and prints AP distribution to the posting journal in the general ledger (if used), job cost, and purchase orders.
If the data is correct, press ENTER and proceed. The screen will prompt the following, adding to the screen, one at a time.
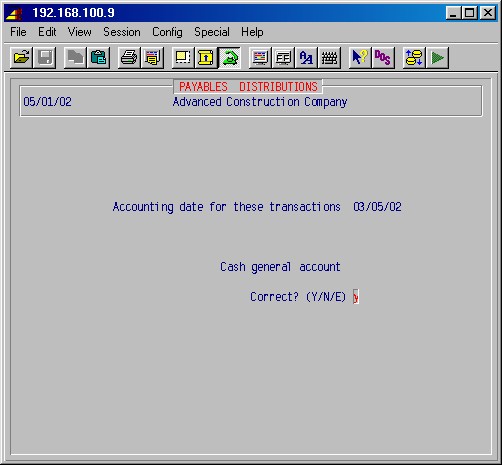
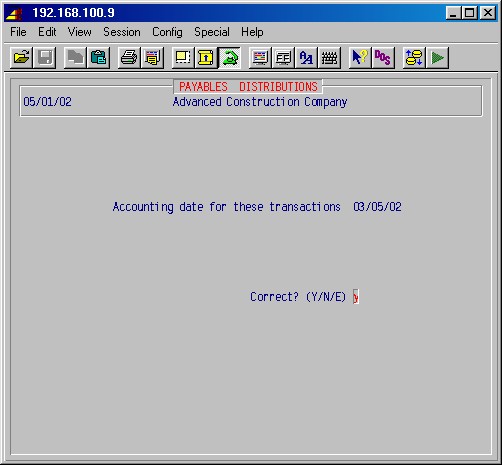
The date shown will be the default for the cycle you are in. If you have changed cycles and you are going back to print the distribution for a previous cycle, this date must match the date used when making the distribution. If the printed report comes out empty, verify the date as the same one used when running 4-8-1 Distribute Payables to GL, JC, PO (above). Type YES ENTER.
NOTE: This reference number will be printed on the Payables Distribution to General Ledger and will not be accessible again. If one or more reports are lost and need to be reprinted, the reference line will be left blank and all postings since the beginning of the month will be printed.
The date shown is the default for the cycle you are in. If you have changed cycles and you are going back to print the distribution for a previous cycle, this date must match the date used when making the distribution. If the printed report comes out empty, verify the date as the same one used when running 4-8-1 Distribute Payables to GL, JC, PO (above). Type YES ENTER.
On the printer selection screen, type the printer number, the number of copies, and press ENTER.
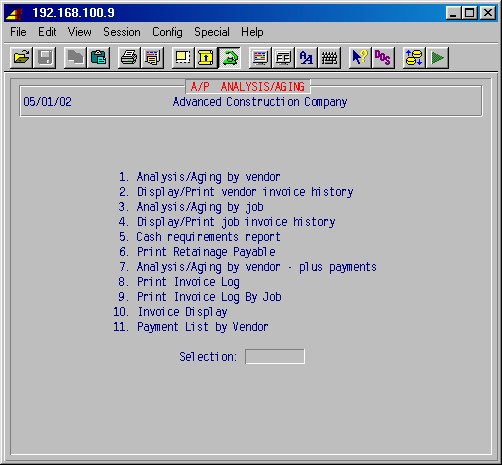
Selecting this procedure will display the following menu:
.
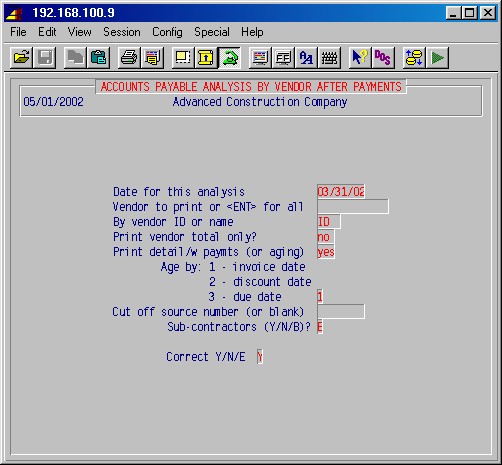
On the printer selection screen, type the printer number, the number of copies, and press ENTER. You will see this screen:
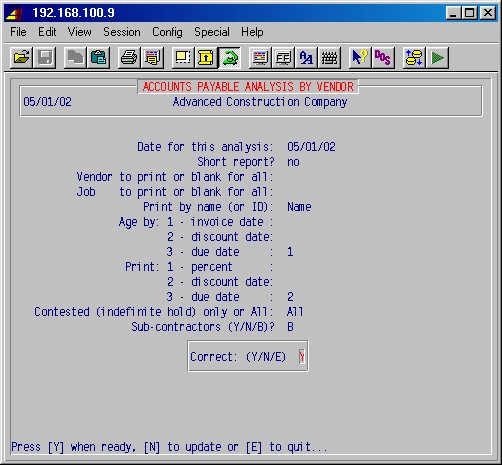
Date for this analysis: This is the aging date. No invoices dated later than this date will be printed. Type the date for this report or use the default date, which is today's date, and press ENTER.
Enter the number for the type of date you want to use for aging.
Enter the number for what you want printed in the fourth column.
.
.
.
.
.
.
.
.
.
.
.
.
If you answered YES to the print report option, you will now see the printer selection screen. Type the printer number, the number of copies, and press ENTER. Your report will now print and the screen will return to the 4-9 AP Analysis Reports menu.
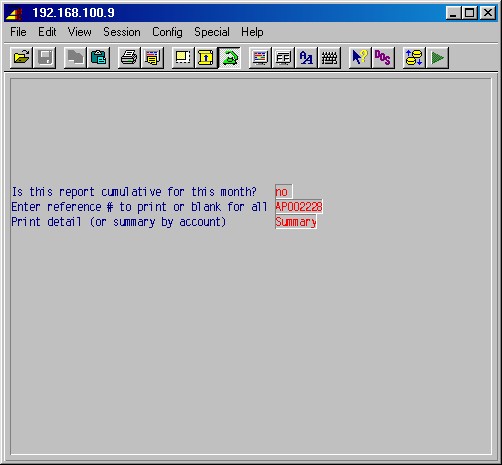
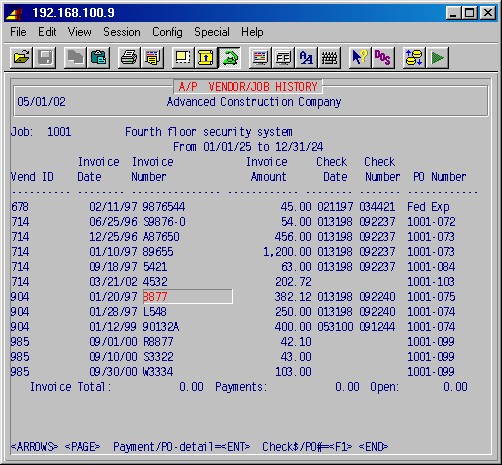
If you answered NO, the screen will display a report according to the parameters you defined:
You can use the ARROW, PAGE and HOME keys to scroll up and down and jump to the first/last invoice or type enough of the number of an invoice for it to show up. Press ENTER on a highlighted invoice to see the payment history (when the a check number or PO is displayed in the last column). Press F1 to switch back and forth between PO and check numbers in the last column.
.
Press END when finished and the screen will return to the 4-9 AP Analysis Reports menu.
.
.
On the printer selection screen, type the printer number, the number of copies, and press ENTER. You will see the following:
.
.
.
.
.
.
You will see the following:
.
.
.
.
.
.
.
If you answered YES to the print report option, you will now see the printer selection screen. Type the printer number, the number of copies, and press ENTER. Your report will print and the screen will return to the 4-9 AP Analysis Reports menu.
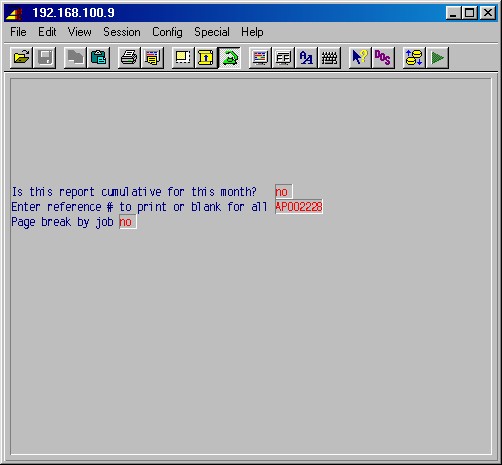
If you answered NO, the screen will display a report according to the parameters you defined:
Use the ARROW, PAGE and HOME keys to scroll up and down and jump to the first/last invoice, or type enough of the invoice number for it to show up. Press ENTER on a highlighted invoice to see the payment history (when a check number or PO number is displayed in the last column). Press F1 to switch back and forth between PO and check numbers in the last column. Press END when finished, and the screen will return to the 4-9 AP Analysis Reports menu.
.
On the printer selection screen, type the printer number, the number of copies, and press ENTER. The following input screen will be displayed:
This input screen allows you to specify the dates, from the oldest to the most future date, on which to print the invoice balances due by those dates.
First, specify whether the report will be by Discount, Due
or Invoice date.
Next, type the four dates just discussed, pressing ENTER after each.
Last, type the date for discount. This is the latest date on which you can pay current invoices and still take the discount. When you have typed all the dates, you are asked if they are correct. If YES, press ENTER. The AP Cash Requirements Report will now be printed and you will return to the 4-9 AP Analysis Reports menu.
.
.
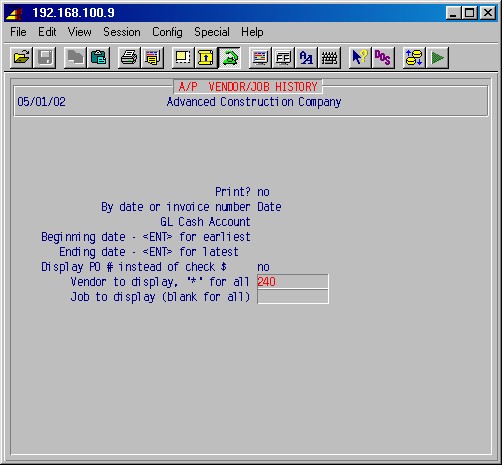
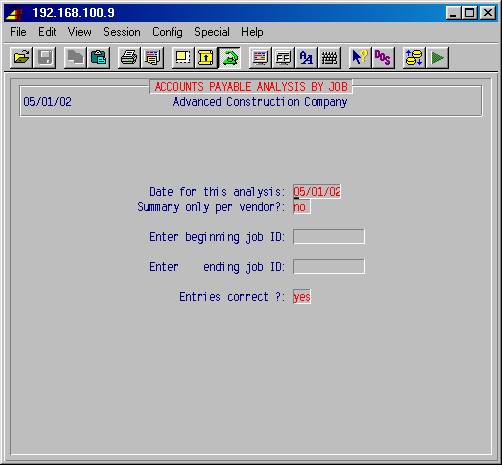
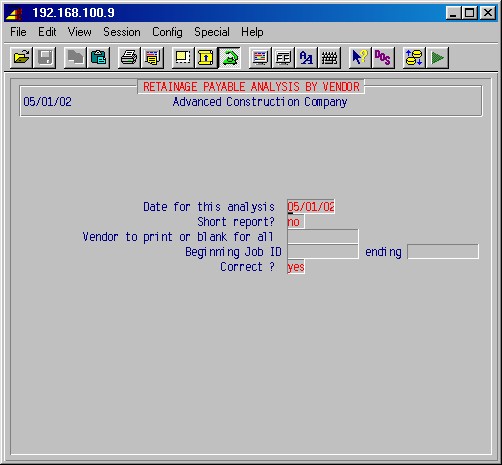
On the printer selection screen, type the printer number, the number of copies, and press ENTER. You will see the following screen (items in bold type are examples):
.
.
.
.
The analysis report will print and the system will return to the 4-9 AP Analysis Reports menu.
.
.
On the printer selection screen, type the printer number, the number of copies, and press ENTER. You will see the following (items in bold type are examples):
.
.
.
.
.
.
.
.
.
If you answered YES, this analysis report will be printed and the system will return to the 4-9 AP Analysis Reports menu.
.
.
.
.
You'll be prompted:
.
Once you have selected a vendor, you'll be prompted:
You can specify an invoice number if you know it, or leave blank and press ENTER.
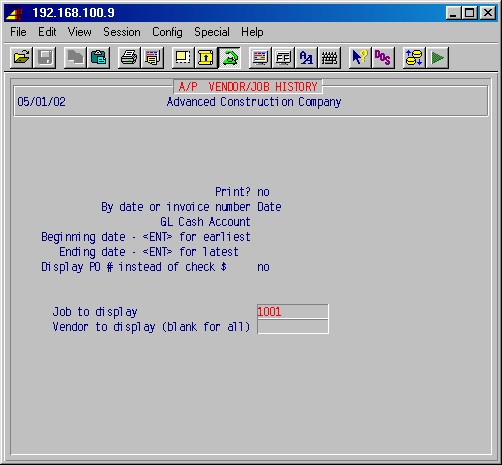
Leaving the invoice number blank, you'll then be prompted:
Beginning date
Ending date
If you want to limit the list of invoices for the selected vendor to a range of dates, enter the beginning and ending dates, or leave them blank to see a list of all invoices for the selected vendor:
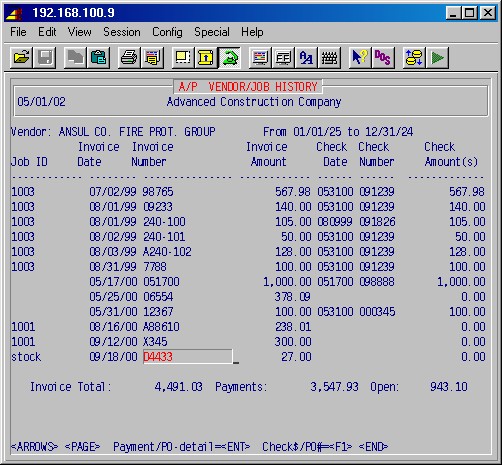
Using the ARROW, PAGE or HOME keys, or by typing enough of the invoice number for it to show, select the invoice you wish to see and press ENTER.
If you want to exit this area, press END. You can then specify another vendor ID, or press ENTER again to exit this procedure.
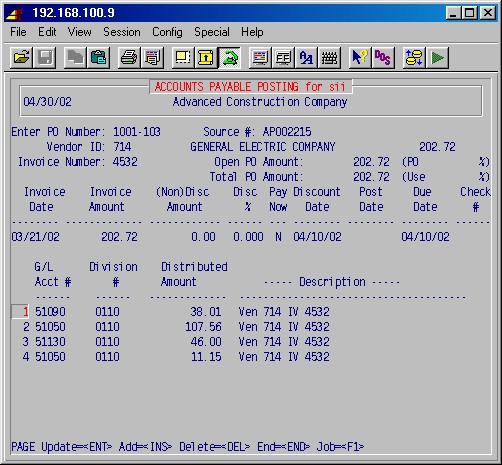
To view additional information on a specified invoice, highlight the invoice number and press ENTER. The system will display a screen similar to the original invoice entry screen, showing general ledger postings as in the following example:
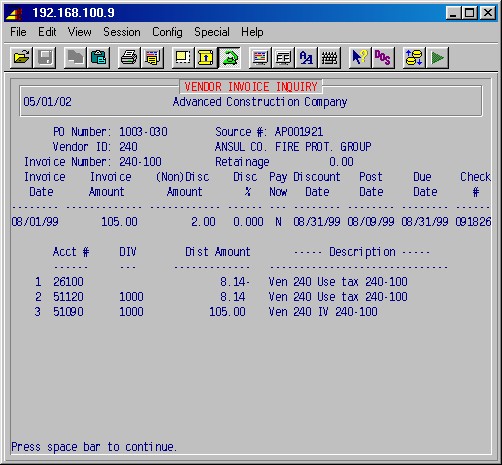
As you can see, this screen provides you with most of the original information entered to create this invoice as well as the source number and general ledger entries.
Press the space bar to continue, and the system will display this screen with the job entries, if there were originally any entries to a job.
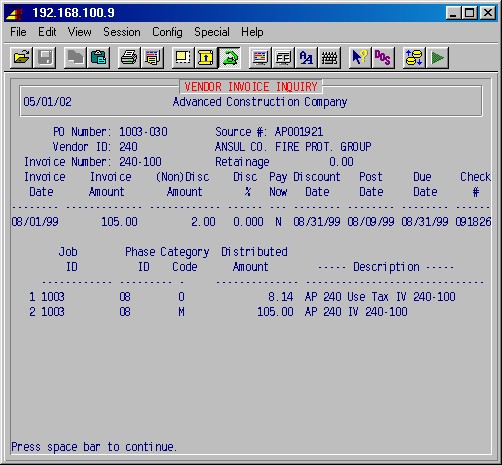
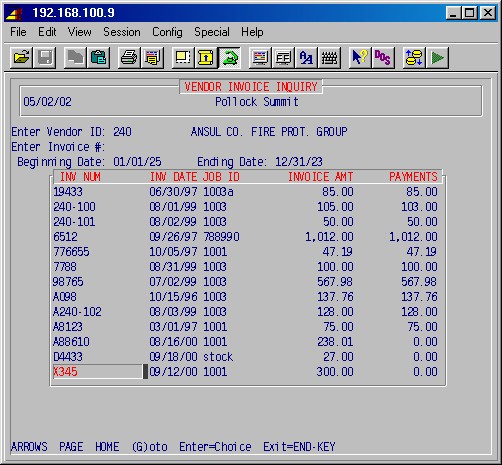
Press the space bar again, and the system will display the check number, date, amount, and other pertinent information about all payments made on this invoice, as in the following example:
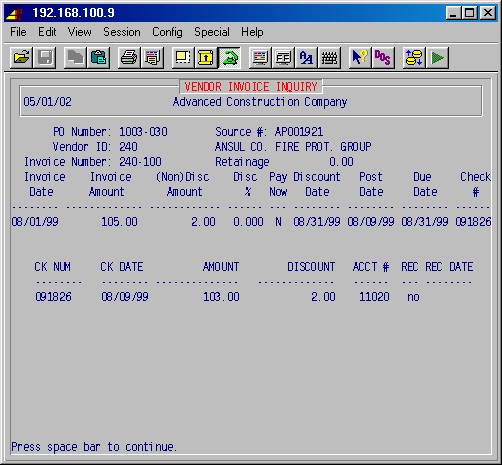
This screen is especially helpful when researching the status of payments to a vendor. Press the space bar again and you will be prompted:
To leave this area, blank out the vendor ID when prompted (space bar or F8), and press ENTER. You'll be returned to the 4-9: AP Analysis Reports Menu.
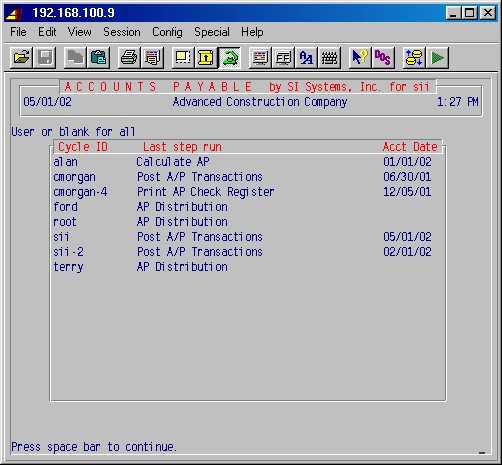
NOTE: For an explanation of AP cycles, see the Summary of Payables Procedures.
These procedures display the status of different AP cycles, start new cycles, and change from one cycle to another. They tell you which steps have been completed and then return to unfinished cycles. In addition, 4-11-3 allows the supervisor to take over another operator's cycle, if necessary. Selecting this procedure will display the following menu:
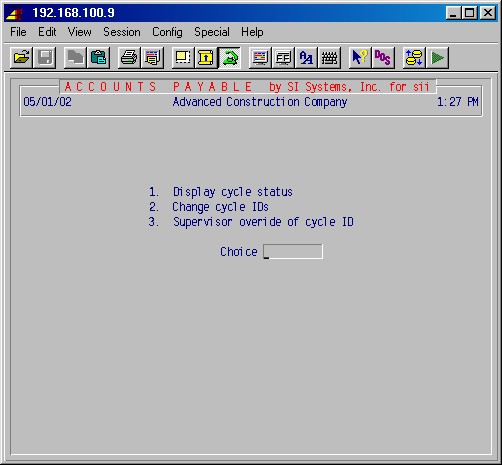
This procedure allows you to change your cycle to an existing cycle or start a new one by assigning a new cycle ID.
Selecting this procedure will prompt:
Cycle ID to use 07/01/02
Type the cycle ID chosen from 4-11-1 and press ENTER to return to an existing cycle. You can start a new cycle by typing any single character and pressing ENTER. You�ll be prompted for it's accounting date. Otherwise, the accounting date for the selected cycle will be displayed if the cycle has not been completed through the 4-8: Post Payables Distribution step.
Closed accounting period date 07/01/02
This date is provided for internal control purposes and allows supervisors to specify a limiting date for all posting. This means that a payables clerk cannot start a payables cycle dated prior to the "closed accounting period date" specified by the supervisor, thereby preventing GL posting to a previous closed out period. Typically, this would be the date at the end of the period last closed (the end of the previous month). If you do not want this kind of control, a date of 01/01/10 could be entered here.
Normally, each operator is responsible for his/her cycle and that cycle should be finished every day or so. One operator cannot access another operator's cycle. This procedure allows the supervisor to take over another operator's cycle if necessary. This selection will next prompt:
User name cycle ID / /
Type the user name you wish to override and press ENTER. Next, type the single letter cycle ID, if the cycle has one, and press ENTER. Lastly, type the accounting date for this cycle ID and press ENTER. The system will return to the #4 AP main menu, and you will now have access to the other operator's cycle. This cycle ID will be displayed in the header, "ACCOUNTS PAYABLE for mary" (for example), verifying the cycle ID you have now assumed.
This procedure allows you to delete old invoices. You'll be prompted:
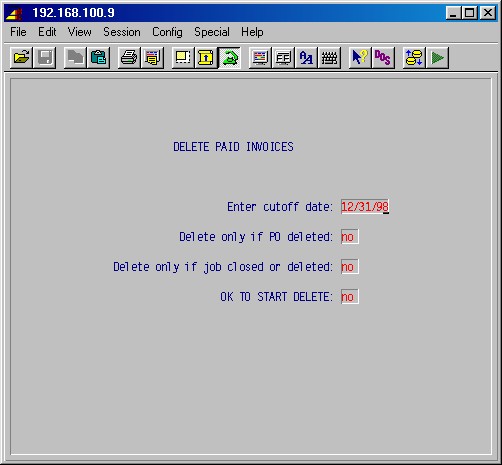
Enter cutoff date
Enter the last invoice date through which you want to delete invoices.
Delete only if PO deleted:
Answer YES if you want to delete invoices if their accompanying PO has been deleted.
Delete only if job closed or deleted:
Answer YES if you want to delete invoices if their job has been deleted or is closed.
OK TO START DELETE:
This is your last chance to abandon this action. Answer YES and press ENTER to start deleting invoices.
This selection allows you to maintain and print certificates of insurance information for vendors:

This selection presents the following maintenance screen (note: this data is also available through 4-1-2: Miscellaneous Vendor Data):
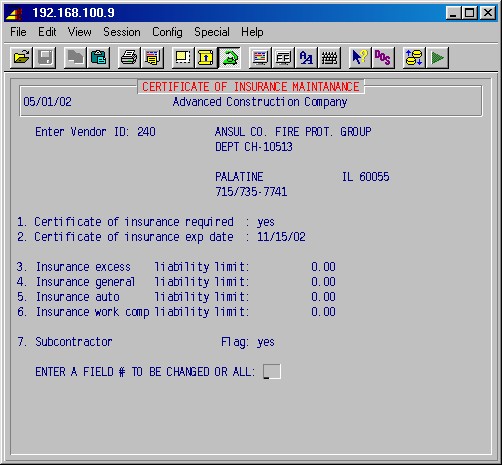
Enter Vendor ID
Enter the ID [H] of the vendor.1. Certificate of insurance required
If purchases from this vendor requires a certificate of insurance answer YES. When entering invoices from this vendor in 4-2, you'll be warned if the certificate of insurance has expired (see exp date, next).2. Certificate of insurance exp date
If you answered YES above, enter the expiration date of the certificate of insurance for this vendor.3. Insurance excess liability limit
4. Insurance general liability limit
5. Insurance auto liability limit
6. Insurance work comp liability limit
These amounts and dates are notational only.7. Subcontractor Flag:
Answer YES if this vendor is a subcontractor.ENTER A FIELD # TO BE CHANGED OR ALL
Type the number of the field you wish to change or type ALL to access all fields; press ENTER. To exit, press ENTER, and you will be prompted for another vendor ID. Press ENTER again, and you'll be returned to the menu, 4-13: Certificate of Insurance.
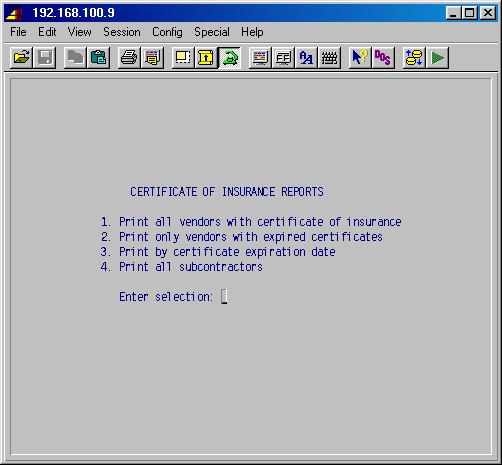
This selection presents the following menu:
This selection will print a list of all vendors with a certificate of insurance, listing the vendor ID and name, expiration date, and the values and dates in the insurance fields, as entered in 4-13-1.
This selection will print a list of all vendors with an expired certificate of insurance, listing the vendor ID and name, expiration date, and the values and dates in the insurance fields, as entered in 4-13-1.
This selection will print a list of all vendors with a certificate of insurance with expiration dates prior to the entered cut-off date, in order of expiration dates, listing the vendor ID and name, expiration date, and the values and dates in the insurance fields, as entered in 4-13-1.
This selection will print a list of all vendors with a certificate of insurance who are also marked as being sub-contractors, listing the vendor ID and name, expiration date, and the values and dates in the insurance fields, as entered in 4-13-1.
© 2001 SI Systems, Inc.
2323 Belleair Road
Clearwater, FL 33764
800/422-2277, 727/531-0669
Fax: 727/536-8858