How To Use This Manual
Organization
This manual is organized according to the menu and sub-menu selections. You
can easily locate instructions for any menu item by turning to the corresponding
menu numbers. The first number represents the menu selections (modules) under
the main menu; the second number represents the selections under the module
menus; the third number represents selections under sub menus, and so on. For
example:
The refers to selection 4 Accounts payable, from the main menu. The
1 refers to the first selection, 1 Vendor Maintenance, from the
accounts payable menu. The 3 refers to the third selection, 3 Vendor
List by Vendor ID, from the vendor maintenance menu.
On the same line as the number is the title of that area of the program.
-
4-1-3 Vendor List by Vendor ID
Indented from the left margin are the words, prompts, questions etc. which
the system displays to you on the screen. Messages and prompts might include
the various menus and items such as:
-
1. Print standard checks
-
Enter the printer number to use
-
Is the check lined up correctly?
Notice that these prompts or words are in bold type.
Many of the prompts or questions which the system asks you have a "most likely"
or default answer. This default answer will be shown after the question. If
the default answer shown is the one you wish, then you can simply press ENTER
to accept the default answer. Otherwise you can select a different answer, and
then press ENTER.
Abbreviations
AP = Accounts Payable
AR = Accounts Receivable
ES = Estimating
GL = General Ledger
HR = Human Resources
IN = Inventory |
IQ = Inquiry
JC = Job Cost
PO = Purchase Order
PR = Payroll
UP = Unit Pricing Estimating
UT = Utilities |
Menus and Input Screens
Types of Screens
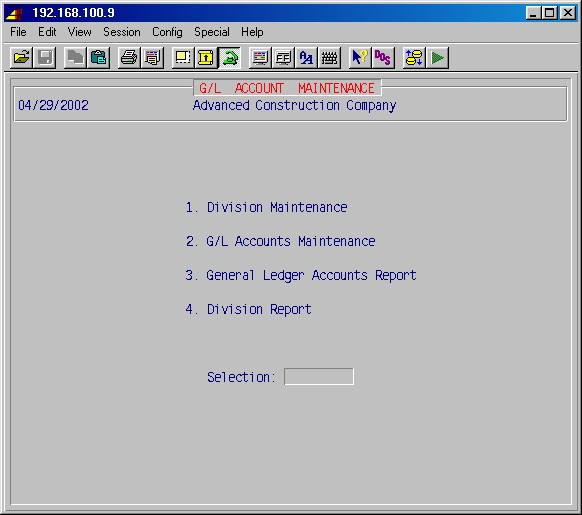
Vertical Menu
Two main types of screens will be found in the system. The first is a vertical
menu, such as the one below:
To use this menu, simply type the number of the selection you wish
to use and press ENTER. If no further work is desired from these selections,
making no entry (blank) and pressing ENTER will exit this menu.
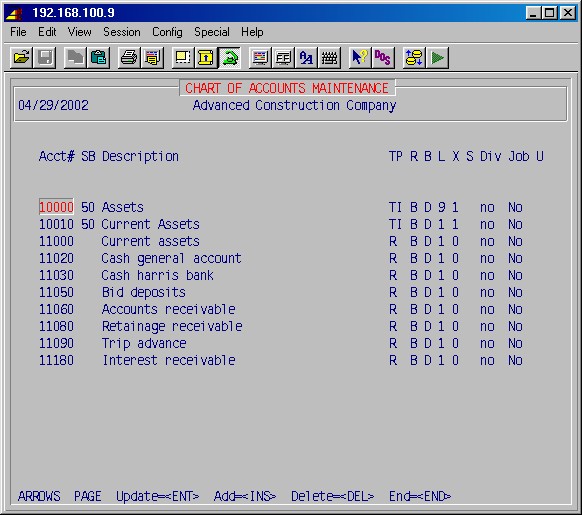
Horizontal/Scrolling Screen
The second main screen style is a scrolling or horizontal screen, such as
the one below:
To use this style of screen, press the indicated key for your choice of function,
or use the up/down arrow keys or page up/down to move through the displayed
data. Pressing the HOME key moves you to the last line of the displayed
data, pressing the HOME key again moves you to the first line of the
displayed data. Press ENTER to update information. After pressing
the INS key, you will be in the add or insert mode and can
continue to add new lines without having to press the INS key for each new
line. To get
out of the add mode, press any of these keys: HOME, Page-Up/Down
or Up/Down arrow, when finished with ENTERing data on a line. To go
back from a horizontal screen to the previous menu, press the END key.
To go back to the previous menu from an input screen, press ENTER instead
of another selection.
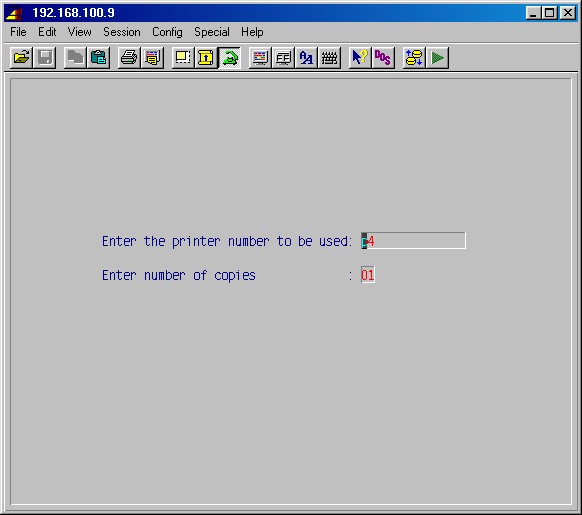
Printer Selection Screen
Throughout this manual, there will be references to the printer selection screen.
When this screen is present, specify the printer information as follows:
Type p1, p2, lp0, etc., as applicable to your system for
the printer number, press ENTER, type the number of copies you want to
print and press ENTER.
NOTE: Typing printer trash allows the system
to go through the motions of printing without actually putting anything on
paper.
Use printer crt to cause any printed output to be available for display
on the screen. (See F2 - View print job for further instruction)
Top
Special Function Keys
-
F1
The F1 function key allows you to skip over the remainder of multiple input
fields (underlined or bolded fields) on input screens without having to press
ENTER multiple times to move the cursor through the fields to the end.
You are basically saying, "I'm finished with all the underlined areas." Pressing
F1 skips over all the fields you have access to at that time.
-
F3
The F3 function key allows you to toggle the insert/typeover modes when you
are making a correction or addition in a line of data input. The insert mode
allows you to insert a character or characters in the middle of an input field,
moving the rest of the line to the right, instead of overwriting the character(s)
where you placed the cursor. When you are in the insert mode, you will see
an "insert" prompt in the lower right hand corner of your screen.
-
F4
The F4 function key should be used with extreme caution and only where the
screen prompts you to do so. Indiscriminate use of this function key can result
in loss of data.
-
F8
The F8 function key is referred to as the "zap" key because it allows you
to clear a field. If you are in a string field (such as customer name),
pressing
F8 clears the field from the position of the cursor to the end of the field.
If you are in a numeric field, pressing F8 sets the field back to zero and
puts the cursor back to the beginning of the field. A date field can also
be cleared
by pressing the F8 key.
F2 - Adding machine/calculator
This function will display a full functioning calculator. Press F2
and type add ENTER. The screen will display a calculator which can
be operated with the numbers on the keyboard. If the cursor is in a numeric
field when you invoke the calculator, the system will bring to the calculator
the value from the field and carry back the results of your calculations
to
the same field, if you desire. To return to the main screen,
press End to exit the calculator.
-
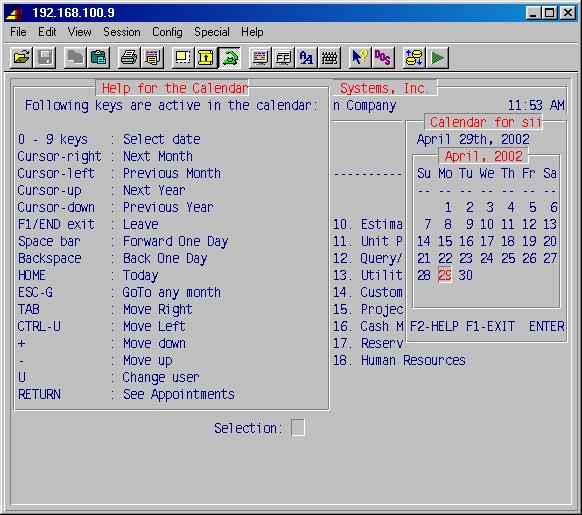
F2 - Calendar
This function displays
a current monthly calendar or a calendar for a specified month and year.
Press F2 and when prompted, type cal for calendar and ENTER.
The system will display the current month's calendar in the upper right corner
of the screen. Change the year with the up and down arrow keys
or the month with the right and left arrow keys. Move forward
by day with the space bar. Press F2 for a help screen showing all the
functions available as shown on this sample screen:
When you are finished, press F1 or END to exit the calendar
and return to the screen exactly as it was before you chose the calendar
function.
-
F2 - Cancel printer
This function is used to cancel a print job. Press F2. At the prompt,
type cancel ENTER. The system will ask "which printer" and display
a list of print jobs by printer number from just your work. Specify which
print job you wish to cancel and press ENTER. Entering just the printer
number will cancel what is currently being printed, regardless of whose work
it is. Generally don't do this.
NOTE: This function will cancel the print job being
sent to the printer, but the printer will continue to print until its memory
buffer is empty. If you are printing forms or checks you don't want to waste,
turn off the power to the printer or press the reset button if your printer
has one. It is also a good idea to roll back the forms in the printer a
few inches before you turn on the power because the printer can still print
a few more lines in some instances.
-
F2 - Change Password
This function allows you to change your login password. Press F2 and
the choice type passwd for password. You will be prompted for
your “old password,” which means the password you used when you logged on
the system for the session you are now running. Next, choose 1 Pick a password.
When you have successfully entered your new password twice, press the space
bar to return to your menu.
-
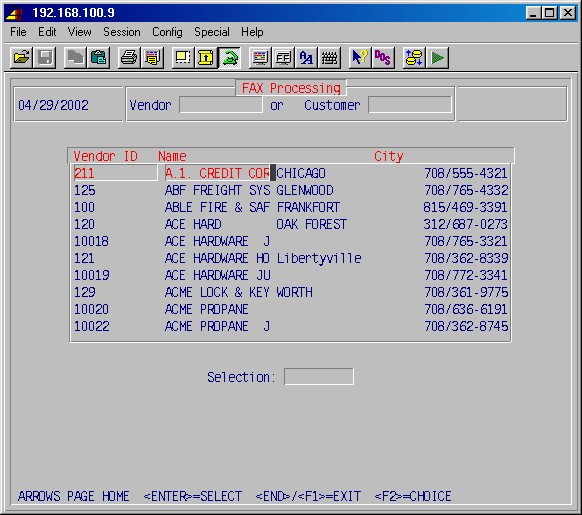
F2 - Fax (optional)
This function allows you to manually prepare and send a fax if the optional
fax software is in use. Pressing F2 and typing fax will display
an entry line for vendor ID, customer ID, and fax phone number. If you know
the vendor ID and the vendor fax number is listed in the vendor master file,
the system will automatically fill in the fax phone number for you. Similarly,
if you know the customer ID and the customer's fax number is in the customer
master file, the fax number will be filled in automatically.
The request for vendor ID or customer ID repeats until Vendor ID and
Customer ID and FAX Phone # are left blank, allowing you to build
a list of recipients for this fax.
The following is a sample of this entry area showing an F2 lookup on the
vendor.
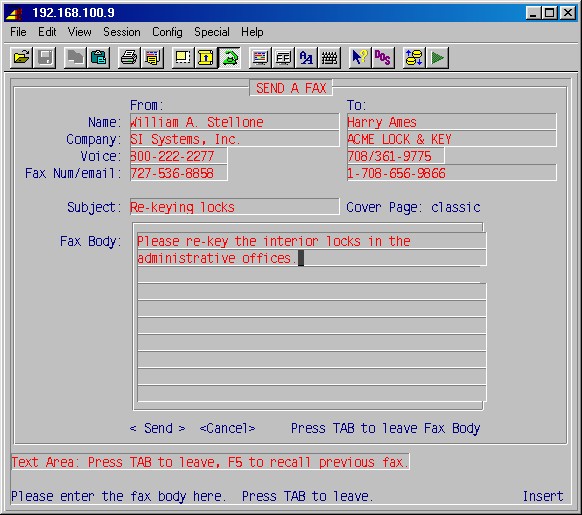
When you have selected one or more vendors and/or customers with a fax
number, or entered the fax number manually, the following screen will be
displayed:
After the list of recipients is completed, enter the subject along with
your message (up to 15 lines). Press F1 or ENTER at the last
line and you'll be prompted:
Send FAX or exit without sending (Y/E)
Type Y and press ENTER to send the fax, or type E
and press ENTER to exit without sending the fax. You'll then be returned
to where you were when you pressed F2. If sent, a copy of this fax
message will be sent to your personal mail.
-
F2 - Faxstats (optional)
This function allows you to list on the screen the status of any faxes which
have not yet been completed. At the choice prompt, type faxstats.
-
F2 - Help Key
The message [H] appears throughout the manual and
signifies special pop-up help menus. They are available in places where
the requested information is in the database.
The help menus, can be accessed in one of three ways:
- Press F2 for a complete list, then use the up and down arrow
keys to highlight your choice and press ENTER.
- Type a partial name and press F2 to take you to the names that
begin with those letters, then use the arrow keys to highlight your
choice and press ENTER.
- Press F2, and begin to type the name you are looking for. You
will see a "search" prompt at the bottom of the help box, which shows
you the partial name you are searching. As you type, the names that
begin with your typed letters will be displayed. Use your arrow keys
to highlight your choice and press ENTER.
For example, if you are asked for the vendor ID and you remember
that the vendor's name starts with a C, press C F2. A pop-up menu
will appear with the names of all vendors that start with a C. Scroll through
the names (using the up and down arrow keys, the page up and page down keys,
or the HOME key), or use the "search" feature and type the first
few letters, highlight the correct vendor, and press ENTER. The correct
vendor ID will be displayed in the input menu where you are working.
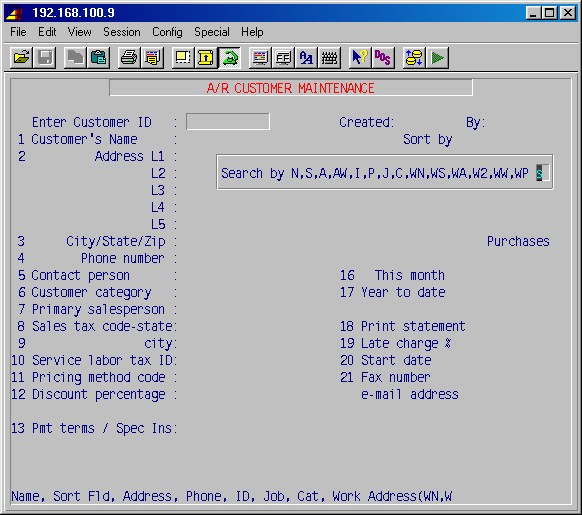
Some help menus, such as AR customer ID, will display a "search
by" field when you press F2, as follows:
This allows you to specify how you search. The help prompt
at the bottom of the screen describes these search parameters. In this example,
the default, S, sorts by the sort field you specified when the data was
entered (or updated). To specify search parameters, press the first letter(s)
of the parameter you wish to use and press ENTER, or just press ENTER
for the default. The following search parameters are available in this example:
N = Name
A = Address
J = Job
WS = Work sort field
WP = Work phone |
S = Search/sort field (user specified)
P = Phone
WN = Work name
WA = Work address |
Pressing
F1 exits help without any selection being made.
-
F2 - Help (Context Sensitive Help/Manual)
This function gives access to online help for any field enabled for input.
Press F2 and at the choice, type H (for help) and press
ENTER. (If the above-mentioned list of choices for the field appears,
press F2 again.) If more than one screen of help text is available,
pressing PageUp, PageDown, HOME, etc. moves you around.
When you are finished, press END.
-
F2 - View print job
This function allows you to view a print job that has been printed to the
"crt" printer. After printing to "crt," and after the screen returns to
the menu, indicating the print job has finished, press F2 and at
the choice, press v for view. The first page of your print
job will be displayed, and the entire document can be viewed one screen
at a time by pressing ENTER. If more than one screen of text is
available, the HOME, PageUp, PageDown, and Up/Down arrow keys
can be used to move quickly through the document . To search, press / and
enter the search text (case sensitive). Press :q ENTER
to exit this area.
Top
© 2002 SI Systems, Inc.
2323 Belleair Road
Clearwater, FL 33764
800/422-2277, 727/531-0669
Fax: 727/536-8858