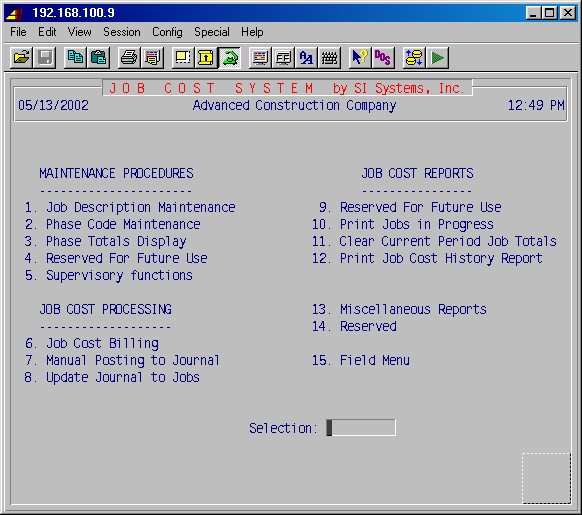
From the main menu, if #7 Job Cost Control is selected, this job cost menu is displayed. The selections on this menu are divided into three groups.
These procedures are used to set up detailed information about each job and phase. Phase totals may be viewed for estimated, current, to-date, field estimated and revised estimated figures. The last procedure offers the ability to control and purge job cost history.
These procedures are different from the other job cost procedures in that they produce invoices and communicate with accounts receivable. Information from the invoices prepared in this job cost processing area is immediately available for the various AR agings and reports. Although job cost figures are captured from other accounting areas, provisions are available in this area for manual posting to the jobs.
This series of procedures processes and prints the various job cost reports, updates the respective totals and reports job history data.
TopSelecting 13-8-7 Schedule of values (Job)Billing from the main menu presents the following screen:
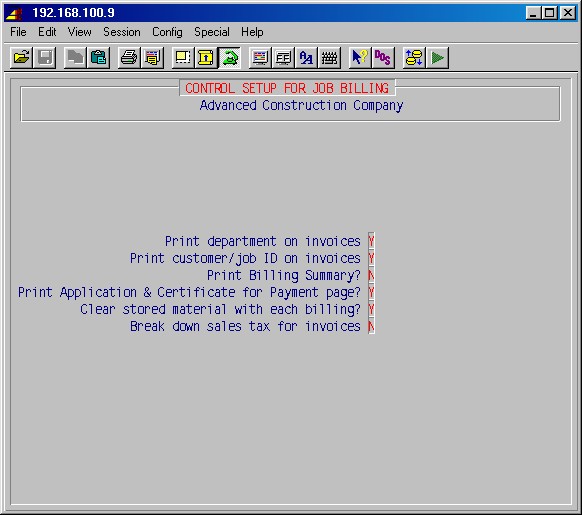
These default setting are used in 7-6: Job Cost Billing.
Print department on invoices
Answer Yes if you want the department (sales type) to print on invoices.
Print customer/job ID on invoices
If Yes then the customer and job ID will print on invoices.
Print Billing Summary?
If you want the Billing Summary page printed, answer Yes.
Print Application & Certificate for Payment page?
If you want the standard AIA form printed, answer Yes.
Break down sales tax for invoices
If Yes then taxes will be broken out on invoices, and you'll additionally be prompted here:
Add sales tax above contract billing:
If sales tax is to be billed in addition to a job's contract amount, then answer Yes here.
If sales tax is included in a job's contract amount, then answer No here.
Press ENTER until you get back to the main menu.
The following areas should already have been set up with printers, sales types,
sales tax and employees which may be needed as noted:
13-1 Client information, for company name, etc. to print on reports.
13-2 Permission to run programs, to give users access to the JC module.
13-3 Printer Designation & Codes, to define printers to be used in printing JC reports, etc.
1-4-1 Sales type maintenance, used in setting up jobs.
5-1-1 Employee Maintenance, used in setting up a job's Who's Who.
13-12 User Login to Employee Maintenance, to give users access to jobs.
General ledger setups must also have been completed, as described in the Quick Guide, before any job cost postings can be done.
Using the maintenance screens as described in the following, verify that these two jobs have been set up correctly: OH and STOCK. The enter information for active jobs, plus any jobs with open AP or AR invoice. At your leisure, all jobs which have been active this fiscal year may be set up.Top
The procedures in this section allow setting up, printing, modifying, viewing, and deleting job descriptions.
This selection will display the following menu:
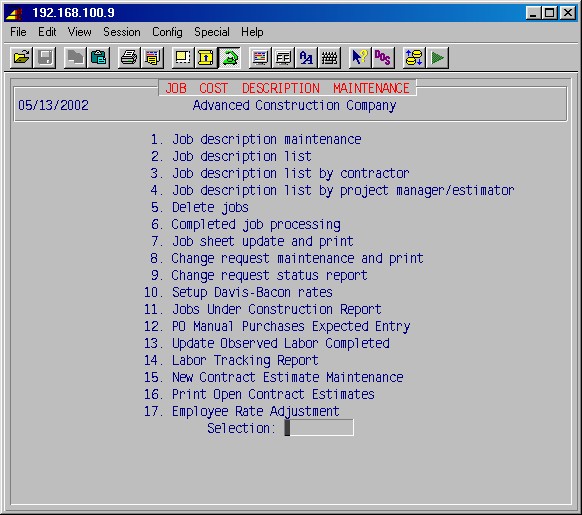
This procedure is used to set up or make changes to job descriptions.
This selection will display the following entry screen (items in bold type are examples):

Enter job ID:
Type a job ID of your choosing, up to 12 characters of letters and numbers.
1. Job name:
Type a job name up to 30 characters. This is the name that will appear in the heading of all job cost reports and invoices.
2. Client ID:
Type an existing customer ID [H] from the accounts receivable customer list. This must be an existing customer or you cannot continue.
NOTE: If you have not yet set up this customer, you may use the express key (press F2 twice), go to 1-1 Accounts Receivable maintenance, and set up the new customer. When you return to this screen, type the new customer ID in this field and continue.
3. Job type:
This is a one or two character code. The first character must be either a C for those jobs requiring certified payroll reports, or R for residential; otherwise leave blank.
4. PO # option:
This field controls how the system automatically numbers the purchase orders. Enter one of the following:
J001 = Consecutively numbers within jobs starting with 001.
P1 = Consecutively numbers within job phases starting with 1.
Blank = Requires you to manually put in the PO numbers.5. Total Sq. Ft.
Optional. Type the square footage of the project if desired.
6. Sales Type ID:
Specify the accounts receivable sales department for this job. These departments were entered as Sales Type ID in 1-4-1 Sales Type Maintenance. This controls the GL entries that are affected by invoicing.
7. Retainage %
Specify the retainage percentage (i.e. 10% = 10.0) that is normal for billings for this job.
8. Terms:
This is an informational field. You may use to specify your payment terms if desired. (Example: Net 10 days).
9. Completed?
If the job is completed, type YES; this will cause the reports to skip this job and prevent PR or AP postings to this job. Otherwise leave blank. If completed, type the date for completion of this project. If this is not available or unknown, press ENTER.
The next six fields are used to identify the job address and are used during invoice printing and POs. The names of these fields are governed by the job type in field #3, Job Type.
If this is a Certified type job, or if you left field #3 blank, the following job address fields are displayed:
10. Job Address line 1:
11. Address line 2:
12. City:
13. St:
14. Zip:
15. County:
Complete these fields as you wish the job address to be identified on invoices and POs.If this is a Residential job, the following fields are displayed:
10. Model:
11. Lot:
12. Block:
13. Street:
14. Sub division:
15. County:County:
If a valid tax ID is entered here and 7-1-1-1 #4 Miscellaneous Information, field #3, Use tax exempt, is "no" then this tax ID will be used to calculate use tax when requisitioning to the job. Otherwise just enter the county.
16 - 18 PAYROLL TAX INFORMATION
These entries specify for payroll the state, locality/city and other for income tax withholding for work on this job. The State tax ID is required.
When these fields are completed and corrected if necessary, press ENTER and the following menu will be displayed as follows:
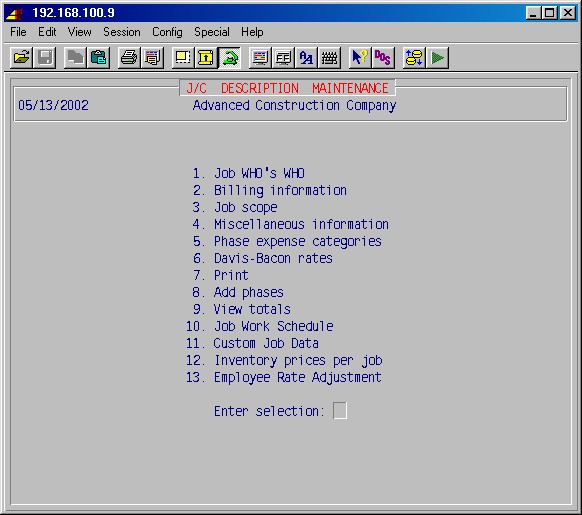
TopThis menu allows you to select specific areas of the job description you wish to complete or edit as detailed below.This menu allows you to select specific areas of the job description you wish to complete or edit as detailed below.

TopJob ID:
Job name:
The job ID and the job name will be displayed from the previous screen.1. Superintendent:
2. Foreman:
3. Project manager:
4. Field Supervisor:
5. Leadman:
6. Architect
7. Engineer:
8. Estimator:
9. Job site phone:
10. Job site FAX:
11. General contractor:
10. G. C. job phone:
11. G. C. job FAX:
These fields are self-explanatory and are available for informational purposes if you wish to use them. Some reports can be limited to a range of different job WHO's WHO.Enter field # to be changed or <RET>
You may now go back and change any field (one-at-a-time) as needed by typing the field number, pressing ENTER, making the change, and pressing ENTER again.When you are through with this screen, press ENTER again and the system will return you to the previous menu.
TopThis screen will carry forward the job ID, job name and address, and customer ID from the previous screen.
1. Date: (optional)
Type the date this job was booked.2. Trade: (optional)
This field must be left blank, except for General Contractors.3-6 Job:
Job name and address was transferred from the prior input screen. Review and correct if necessary.7. Time & material:
Type YES or NO to specify whether or not this job is a time and material job.8. % Overhead:
Not currently used.$/hour OH for payroll:
If "Use ONLY percent job OH/burden" is set to No in 13-8-5, then this amount is used by payroll for this job, in addition to other burden and overhead (FICA, Workman's Comp, FUTA/SUTA, etc.).9. % Profit:
Not currently used.% Burden
If "Use ONLY percent job OH/burden" is set to Yes in 13-8-5, then this percentage is used by payroll for this job to calculate the only overhead/burden for the job. Note that if "JC % BURDEN" in 7-2-1: Phase Code Maintenance, has been set to a value other than zero for a phase, then that percentage will be used to calculate the OH/burden for that phase, instead of the above default percentage for the job.
10. Contract/PO No:
Type the contract or purchase order number specified by the customer.11. Customer ID:
Transferred from the previous screen. Review and correct if necessary.12-16 Bill to:
Type in the billing address for this job only if it is different from the customer's address. If it is the same, leave blank.When these fields are completed and corrected if necessary, press ENTER.
TopThis screen contains 15 lines available for description of the work to be done on this job orany other notations you may wish to make. When this screen is completed, press ENTER.
Top1. Schedule Of Values:
Type YES or NO to specify whether this job is to be billed from a schedule of values (AIA billing).2. Prevailing Wage:
Type YES or NO to specify whether this is a prevailing wage job.3. Use Tax Exempt:
Type YES or NO to specify whether this job is Use Tax exempt. (If the is "NO" and a valid tax ID is entered in 7-1-1-1 #15, County, then that tax ID will be used to calculate use tax when requisitioning to the job or entering AP invoices.)4. PO Sales tax ID:
Enter the tax ID for sales tax to be paid on purchase orders (or "xx" for none).Billing tax ID:
Enter the ID of the tax authority for billings for this job or "xx" if exempt.5. Exemption number:
Type in the sales tax exemption number for this job if applicable.6. Notice to owner:
Type three characters of your choice that will appear on the accounts receivable aging report with any invoices for this job.7. Bonded job:
Type three characters of your choice that will appear on the accounts receivable aging report with any invoices for this job.8. Certified Benefits:
This is a mandatory field if this is a certified job. Type a C or F as follows:
C if you pay benefits in cash to bring their wages up to scale.
F if you pay benefits to a pension fund or other funds other than cash to bring their wages up to scale.9. Job Site Inventory:
Enter YES if this job has an on-site inventory or is set up as an inventory.10. Waiver of Lien Required:
Enter YES if a waiver of lien is required when issuing accounts payable checks to subcontractors on this job.11. Waiver Base:
Currently not used.12. Waiver Minimum:
Enter the minimum amount for which a waiver of lien is required. (Any purchase at or above this amount will generate a waiver of lien.)Minority Purchases Rq:
Enter YES if minority purchases are required for this job.PERCENT:
Enter the minority percentage of purchases required for this job.When these fields have been completed, press ENTER.
This selection will display the following (items in bold type are examples):
NOTE: This master list is located in job ID OH, which is a special job with information required by the system. The master list of phase expense categories may be changed to your specifications by selecting 7-1-1: Job Cost Description Maintenance, entering OH as the job ID, and paging to the above screen to make the changes.
The system will initially display a list with the standard categories as in the example above. These may now be changed for this job if desired. If you regularly use a different set of expense categories, it is best to change the master list as described in the note above.
Selecting 7, Print, will print a two page report of this job with the information you have entered in the above input screens. One page is a field copy and the other page is an office copy with information and checklists appropriate to each.
Phases may be entered by selecting 8, Add phases, as well as in step 7-2 below.
When done, hit ENTER.
This selection allows you to enter current Davis-Bacon pay rates for the various work classes applicable to your area and your company for this job. If these fields are filled in, the payroll system will choose the higher of the pay rates for a particular work class from this table or your company rates entered in 5-4-3-3: Union Work Class Maintenance, or for the employee in employee maintenance. This selection will display the following input screen (items in bold type are examples):
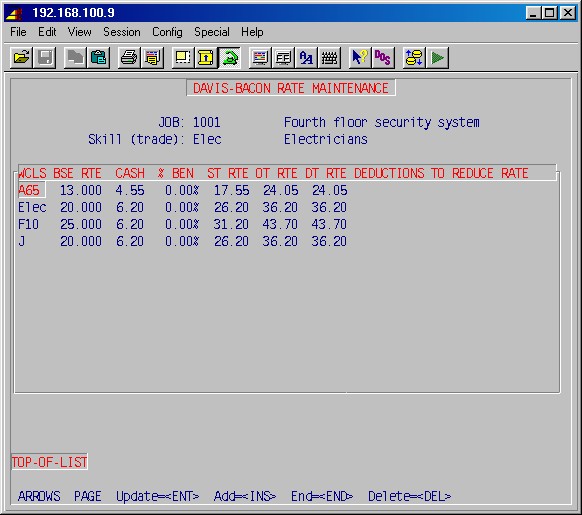
TopUse the INS, DEL, ARROWS, PAGE, HOME and ENTER keys to add, delete and update entries.
WCLS
Enter the work class required from the Davis-Bacon tables for the selected skill.BSE RTE
Enter the base rate for this work class and skill.CASH
Enter the dollar cash benefit for this work class and skill.% BEN
Enter the percent benefit for this work class and skill.ST RTE
Enter the regular time (standard) rate for this work class and skill.OT RTE
Enter the overtime rate for this work class and skill.DT RTE
Enter the doubletime rate for this work class and skill.DEDUCTIONS TO REDUCE RATE
Enter deduction IDs you want to use to reduce this rate, e.g. MEDI, 401k.
Use deductions paid by the employer: type C (company overhead accrual), as set up in 5-3-1: Deduction Maintenance.
Press END when done and you'll be prompted:
Print Davis Bacon List:
Type Y and ENTER to print lists or just ENTER.
This selection allows you to print the job information including most relevant information about that job. If you are using a job form, you will have copies ready for the foreman, estimating, AR, AP, and purchasing.
Selecting this procedure will display the printer selection screen. Type the printer number and the number of copies and press ENTER. Your job will be printed and the system will return to the previous menu.
This selection will transfer you to section 7-2: Phase Code Maintenance where you may add the phases.
This selection gives access to the additional user defined fields, as
set up in 13-8-16: User Defined Data Maintenance.
You will be prompted:
Item to change:
Enter the number of the field you wish to update. When done, just press ENTER with an item of 0, and you'll be returned to the previous menu.
This selection allows you to set up a list of inventory items with their quoted prices for this job.
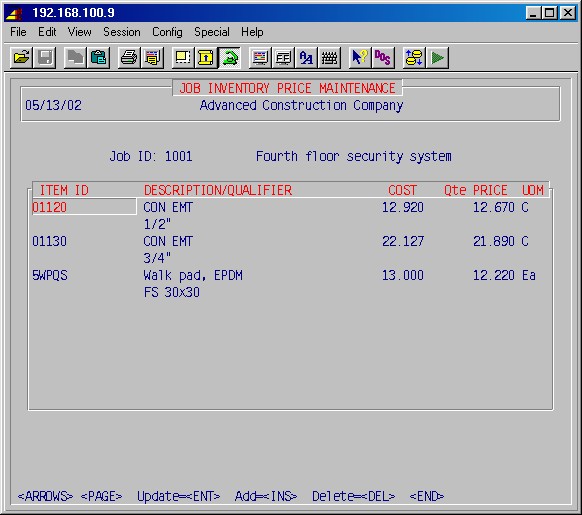
Use the INS, DEL, ARROW, PAGE, HOME,
and ENTER keys to add, delete and update items.
Press END when done.
ITEM ID
Enter the ID [H] of the item you want to set up a job price for.
DESCRIPTION/QUALIFIER
This will display the item description and qualifier.
COST
This will display the item cost.
Qte PRICE
Enter the quoted price for this item for this job.
UOM
This will display the unit of measure if the item.
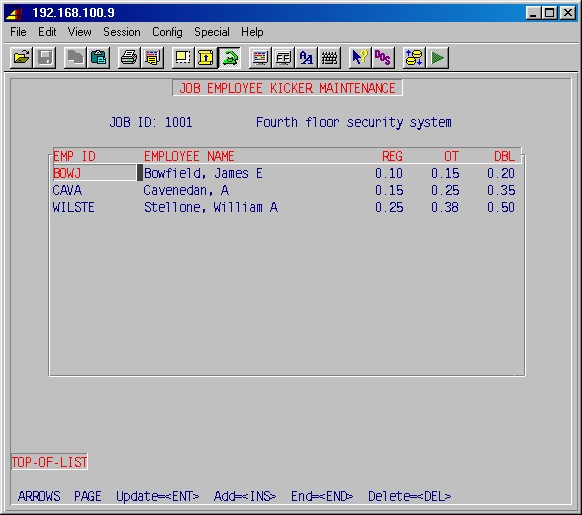
This selection allows you to set up a list of employees and additional dollars per hours paid when working on this job. On exit from this maintenance screen, you'll also be given the option of printing the list.
Use the INS, DEL, ARROW, PAGE, HOME,
and ENTER keys to add, delete and update items.
Press END when done.
EMP ID
Enter the ID [H] of the employee you want to set up additional $/hr rates for.
EMPLOYEE NAME
The system displays the name of the employee.
REG
Enter the additional dollar amount to be paid per regular hour.
OT
Enter the additional dollar amount to be paid per overtime hour.
DBL
Enter the additional dollar amount to be paid per doubletime hour.
When done with this job menu, just press ENTER and you'll be prompted for a new job ID. Here you may enter another job ID, or just press ENTER to return to the Job Cost Description Maintenance menu.
This procedure will print a job list, grouped by job IDs, of open, closed, or all jobs in a variety of formats depending on how much detail you want, including a US Department of Labor projects list.

If YES is specified, these options are avaliable:

Selecting this procedure will first display the printer selection screen. Type the printer number and the number of copies and press ENTER. The following options screen will then be displayed, line by line:
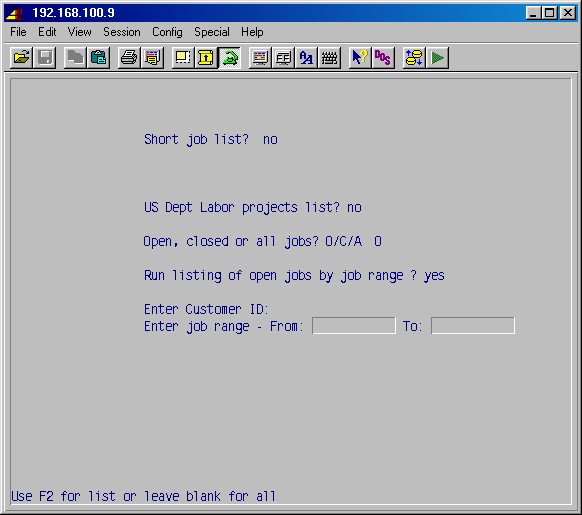
TopShort job list? NO
If you answer YES, you will be prompted:Single line only?
If you answer YES, the report will consist of one line per job with the job ID, job name, contractor, phone, and estimator.If you answer NO to single line only, the report will consist of two lines per job with additional dollar information including the contract price, amount billed, received, and retained.
In you answer NO to short job list, you will be prompted:
US Dept Labor projects list?
If you answer YES, the report will be in a monthly format appropriate for the US Department of Labor, listing the job name, job ID, contract number, dollar amount, award date, estimated completion date, and the federal funding agency.
If you answer NO, the system will print a long format report, listing the job name, address, client ID, estimator ID, dollar information, and various other data.
Open, closed, or all jobs? O/C/A
Specify the jobs you wish to include on the report:
O = Open jobs still in progress
C = Closed or completed jobs
A = All jobsRun listing of open jobs by job range?
Type Y if you want the option of entering a customer ID and/or a range of jobs to list.Enter Customer ID:
If you answered Y above, you may limit the list to jobs for just one customer by entering the customer ID here.Enter job range - From: To:
If you answered Y above, you may limit the list to jobs in a range you specify here.The report will now be printed and the system will return you to the 7-1: Job Cost Description Maintenance Menu.
This procedure will print a job list, grouped by contractor (client ID), of open, closed, or all jobs in a variety of formats depending on how much detail you want, including a US Department of Labor projects list.
Selecting this procedure will first display the printer selection screen. Type the printer number and the number of copies and press ENTER. The following options screen will then be displayed, line by line:
Short job list? NO
If you answer YES, you will be prompted:Single line only?
If you answer YES, the report will consist of one line per job with the job ID, job name, contractor, phone, and estimator.If you answer NO to single line only, the report will consist of two lines per job with additional dollar information including the contract price, amount billed, received, and retained.
In you answer NO to short job list, you will be prompted:
US Dept Labor projects list?
If you answer YES, the report will be in a monthly format appropriate for the US Department of Labor, listing the job name, job ID, contract number, dollar amount, award date, estimated completion date, and the federal funding agency.
If you answer NO, the system will print a long format report, listing the job name, address, client ID, estimator ID, dollar information, and various other data.
Open, closed, or all jobs? O/C/A
Specify the jobs you wish to include on the report:
O = Open jobs still in progress
C = Closed or completed jobs
A = All jobsRun listing of open jobs by job range?
Type Y if you want the option of entering a customer ID and/or a range of jobs to list.Enter Customer ID:
If you answered Y above, you may limit the list to jobs for just one customer by entering the customer ID here.Enter job range - From: To:
If you answered Y above, you may limit the list to jobs in a range you specify here.The report will now be printed and the system will return you to the 7-1: Job Cost Description Maintenance Menu.
This procedure will print a job list, grouped by project manager/estimator, of open, closed, or all jobs in a variety of formats depending on how much detail you want, including a US Department of Labor projects list.
Selecting this procedure will first display the printer selection screen. Type the printer number and the number of copies and press ENTER. The following options screen will then be displayed, line by line:
Short job list? NO
If you answer YES, you will be prompted:Single line only?
If you answer YES, the report will consist of one line per job with the job ID, job name, contractor, phone, and estimator.If you answer NO to single line only, the report will consist of two lines per job with additional dollar information including the contract price, amount billed, received, and retained.
In you answer NO to short job list, you will be prompted:
US Dept Labor projects list?
If you answer YES, the report will be in a monthly format appropriate for the US Department of Labor, listing the job name, job ID, contract number, dollar amount, award date, estimated completion date, and the federal funding agency.
If you answer NO, the system will print a long format report, listing the job name, address, client ID, estimator ID, dollar information, and various other data.
Open, closed, or all jobs? O/C/A
Specify the jobs you wish to include on the report:
O = Open jobs still in progress
C = Closed or completed jobs
A = All jobsRun listing of open jobs by job range?
Type Y if you want the option of entering a customer ID and/or a range of jobs to list.Enter Customer ID:
If you answered Y above, you may limit the list to jobs for just one customer by entering the customer ID here.Enter job range - From: To:
If you answered Y above, you may limit the list to jobs in a range you specify here.
You may limit the list of jobs to one estimator, or one project manager, and to a range of sales types. If you want a new page for each estimator, answer Y to that option.
The report will now be printed and the system will return you to the 7-1: Job Cost Description Maintenance Menu.
This procedure allows deleting jobs one at-a-time by job ID. The following screen will be displayed:
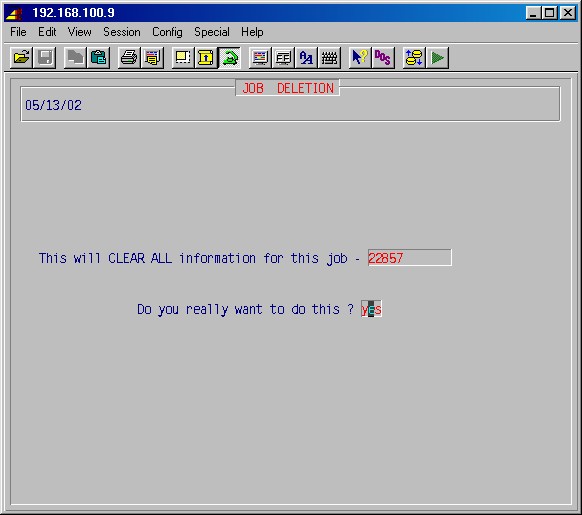
TopThis selection will first prompt:
Job ID to delete
Type the job ID you wish to delete and press ENTER. The system will then prompt:This will CLEAR ALL information for this job -
Do you really want to do this ? NOThis step will permanently delete this job's records from the system. If you are not sure, press just ENTER to cancel this procedure. If you are ready to proceed, type YES ENTER and this job will be deleted and the system will return you to the 7-1: Job Cost Description Maintenance Menu.
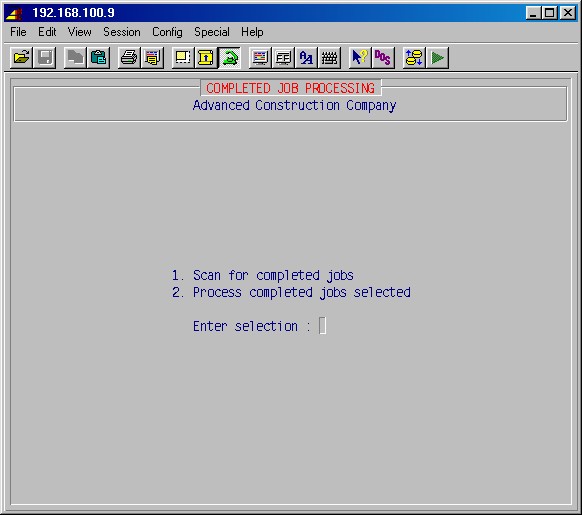
These procedures are a two part process. The first will select all jobs marked as completed in a specified data range and make a list of those jobs. The second part will take those selected jobs and print various reports or delete all or part of the job information. This selection will display the following menu:
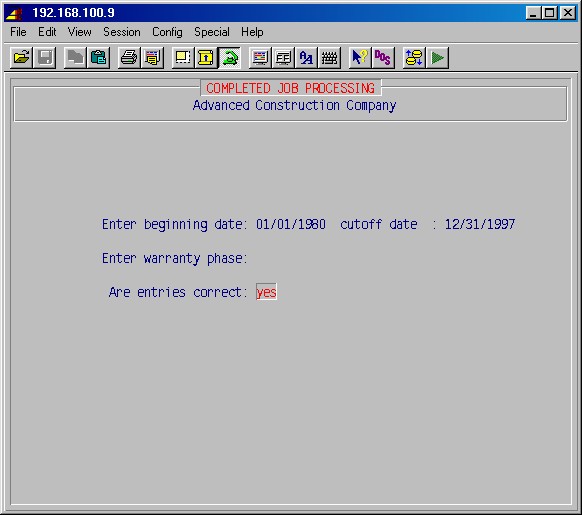
TopEnter beginning date:
Enter the earliest date for jobs you wish to process which have been completed on or after this date.Enter cutoff date:
Specify the final date for jobs which you wish to process which have been completed on or before this date.Enter warranty phase:
Leave blank for most applications. This is a field for jobs where you have created a warranty phase which you do not want to delete because warranty work may continue long after the job is completed. Entering the warranty phase number here if applicable, will prevent the warranty phase from being deleted in the next step.Are entries correct:
Type NO ENTER if you need to go back and make corrections. When you are ready, type YES ENTER and the system will scan the job records and build a list as you have specified returning you to the 7-1-6: Completed Job Processing Menu.
These procedures will take the most recent list of jobs selected in 7-1-6-1: Scan File for Completed Jobs, in the previous section and print various reports and eventually delete some or all of the information on those jobs.
Please note that each of these procedures works with the entire list of selected jobs. Therefore all jobs on the selected list will be printed or deleted depending on the option chosen. The options should be used in the order shown.
This selection will display the following menu:

This procedure will print a list of the selected jobs, by job ID and job name, with a report heading which you name. This selection will first prompt:
Enter report heading: ___________________________________________
Type whatever heading you wish to appear on this report and press ENTER. The printer selection screen will now be displayed. Type the printer number and the number of copies and press ENTER. Your report will now be printed and the system will return you to the 7-1-6-2: Completed Job Processing Menu.
This report is the same as the report produced in 7-10-1: Print Jobs In Progress Reports.
This procedure will print a report of the selected jobs showing, for each job, the job cost to-date and a total for all selected jobs of the amount of contracts, amount of change orders, gross billings, receipts, amount retained, and costs to date. Each job shows the estimated costs, to-date costs, and amount over/under for each phase of the job and for each phase expense category, totaled for all phases.
Selecting this procedure will display the printer selection screen. Type the printer number and the number of copies and press ENTER. Your report will now be printed and the system will return you to the 7-1-6-2: Completed Job Processing Menu.
This report is the same as the report produced in 7-12: Print Job Cost History Report.
This procedure will print a report of the selected jobs showing the detailed job cost history for each job. Selecting this procedure will display the printer selection screen. Type the printer number and the number of copies and press ENTER. Your report will now be printed and the system will return you to the 7-1-6-2: Completed Job Processing Menu.
This procedure will delete the phase records only of the selected jobs. This selection will first prompt:
Enter warranty phase : (The phase which is not to be deleted)
Is entry correct : NO
Specify the phase ID of the warranty phase, if applicable, as explained
in 7-1-6-1.
If you are sure you wish to continue and delete this phase, type YES
ENTER. The system will perform this procedure and return you to
the 7-1-6-2: Completed Job Processing Menu.
This procedure will delete all information - history, phases, and AIA billing, of the selected jobs from the system. This selection will first prompt:
DELETE COMPLETED JOBS
Are you sure : NO
If you are sure you wish to continue and delete all information of all selected jobs, type YES ENTER. The system will perform this procedure and return you to the 7-1-6-2 Completed job processing menu.
This procedure will delete the history only for the selected jobs, leaving the job heading, the phases, and the AIA billing intact. This would be used if you did not choose to delete the entire job in step 7-1-6-2-5 above. This selection will first prompt:
DELETE HISTORY
Are you sure : NO
If you are sure you wish to continue and delete the history of all selected jobs, type YES ENTER. The system will perform this procedure and return you to the 7-1-6-2: Completed Job Processing Menu.
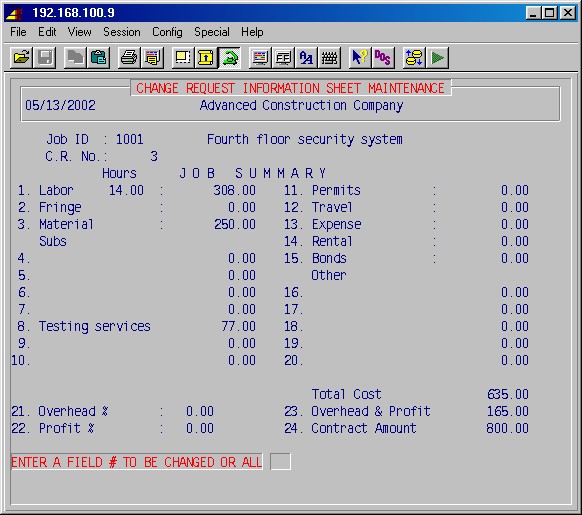
A job information sheet must be prepared for each job and has to be done before you can put in change requests. The job information sheet is a way to catalog and itemize how the total of the job contract was calculated and the total must equal the contract amount for the job. It also provides basic information about the job which is transferred to a change request when one is created.
All material, labor, and miscellaneous costs may be itemized, and figures for overhead and profit may be entered as a percentage or as a dollar amount. You may complete a job sheet in as much or as little detail as you wish. If desired, you may enter only one line with the total cost in field #16 which will generate the bottom line contact amount for this job sheet.
This selection will display the following input screen (items in bold type are examples):
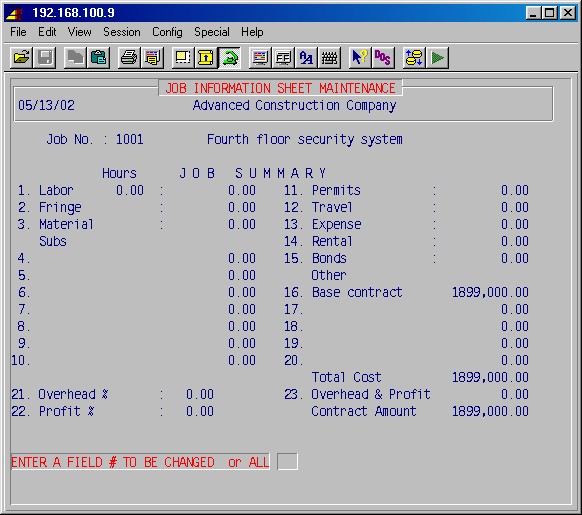
Top
Job No.:
Specify the job ID [H] and press ENTER. If this is a valid job, the system will display the job name. If you have not yet set up this job, you must first go to 7-1-1: Job Description Maintenance and enter this job.Fields 1 through 3 and 11 through 15
These categories are generally required for most jobs and are provided by the system. Enter the amounts of these various expense categories from the job estimates and work sheets you used to arrive at the contract amount.Fields 4 through 10
These fields are provided for additional subcontractors. Type the subcontract category and the amount as required from your estimates.If your overhead and profit, as a percentage of total cost, were entered when the job was set up, those percentages will appear here. If not, leave these fields blank and enter the dollar amount of profit and overhead in field #23.Fields 16 through 20
These fields are provided for any other expense categories. Type the category name and the amount from your estimates.Total cost
The system will calculate the total cost from all the expense categories you have entered and display it here. If this is not accurate, you will need to adjust the amounts in the expense categories until this balances with your estimates.If you entered overhead and profit as percentages in fields #21 and #22, the system will calculate the total dollar amount for overhead and profit from the total cost figure and those percentages and display the amount here. If you did not enter profit and overhead as percentages and left those fields blank, enter the total dollar amount you estimated for overhead and profit.Contract amount
The system will calculate the total contract amount from the total cost and the overhead and profit and display it here.Enter a field # to be changed or ALL
The total of this job sheet must equal the contract amount. If they do not balance, you may now go back to any field and make changes by typing the field number and pressing ENTER. You may also type all and press ENTER, which will allow you to move down through all the fields making changes as required.When done, press ENTER and you'll be prompted:
PRINT THIS JOB SHEET
Type Y if you want to print it. Then press ENTER.
This procedure allows the preparation and printing of change requests
through the various status categories from pending, approved, accepted,
rejected, to void. The system will automatically assign the next number
to a new change request, or you may review an old change request by typing
the C.R. No. (change request number) you wish to review. This selection
will display the following input screen (items in bold type are examples):
Job No.:
Specify the job ID and press ENTER.C.R. No.:
The system will prompt you with the next available change request number.If you are creating a new change request, press just ENTER. The system will insert the next available change request number in the C.R. No. field, insert data in fields #2 through #16 from the original job setup, and prompt you for the action (or status) in field #17.
If you are editing a previous change request, specify the change request number you wish to edit and press ENTER. The system will display all fields as previously completed including the date that the change request was created.
NOTE: Field #2 Trade must be blank or filled in with "owner" in order for you to own this change request and have it show up in your totals.
17. Action (status):
Specify the status of this change order/request by typing one of the status definitions statements from the menu at the bottom of the screen:Accepted - (same as approved)
Approved -
Pending -
Void -
Rejected -
Blank - (same as pending)
Enter a new field # to be changed or all
You may now go back and change a field if necessary by typing the field number, pressing ENTER, making the change and pressing ENTER again. When you are finished, press ENTER again and the following input screen will be displayed:
TopScope
The system provides 15 lines to type a description of the work to be done on this change request. You may leave this blank or type a detailed description, as required.Enter a field # to be changed A = ALL
If you need to make changes or corrections, type a specific field number or type A (to make all the fields available for edit) and press ENTER. When you are ready to continue, press just ENTER and the system will display the next input screen as follows:This input screen is very similar to the job sheet prepared in 7-1-7 for this job. Any sub-contractors and other expenses listed on the job sheet will be displayed here, as well as the percentages of overhead and profit that were entered on the job sheet. You need only input the figures pertinent to this change request, leaving all other fields as is. If necessary, you may list other sub-contractors and other expenses or change the percentages of overhead and profit - these additions and changes will be for this change request only.
When you are finished, press F1 to take the remainder of the fields out of the edit mode. You may then make changes by entering the field number and making the change or just press ENTER to continue. The system will then prompt:
Print this job sheet NO
If you want to print this change request sheet now, type YES and press ENTER. You will next be prompted:
Print on form NO
If you want to print on a change request/order form, type YES and press ENTER. The printer selection screen will be displayed. Type the printer number and the number of copies and press ENTER. If not printing on form, you'll then be prompted:
Print in sub format or owner:
Enter either S or O to print either in a format that's suitable for sending to a subcontractor, or for internal use.Your change request/order will be printed and the system will return you to the first screen in this CO information sheet maintenance procedure, prompting for a job number.
For your convenience, the job number you just used is displayed. If you need to prepare another change request for this job, press just ENTER. The next consecutive new CR number for this job will be displayed. To start a new CR, press just ENTER and continue as described above.
To exit this area, either "blank out" the job number by pressing the space bar one time and press ENTER, or press the END key. The system will return you to the 7-1: Job Description Maintenance Menu.
This procedure will print reports of the status of change requests for a specified job or all jobs. You may print reports for specific status codes of CR's or all status codes for the owner, subs or both. This selection will display the following menu:
TopEnter report selection
Specify the type of report you wish to print by typing the report number 1 through 4 and press ENTER. For example; if you want a report of all change orders with a status of "pending" for a particular job or all jobs, type 1 and press ENTER.For owner, subs, or both
Specify who you are printing this report for by typing O (for owner), s (for subs), or b (for both) and press ENTER. The printer selection screen will now be displayed. Type the printer number and the number of copies and press ENTER.The system will next prompt:
Enter job ID or ALL
Specify a job ID and press ENTER or type ALL ENTER to print a report of specified CR's for all jobs. If you specified one job, your report will be printed and the system will prompt you for another job ID. You may now type another job ID and print another report, and so on, or press just ENTER to return to the 7-1: Job Description Maintenance Menu.
This selection allows you to enter current Davis-Bacon pay rates for the various skills and work classes applicable to your area and your company for this job.
This selection is exactly the same as 7-1-1-6: Davis-Bacon Rates.
This selection prints a list of jobs showing Job ID, name, address, general contractor, superintendent, foreman and project manager. You'll first be prompted:
Print Completed Jobs Also?
Answer Yes to include completed jobs on the list.
Next you'll be prompted for the printer and number of copies, and the report will print.
This selection allows you to enter expected manual purchases for each phase of a job.
TopEnter job ID:
Type the ID of the job and press ENTER.Enter posting date:
Enter the date of this posting.All phases for the job will then be displayed. Use the ARROW and PAGE keys as needed to highlight the phase you want, and press ENTER to update the Additional PO $ amount.
Press END when done.
This selection allows you to update the observed labor complete percentage for phases of a job.
TopJob ID:
Type the ID of the job and press ENTER.Phase ID:
Type the ID of the phase and press ENTER.Is Observed Complete Correct (Y/N):
Press ENTER if you want to change the % OBSERVED COMPLETE value. Otherwise, type Yes and press ENTER to exit this screen.The other fields on this screen are display only.
When prompted again for Job ID, press spacebar and ENTER to leave this selection.
This selection prints a report to track labor hours for each phase of a job, showing original estimated, change orders, in-progress unapproved change orders, total contract hours budgeted, total unapproved hours, hours to date, percent contract budget complete, percent contract unapproved complete, percent observed complete, contract unapproved hours saved/loss, projected hours at completion. Note that this report requires a wide-carriage printer.
TopEnter Job ID:
Type the ID of the job and press ENTER.Enter Sub Phase OR <ENTER> for ALL:
If this is left blank, phases will be listed in groups of phase IDs beginning with the sane number, each group on a separate page. Otherwise the report will print one line per phase.Are Entries Correct:
If the above entries are correct, press ENTER.You'll be prompted for a printer and number of copies and the report will print.
This selection allows you to enter or update change requests for a job, including date, address, status, scope, estimated labor, material, etc. for each phase.
The first two screens are similar in appearance and function to the first two screens in 7-1-8: Change Request Maintenance and Print.
After going through the two above screens, the third screen appears as follows:
TopLABOR RATE/HOUR:
Enter the hourly labor rate to be used in the estimate.BURDEN PERCENT:
Enter the burden percentage to be used in the estimate, if any.SALES TAX:
Enter the sales tax percentage to be used in the estimate.Next, use the left/right arrow keys to select the phase category you want to enter or update estimates for, and use page up/down and up/down arrows to select the phase you want to enter or update estimates for, and simply enter the number you want for the phase and phase category selected. The Labor $ column is display only and is calculated from labor hours and rate.
To change the contract amount, press C.
To go back and change the labor rate, burden or sales tax, press D.
To exit this maintenance screen, press F1 at any time.
After pressing F1, you'll be prompted:
PRINT THIS ESTIMATE SHEET?
Type Y if you want it printed. Press ENTER and you'll be returned to the first screen where you can enter another change order estimate, or blank out the job ID and press ENTER to return to 7-1-1: Job Description Maintenance Menu.
This selection will print a list of open contract estimates, showing job
ID, name, change number and amount.
You'll be prompted for printer and number of copies, and the report will
print.
This is the same procedure as 7-1-1-13 . It allows you to set up a list of employees and additional dollars per hours paid when working on this job. On exit from this maintenance screen, you'll also be given the option of printing the list.
The following procedures allow setting-up, modifying, viewing, deleting and printing phase codes. Phase codes may also be moved from one job to the next, thus eliminating having to enter them manually each time a new job is added. This selection will display the following menu:
This procedure allows setting-up and modifying, phases on existing jobs. This procedure deals with one job at a time. This selection will display the following input screen (items in bold type are examples):
TopEnter the job ID
This must be an existing job set up through the job description procedure. When this is typed, the system will display the job name.Use the INS, DEL, ARROW, PAGE, HOME and ENTER keys as described earlier (horizontal menu) to add, delete and update entries.
Phase ID
Type up to nine characters for the phase ID, letters or numbers. The reports will alphabetize phases according to the phase IDs. If desired, certain cost reports will subtotal phases based on the first two characters of the phase ID.Phase description
Type a short description for each phase.The next four headings apply to payroll settings which you may need to change for a phase or phases of this job. If these are left blank, payroll information governs; if any of these are filled in, these settings will override the payroll settings for anyone who works on the specified phase of this job.
Work cmp
This is the payroll base work comp class. If this is filled in, the system will take the job state location from the job description set up and combine it with the base work comp class you enter here and use that work comp class rate for anyone who works on this phase of this job. (Example: Our sample job is located in Florida. Therefore, if we filled in a base work comp rate of 5190, the work comp class that belongs to this phase of the job is FL5190.)Union
This is the union local for this job location. If this is filled in, this union will replace the union local in the payroll records for anyone working on this phase of this job.Work cls
This is the union work class for this job location. If this is filled in, this work class will replace the work class in the payroll records for anyone working on this job.Dept ID
This is the payroll department ID which may apply exclusively for this job. If this is filled in, this payroll department ID will replace the department ID in the payroll records for anyone working on this phase of this job.When you have entered all phases for a job press END to exit this area and the system will prompt for another job ID. When you are through with this area press ENTER again and the system will return you to the 7-2: Phase Code Maintenance Menu.
Selecting F6 allows access to the following list of GL Accounts and divisions for use by POS to override the normal defaults.
This procedure will print a list of the phase codes for the jobs specified. Selecting this procedure will display the printer selection screen. Type the printer number and the number of copies and press ENTER. The system will prompt:
TopBeginning job ID ____________ ending ____________
Type the beginning and ending job IDs and press ENTER. Your report will be printed and the system will return you to the 7-2: Phase Code Maintenance Menu.
This procedure allows moving (copying) the phases that exist on one job to another job, thus eliminating making manual entries each time phases are set-up for a new job. This selection will display the following input screen (items in bold type are examples):
TopEnter job ID to be copied from:
Type the ID of the job from which the phases are to be copied. If this is a valid job ID, the job name will be displayed on this line.to
Type the ID of the job to which the phases are to be copied and press ENTER.Copy new job's department to phases:
If answered Yes, the department on all phases copied to the new job will be set to the department ID of the new job, rather than the departments from the phases copied.Copy billing lines:
If answered Yes, this will copy all AIA and Unit billing lines set up for the job you're copying from.Sub job code or blank:
If the first characters of your phase IDs signify sub jobs within a job, and you only want to copy phases from a certain subjob, enter the subjob here. Otherwise just leave blank.Specify GL division or leave blank:
If you wish to set the GL division number on all phases copied to a certain GL division, enter it here. Otherwise, just leave blank to let division numbers be copied from the original phases.Next you'll be prompted:
WOULD YOU LIKE TO COPY (A)LL, (S)OME OR (N)ONE ?
Type one of the following:
All = All phases are copied to the destination job.
Some = The system displays one phase at a time which you select by typing YES for the ones you wish to copy.
None = None will copy no phases and let you exit this area with no changes.After your selection, press ENTER, the copy will be made, and the system will prompt for another job ID to be copied. If you are ready to exit this area, press ENTER again and the system will return you to the 7-2: Phase Code Maintenance Menu.
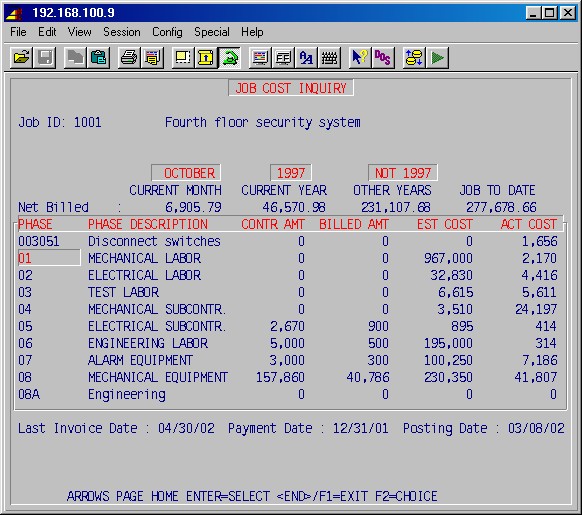
These procedures allow viewing existing job totals, by phase, for the following categories of job totals: 1=Estimated, 2=Current, 3=To-date, 4=Field estimate, 5=Revised estimated. In addition, the 4=Field estimate may be updated in this area.
This area may be used in conjunction with the procedures in 7-7: Manual Posting to the Journal to set up a new job, set up a job in progress that was started prior to using the computer, or to update totals as required. Entries or totals for the various categories are entered using the manual posting procedures in 7-7, which provides a printed record and audit trail of those entries. The phase totals in this step come to be when step 7-8: Update Journal to the Jobs is run.
The system will update the 2=current and the 3=to-date totals through normal postings. This selection will display the following input screen (items in bold type are examples):
Enter job ID:
Type a job ID [H] and press ENTER. If this is a valid job ID the job name will be displayed.
Enter phase ID:
Type a phase ID [H] and press ENTER. If this is a valid phase, the phase name will be displayed and a bottom menu will be displayed.
Please select 1 of these functions:
1 = Estimated job/phase totals
2 = Current period job/phase totals
3 = To date job/phase totals
4 = Field est job/phase totals
5 = Revised est job/phase totals
Each of these procedures is identical. Therefore, select the one that corresponds with the data to be viewed and press ENTER.
The system will display the various cost categories available for the specified phase as shown on the following input screen (the example is for current but each screen is identical):
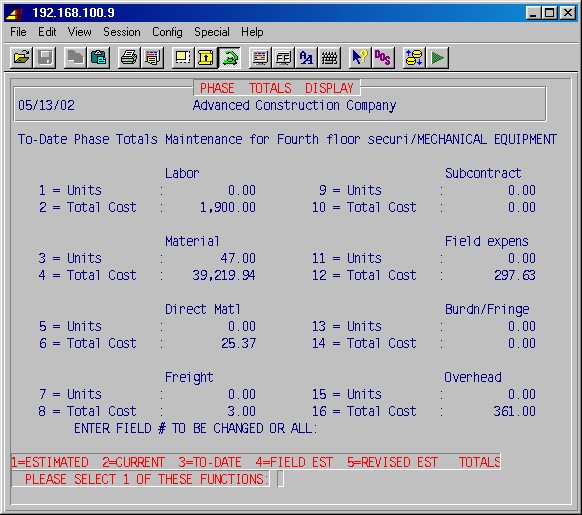
NOTE: Update is allowed for only 4=Field Est. All other changes are made through 7-7: Manual Posting to the Journal and the 7-8: Update Journal to the Jobs.
ENTER FIELD # TO BE CHANGED OR ALL:
Specify the field number for the data you wish to input and press ENTER. Type in the data and press ENTER again. Specify another field number and continue entering data, one field at-a-time.
Within each category, units and total cost may be entered. Fill in only the categories that apply to this phase.
EXAMPLE: For labor, units would represent hours. In subcontract, there would be no units but just a total cost for the subcontract.
When you are finished with this function, press ENTER again and the bottom menu will be displayed. You may now select another function and enter data for this same job and phase or press ENTER again, specify the same job and another phase or another job and phase, and continue entering data.
When you are completely finished with this area press ENTER again and the system will return you to the #7 Job cost main menu.
TopCAUTION: This area should be used with extreme care, and should be locked for normal operators.
The following procedures allow deleting job history, changing and/or recalculating job totals from job history, and clearing the payroll imposed lock on 7-8. This selection will display the following menu:
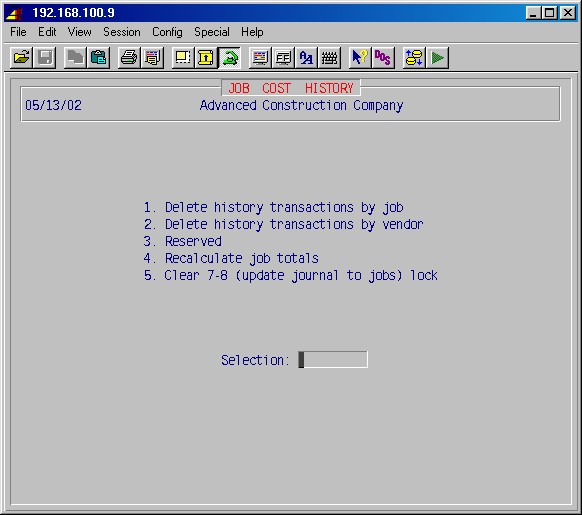
This procedure allows deletion of history transactions for a single job or a range of jobs. This selection will display the following input screen (items in bold type are examples):
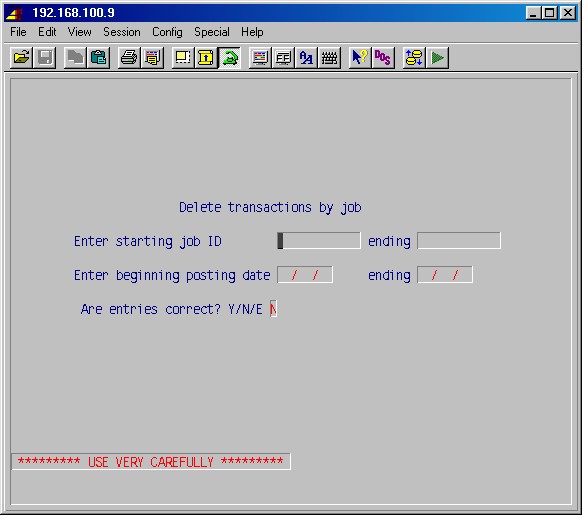
TopEnter starting Job ID
Enter ending Job ID
Specify the range of job IDs for which you wish to delete the job history and press ENTER. If you want to delete the history for just one job, specify that job ID in both fields.All Entries Correct? NO
If you need to correct your entries, press just enter and go back and make corrections. When you are ready to proceed, pres Y ENTER. This procedure will be performed and the system will return you to the 7-5: Job Cost History Maintenance Menu.To exit this area without deleting any job histories, fill both fields with z's (zzzzzzzzzzzz), answer YES, and press ENTER.
CAUTION: This procedure is not normally required - use care.
This procedure allows deletion of job cost history transactions for a
single vendor or a range of vendors. This selection will display the following
input screen (items in bold type are examples):
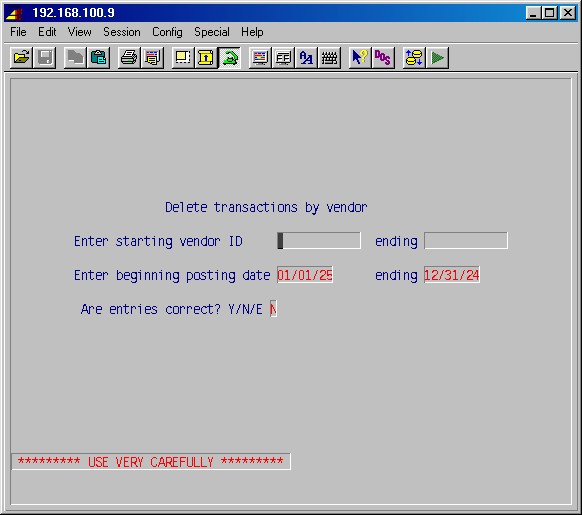
TopEnter starting vendor ID
Enter ending vendor ID
Specify the range of vendor IDs for which you wish to delete the job history and press ENTER. If you want to delete the history for just one vendor, specify that vendor ID in both fields.All Entries Correct? NO
If you need to correct your entries, press just enter and go back and make corrections. When you are ready to proceed, type YES ENTER. This procedure will be performed and the system will return you to the 7-5: Job Cost History Maintenance Menu.To exit this area without deleting any job histories, fill both fields with z's (zzzzzzzzzzzz), answer YES, and press ENTER.
This procedure will recalculate job cost totals from the job's history (detail), and optionally billing totals from AR invoices for the job. This procedure will only arrive at correct total job cost figures if the job's history is complete, and at correct total job billing figures if no AR invoices have been deleted for the job. This procedure should only be run at a time when there is no-one else on the system that may create posting to the job being recalculated.
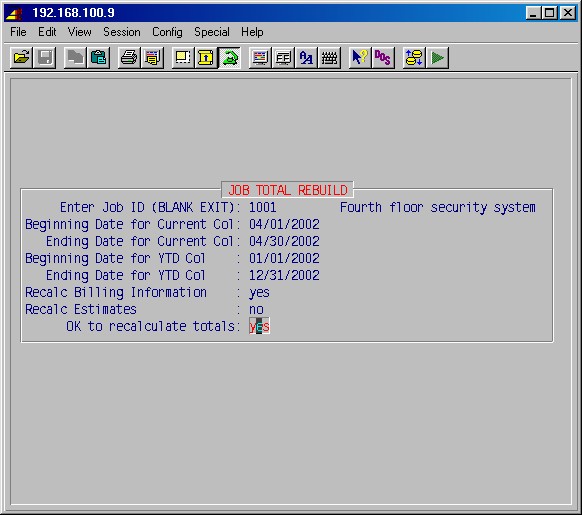
TopEnter Job Id (BLANK EXIT):
Enter the ID of the job you want to recalculate or leave blank to exit, and press ENTER.Beginning Date For Current Col:
Ending Date For Current COL:
Enter the date range for your "current" period. (The current period is defined by when you do 7-11: Clear Current Period Job Totals.)Beginning Date For YTD COL:
Ending Date For YTD COL:
Enter the date range that defines the current year for the job.Recalc Billing Information:
If, in addition to recalculating job cost totals, you also want the job's billing figures recalculated, based on existing AR invoices for the job, answer Yes here.OK To Recalculate Totals:
This is your last chance to abandon this action. If you really want to recalculate job totals, answer Yes here.If you answered Yes the procedure will clear the job totals and start to recalculate them. This may take quite a while, depending on the extent of the job history and the number of invoices for the job.
If you are locked out from doing step 7-8, and you are SURE that all payroll batches which had started step 5-17 have been completed through step 5-18 and that no other user is currently doing step 7-8, you may select 7-5-5 to clear the lock. (Also note that doing step 7-8 will prevent 5-17 step from being done until 7-8 has been completed.)
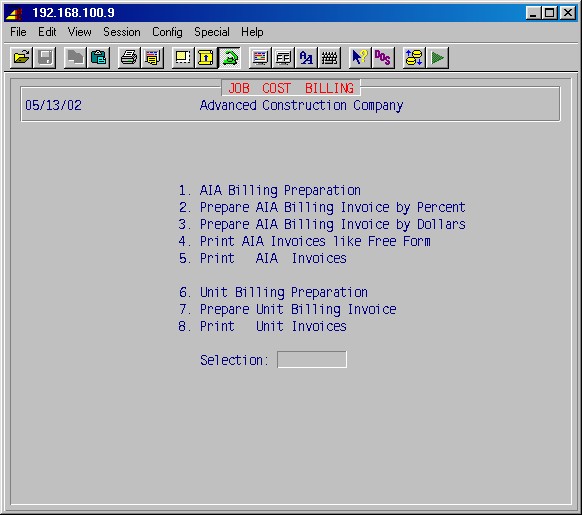
These job cost billing procedures are normally only used if your customer wants to be billed in various categories and prescribes a billing schedule (schedule of values). If your customer does not prescribe a billing schedule, you may choose to bill through free form invoicing in the accounts receivable module. However, the AIA billing procedures outlined below provide a convenient method for billing contracts and change orders, keeping track of the amounts billed and retainages and preventing overbilling.
When used, this job cost billing section takes the place of the procedures in accounts receivable, step 1-10: Invoice Processing. Once you print the invoice in final form, the system handles the data just as if it had been had been done in step 1-10. The data from these invoices produced in job cost billing are now available to accounts receivable processing to produce the sales journal and various other reports as well as distribute to general ledger.
Invoices are created either by the AIA billing procedures for fixed amount contracts (steps 1 through 5), or by the unit billing procedures for contracts based on a per-unit amount (steps 6 through 8).
TopFor fixed amount contracts, a schedule of billing values must first be prepared in step 7-6-1: AIA Billing Preparation.
Next, you will usually print a worksheet, using step 7-6-5: Print AIA Invoices, and give it to the job superintendent. This worksheet will show the percentages of completion and the dollar amount as of the last billing. The superintendent will specify the current percentage of completion or dollar amount of completion for each scheduled item and return the worksheet to you.
Next, an invoice is prepared using either step 7-6-2: Prepare AIA Billing Invoice by Percent, or step 7-6-3: Prepare AIA Billing Invoice by Dollars using the figures specified by the superintendent. Use step 7-6-2 if you want to bill by percentage of completion, or use step 7-6-3 if you want to bill by total dollar amount.
Generally, another worksheet is printed with the new figures and sent back to the superintendent for final verification and approval before the invoice is printed. You may print as a worksheet (a preliminary version) as many times as is required, before you print as an invoice (a final copy).
Next, print the invoice using step 7-6-5: Print AIA Invoices.
For contracts based on a cost-per-unit, a schedule of billing values must first be prepared in step 7-6-6: Unit Billing Preparation. Next, an invoice is prepared using step 7-6-7: Prepare Unit Billing Invoice. Next, the invoice is printed using step 7-6-8: Print Unit Invoices.
The invoice results are also displayed on the 7-1-1: Job Description Maintenance screen, menu choice 9, View Totals, showing job-to-date billing and retainage activity.
TopJob Cost - Billing Retainage through AIA
1) In 7-6-1: AIA Billing Preparation, add a line called "Retainage" with a zero (0) amount. This line should be added just above "Total Base Contract"
2) In 7-6-2: Prepare AIA Billing Invoice by Percent or in 7-6-3: Prepare AIA Billing Invoice by Dollars, go to the "Retainage" line and enter in the "Retained Amount" column the amount of the retainage you want to bill as a negative retained amount (enter the amount with a "-"). All or partial retainage may be billed at any time.
While retainage may accurately be billed in conjunction with a regular billing, the results can be confusing. It is recommended that retainage always be billed in a separate billing by itself.
3) Process 7-6-5: Print AIA Invoices normally. This technique will produce a positive bill and the invoice will become a normal accounts receivable and show on all AR reports.
Selecting 7-6: Job Cost Billing will display the following menu:
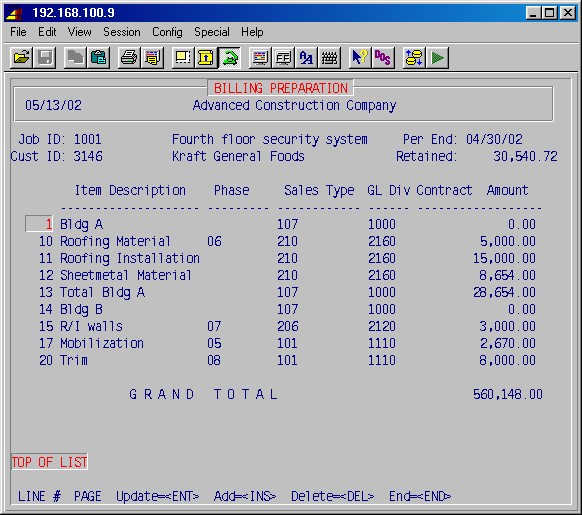
This procedure is used to create a schedule of billing values "schedule of values" listing all items or categories as your customer has prescribed for invoices. This schedule of values may be as detailed as is required; however, this procedure must be completed with a minimum of one line (Example: Amount of contract) and a total line which must begin with the word Total (Example: Total base contract).
Approved change requests that you wish to include on invoices may also be added to this schedule with a second total line (Example: Total change orders). The system includes a line Grand Total which is the sum of the previous line or lines which begin with the word Total.
Each line on the schedule of billing values begins with a line number designated by you when you first enter that line, and all lines on this schedule and the final invoice are displayed in numerical order. This numbering method allows you to determine the order that these line items are displayed and (if you leave sufficient numbers between items) allows you to insert additional lines at any position. (If you start to run out of lines, start re-numbering lines)
This selection will display the following input screen (items in bold type are examples):
Job ID:
Customer ID
Type the job ID [H] and press ENTER. If this is a valid job ID, the system will display the name of the job, and the customer ID and customer name, as well as any line items you have previously entered in this schedule of values.
Period Ending:
If any invoices have been issued, this will display the period ending date used on the last invoice. If none have been issued, this field will be blank.
Retained:
This field will display the total amount retained on previous invoices.
If you have previously entered a schedule of billing values, the system may display a message after the job ID has been entered as follows:
Billing out of balance with job by $ xxxx.xx
This message advises you that the total base contract amount (contract price) and the total of the change orders does not equal the amounts in those fields in 7-1-1: Job Description Maintenance. This may mean that either the contract price is not correct in either place or that all approved change orders have not been put on this schedule of values.
Line number
The line number governs the order in which these lines will be displayed on this schedule and on all invoices. All lines on this schedule and the final invoice are displayed in numerical order. This numbering method allows you to determine the order that these line items are displayed and (if you leave sufficient numbers between items) allows you to insert additional lines at any position.If you are entering this schedule for the first time, the system will be in the add mode and is prompting you for a line number. These lines should be numbered with sufficient space between numbers (such as every 5 or every 10) to allow you to insert lines in between if you need to.
If you have previously entered a schedule the system will display nine lines of it at a time. If you are just viewing the entries, you may reveal more lines by just pressing the down arrow or page down keys until the desired line is visible. You may update a line by moving to that line, pressing ENTER, and making your changes, or delete a line by pressing DEL.
To add a new line press INS and specify a line number for the position where you want this new line displayed. When you complete the line, the system will place it in the proper position.
Item description
Type a short (up to 20 characters) description for this invoice item.
Phase
This is an optional way to relate this schedule of billing values to your schedule of costs. Otherwise, leave this blank.
Sales Type
Enter the sales type (department) [H] for this line.
GL Div
If you have a divisionalized general ledger, enter the appropriate division number here.
Contract amount
Type the amount of the total base contract that you wish to allocate for this item.
Total
As explained in the introduction to this section, you must end with a line beginning with the word Total, such as Total base contract.
If you have approved change requests, these need to be entered also with a final line beginning with the word Total. You may have as many sections with sub-totals as required as long as each section ends with a line beginning with the word Total. The very last line, provided by the system, Grand Total, will display the sum of all of your Total lines.
When you are finished with this schedule of billing values, press END and the system will prompt you for another job ID in this section. Press ENTER to return to the 7-6: Job Cost Billing menu.
NOTE: All figures on this screen are job-to-date except the retained amount.
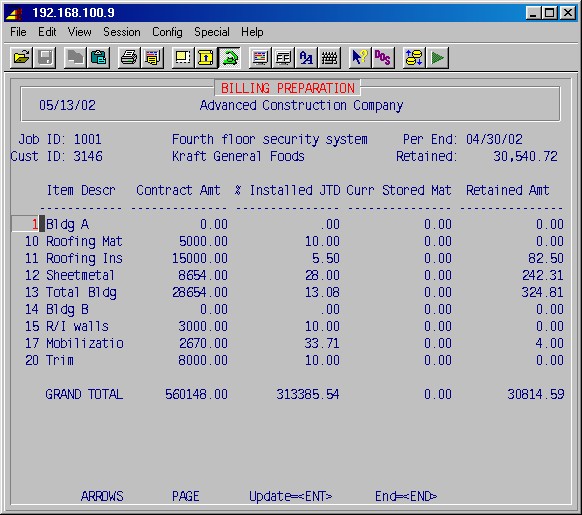
This procedure allows you to prepare an invoice by percentage of completion. For each item in the schedule of billing values, including the change orders, you will assign the percentage of the job which has been completed since inception.
The system will convert this percentage, based on the dollar values you entered in 7-6-1, to the dollar amount of installed material. You may also enter the dollar value of stored material and the dollar amount of labor for this portion of the job. Based on these figures, the system will display the retained amount for this invoice only which you may change if necessary.
NOTE: The % installed plus the dollar amount of stored material equals the total completed and the % completed to date, as shown on the invoice worksheet. The stored material is thus billed the first time it is entered into stored. When you prepare a bill and reduce the amount of stored material and increase the % completed a corresponding amount (because that stored material has now been installed), the system will not bill for the amount you reduced stored material - it was billed previously when it was put into stored.
Usually, you will first print a worksheet using 7-6-5: Print AIA Invoices and give it to the superintendent. This worksheet will show the percentages of completion and the dollar amount as of the last billing. The superintendent will specify the current percentage of completion or dollar amount of completion for each scheduled item and return to you. You will then complete 7-6-2: Prepare AIA Billing Invoice by Percent using the figures specified by the superintendent. Generally, another worksheet is printed with the new figures and sent back to the superintendent for final verification and approval before the invoice is printed. You may print as a worksheet (a preliminary version) as many times as is required, before you print as an invoice (a final copy).
NOTE: As long as you have not printed the invoice in final form, if you make mistakes, or changes need to be made, simply go into this billing preparation step and change it. You may do this as many times as you wish as long as you print a worksheet. After you print the invoice in final form, if you made a mistake, you can correct the invoicing by entering the % complete and the stored material from the previous correct billing and printing in final form; then, enter the correct numbers again for the current billing.
Do not try to make corrections with "minus" entries.
Use the complete and stored from the last good invoice.
This selection will display the following input screen (items in bold type are examples):
TopJob ID
Type the job ID [H] here. If this is a valid Job ID, the system will display the job name and the customer ID and name.Per End
Type the billing period ending date which will appear on the invoice as the invoice date.Retained
The system will display the total amount that has been retained on this job for all invoices since inception.The system may display a message after the job ID has been entered as follows:
Billing out of balance with job by $ xxxx.xx
This message advises you that the total base contract amount (contract price) and the total of the approved change orders does not equal the amounts in those fields in 7-1-1: Job Description Maintenance. This may mean that either the contract price is not correct in either place or that all approved change orders have not been put on this schedule of values.
Item Descr
The item descriptions will be displayed exactly as they were set up in the schedule of values in 7-6-1: AIA Billing Preparation.Contract Amt
The contract amounts for each line will be displayed exactly as they were set up in the schedule of values in 7-6-1: AIA Billing Preparation.For the following fields, specify the job-to-date status of the installed material, stored material and labor as needed. Select the line you wish to start with and press ENTER. This will cause each line, one-at-a-time, to go into the edit mode and allow entering new amounts for each line. Pressing just ENTER instead of a new amount will leave the old amount. As the job progresses, some scheduled items will be completed. Just press ENTER to leave their amounts unchanged.
% Installed JTD
If this is the first billing, the % installed job-to-date for each line item will be zero. Type the percentage of the job that has been completed to-date for each line item since the job's inception.If there has been a previous billing, the last entry for % installed job-to-date you made in this column will be displayed for your reference. As applicable, type the new percentage of this job that has been completed for each line item since the job's inception as of this billing date.
The system will subtract this new dollar value of completion from the previous dollar value of completion and use that difference as the dollar value of installed material for this invoice.
Curr Stored Mat
Type the dollar amount of current stored material on this job, in this category, at this time.Retained Amt
The system will display the dollar amount of retainage for this period only, not the entire job, based on the dollar amount of installed material, stored material, and labor. It is calculated based on the percentage specified in the job description set up in 7-1-1, and may be altered or set to zero as circumstances require.NOTE: The system will calculate the amount of retainage for all line items including change orders. If your contract does not require retainage on change orders, you will need to reduce the retained amount that the system has calculated by that amount.
The last line at the bottom displays the job-to-date totals for contract amounts, % complete (installed material), stored material and retainage.
If more lines are entered than the screen can hold, the screen will scroll the line display section to make room for the additional lines.
When you are finished with this procedure press END and the system will prompt you for another job ID to prepare another invoice. To exit this area press just ENTER.
NOTE: All figures on this screen are job-to-date except the retained amount.
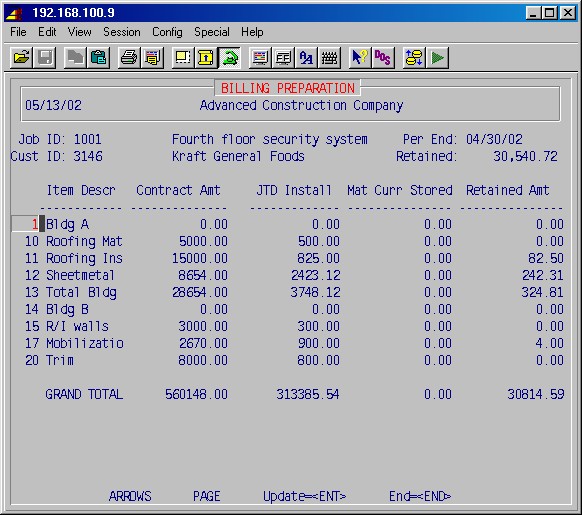
This procedure is identical to 7-6-2: Prepare AIA Billing Invoice by Percent except it allows you to enter the installed material as well as the other billing items in dollars. For each item in the schedule of billing values, including the change orders, you will enter the dollar amount of installed material which has been completed since inception.
In addition to the installed material, you may also enter the dollar value of stored material for this portion of the job. Based on these figures, the system will display the retained amount for this invoice only which you may change if necessary.
NOTE: The dollar amount of installed material plus the dollar amount of stored material equals the total completed and the % completed to date, as shown on the invoice worksheet. The stored material is thus billed the first time it is entered into stored. When you prepare a bill and reduce the amount of stored material and increase the amount of installed material (because that stored material has now been installed), the system will not bill for the amount you reduced stored material - it was billed previously when it was put into stored.
Usually, you will first print a worksheet using step 7-6-5: Print AIA Invoices and give it to the superintendent. This worksheet will show the percentages of completion and the dollar amount as of the last billing. The superintendent will specify the current percentage of completion or dollar amount of completion for each scheduled item and return to you. You will then complete 7-6-3: Prepare Stage Billing Invoice by Dollars using the figures specified by the superintendent. Generally, another worksheet is printed with the new figures and sent back to the superintendent for final verification and approval before the invoice is printed. You may print as a worksheet (a preliminary version) as many times as is required, before you print as an invoice (a final copy).
NOTE: As long as you have not printed the invoice in final form, if you make mistakes, or changes need to be made, simply go into this billing preparation step and change it. You may do this as many times as you wish as long as you print a worksheet. After you print the invoice in final form, if you made a mistake, you can correct the invoicing by entering the % complete and the stored material form the previous correct billing and printing in final form; then, enter the correct numbers again for the current billing.
This selection will display the following input screen (items in bold type are examples):
TopJob ID
Type the job ID [H] here. If this is a valid Job ID, the system will display the job name and the customer ID and name.Per End
Type the billing period ending date which will appear on the invoice as the invoice date.Retained
The system will display the total amount that has been retained on this job for all invoices since inception.The system may display a message after the job ID has been entered as follows:
Billing out of balance with job by $ xxxx.xx
This message advises you that the total base contract amount (contract price) and the total of the change orders does not equal the amounts in those fields in 7-1-1: Job Description Maintenance. This may mean that either the contract price is not correct in either place or that all approved change orders have not been put on this schedule of values.
Item Descr
The item descriptions will be displayed exactly as they were set up in the schedule of values in 7-6-1: AIA Billing Preparation.Contract Amt
The contract amounts for each line will be displayed exactly as they were set up in the schedule of values in 7-6-1: AIA Billing Preparation.For the following fields, specify the job-to-date status of the installed material, stored material and labor as needed. Select the line you wish to start with and press ENTER. This will cause each line, one-at-a-time, to go into the edit mode and allow entering new amounts for each line. Pressing just ENTER instead of a new amount will leave the old amount. As the job progresses, some scheduled items will be completed. Just press ENTER to leave their amounts unchanged.
JTD Install
If this is the first billing, the job-to-date installed material for each line item will be zero. Type the dollar amount of installed material that has been completed for each line item since the job's inception.If there has been a previous billing, the last entry for job-to-date installed material you made in this column will be displayed for your reference. As applicable, type the new dollar amount that has been completed for each line item since the job's inception as of this billing date.
The system will subtract this dollar amount from the previous amount and use that difference to calculate the dollar value of installed material for this invoice.
Mat Curr Stored
Type the dollar amount of current stored material on this job, in this category, at this time.Retained Amt
The system will display the dollar amount of retainage for this period only, not the entire job, based on the dollar amount of installed material, stored material, and labor. It is calculated based on the percentage specified in the job description set up in 7-1-1, and may be altered or set to zero as circumstances require.NOTE: The system will calculate the amount of retainage for all line items including change orders. If your contract does not require retainage on change orders, you will need to reduce the retained amount that the system has calculated by that amount.
The last line at the bottom displays the job-to-date totals for contract amounts, installed material, stored material, and retainage.If more lines are entered than the screen can hold, the screen will scroll the line display section to make room for the additional lines.
When you are finished with this procedure press END and the system will prompt you for another job ID to prepare another invoice. To exit this area press just ENTER, and the system will return you to the 7-6: Job Cost Billing menu.
This procedure prints invoices in AIA format based on the information provided in the billing preparation steps above.
Usually, you will first print a worksheet and give it to the superintendent. This worksheet will show the percentages of completion and the dollar amount as of the last billing. The superintendent will specify the current percentage of completion or dollar amount of completion for each scheduled item and return to you. You will then complete either 7-6-2: Prepare AIA Billing Invoice by Percent, or 7-6-3: Prepare AIA Billing Invoice by Dollars using the figures specified by the superintendent. Generally, another worksheet is printed with the new figures and sent back to the superintendent for final verification and approval before the invoice is printed. You may print as a worksheet (a preliminary version) as many times as is required, before you print as an invoice (a final copy).
Many of our customers have commented that the stored material part of this report (column F - Materials Presently Stored) doesn't make any sense and is incorrect. We agree that it looks strange, but we have programmed this report to exactly follow the AIA billing rules. The following is an excerpt from the AIA instruction sheet for AIA documents G702a/G703a:
Column F: Enter here the value of Materials Presently Stored for which payment is sought. The total of the column must be recalculated at the end of each pay period. This value covers both materials newly stored for which payment is sought and materials previously stored which are not yet incorporated into the Project. Mere payment by the Owner for stored materials does not result in a deduction from this column. Only as materials are incorporated into the Project is their value deducted from this column and incorporated into column E (Work Completed-This Period).
Selecting this procedure will first display the printer selection screen. Type the printer number and the number of copies and press ENTER. The system will display a series of input screens as follows:
Is this invoice to be used as a worksheet ? YES
Usually you will print a worksheet first one or more times as described above before a final invoice is prepared. Press just ENTER to print a worksheet. You may go back to steps 7-6-2 or 7-6-3 and make changes and print this in worksheet form as many times as needed.When you are ready to print the invoice in final form, type NO ENTER.
Are you using company letterhead paper ? NO
Specify whether the printing is on letter head paper. Type YES ENTER if it is, and the computer will not print your company name and address on the invoice. Otherwise, press just ENTER and your company name and address will be printed on the invoice.
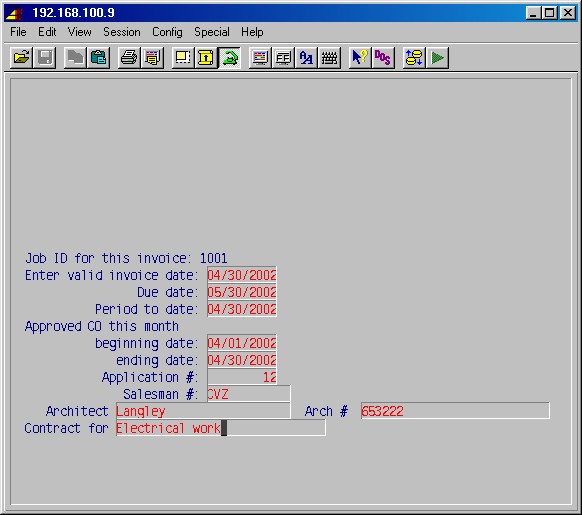
Enter the job ID for this invoice:
Specify the job ID [H] for this invoice and press ENTER.
Enter valid invoice date:
Enter the date for this invoice. (This date must be within the date range specified in 13-8-15 for invoices.)
Due date / /
Specify the due date which will be used by several accounts receivable reports and press ENTER.
Period to date:
Enter the period ending date used for the invoice.
Approved CO this month beginning date:
ending date:
Specify a date range for current month if you want to have change order amounts shown divided between approved prior months and approved this month.
Application #:
Enter the number of this application for payment.
Salesman #:
Enter a valid salesman ID for the invoice, if applicable.
At this point, if you are printing the invoice in final form and if you have elected to use the optional sales tax entry screen, the system will display the following:
NOTE: This optional sales tax entry screen is set under #13 Utilities from the main menu in 13-8-7: Schedule of Values (Job) Billing by answering YES to "Break down sales tax for invoices".
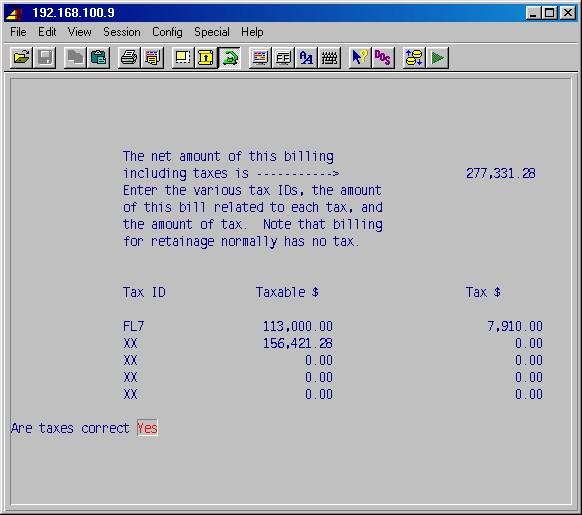
TopGross amount of billing including taxes
The system will display the gross amount of the billing including any taxes which were added into the bid and are a part of the schedule of values.
The system will now allow you to enter, one line at-a-time, up to five lines for various state and local taxes. You will enter the tax ID, the taxable amount, and the tax dollars for each. The sum of these taxable amounts and the tax dollars, must equal the figure displayed for the gross amount of the billing including taxes. If a portion of the gross is not taxable, then you must have a line with a tax ID of "xx".
When you are finished entering tax lines, press F1 one or more times to scroll through the rest of the tax lines until the message appears:
Are these correct NO
If you need to make corrections or additions, press just ENTER and go back. When you are ready to continue, press YES ENTER.
If the sum of the taxable $ and the tax amount do not equal the gross amount of the billing, the system will display this message:
The entire gross amount must be allocated
When this message is displayed, the system will return you to the first tax line and you will be required to re-enter all the tax lines until they balance with the gross amount.
If the tax lines do balance with the gross amount, the procedure will continue and display the following message:
Enter the invoice number or RET for the next one:
Specify the invoice number or press just ENTER and the system will select the next available invoice number.
Comments
The system will now provide you with five lines to enter any comments which you wish to have printed on the invoice. This is for your use if you need it and may be left blank. Press F1 when you are finished.If this invoice is being printed in final form, the system will prompt:
Reprint this invoice ? NO
If you need to reprint for any reason, you must do so now by typing YES ENTER. If not, press just ENTER. The system will next prompt:
Do you want to update the job/accounting totals ? YES
Normally, answer YES here by pressing just ENTER. Answering YES will generate an invoice entry in accounts receivable and update the amount billed and retained in the job. Answering NO skips updating AR and job totals and MUST NOT be used except to bring a new system up to date.
The system will prompt:
DO YOU WANT TO PRINT ANY MORE WORKSHEETS / INVOICES ? NO
Answer YES if you want to print any more worksheets or invoices for different jobs. When you are finished, press just ENTER and the system will return you to the 7-6: Job Cost Billing menu.
The basic procedures for unit billing are similar to the AIA (progress) billing procedures except the billing is based on a cost per-unit, rather than a fixed dollar amount. There is not a total contract price, but a schedule based on a cost per-unit instead.
Each item is listed on a separate line consisting of the item ID and description, phase, the unit of measure, the unit cost, and the quantity. A final line must be included which starts with the word "total", such as Total contract.
Approved change orders that you wish to include on invoices may also be added to this schedule with a second total line (Example: Total change orders). The system includes a line Grand Total which is the sum of the previous line or lines which begin with the word Total.
This schedule of per-unit costs is first set up in this procedure. This schedule must first be set up before an invoice can be prepared. Then, individual bills are prepared in step 7-6-7: Prepare Unit Billing Invoice. Lastly, invoices are printed in step 7-6-8: Print Unit Invoices.
Usually, you will first print a worksheet using step 7-6-8: Print Unit Invoices and give it to the superintendent. This worksheet will show the original contract quantity and unit cost and the completed quantity and amount of all scheduled items as of the last billing. The superintendent will specify the current completed quantity for each scheduled item and return to you. You will then complete 7-6-7: Prepare Unit Billing Invoice using the figures specified by the superintendent. Generally, another worksheet is printed with the new figures and sent back to the superintendent for final verification and approval before the invoice is printed. You may print as a worksheet (a preliminary version) as many times as is required, before you print as an invoice (a final copy).
This selection will display the following input screen (items in bold type are examples):
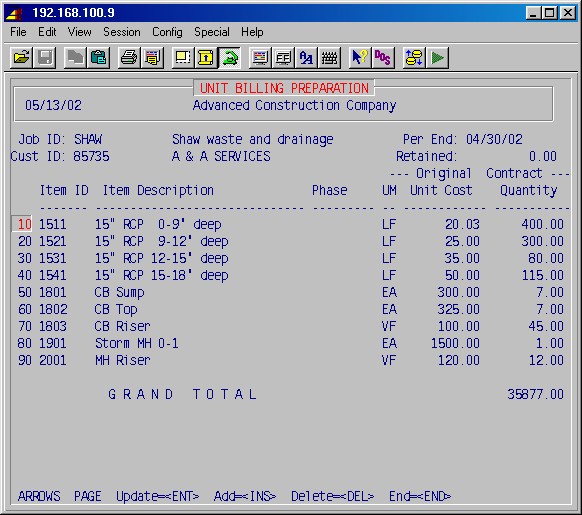
TopJob ID
Type the job ID [H] for the job you wish to set up a schedule of costs per-unit. If this is a valid job ID, the system will display the job name, the customer ID and the customer name associated with that job.Per End:
If any invoices have been issued, this will display the period ending date used on the last invoice. If none have been issued, this field will be blank. You may change this date if desired, or press just ENTER.Retained:
This field will display the total amount retained on previous invoices.If you have previously entered a schedule of costs per-item, it will now be displayed and you may use the INS, DEL, ARROW, PAGE, HOME and ENTER keys to make changes.
Line number
The line number governs the order in which these lines will be displayed on this schedule and on all invoices. All lines on this schedule and the final invoice are displayed in numerical order. This numbering method allows you to determine the order that these line items are displayed and (if you leave sufficient numbers between items) allows you to insert additional lines at any position.If you are entering this schedule for the first time, the system will be in the add mode and is prompting you for a line number. These lines should be numbered with sufficient space between numbers (such as every 5 or every 10) to allow you to insert lines in between if you need to.
If you have previously entered a schedule the system will display nine lines of it at a time. If you are just viewing the entries, you may reveal more lines by just pressing the arrow or page down keys until the desired line is visible. You may update a line by moving to that line, pressing ENTER, and making your changes, or delete a line by pressing DEL.
To add a new line press INS and specify a line number for the position where you want this new line displayed. When you complete the line, the system will place it in the proper position.
Item ID
Type the item ID (up to 7 characters) here. This ID is usually specified by the agency which will receive the invoices for the job.Item description
Type a short (up to 28 characters) description for this invoice item and press ENTER. The system will now allow you to type a second line of description (up to 28 characters) if desired.Phase
This is an optional way to relate this schedule of billing values to your schedule of costs. Otherwise, leave this blank.UM
Type the abbreviation here for the unit of measure, using any code required. Below are examples:LF = Linear foot EA = Each
VF = Vertical footUnit cost
Type the unit cost from your original contract.Quantity
Type the quantity of this item from the original contract.Total
As explained in the introduction to this section, you must end with a line beginning with the word Total, such as Total base contract.If you have approved change orders, these need to be entered also with a final line beginning with the word Total. You may have as many sections with a sub-total as required as long as each section ends with a line beginning with the word Total. The very last line provided by the system, Grand Total, will display the sum of all of your Total lines.
When you are finished with this schedule of billing values, press END and the system will prompt you for another job ID in this section. Press ENTER to return to the 7-6: Job Cost Billing menu.
This procedure is used to prepare the unit billing invoice which will then be printed in step 7-6-8: Print Unit Invoices. Before you can use this step to prepare a unit billing invoice, you must first set up a schedule of costs per-item in step 7-6-6: Unit Billing Preparation.
This procedure is most similar to 7-6-3: Prepare AIA billing Invoice by Dollars used in the AIA billing procedures; however, in this procedure you will enter only the quantity completed this period, and not the amount installed since the beginning of the job as in 7-6-3.
Usually, you will first print a worksheet using step 7-6-8: Print Unit Invoices and give it to the superintendent. This worksheet will show the original contract quantity and unit cost and the completed quantity and amount of all scheduled items as of the last billing. The superintendent will specify the current completed quantity for each scheduled item and return to you. You will then complete 7-6-7: Prepare Unit Billing Invoice using the figures specified by the superintendent. Generally, another worksheet is printed with the new figures and sent back to the superintendent for final verification and approval before the invoice is printed. You may print as a worksheet (a preliminary version) as many times as is required, before you print as an invoice (a final copy).
This selection will display the following input screen (items in bold type are examples):
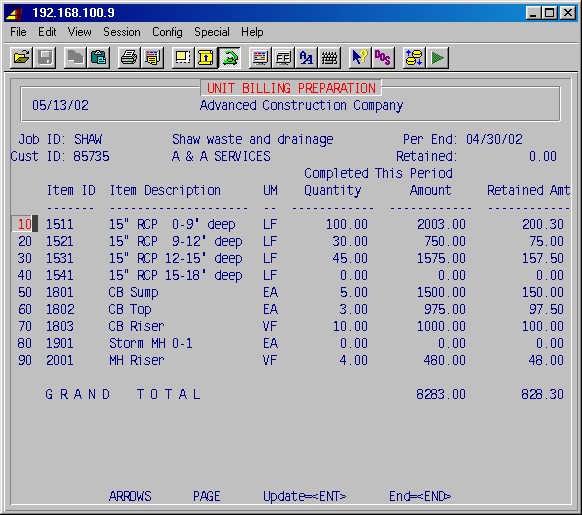
Job ID
Type the job ID [H] for the job you wish to bill. If this is a valid job ID, the system will display the job name, the customer ID and the customer name associated with that job.
Per End:
If any invoices have been issued, this will display the period ending date used on the last invoice. If none have been issued, this field will be blank and you need to enter the correct date. Since this date will be used as the invoice date, it must be set to the correct invoice date and not left blank.
Retained:
This field will display the total amount retained on previous invoices.
Item ID
Item description
The item IDs and descriptions will be displayed exactly as they were set up in 7-6-6: Unit Billing Preparation.
For the following fields, use the ARROW and PAGE keys to select the line you wish to start with and press ENTER to specify the quantity completed this period and the retained amount, one line at a time.
Quantity completed this period
Enter the unit quantity of this item completed for this period which you wish to include on this invoice.
Amount this period
The system will display the dollar amount of this item for this invoice based on the quantity that you entered and the cost per-item that you entered in 7-6-6: Unit Billing Preparation.
Retained amount
The system will display the dollar amount of retainage for this period only, not the entire job, based on the amount completed this period. It is calculated based on the percentage specified in the job description set up in 7-1-1, and may be altered or set to zero as circumstances require.NOTE: The system will calculate the amount of retainage for all line items including change orders. If your contract does not require retainage on change orders, you will need to reduce the retained amount that the system has calculated by that amount.
The last line, Grand Total, displays the total dollar amount completed this period and the total retainage this period.
When finished, press END and the system will prompt you for another job ID to invoice. To exit this area, press just ENTER and the system will return you to the 7-6: Job Cost Billing menu.
This is the final step in preparing a unit billing invoice. You can not print the invoice until you have prepared the invoice in step 7-6-7.
Usually, you will first print a worksheet and give it to the superintendent. This worksheet will show the original contract quantity and unit cost and the completed quantity and amount of all scheduled items as of the last billing. The superintendent will specify the current completed quantity for each scheduled item and return to you. You will then complete 7-6-7: Prepare Unit Billing Invoice using the figures specified by the superintendent. Generally, another worksheet is printed with the new figures and sent back to the superintendent for final verification and approval before the invoice is printed. You may print as a worksheet (a preliminary version) as many times as is required, before you print as an invoice (a final copy).
Selecting this procedure will first display the printer selection screen. Type the printer number and the number of copies and press ENTER. The system will display a series of input screens as follows:
TopIs this invoice to be used as a worksheet ? YES
Usually you will print a worksheet first one or more times as described above before a final invoice is prepared. Press just ENTER to print a worksheet. You may go back to steps 7-6-7 and make changes and print this in worksheet form as many times as needed.When you are ready to print the invoice in final form, type NO ENTER.
Are you using company letterhead paper ? NO
Specify whether the printing is on letter head paper. Type YES ENTER if it is, and the computer will not print your company name and address on the invoice. Otherwise, press just ENTER and your company name and address will be printed on the invoice.Due date / /
Specify the due date which will be used by several accounts receivable reports and press ENTER.Enter the job ID for this invoice:
Specify the job ID for this invoice and press ENTER.At this point, if you are printing the invoice in final form and if you have elected to use the optional sales tax entry screen, the system will display the following sales tax input screen:
NOTE: This optional sales tax entry screen is activated under #13 Utilities from the main menu in 13-8-7: Schedule of Values (Job) Billing by answering YES to "Break down sales tax for invoices".
Gross amount of billing including taxes
The system will display the gross amount of the billing including any taxes which were added into the bid and are a part of the schedule of values.The system will now allow you to enter, one line at-a-time, up to five lines for various state and local taxes. You will enter the tax ID, the taxable amount, and the tax dollars for each. The sum of these taxable amounts and the tax dollars, must equal the figure displayed for the gross amount of the billing including taxes. If a portion of the gross is not taxable, then you must have a line with a tax ID of "xx".
When you are finished entering tax lines, press F1 one or more times to scroll through the rest of the tax lines until the message appears:
Are these correct NO
If you need to make corrections or additions, press just ENTER and go back. When you are ready to continue, press YES ENTER.
If the sum of the taxable $ and the tax amount do not equal the gross amount of the billing, the system will display this message:
The entire gross amount must be allocated
When this message is displayed, the system will return you to the first tax line and you will be required to re-enter all the tax lines until they balance with the gross amount.
If the tax lines do balance with the gross amount, the procedure will continue and display the following message:
Enter the invoice number or RET for the next one:
Specify the invoice number or press just ENTER and the system will select the next available invoice number.
Comments
The system will now provide you with five lines to enter any comments which you wish to have printed on the invoice. This is for your use if you need it and may be left blank. Press F1 when you are finished.If this invoice is being printed in final form, the system will prompt:
Reprint this invoice ? NO
If you need to reprint for any reason, you must do so now by typing YES ENTER. If not, press just ENTER. The system will next prompt:
Do you want to update the job/accounting totals ? YES
Normally, answer YES here by pressing just ENTER. Answering YES will generate an invoice entry in accounts receivable and update the amount billed and retained in the job. Answering NO skips updating AR and job totals and MUST NOT be used except to bring a new system up to date.
The system will prompt:
DO YOU WANT TO PRINT ANY MORE WORKSHEETS / INVOICES ? NO
Answer YES if you want to print any more worksheets or invoices for different jobs. When you are finished, press just ENTER and the system will return you to the 7-6: Job Cost Billing menu.
These procedures allow making journal entries for manual postings to the job cost system and printing the results of those entries for verification and for an audit trail. These entries will later be posted to the jobs in step 7-8 Update journal to jobs. This procedure is normally used only for one of the following reasons:
1. To post entries that are adjustments, or are not generated from accounts payable, payroll or accounts receivable.
2. To enter beginning balances on jobs existing prior to going on the computer. The advantage of using this procedure to enter beginning totals (versus step 7-3: Phase Totals Maintenance) is that a printed copy of all entries may be made.
This selection will display the following menu:
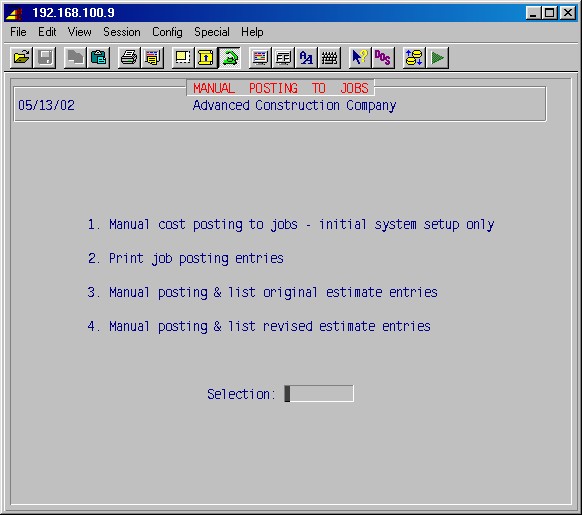
This procedure allows making journal entries for manual postings to the job cost system. These entries will later be posted to the jobs in step 7-8: Update Journal to Jobs. This is normally only used for the two special circumstances mentioned in the introduction to this section and should not be used indiscriminately.
This selection will display the following input screen (items in bold type are examples):

Source #:
If you are changing or correcting previous entries that have not been updated to the jobs in step 7-8, type the source number for those entries, or press just ENTER if these are new entries.To exit this procedure press E and ENTER.
Enter post date MMDDYY : / /
Type the date you wish these entries to post to the jobs. The system will prompt:Is this date correct? YES
Type NO ENTER to go back and change the date, or press just ENTER to continue.
Use the INS, DEL, ARROW, PAGE, HOME and ENTER keys to add, deleted and update entries as needed.
Job ID
Type an existing job ID. The system will show the job name after "Description:".Phase
Type an existing phase ID for this job.Code
Specify the appropriate phase category code from the list at the bottom of the screen. All codes except labor and materials are user definable. Below are examples:
M = Material
N/C = Consumables
E = Equip. Rental
O = Other
B = Burden/Fringe
H = OverheadVendor ID
Enter then vendor ID for this posting, if applicable. If you selected phase code L (labor), the system automatically fills in *PR.Hours/Units
Enter number of hours or units as appropriate.
If you specified a category of L (labor), you'll be prompted for the labor rate and the amount will automatically be calculated.Amount
Enter the amount you wish to distribute to this phase of this job.Description
Type a brief (up to 26 characters) description for this entry. If you press just ENTER the system will fill in this description with the computer assigned source number and posting date.When finished, press END and you'll be prompted for Source #.
To exit this procedure press E and ENTER.
This selection allows you to print a report listing all manual job cost entries which have not been updated to the jobs as of a specified cutoff date. This report allows you to verify your entries before they are posted to the jobs and provides a record of those postings with the source number for an audit trail.
Selecting this procedure will display the printer selection screen. Type the printer number and the number of copies and press ENTER. The system will then display the following input screen:
TopEnter run date : / /
The system will display the posting date of the last run of the previous step, 7-7-1: Manual Posting toJobs. This date will be printed on this report as a run date and is also a cutoff date; all runs of the previous step, 7-7-1: Manual Posting to Jobs, that have a posting date on or before this run (cutoff) date will be printed on this report. You may change this date if required, or press just ENTER to accept the suggested date.
Is this date correct ? : NO
Correct this date if required. When you are ready to proceed, type YES ENTER. Your report will be printed and the system will return you to the 7-7: Manual Posting to Journal menu.
This procedure is used to enter the job phase totals for the original estimates for a new job. These totals may be viewed in step 7-3: Phase Totals Display, 1=Estimated. This procedure provides a record of these entries and an audit trail which is particularly useful if revisions are made. These entries will later be posted to the jobs in step 7-8: Update Journal to Jobs.
This selection will display the following input screen (items in bold type are examples):
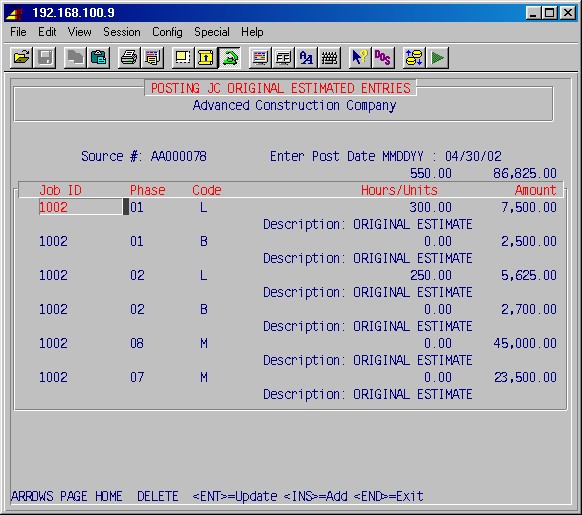
Source #:
If you are reviewing a previous set of entries, type the source number, press ENTER, and those entries will be displayed. If you are entering a new set of entries, press just ENTER.To exit this procedure press E and ENTER.
Enter post date MMDDYY:
If you entered an existing source number, the posting date for those entries will be displayed. If this is new, type the date you wish to post these entries and press ENTER. The system will then prompt:Is this date correct? YES
This is your last chance to correct this posting date. If you answer NO, you may go back and correct it. Press just ENTER when you are ready to proceed.
The system will then prompt:
No entries ADD: YES
If necessary, typing NO ENTER will allow you to exit out of this source number and posting date without making any entries. You may re-enter this source number later if you wish, but the system will not select it again.
Normally, you would proceed by pressing just ENTER. The system will display the following fields to enter the job totals one line at a time.
Next, use the INS, DEL, ARROW, PAGE, HOME and ENTER keys to add, deleted and update entries as needed.
SEQ
The system will number each line in numerical order starting with 1.JOB ID
Type the job ID for this entry. For your convenience, this will be repeated on subsequent lines until you change it.PHASE
Type the phase ID here. This will be repeated on subsequent lines until you change it.
Type an existing job ID.CODE
Specify the appropriate phase category code from the list at the bottom of the screen. All codes except labor and materials are user definable. Below are examples:
|
L = Labor
M = Material N/C = Consumables E = Equip. Rental |
S = Subcontract
O = Other B = Burden/Fringe H = Overhead |
TopUNITS/HOURS
Enter number of hours or units as appropriate.AMOUNT
Enter the amount you wish to distribute to this phase of this job.When finished, press END and you'll be prompted for Source #.
To exit this procedure press E and ENTER.
The system will prompt:
Print posting list: YES
Type NO ENTER if you want to exit without printing your entries.
Normally, you would press just ENTER to print a report of these entries to review before you do step 7-8: Update Journal to Jobs. The system will prompt:
Enter source # or <RETURN> for all:
You may print a specified set of entries by entering the source number, or all sets by pressing just ENTER. The printer selection screen will now be displayed. Type the printer number and the number of copies and press ENTER. Your report will be printed and the system will return you to the 7-7: Manual Posting to Journal Menu.
This procedure is used to enter the job phase totals for the revised estimate totals for ongoing jobs. These totals may be viewed in step 7-3: Phase Totals Display, 5=Revised estimated. This procedure provides a record of these entries and an audit trail which is particularly useful if revisions are made. These entries will later be posted to the jobs in step 7-8: Update Journal to Jobs.
This procedure is identical to step 7-7-3 above.
This procedure updates the contents of the journal to the respective jobs. The journal may contain data from accounts payable, accounts receivable, payroll and manual entries posted. This procedure must be performed before any job cost reports are run.
Selecting this procedure will display the printer selection screen. Type the printer number and the number of copies and press ENTER.
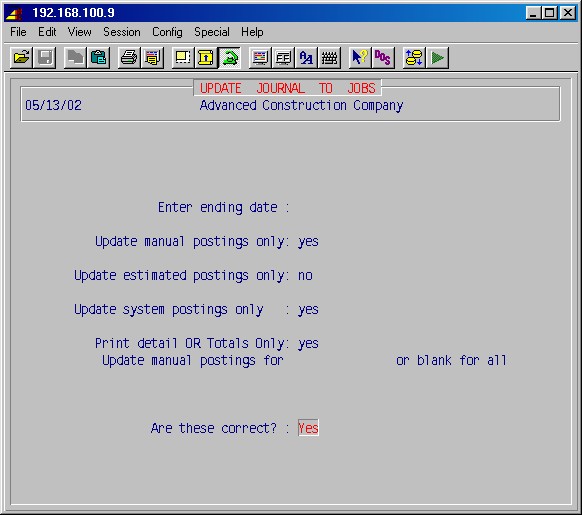
Enter ending date
Press just ENTER to update all transactions, otherwise only transactions dated up to the ending date will be updated.
Update manual postings only: NO (or system postings only)
Normally, press just ENTER to accept the default NO and update system postings only. You would only answer YES if you have just posted manual entries in 7-7-1 and want to update the jobs with these postings.
Update estimated postings only: NO (or system postings only)
Normally, press just ENTER to accept the default NO and update system postings only. You would only answer YES if you have just posted estimated entries in 7-7-3 and want to update the jobs with these postings.
Only one of the two options above may be answered Yes in a posting
run.
If either of these are answered Yes, you'll be prompted:
Update manual postings for (user) or blank for all
If you only want to post entries you've made, just press ENTER, otherwise blank out the user and press ENTER to post all entries.
Are these answers correct? : NO
You may abandon this operation by pressing just ENTER.
Otherwise, to proceed, type YES ENTER.
The system will update the job cost records with the journal entries you have specified and return you to the #7 Job Cost main menu.
TopThese procedures will print or display various jobs reports for jobs in progress. This selection will display the following menu:
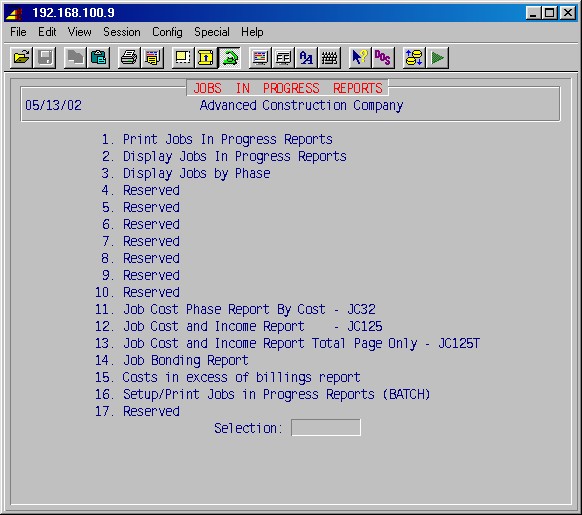
This procedure will print a report of specified jobs, either jobs in progress or completed jobs, with the degree of detail specified in the following set up screen.
Selecting this procedure will first display the printer selection screen. Type the printer number and the number of copies and press ENTER. The following set up screen will then be displayed (items in bold type are examples):
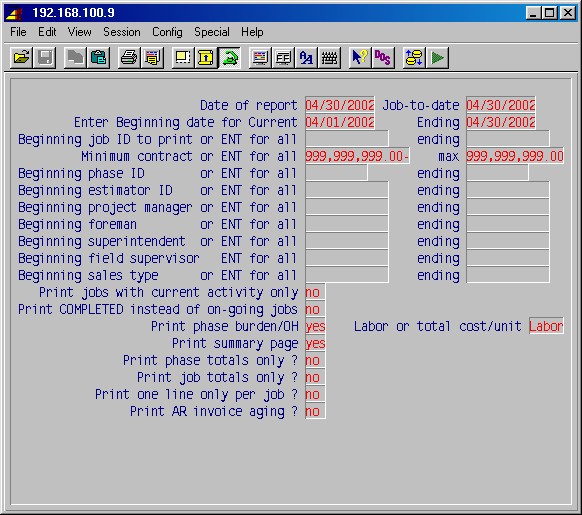
TopDate of report
Type the date you wish to appear on this report.Beginning Job ID to print or RET for all Ending
Type the range of job ID's you wish to print. To print only one job, type that job's ID in both fields. To print all job's, leave both fields blank and press just ENTER in each.Beginning Phase ID or RET for all Ending
Type the range of phase ID's you wish to print. To print only one phase, type that phase's ID in both fields. To print all phases, leave both fields blank and press just ENTER in each.
Beginning Estimator ID or RET for all Ending
Type the range of estimator ID's you wish to limit the jobs to be printed to. To print only jobs for one estimator, type that estimator's ID in both fields. To print jobs for all estimators, leave both fields blank and press just ENTER in each.Beginning Project Manager or RET for all Ending
Type the range of project manager ID's you wish to limit the jobs to be printed to.Beginning Foreman or RET for all Ending
Type the range of foreman ID's you wish to limit the jobs to be printed to.Beginning Superintendent or RET for all Ending
Type the range of superintendent ID's you wish to limit the jobs to be printed to.Beginning Field Supervisor or RET for all Ending
Type the range of field supervisor ID's you wish to limit the jobs to be printed to.Beginning Department or RET for all Ending
Type the range of department ID's you wish to limit the jobs to be printed to.Print jobs with current activity only ?
The default NO will print all active jobs. Answer YES to print jobs with current activity only.NOTE: Current activity is referring to jobs with current period job totals. The current period job totals are cleared in step 7-11: Clear Current Period Job Totals. These totals are cleared as often as you choose, but are generally cleared monthly at the end of the draw period.
Print COMPLETED instead of on-going jobs ?
The default NO will print all on-going jobs. Answer YES if you want to print only jobs marked with the status "completed".Print phase burden/OH ?
The default YES will print burden and overhead (OH) for each phase. Answer NO if you only want the job totals for burden and overhead.Print summary page
The default Yes will print a page summarizing all jobs printed.Print phase totals only ?
The default NO will print job cost detail for all phases. Answer YES if you want just the phase totals without the detail.Print job totals only ?
The default NO will print the report with jobs subtotaled by phases. Answer YES if you want a report with job totals only. If you answer YES, this screen will prompt at the end "How many jobs per page ?", as described below.Print one line only per job ?
The default NO will print a report with detailed information about each job for estimated, current, to-date and over/under comparison. Answer YES if you want a summary report with only one line per job.Print AR invoice aging ?
Type YES if you also want to print an AR aging report. This will show the balance of your invoices for this job, aged by invoice date. If you answer YES here, the following question will be displayed:Print AR aging summary ONLY ?
The default NO will print a detailed aging report listing each invoice for this job. If you answer YES, the aging report show only the total amount due in each aging category.How many jobs per page - 1 or 3 ? 1
If you answered YES to "Print job totals only ?", this question will be displayed at the end. You may select either the default of 1 for one job per page or type 3 to select three jobs per page.NOTE: Printing the AR aging allows only one job per page.
Press ENTER and your report will now be printed as specified and the system will return you to the 7-10 Print Jobs in Progress Menu.
This selection allows you to explore on the screen all cost and billing information for a specified job, letting you view the details that make up summary figures. This selection will display the following screen:
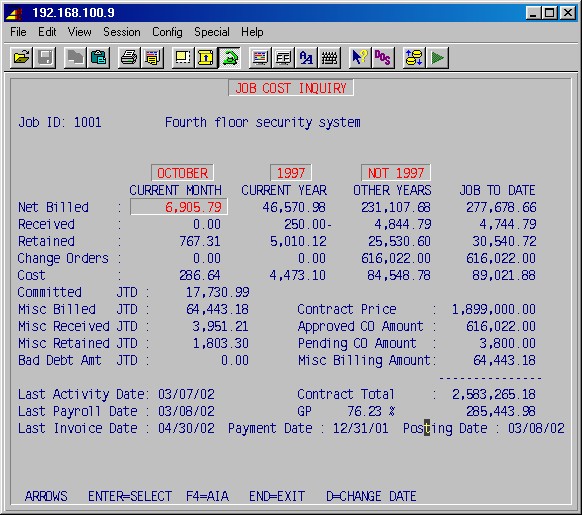
Job ID:
Specify the job ID of the job you wish to view and press ENTER. If this is a valid job ID, the system will display the job name.If you want to have the figures for another month or year displayed, press D and you'll be prompted:
Enter new month and year:
Type the month and year you want to see and press ENTER after each.To explore the details that make up an amount, use the arrow keys to select (highlight) that amount and press ENTER. Then use the options listed on the bottom line of each screen that appear to see more and more details as needed. The following is an example is looking at the cost in the material phase category, selecting a PO, listing an AP invoice summary for that PO, and looking at the individual items that make up that PO:
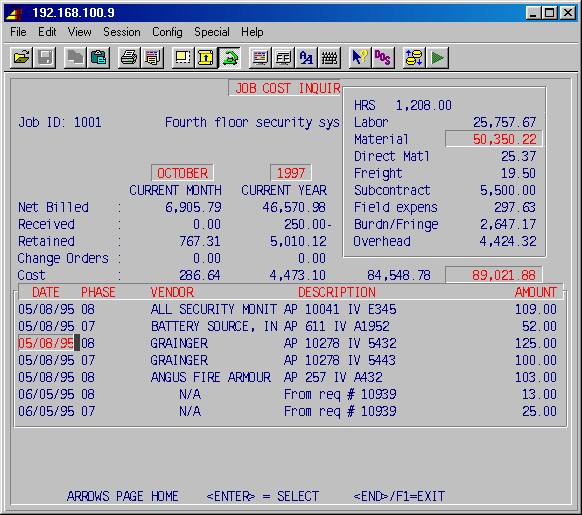
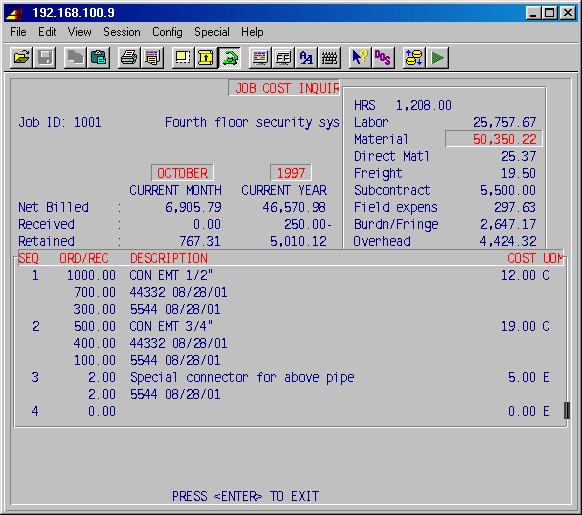
TopSimilarly, pressing ENTER on a billing amount will show the list of AR invoices that make up that amount, selecting and pressing ENTER on one of these invoices will show the invoice body of that invoice, and you can further press F4 to see the payments for that invoice.
Pressing ENTER on JTD Committed, will display the list of outstanding PO's for the job.
Pressing ENTER on Contract Price, Approved CO Amount and Pending CO Amount lets you view the job sheet information, scope, and job summary for the original job contract, approved and pending change orders, respectively.
Pressing ENTER on Misc Billing Amount will let you explore miscellaneous AR free form invoices billed to the job (but not included in Net Billed, Contract Price and Change Orders for the job).
When you are finished, press END and the system will prompt you for another job ID. If you want to exit this area, press ENTER again and the system will return you to the 7-10: Print Jobs in Progress Menu.
Use F4 to see the job by phases.
This selection lets you explore estimated, actual and committed costs by phase for a job. The following screens are examples:
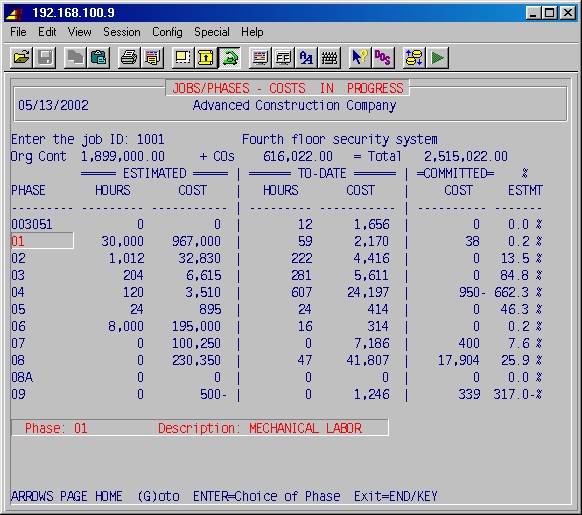
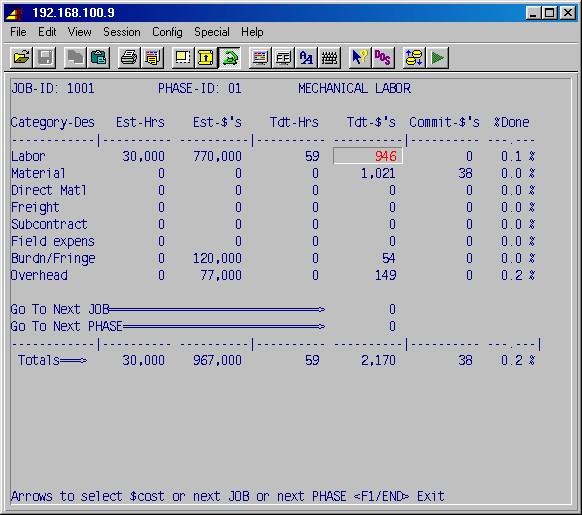
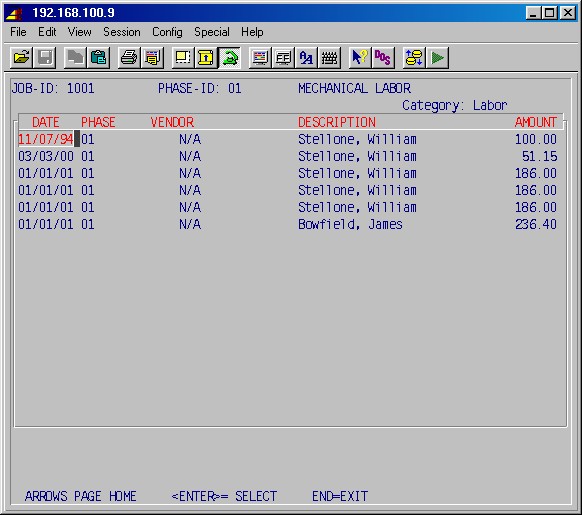
TopIn general, just follow the options on the bottom of the screen, but note that in order to get back from the second screen you must press F1 or press the down arrow till you get to Go To Next JOB and press ENTER.
This selection will print a report for bonding purposes, subtotaled by job, which will detail the contract price, original estimates, current estimates, costs to date, % completed, various profit figures, and billings for all jobs or specified jobs.
Selecting this procedure will first display the printer selection screen. Type the printer number and the number of copies and press ENTER. The following input screen will then be displayed:
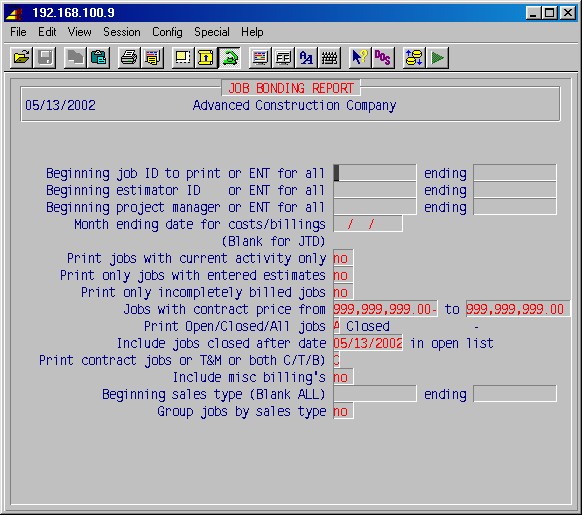
TopBeginning job ID to print or RET for all Ending
Type the range of job ID's you wish to print. To print only one job, type that job's ID in both fields. To print all job's, leave both fields blank and press just ENTER in each.Beginning Estimator ID or RET for all Ending
Type the range of estimator ID's you wish to limit the jobs to. To print only jobs for one estimator, type that estimator's ID in both fields. To not limit jobs by estimators, leave both fields blank and press just ENTER in each.Beginning Project Manager or RET for all Ending
Type the range of project manager ID's you wish to limit the jobs to. To print only jobs for one project manager, type that project manager's ID in both fields. To not limit jobs by project managers, leave both fields blank and press just ENTER in each.Month ending date for cost/billings
If not left blank, the report will only include costs up through the month of the date and invoices with dates up through the date.Print jobs with current activity only
Answer YES if you want a report with jobs with current activity only.Print closed jobs only
Answer NO if you want a report will all jobs listed.
Answer YES to only list closed jobs (jobs marked as completed).Print Contract Jobs (or T&M)
You may choose between printing contract or T&M jobs (7-1-1, second screen, choice number 2, Billing Information, field number 7, Time & Material, controls if a job is a contract or T&M job).
Answer Yes to print contract jobs, or No to print T&M jobs.Include Misc Billing's
If answered Yes, then the report will include miscellaneous AR free form invoices billed to the job in the billing amounts for the job.Press ENTER and your report will now be printed as specified and the system will return you to the 7-10: Print Jjobs in Progress Menu.
This selection will print a report of specified jobs, subtotaled by job, which will detail costs in excess of billings or billings in excess of costs for the jobs specified.
Selecting this procedure will first display the printer selection screen. Type the printer number and the number of copies and press ENTER. The following input screen will be displayed:
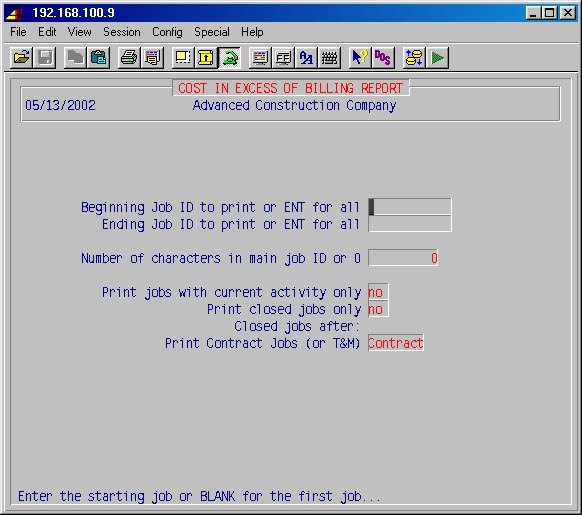
TopBeginning job ID to print or RET for all
Ending job ID to print or RET for allType the range of job ID's you wish to print. To print only one job, type that job's ID in both fields. To print all job's, leave both fields blank and press just ENTER in each.Number of characters in main job ID or 0
If you want the report broken down in groups of jobs, specify the number of beginning characters in job ID's which define a group. For example: if your job IDs are set up so they all start with the two character state abbreviation for the state the job is in, you could specify 2 here.Print jobs with current activity only
The default NO will print all active jobs. Answer YES to print jobs with current activity only.NOTE: Current activity is referring to jobs with current period job totals. The current period job totals is cleared in step 7-11: Clear Current Period Job Totals. These totals are cleared as often as you choose, but are generally cleared monthly at the end of the draw period.
Print closed jobs only
Answer NO if you want a report will all jobs listed.
Answer YES to only list closed jobs (jobs marked as completed).Print Contract Jobs (or T&M)
You may choose between printing contract or T&M jobs (7-1-1, second screen, choice number 2, Billing Information, field number 7, Time & Material, controls if a job is a contract or T&M job).
Answer C to print contract jobs, or T to print T&M jobs.
Press ENTER and your report will now be printed as specified and the system will return you to the 7-10: Print Jobs in Progress Menu.
This procedure allow you to set up and print batches of a report similar to 7-10-1 above, specifying printer number, number of copies, report date, beginning and ending job IDs, beginning and ending estimator IDs, current activity only, completed jobs only, print phase categories B and O, print phase totals only, print job totals only, one line per job, print AR aging, aging summary only, number of jobs per page (1 or 3), for each batch.
This procedure clears the current period totals for the jobs specified. This procedure should not be run until after all job cost reports have been run, because it clears the current period fields to zero. This procedure is selective so that jobs may be cleared individually or all at once.
These totals are cleared as often as you choose, but are generally cleared monthly at the end of the draw period.
This selection will display the following input screen (items in bold type are examples):
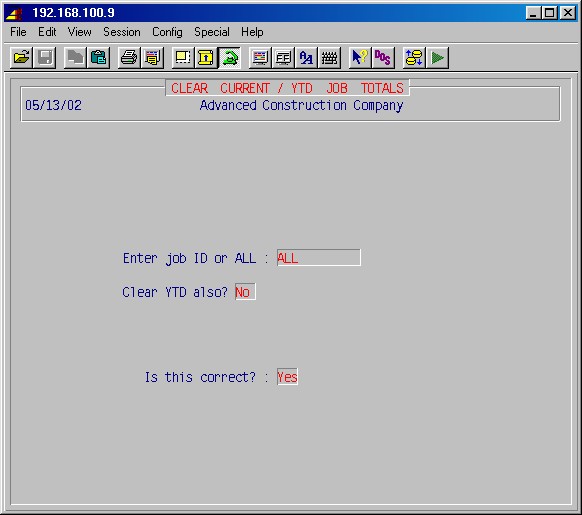
Enter Job ID or ALL
Specify a job ID to clear or type ALL to clear all jobs.
Clear YTD also? NO
This gives you the option of clearing the year-to-date totals also. This is generally done at the end of the year after all job cost reports have been run. Type YES if you also want to clear the YTD totals.
Is this correct ? : NO
If you need to make any changes press just ENTER and make your corrections. Type YES ENTER when you are ready to proceed. The specified totals will now be cleared and the system will return you to the #7 Job cost main menu.Top
This procedure allows printing job cost history for a specified job or all jobs, specified phase or phases, specified period of time, for some or all vendors. The job history which will be printed consists of all job postings, by date, for the specified job(s) and phase(s) including material by vendor, labor by employee, payroll expenses, including burden, fringe, taxes, and insurance, and manual postings.
Selecting this procedure, you will first be prompted:
Summary history (or detail)
Just hit ENTER for the detailed report.
The printer selection screen will then appear. Type the printer number and the number of copies and press ENTER. The system will then display the following input screen (items in bold type are examples):
Date for this report
Type the most recent date through which you want to print job cost history. This is both a report date and a cutoff date.
Start date
Type the oldest date from which you want to print job cost history. This must be earlier than the cutoff date. Leave this blank if you want to print all history for a job through the report (cutoff) date.
Starting Job ID to print, <CR> for first
Ending Job ID to print, <CR> for last
Type the range of Job IDs you want to print on this report. If you want to print just one job, type that job ID in both fields. If you want to print all jobs, press just ENTER after each.
Starting phase to print, <CR> for first
Ending phase to print, <CR> for last
Type the range of phase IDs you want to print on this report. If you want to print just one phase, type that phase ID in both fields. If you want to print all phases, press just ENTER after each.
Starting vendor to print, <CR> for first
Ending vendor to print, <CR> for last
Type the range of vendor IDs you want to print on this report. If you want to print just one vendor, type that vendor ID in both fields. If you want to print all vendors, press just ENTER for after each.
Print by phase (or by vendor)
Answer Yes if you want the job history lines broken down in groups by phase IDs, otherwise they'll be in groups by vendor ID.
Category to print or <CR> for all
If you want to limit the report to just one phase category (one of L, M, N, C, E, S, O, B, I or R), enter it here. Otherwise leave blank.
Print employee name only
If answered Yes the amount will not print for category L (labor) job lines.
All Correct ? (Y/N/E)
To exit this procedure without printing, press E.
To go back and correct any of the above entries, press N.
To print the report, press Y.
Then press ENTER.
If, at the prompt Summary history (or detail) you instead press S, for summary, and hit ENTER, the printer selection screen will then appear. Type the printer number and the number of copies and press ENTER. The system will then display the following input screen:
Start date (Must be earlier than end date)
Type the oldest date from which you want to print job cost history. This must be earlier than the cutoff date. Leave this blank if you want to print all history for a job through the report (cutoff) date.
End date
Type the most recent date through which you want to print job cost history summary.
Beginning Job ID to print (blank for all) Ending
Type the range of Job IDs you want to print on this report. If you want to print just one job, type that job ID in both fields. If you want to print all jobs, press just ENTER after each.
Display only
If answered Yes, the report will be shown on the screen, rather than printed on paper.
Print Categories
If answered Yes, a heading will be printed for each phase category.
Print Phases
If answered Yes, a heading will be printed for each phase.
All correct ? NO
Review your entries. If you need to make corrections, press just ENTER and make the changes. When you are finished, type YES ENTER.Top
This menu consists of a number of specialized reports, which may or may not be applicable to your company.
This report will list a comparison between estimated and actual labor hours and dollars for all completed jobs with completion dates in a selected date range.
These reports have been designed for specific customers with their unique
requirements in mind.
Please note: These reports are NOT broken, but do have
unusual ways of selecting and grouping data.
If they happen to be usefull to you, then feel free to use them.
This report will list labor hours, labor dollars, material dollars, fees and contract amount for each change order broken down by original contract, approved, pending and rejected change orders, for a range of jobs.
This selection allows a comparison between job cost history and GL transaction history in a selected date range. The job history additionally be limited to a range of phase IDs and to completed, open or all jobs. You may enter up to ten GL account numbers for each job phase category, e.g. Labor, Material, N/C, E, S, O, B, H and I (income).
This menu gives access to a number of job maintenance screens and reports, with the limitation that only users who are on the job's "who's who" list may access a given job. This gives access for project managers, estimators, superintendents, foremen, etc. to their jobs.

This selection allows entering and updating estimates for a new contract
(job). This entry screen is similar to 7-1-8: Change Request
Maintenance and Print.
© 2001 SI Systems, Inc.
2323 Belleair Road
Clearwater, FL 33764
800/422-2277, 727/531-0669
Fax: 727/536-8858