From the main menu, if #5 Payroll is selected, this payroll menu is displayed.
The selections on this menu are divided into three groups.
The first group, selections #1 through #7, consists of the file maintenance programs. This is the area where employees names, addresses, social security numbers, etc. are maintained. Information relating to departments, workmen's compensation classes and tax tables is also maintained here.
The second group, consisting of selections #8 and #9, is the time entry group. It is here that information from time cards is entered and then printed for verification and editing as necessary.
The third group, consisting of selections #10 through #21, is the payroll processing and reporting group. Here the information entered in step #8 above is processed and eventually printed on checks, distributed to the general ledger and job cost.
Please note: Steps 8 through 11 are preliminary - any data entered may be changed or deleted. Steps 8 through 11 may be run repeatedly until the results are as required. Running step 12 commits the payroll.
The regular weekly payroll cycle starts with step #8 and goes through step #18.
Time can be entered in any order you wish. Time can be posted to several different
jobs or items, different workmen's comp rates and more.
There are several payroll areas that must be set up before you can process a payroll. The following setups must be completed in order:
General setup
Step 13-1: Client information has several fields related to payroll that must be completed, including the company name and address as it will appear on official reports and bank account information for direct deposit. Selecting 13-1 will display the following input screen :
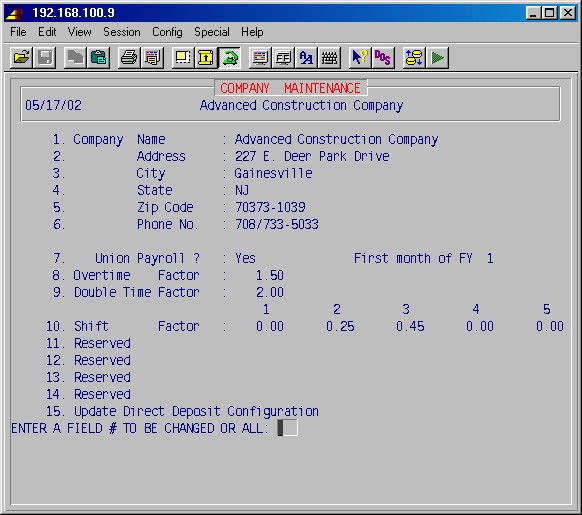
1-6. Company name, address, & phone
Complete these fields with your company's name and address as you wish them to appear on all reports and transmittals. This address will appear on W2s, magnetic media, and all union, governmental, and other system reports.
7. Union payroll? First month of FY
Answer YES if this is a union payroll. This will cause union areas to be accessible for input and payroll will be processed as a union payroll.
Specify the first month (1-12) of your fiscal year (FY). This is a GL setup, but must be completed because it controls the accounting.
8. Overtime factor
Specify (as a decimal) the hourly pay factor for overtime pay. Example: Overtime pay is typically one and one-half times the normal hourly pay and would be entered as 1.50.
9. Double time factor
Specify (as a decimal) the hourly pay factor for doubletime pay. Example: Doubletime pay is typically two times the normal hourly pay and would be entered as 2.00.
10. Shift factor 1 2 3 4 5
Specify, if applicable, the shift premium (extra pay per hour), you pay for employees working different shifts. This is entered as a dollar amount (Example: 25 cents per hour is entered as 0.25) and may be entered for up to five shifts. The amount is added to the employee's basic rate at time card entry.
11. Reserved
12. Reserved
13. ReservedThe next three fields are for direct deposit only and may be left blank if you are not using the direct deposit feature of payroll.
NOTE: #14 and #15 should be left blank unless you are utilizing the direct deposit feature
14. Company direct deposit account # Bank ID:
Enter your bank account number (generally your payroll account number) from which direct deposits from payroll will be deducted. The bank ID number is the nine digit bank routing number which identifies your bank to the banking system. This number is on your checks or you may call your bank for the proper number.
15. ACH receiving bank ID
Enter the nine digit bank routing number for the ACH (automated clearing house) bank ID. This is the bank where your bank will send the direct deposit deducted from your payroll account for routing to your employee's bank. This bank number must be obtained from your bank.
Miscellaneous Pay & Deductions
Step 5-3-1: Deduction Maintenance is used to create a list of all possible employee deductions, miscellaneous pay, reimbursements and company overhead categories.
Work Comp Classifications
Step 5-4-1: Work Comp Classification Maintenance is used to input the work comp classification codes and rates for your employees.
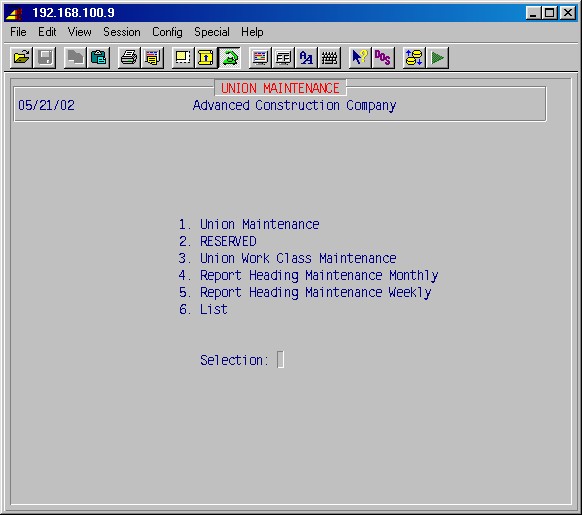
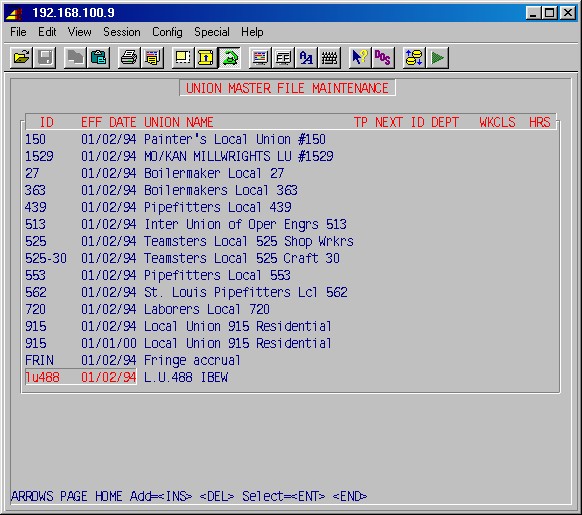
Union Maintenance
Step 5-4-3-1: Union Maintenance is used to input the master files for each union.
Union Work Class
Step 5-4-3-3: Union Work Class Maintenance is used to input union work class information.
Union Contribution
Step 5-4-3-2: Contribution Maintenance is used to input the union contributions for each union entered above.
Payroll Departments
Step 5-5-1: Department Maintenance is used to set up the various payroll departments and the general ledger numbers associated with each department, which control the accounting.
Tax Tables Setup
Step 5-7-1 Tax Table Maintenance must be used next to maintain tax tables for federal, state, and local taxes. Note that the FDM and FDS (Federal) are the master tax tables from which the system pulls various information. In addition to federal tax table information, the federal tax ID for all federal reports including W2s, magnetic media, and direct deposit, as well as the FUTA percent and limit are pulled from these tables. It is essential that all information on these tables be accurate.
Davis-Bacon Skill Setup
Step 5-7-6: Davis-Bacon Skill Maintenance must be done.
Employee Information
Step 5-1-1: Employee Maintenance is where employees are set up and most employee information is entered.
Employee Deductions
Step 5-3-2: Employee Deduction Maintenance may now be used to enter each employee's deductions and miscellaneous payments.
Time Entry Setup
There are several options for time entry which must be set before you process a payroll for the first time. These are set according to your preference and company policy, and are normally set once at installation and not changed again.To access this setup screen, go to the main menu and choose #13 Utilities, then #8 Control record maintenance, then #8 Time card entry/tax control.
Selecting 13-8-8: Time Card EntryTax Control, will display the following input menu :
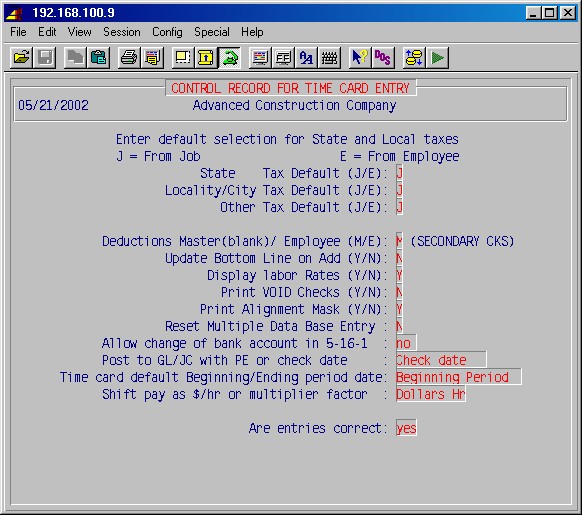
State tax default (J/E):
Specify whether you want the location of the job, or the home state of the employee to control the taxes. If your jobs are primarily in one state, you will generally set this to Employee. If your jobs are in several states, you will generally set this to Job.Locality tax default (J/E):
This is similar to the state tax default option above. If your jobs are in different localities that have local taxes, set this option to Job. If not, set it to Employee.Other tax default (J/E):
This is similar to the state tax default option above. If your jobs are in different localities that have local taxes, set this option to Job. If not, set it to Employee.Deductions from master or employee (M/E):
This option relates to secondary or multiple checks created in step 5-8-6.It is often necessary to omit or change all or some of the normal deductions, as entered in 5-3-2: Employee Deduction Maintenance, on a secondary check. This requirement necessitates the use of a deduction screen if you are writing a secondary check.
This deduction screen may either be a complete listing of all possible deductions with no amounts from the Master list in 5-3-1 Deduction Maintenance, or the Employee deduction record for this employee with the amounts per regular pay period, from 5-3-2: Employee Deduction Maintenance.
Update bottom line on ADD (Y/N):
The time entry screens have a horizontal line of fields on the lower third of the screen to input information for department, class and union information, shift, and tax state. These fields are filled in with information from the master files.If you often need to change any of these fields in time entry, set this option by typing Yes. This will allow you to access these fields in the normal Add mode when you are doing time entry.
If you seldom change these fields, set this option to No. This will cause the cursor to skip over these fields in the Add mode. They may be changed, but only in the Update mode.
Display labor rates (Y/N):
This option allows you to omit the labor rates from time card entry fields to maintain confidentiality of employee pay rates. If you set this to No, you can have operators enter time without revealing pay rates to them.Print VOID checks (Y/N):
This option gives you the choice of printing void checks. This is a matter of preference, sometimes for internal control purposes. If you set this to Yes, you will have a paper check to account for each check number.Print Alignment Check: (Y/N):
This specifies whether option to print alignment check is offered during check printing.Are entries correct: YES
If you need to make changes, type NO ENTER and make your corrections. Otherwise press just ENTER.Selecting 13-8-5: Payroll to Job Cost Burden/Fringe/Overhead, will display the following input menu :
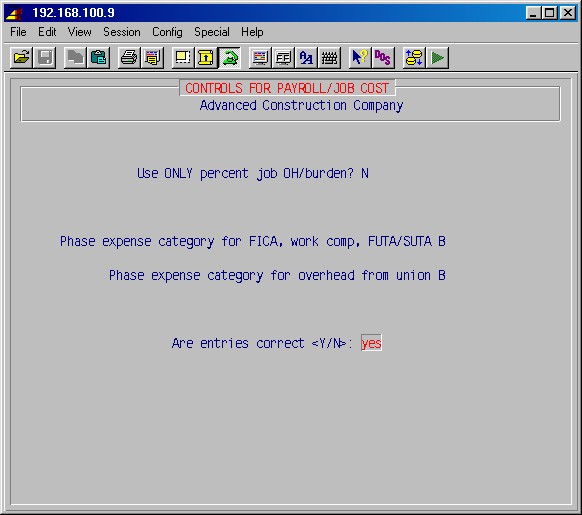
Use only percent job OH/burden? N
If you want to use a fixed percentage of payroll for job overhead/burden cost, rather than actual cost (FICA, work comp, FUTA/SUTA, Medicare, Company Overhead, etc.) type Y and press ENTER. The system will prompt:Percent job OH/burden 0.00
Phase expense category for OH/burden B
Enter the percentage and phase expense category (one of L, M, N, C, E, S, O or B, as viewed in 7-1-1-#5).
Please note that the choice of these categories is a company policy issue.Otherwise just press ENTER, and the system will prompt:
Phase expense category for FICA, work comp, FUTA/SUTA B
Phase expense category for overhead from union B
Enter the phase expense category to be used for each.Are entries correct <Y/N>: yes
If you need to make changes, type NO ENTER and make your corrections. Otherwise just press ENTER, and the system will prompt:
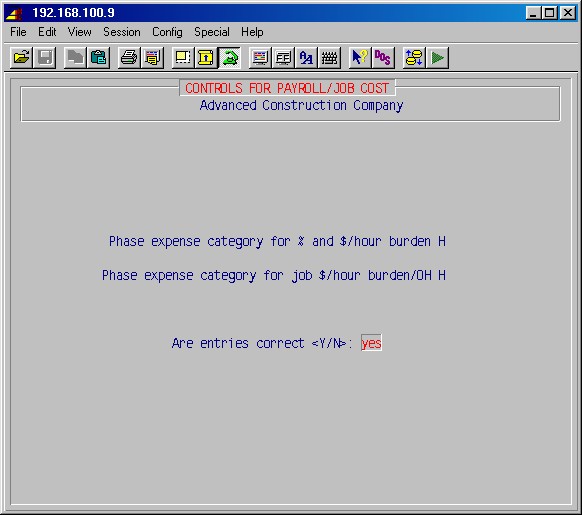
Phase expense category for % and $/hour burden H
Phase expense category for job $/hour burden/OH H
Enter the phase expense category to be used for each.Are entries correct <Y/N>: yes
If you need to make changes, type NO ENTER and make your corrections. Otherwise just press ENTER, and the system will prompt:

Phase expense category union fringes H
Enter the phase expense category to be used for union fringes.Are entries correct <Y/N>: yes
If you need to make changes, type NO ENTER and make your corrections. Otherwise press just ENTER three times until you return to the main menu.
The procedures in this area allow adding, modifying, viewing or deleting employee records. Selecting 5-1 Employee Information from the payroll main menu will display the following menu (to change confidential status type all):

This selection will display the following input screen :
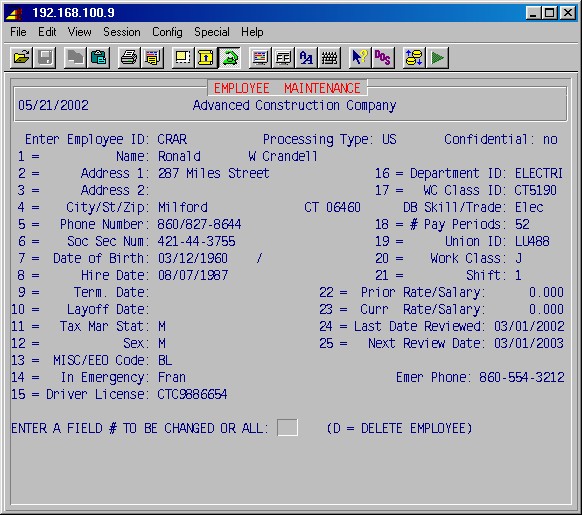
Enter Employee ID:
This is a unique ID which you specify to identify your employee to your company. You may use any combination of letters or numbers up to 12 characters long (sufficient for social security numbers which are sometimes used). If an employee already exists with this ID, the system will display the information on file for this employee.
Processing Type:
Specify type of payroll, US or Canadian.
Confidential:
Specify whether this employee is part of the field or confidential payroll. Employees specified as confidential are not available for maintenance or time entry unless operator is authorized to access confidential payroll.
1 = Name:
Type the employee's first name, middle initial (if any), and last name.
2 = Address 1:
Must be filled in.
3 = Address 2:
Optional second address line.
4 = City/ST/Zip
Type the city, state, and zip code. Entering the zip code will automatically enter the city and state. Note: No comma should be entered after the city.
5 = Phone number:
Type the employee's telephone number - optional.
6 = Soc sec num:
Type the social security number - mandatory. Required to be unique - no two employees may have the same SSN.
7 = Date of birth:
Type the birth date - optional.
Fields 8, 9, 10, 23, and 24 give access to Record of Employment for the employee. The Record of Employment is an automatically created list of hires, fires, reviews and pay changes:

You can use the ARROW, PageUp, PageDown and HOME keys to scroll through the entries, as needed. Press INS to add a new line, or END to leave this screen.
8 = Hire date:
Type the date the employee was hired.9 = Term. date:
Type the date of termination - use only if the employee is really terminated.
If a terminated employee is rehired, merely change the termination date to a "?" to reactivate. This area MUST be filled in to allow you to "delete" an employee.10 = Layoff date:
Type the date the employee was layed off. If a layed off employee is rehired, merely change the layoff date to a "?" to reactivate.11 = Tax mar stat:
Type M or S -marital status for federal tax purposes.12 = Sex:
Type Male or Female as needed.13 = Misc/EEO code:
This field may be used for a miscellaneous or minority code (up to two spaces), as needed for EEO reporting. Enter minority codes only. Normal minority codes are:
Ca Caucasian
BL Black/African American
HS Hispanic
AS Asian American
AI American Indian14 = In Emergency:
Type the person and phone number to call in case of emergency.15 = Driver License:
Type the driver license number - optional.16 = Department ID:
Specify the accounting department normally used for this employee. If the department ID is in doubt, press the space-bar to scroll the existing department IDs; then press ENTER to select the one you want.Specify the work comp class ID normally used for this employee. If the class ID is in doubt, press the space-bar to scroll the existing work comp class IDs; then press ENTER to select the one you want.DB skill/trade:
The DB skill/trade is the Davis-Bacon Skill Description to be reported on certified payroll reports. This is a required field; if this is an office employee or other employee who will never appear on a certified report, enter NA. Skill IDs must be set up first in 5-7-6: Davis-Bacon Skill Maintenance, before they may be entered here.18 = # Pay periods:
Specify the number of pay periods per year. (Example: 52 designates weekly pay).19 = Union ID:
Type the union number, as needed.20 = Work class:
Specify the union work classification, as needed. This work class will be reported on the certified payroll in combination with the Davis-Bacon skill in #17 above.21 = Shift:
Specify shifts 1 through 5, as needed. Normally 1. Using shifts from 2 to 5 will pay the employee the additional dollars/hour specified in 13-1: Client Information, #10.22 = Prior Rate / Salary:
Type, as needed, the hourly pay rate or salary prior to the last review.23 = Curr Rate / Salary:
Type the current hourly pay rate or salary - mandatory unless the pay rate is controlled by a union. If a salaried employee will have time charged to jobs, the equivalent hourly pay rate must be entered here.24 = Last date reviewed:
Type the date of last performance/salary review, as needed.25 = Next review date:
Type the date of the next performance/salary review scheduled, as needed.ENTER A FIELD # TO BE CHANGED OR ALL: D = DELETE EMPLOYEE
1. Press ENTER to accept the information as shown and continue to the next screen.
2. Type ALL and press ENTER to update all of the fields, including type of PR and confidential specification.
3. Select a field number from 1 to 25 and press ENTER to update a specific field.
4. Type a D and press ENTER to delete the employee.NOTE: This delete employee only works now, before a payroll is processed for this employee.
When you have completed all of these fields, press ENTER and the next set of input fields will be displayed as follows :
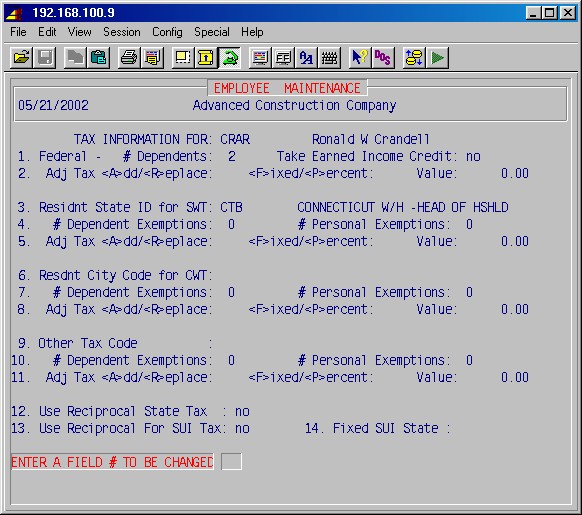
1 = Federal - # Dependents:
Type the number of dependents claimed by the employee on the W4 form for federal taxing purposes. If no tax is to be withheld, specify an Adjustment to tax of zero, and Replace in the next step.
Take Earned Income Credit:
Enter Yes if employee is to take Earned Income Credit, as entered in the tax tables. Otherwise No.2 = Adj tax:
If the employee wishes to have additional federal tax withheld, or wishes to replace the tax-table calculated federal tax with a fixed amount or a percentage, specify the method here. Specify <A>dd to or <R>eplace the tax table calculated tax, using a <F>ixed amount or a <P>ercentage of gross.NOTE: If your state has no income tax, then skip steps 3 through 5 below, which do not apply to you.
3 = Residnt state ID for SWT:
Type the code assigned to this employee's state of residence for state withholding tax.4 = # Dependents / personal exemptions:
Type the number of dependents and/or personal exemptions claimed by the employee for state income tax purposes.5 = Adj tax:
If the employee wishes to have additional state tax withheld, type the additional amount per pay period here. Specify <A>dd to or <R>eplace the tax table calculated tax, using a <F>ixed amount or a <P>ercentage of gross.NOTE: If you have no city or local income tax, then skip steps 6 through 8 below, which do not apply to you.
6 = Resdnt city code for CWT:
Type the code assigned to this employee's city or locality of residence for local income tax.7 = # Dependents / personal exemptions:
Type the number of dependents and/or personal exemptions claimed by employee for city or local income tax purposes.8 = Adj tax:
If the employee wishes to have additional city or local tax withheld, then enter the additional amount here. Specify <A>dd to or <R>eplace the tax table calculated tax, using a <F>ixed amount or a <P>ercentage of gross.NOTE: If you have no other county or local income taxes, then skip steps 9 through 11 below, which do not apply to you.
9 = Other tax code:
Type the Tax ID for any other county or local income tax to be withheld from this employee.10 = # Dependents / personal exemptions:
Type the number of dependents and/or personal exemptions claimed by employee for this tax.11 = Adj tax:
If the employee wishes to have additional "other" tax withheld, then enter the additional amount here. Specify <A>dd to or <b>eplace the tax table calculated tax, using a <F>ixed amount or a <P>ercentage of gross.12 = Use reciprocal state tax:
If YES, takes work state taxes instead of home state taxes, even if states have reciprocal agreements. See table below.13 = Use reciprocal SUI tax:
If YES, takes work state taxes instead of home state taxes, even if states have reciprocal agreements. See table below.Fields 12 and 13 only take effect if states have reciprocal tax agreements. Taxes are calculated as determined in the following table (using states MI and WI as examples):
14 = Fixed SUI state:
If a state is entered here, that state is used for all SUTA taxes calculations. If left blank, the table above determines SUTA tax calculations.ENTER A FIELD # TO BE CHANGED OR ALL:
1. Press ENTER to accept the information as shown and continue to the next screen.
2. Type ALL and press ENTER to update all of the fields.
3. Select a field number and press ENTER to update a specific field.When you have completed all of these fields, press ENTER and the next set of input fields will be displayed as follows :
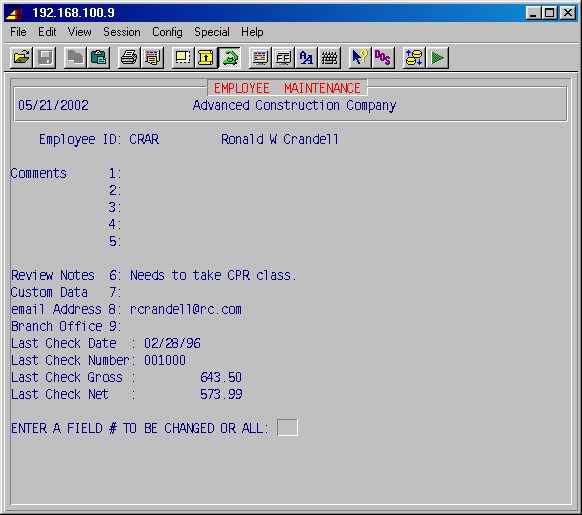
Comments 1: through 5:
Here you may write comments or notes regarding this employee.Review notes 6:
This may be used for one line of notes concerning this employee's review. This note will print on the Employee Rreview Report (5-1-6).Custom data:
This is a screen of user defined data entry areas which may be set up in step 13-8-16 (PR).The following fields are strictly informative and are updated each time payroll is processed.
Last check date:
Last check number:
Last check gross:
Last check net:The above fields may not be updated here and are simply a convenient place to review this last check information for a specified employee.
When you have completed fields 1 through 6, press ENTER and the first employee maintenance input screen will be displayed ready to specify another employee ID.
At this point, you may input another new employee or make changes to an existing record, or simply press ENTER to leave this area and return to 5-1: Employee Information Menu.
These selections will print various lists of employees organized by employee ID or employee last name. This selection will display the following menu:
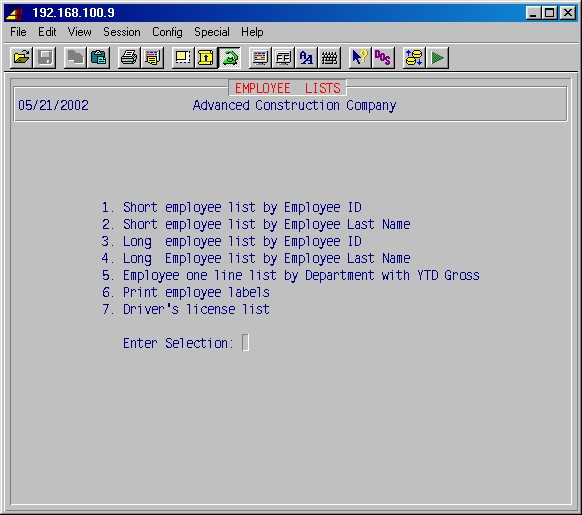
This procedure will print, for one or more departments, an abbreviated list of employees by employee ID, listing the full name, address (if desired), phone number, social security number, department, WC class, hire date, and termination date.
If the standard report is specified then select to design your own report, or use the standard report.
Selecting this procedure will display the printer selection screen. Type the printer number and the number of copies and press ENTER. You will then be asked:
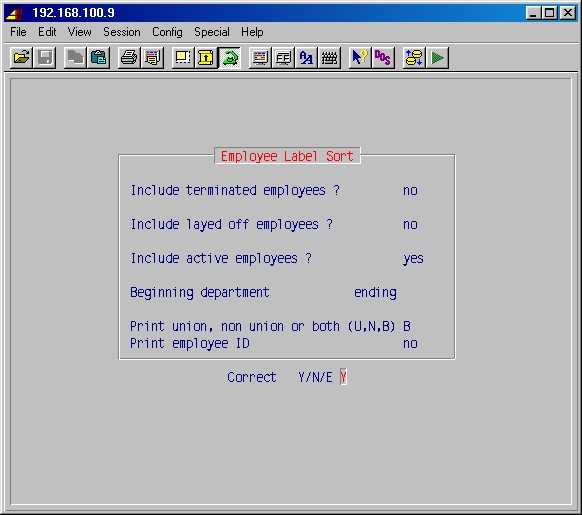
Top
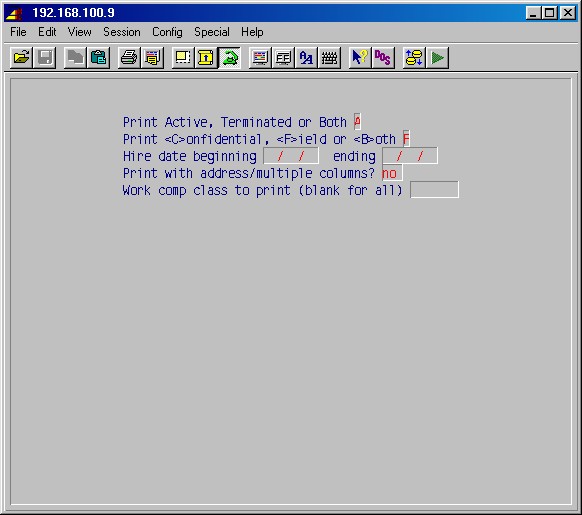
Print Active, Terminated, or Both
The default is Active employees presently on the payroll. You may also print only terminated employees by specifying Terminated, or Active and Terminated by specifying Both.Print <C>onfidential, <F>ield or <Both>
This question is normally answered Both. The other two choices are not used by most companies.Print with address/multiple columns?
The default is names-only with no addresses. If you want to print addresses also, type YES.Work comp class to print
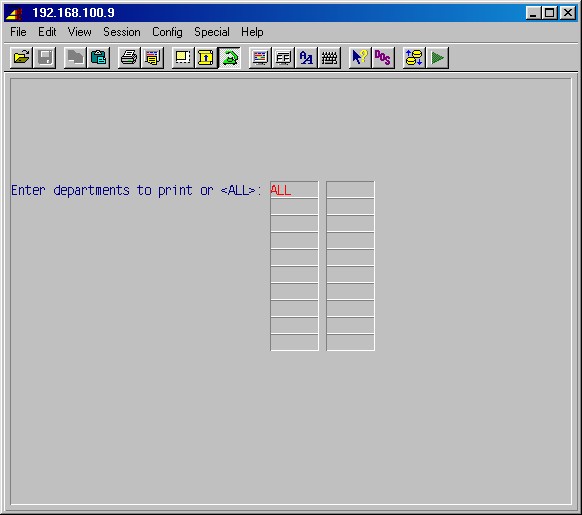
Enter a workman's compensation class if you want to limit the list to one class. Otherwise leave blank for all.Enter departments to print or <ALL>:
You may specify one or more departments by typing in the name of the departments or simply type ALL to print all employees in all departments.Are entries correct:
Verify the entries and press ENTER. Your report will now be printed and you will return to the 5-1-2: Employee Lists Menu.
This procedure will print, for one or more departments, an abbreviated list of employees, alphabetically, by employee last name, listing the full name, address (if desired), phone number, social security number, department, WC class, hire date, and termination date.
Selecting this procedure will display the printer selection screen. Type the printer number and the number of copies and press ENTER. Next, specify which groups of employees you wish to print as described in 5-1-2-1. Your report will now be printed and you will return to the 5-1-2 Employee Lists Menu.
This procedure will print, for all departments, a detailed list of employees, by employee ID, which includes all required information entered in 5-1: Employee Maintenance.
Selecting this procedure will display the printer selection screen. Type the printer number and the number of copies and press ENTER. The system will the prompt:
TopPrint Active, Terminated or Both <A/T/B>:
The default is Active employees presently on the payroll. You may also print only terminated employees by specifying Terminated, or active and terminated by specifying Both.
Print Confidential, Field or Both <C/F/B>:
This question is normally answered Both. The other two choices are not used by most companies.
Work comp class to print
Enter a workman's compensation class if you want to limit the list to one class. Otherwise leave blank for all.
Your report will now be printed and you will return to the 5-1-2: Employee Lists Menu.
5-1-2-4 Long employee list by employee last name
This procedure will print, for all departments, a detailed list of employees, alphabetically, by employee last name, which includes all required information entered in 5-1 Employee Maintenance.
Selecting this procedure will display the printer selection screen. Type the printer number and the number of copies and press ENTER. Next, specify which groups of employees you wish to print as described in 5-1-2-3 above. Your report will now be printed and you will return to the 5-1-2: Employee Lists Menu.
This procedure will report of specified employees by department, one line per employee, showing the employee ID, name, YTD gross earnings, department, hire date, and termination date, if any. Options include: active/terminated/both, confidential/field/both, all/select work class, and all/selected departments.
Print with address/multiple columns
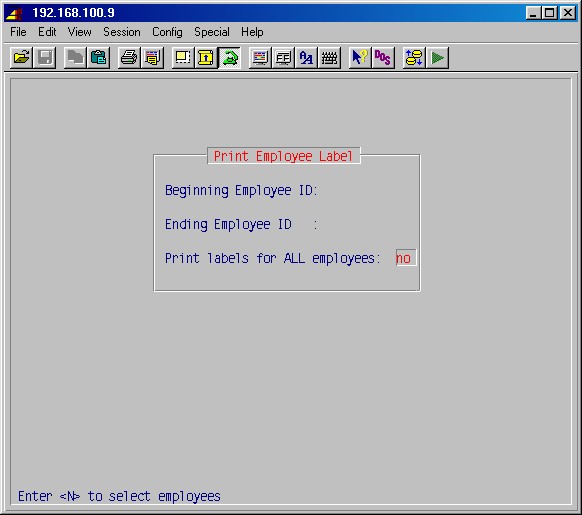
Answering Yes to this will print employee address/phone labels in 3 columns across.
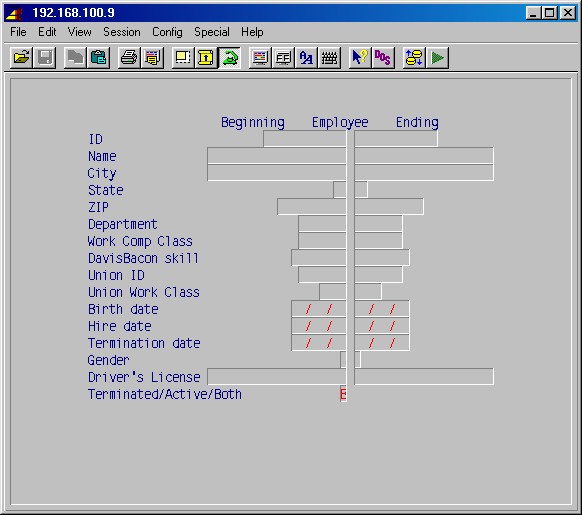
Beginning Employee ID:
Enter ID of the first of a range of employees or leave blank to exit or to start with the first employee. If you leave it blank you'll be given the option to exit the program here.Ending Employee ID:
Enter the ID of the last of a range of employees or leave blank to use all employees from the beginning ID.Print labels for ALL employees:
If you answer Yes here, labels for all employees in the selected range will be printed, regardless of their status.
Answering No here will prompt:Change these options as needed to select the status of the employees you want to print labels for.
Then, when the printer and number of copies have been selected, the labels will print and you'll be returned to the 5-1-2: Employee Lists Menu.
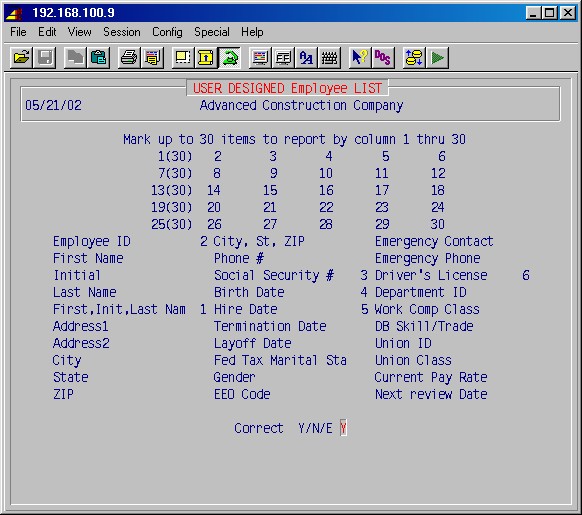
If you chose to design your room own report, these selections are avaliable:
This step is used to input information for two procedures:
Direct Deposit to Checking or Savings
This procedure allows you to input one or more of an employee's bank checking
accounts or savings account(s) number(s), and other related information
to enable direct deposit of specified amount(s) of an employee's pay directly
to his bank(s) using the Automated Clearing House (ACH) services of the
banking system - if this is set up on your system. This setup and dialing
out procedure is unique for each company. Before you can complete this step,
you need to set up a deduction ID for direct deposit in 5-3-1.
For direct deposits, all of the fields below must be completed.
NOTE: Direct deposit also requires fields #14 & #15 to be completed in 1-13-1: Client Information, and tax table FDM must have a valid federal ID number.
Credit union deductions
This procedure allows you to input credit union account number(s) to enable
deductions for credit union(s). For credit union deductions, the bank account
field must be completed (with the credit union account number) and the rest
of the fields left blank. These accounts numbers will print out on the 5-17-10:
Credit Union Deduction Report.
This selection will first prompt you for the employee ID [H]:
Enter The Employee ID:
Type the employee ID and press ENTER and the system will display the following screen :
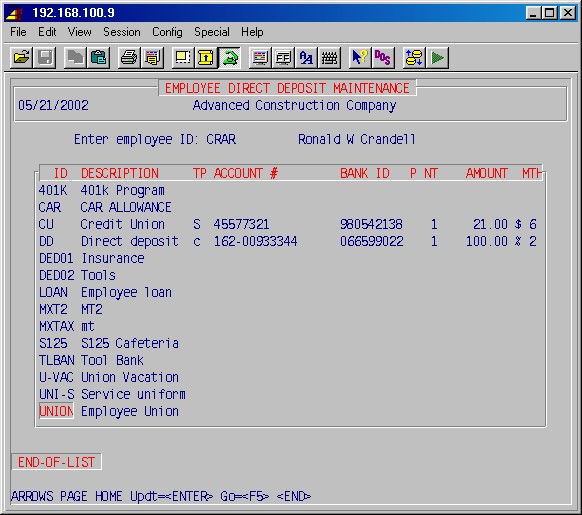
Use ARROW, PAGE and HOME keys to scroll/select a deduction.
Press ENTER to update the fields for deductions, as applicable:
ID
This is the Deduction/Earnings ID, as entered in 5-3-1: Deduction/Earnings Maintenance.
Description
The deduction/earnings description, as entered in 5-3-1: Deduction/Earnings Maintenance.
TP
Specify the type of account. Leave blank for credit union. The C or the S is what activates the system for direct deposit.C = Checking
S = Savings
blank = Credit union
Account #
Type either the bank checking or savings account number or the credit union account number for this employee deduction/direct-deposit and press ENTER.
Bank ID
Bank routing ID for direct deposit. Leave blank for credit union. For direct deposits to checking or savings, specify the complete bank routing number for the employee's bank account. This must be a nine digit number.
P NT
Pre-note counter. Begins 0, shows number of times dummy data has been sent with direct deposit for a new account. Actual direct deposit begins only when the pre-note counter is 2.
Amount
Enter the deduction or direct deposit percentage or amount. If the next field (MTH) is 2 then the figure is a percentage of net pay. If the MTH field is 6, then the figure is a fixed dollar amount.
MTH
Enter 2 for percentage of net pay, or 6 for a fixed dollar amount.
Press END when done with this employee.
You may now type another employee ID or press ENTER again to return to the previous menu.
This procedure will allow you to maintain a running total of employee's hours in apprentice classes.
Selecting this procedure will display the following input screen :
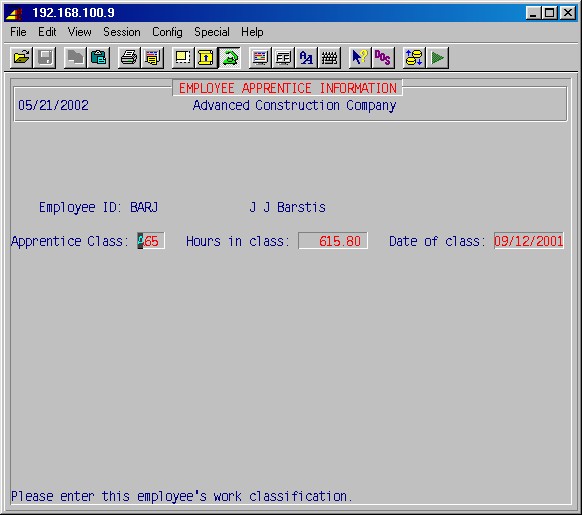
Employee ID
Type the employee ID [H] and press ENTER.
Apprentice class
Type the employee's work classification and press ENTER.
Hours in class
When you first input an apprentice class in this area, it is necessary to reset the number of hours to zero. Simply type 0 and press ENTER.This field will be updated each pay period from the payroll system and will show a running total of the hours accumulated in this work class. These hours will continue to accumulate until the apprentice class is changed and the hours reset to zero.
Date of class
Type the date the employee started in this work class and press ENTER.
You may now type another employee ID and repeat the procedure for that employee, or simply press ENTER to return to the payroll system main menu.
This procedure will allow you to maintain a record of vacation, personal, holiday, and sick time allowances for each employee, and review the number of hours of each taken, and the balance of time remaining in each category.
You will input, for each employee, the number of hours allowed and the number of hours that accrue per pay-period for each of these four categories.
The field for hours taken will be updated each pay period from the payroll system and will show a running total of the hours accumulated in each of the four categories. The running balance of hours allowed in each category will be computed and displayed in the balance field.
This selection will display the following input screen :
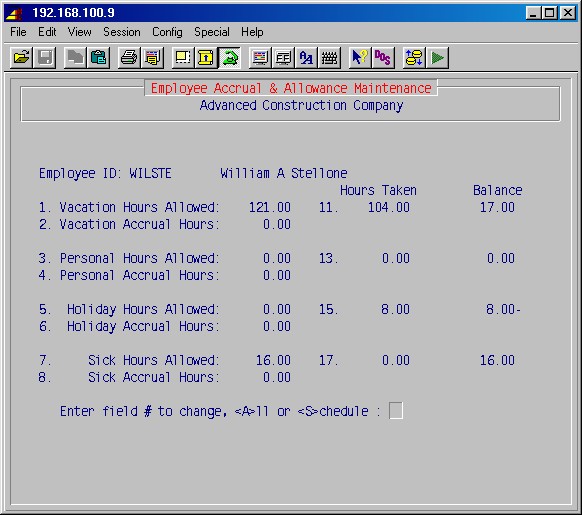
Employee ID
Type the employee ID and press ENTER.The fields for hours allowed and accrual hours in the vacation, personal, holiday, and sick leave categories are normally entered when an employee is hired, and adjusted at events when these allowances change, in accordance with your personnel policies (i.e. after probation period, after one year of service, promotions, etc.).
You may change all fields at once by pressing All ENTER, or type the number of the field you wish to change and press ENTER.
Hours allowed
Type the annual number of hours allowed to this employee at this time for vacation, personal time off, holidays, and sick leave in accordance with your personnel policies, union contracts, or terms of employment.Accrual hours
Type the number of hours that accrue on a per-pay basis for each of these categories that have "hours allowed" filled in.EXAMPLE: If an employee is eligible for a two week vacation (80 hours), and he is paid weekly (52 pay periods per year), then the vacation accrual hours for that employee is 1.54. (# hours divided by # pay-periods).
When all fields have been entered, press ENTER and you will be prompted for another employee ID. You may now type another employee ID and repeat the procedure for that employee, or simply press ENTER to return to the payroll system main menu.
This procedure will print a report of all employees whose "next review dates" fall in a specified date range. The report will show the employee ID, full name, social security number, department, review date, and present rate of pay.
Selecting this procedure will first display the printer selection screen. Type the printer number and the number of copies and press ENTER. The screen will then prompt:
Beginning review date / /
Ending review date / /
Specify the period of time for which you want a report of next review dates by typing a beginning and ending review date, pressing ENTER after each entry.
Your report will now be printed and you will be returned to the payroll system main menu.
This procedure will print a report by employee ID of all employees for which you are monitoring apprentice classifications. The report will show the employee ID, full name, class, date of class, and number of hours. You may print the report for a particular work class or all work classes.
This selection will first prompt:
Enter work class to be reported or hit <ENTER> for all: _____
Specify a particular work class or just press ENTER to print all classes.
Next, the printer selection screen will be displayed. Type the printer number and the number of copies and press ENTER.
Your report will now be printed and you will return to the payroll system main menu.
This procedure will print a report by employee ID of vacation time accrued, taken, and unused for one or more departments. The report will show the employee ID, full name, accrued vacation time, vacation time taken, balance, rate, and the liability (dollar value of the vacation time accrued but not taken).
Selecting this procedure will first display the following input screen:

Top
Enter departments to print or <ALL>:
You may specify one or more departments by typing in the name of the departments or simply type ALL to print all employees in all departments.Are entries correct:
Verify the entries and press ENTER.Next, the printer selection screen will be displayed. Type the printer number and the number of copies and press ENTER. Your report will now be printed and you will return to the payroll system main menu.
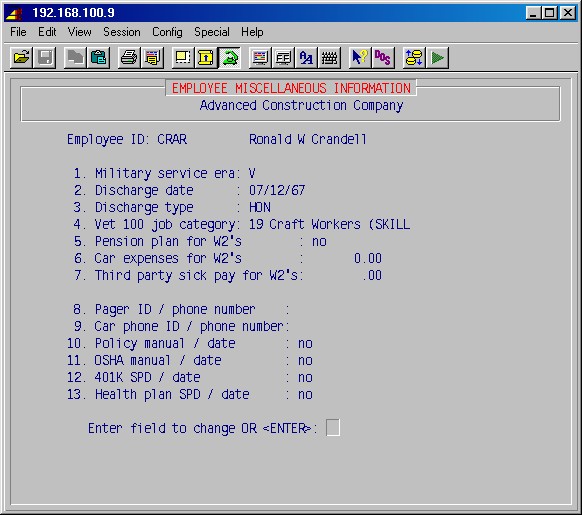
Use these entries as needed. Choices #5, #6, #7 are operator entered and used with W2s.
When in field #4 (Vet 100 job category), you can press F2 for a
list of valid categories.
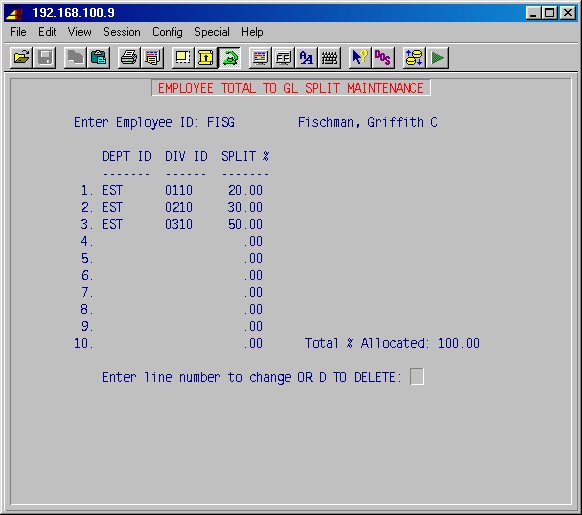
This procedure is a set up area which allows you to split an employee's payroll cost between two or more departments/divisions on a percentage basis. The system will first pay the employee in his "home" department, then step 5-16: Distribute to GL, will re-allocate the cost among the GL accounts of the departments as you have specified in this procedure.
This selection will display the following input screen:
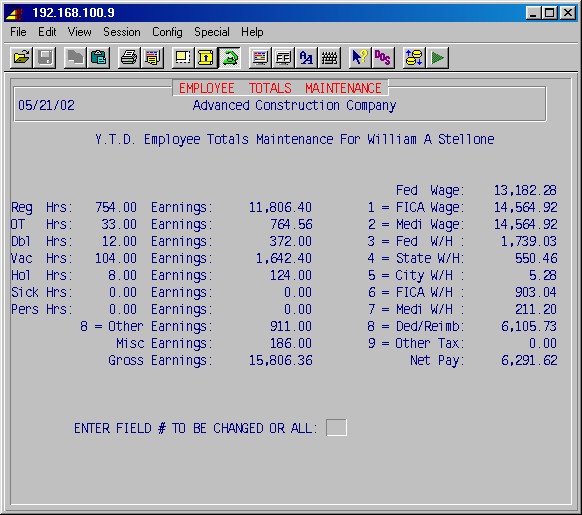
The following procedures allow viewing and updating of employees' current week, year-to-date (YTD) and quarterly totals. You may also make changes in the withholding and deduction amounts on these various screens.
This area is used primarily to adjust tax withholding and deduction amounts when the system is first set up or when paying bonus checks. This will be explained more fully in 5-8: Employee Time Entry.
CAUTION: If you change any deduction after step 5-10: Process Payroll has been run, you must run step 5-10 again.
Any changes made to an employee's totals here do not change the employee's history records, and thus should be used with caution.
This selection will display the following input screen :
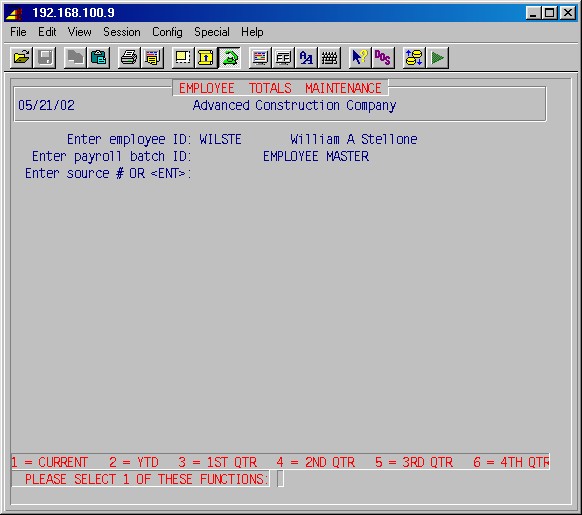
Enter employee ID
If just ENTER is pressed the system will return to the payroll system main menu.Type the employee's ID [H] for whom you wish to update totals. Only valid employee IDs are accepted. If the employee ID entered is valid, the system will display the employee's name.
Enter payroll batch ID
To access the current totals for a certain payroll, enter the payroll batch ID, or leave blank for the employee's master records for the quarters and YTD.
Enter source # or <RET>
For secondary and void checks, type the source number here. For the employee main records, just press ENTER.
A menu will be displayed on the bottom of the screen with the following options:
| 1 = CURRENT | Displays current week employee totals (this is only available when a batch is entered) |
| 2 = YTD | Displays year-to-date employee totals |
| 3 = 1ST QTR | Displays 1st quarter employee totals |
| 4 = 2ND QTR | Displays 2nd quarter employee totals |
| 5 = 3RD QTR | Displays 3rd quarter employee totals |
| 6 = 4TH QTR | Displays 4th quarter employee totals |
Select one of these menu items for the totals you wish to view or adjust. For
illustration we will look at selection 2 = YTD as follows :
You may now make adjustments to the Hrs column, the Earnings column or one of the nine numbered fields:
1 = FICA Wage:
2 = Medi Wage:
3 = Fed W/H:
4 = St W/H:
5 = City W/H:
6 = FICA W/H:
7 = Medi W/H:
8 = Deducts:To update the figures in the Hrs column, enter H
To update the figures in the Earnings column, enter E
or specify the field from 1 through 8 you wish to change,
and press ENTER.
For fields #1, #2, #3, #6, and #7,simply type the new figure and press ENTER. You may now choose another field to change or just press ENTER.
For fields #4, #5 and #9, the following input screen will be displayed :
These selections allow you to correct or change the state and/or city tax paid and the gross earnings related to those taxes. Type the new figure and press ENTER, or just press ENTER to leave unchanged. When you are finished, press END and you will return to the previous screen.
For field #8 for the current payroll, the following input screen will be displayed :
This screen is similar to the employee deduction setup screen in payroll 5-3-2: Employee Deduction Maintenance with the additional column, "this PR". This will show you all deductions, the deduction amount, and the frequency previously set for this employee in 5-3-2, and, if you have run step 5-10: Process Payroll, the amounts scheduled to be deducted for this payroll.
This selection may be used to change a deduction amount for this payroll for the batch specified.
If you to change the deduction amounts for this payroll only, add or
change figures only in the "this PR" field.
You may now select other fields to change or correct or just press ENTER again.
The screen will again display the bottom menu of employee totals as described above (current, YTD, 1st QTR, etc.). You may select another to view or update in the same manner as was just detailed, or simply press ENTER and return to the first screen in this procedure where you will be prompted for another employee ID.
To exit this area, simply press ENTER again and you will return to the payroll system main menu.
NOTE: You must re-process step 10 after any changes to deductions, and must NOT re-process step 10 after any changes to taxes!
The following procedures allow adding or modifying employees' miscellaneous pay and deductions. This selection will display the following menu:
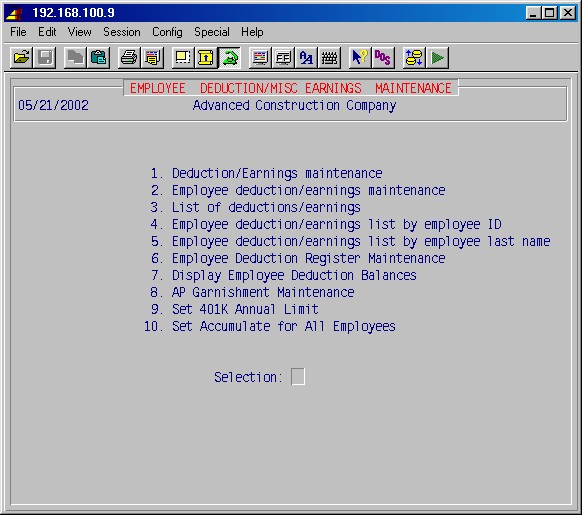
This procedure is used to build a list of all possible deductions used by employees. Not every deduction will be used by every employee. This area is also used to make entries for miscellaneous non-taxed reimbursements such as tolls and phone calls.
This selection will display the following input screen :
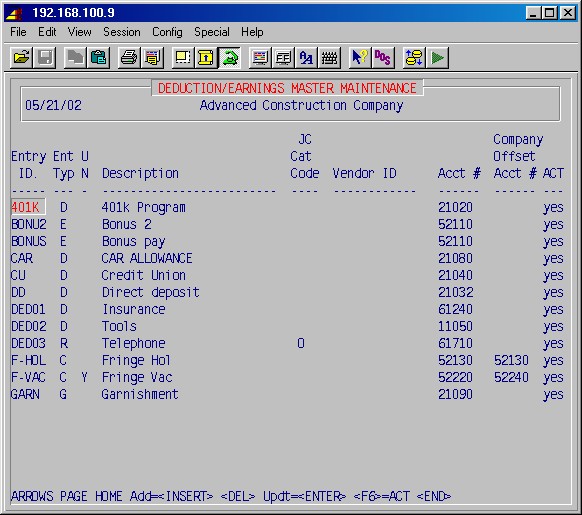
TopAdd new deductions as needed.
Deduct ID
Type the ID (up to 5 letters or numbers) to be used for this deduction. While just numbers may be used, try to make the ID meaningful. For example:LOAN - for deductions made to repay a loan made to an employee
S125 - for deductions made under the S125 plan of the IRS (cafeteria plan)
INS - for deductions made for insurance plans
UNIF - for deductions made for uniform services
REIMB - for reimbursements to be made to employees for expenses paid by them
CU - should be used for credit union
401K - 401K plan deductionsNOTE: Deduction IDs for 401K or S125 MUST begin with the letters 401K or S125.
You can make entries in the tax tables (5-7-1) for variations you may wish to use
(For example: you may wish to designate S125A, S125B, etc.). 401K loans must NOT begin 401K. An example: L401K would be acceptable as a 401K loan ID.Deduction type
(C)=CMPY OVH Company overhead accrual (used for JC and GL only) (D)=DED Normal deductions (E)=EARN Miscellaneous earnings added to gross for W2s (R)=REIMB Reimbursement for employee expenses added to net pay, not on W2s (G)=GARNISH Garnishments and/or tax levies maintained in the garnishment processing U N
Answer Y only for those types of deductions which are loaded by the union calculations.Description
Type a short description of this deduction or reimbursement.NOTE: In the case of a 401K or a S125 plan, or any similar pre-tax benefit plans, setup in the tax tables may be required.
Cat code (Used only for reimbursements)
Specify the job cost category for this deduction if it is not labor and leave blank for labor.NOTE: These are examples. These may not be the names used on your system.
M =
Material O = Other N/C = Consumables B = Burden/Fringe E = Equip. Rental H = Overhead S = Subcontract Vendor ID (Not used at present)
Acct # (CREDIT)
Specify the general ledger account to credit with this deduction (or debit as in the case of miscellaneous non-taxed reimbursements such as tolls and phone calls).Company offset account # (DEBIT)
Used only for accruing company fringe or overhead, not deducted from employee. This fringe or overhead IS charged to the jobs on which the employee worked on a proportionate basis.ACT
Specify Yes if the deduction is currently to be used (Active), or No to disable the deduction for all employees.Use the END function to exit this procedure.
This procedure is used to designate the individual employees' deductions for the frequency, and the amounts to deduct. You may set the frequency and amounts either for the employee master file which will affect all future payrolls, or specify a payroll batch, which will affect that batch only.
CAUTION: If you change any deduction in a specified batch after step 5-10: Process Payroll has been run, you must run step 5-10 again.
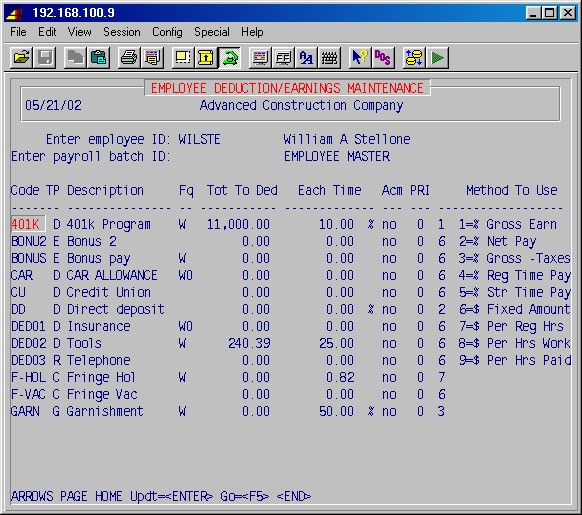
Employee ID
Type the employee ID [H] for which you wish to input or update employee deductions. If the employee ID entered is valid, the system will display the employee's name and all available deductions and reimbursements.Payroll Batch ID
Leave this blank if you want to adjust the employee master records, or specify a payroll batch if you want to adjust deductions for the specified batch only.Code
TP
Description
These fields will be filled in automatically from the list of all possible deductions you entered in 5-3-1 Deduction Maintenance.Select the function needed to change this list as required.
Frequency
The frequency indicates how often this item should be deducted from the employee's check. The choices are:W0 = One time only; the next pay check
W1 = 1st pay period of the month
W2 = 2nd pay period of the month
W3 = 3rd pay period of the month
W4 = 4th pay period of the month
W5 = 5th pay period of the month
W = Every pay check
BM = 1st and 3rd pay period of the month
BW = 2nd and 4th pay period of the month
M = Monthly on the first week of the month or the first week the employee works in the month.
If ACM (see below) is yes, missed deductions are automatically caught up.
Tot to deduct
This is filled in automatically from the information entered in 5-3-6: Employee Deduction Register Maintenance. The specified "Amt each time" will be deducted each week until this total to deduct is reached.NOTE: This field, "Tot to deduct" is a total only for the current year, and therefore is adjusted by the system as part of year end.
Each time
Type the flat amount to be deducted per check, or percentage to deduct.
Note: for garnishments for child support and alimony, always specify 50. For Federal Tax levies, always specify 100.ACM
If answered YES, will accumulate missed deductions for employees not paid, to be deducted from their next paycheck. Caution: If the master deduction for an employee is changed, then the changed amount will be what accumulates. Generally, make temporary changes for an employee's deduction during time entry.PRI
Priority, if the employee earnings are not enough for all deductions. Low priority deductions are removed in whole or in part until a zero net check is obtained.
0 = always; 1 = top priority; 99 = low priority (discards deductions with highest numbers first).Method to Use
Specify by number from the list, the method or formula to use for this deduction. For all garnishments, always use method 3.
This procedure will print a report listing all possible deductions as
entered in 5-3-1: Deduction Maintenance.
Selecting this procedure will display the printer selection screen. Type
the printer number and the number of copies and press ENTER. Your
report will be printed and you will return to the 5-3 Miscellaneous
Pay and Deductions Menu. Press ENTER again to return to the payroll
system main menu.
This procedure will print a report, by employee ID, listing all deductions designated for any specified employee, or all employees as entered in 5-3-2: Employee Deduction Maintenance.
Selecting this procedure will display the printer selection screen. Type the printer number and the number of copies and press ENTER.
Next you will be prompted:
Employee ID to print or just <ENTER> for all __________
Deduction to list <ENTER> for all ____________
Specify a particular employee ID and press ENTER to print a report for that one employee, or just press ENTER to print a report of all employees. Your report will be printed and you will return to the 5-3 Miscellaneous Pay and Deductions Menu. Press ENTER again to return to the payroll system main menu.
This procedure will print a report, alphabetically by employee last name, listing all deductions designated for any specified employee, or all employees as entered in 5-3-2: Employee Deduction Maintenance.
This selection functions just like 5-3-4 above.
This procedure provides a register that allows you to input the dollar amount due for various employee purchases or loans related to certain employee deductions. The total of these transactions sets the total to deduct for the selected deduction. This function works in conjunction with 5-3-2 Employee Deduction Maintenance, where you input the amount and frequency to be deducted.
This selection will first prompt:
Print deduction register: NO
If you wish to just print the deduction register, answer YES. You may print a report for a specified employee or a range of employees, and a specified deduction ID or range of deductions.
If you want to update the deduction register, answer NO. This will prompt for Employee ID and Deduction ID:
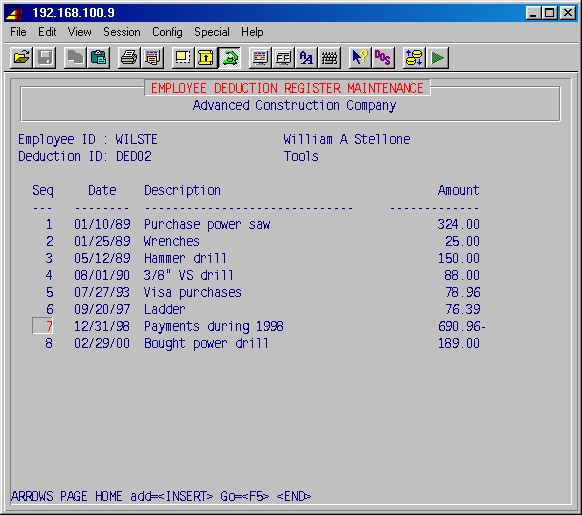
Employee ID
Type the employee ID and press ENTER. If the ID typed was a valid ID, the system will display the full name of the employee.
Deduction ID
Type the deduction ID of the deduction category for which you wish to register a total amount to be deducted over one or more pay periods.
Date
Type the date of the transaction which now requires a deduction.
Description
Type a description which will identify this transaction for your records.
Amount
Type the total amount to be collected and press ENTER.
At this point, check your entries to see that they are accurate. If not, use the update function and make the changes. When you are through, press END and you will be transferred to the 5-3-2 Employee Deduction Maintenance screen for this employee.
Changes to the "total to deduct" in this register will update the employee master records and this employee's information in all batches in progress.
Notice that the amount you entered in the deduction register is now part of the "total to deduct" field of the specified deduction ID. Go to that deduction ID using the arrow keys, then press ENTER and type in the frequency and the amount each time.
Then, press END and you will return to 5-3-6: Employee Deduction Register Maintenance. You may now type another employee ID and input another deduction, or simply press ENTER to return to the 5-3: Miscellaneous Pay and Deductions Menu. Press ENTER again and you will return to the payroll system main menu.
This selection displays the employee deductions that were set up in 5-3-2: Employee Deduction Maintenance, showing the total to deduct, the total deducted, and the balance left to be deducted. This selection allows viewing only with no update.
This selection will display the following screen :
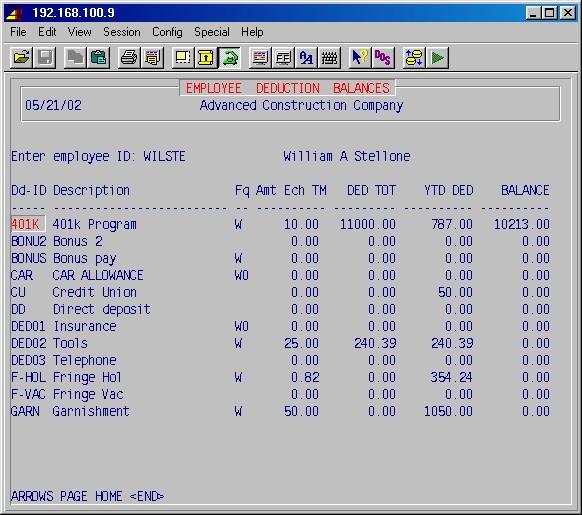
Enter the employee ID
Type the employee ID and press ENTER. If this is a valid employee ID, the system will display the employee's name and deductions.If you want to view another employee's deduction balances, press END and the system will prompt for another employee ID.
When you are ready to exit, press ENTER and the system will return to the 5-3: Miscellaneous Pay and Deductions Menu.
This is a set up area for a feature of the payroll system which will print AP checks for garnishments. In this procedure, you specify the AP vendor, the GL number, and the check stub information for each garnishment for each employee.
Prior to this step it is necessary to set up one or more deduction ID's for garnishments (Example: GARN1, GARN2, GARN3), set up the vendor to pay in AP Vendor Maintenance, and possibly set up a GL liability account number for garnishments. Since it is possible for an employee to have more than one garnishment, you need a garnishment ID for the number of garnishments possible per employee. The amounts to be deducted are set through 5-3-2: Employee Deduction Maintenance, and the actual processing of the AP garnishment checks is done through 5-17-15: AP Garnishment Processing.
This selection will display the following input screen :
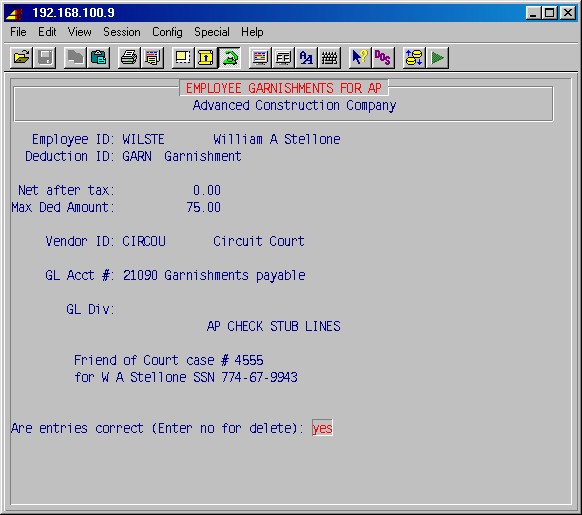
Employee ID:
Specify the employee ID [H]. If this is a valid ID, the system will display the employee's name.
Deduction ID:
Specify the deduction ID [H] for this garnishment. If this is a valid deduction ID, the system will display the deduction description. If there are no entries for this employee for this deduction ID, the system will prompt:No entry found ADD: YES
Press just ENTER to continue.
Net after tax:
Minimum net pay amount after taxes (Used only for Federal tax levies - type 3 calculation method only)
Max Ded Amount:
Maximum garnishment deduction amount (Child support and alimony type 3 calculation method only)
Vendor ID
Specify the vendor ID [H] for the payee of this garnishment.
GL acct #
Specify the GL account number [H] for garnishments. This is generally a liability account (example: garnishments payable) and should be the same account number that was entered when the deduction was set up.
GL Div
If the GL account was divisionalized, specify the division here.
AP check stub lines
Three lines are provided to enter the description for the check stub in accordance with the requirements of the payee.Are entries correct (enter no for delete): YES
If the entries are correct, press just ENTER and this record will be created and you will be prompted for another employee ID.
You may delete this record or make corrections by pressing NO ENTER. The system will prompt:
Delete record (YES/NO): NO
Press just ENTER and you will be prompted for the employee ID. Enter the same employee and the deduction ID and the previous information will be displayed for you to revise if necessary. If you answer YES ENTER this entry will be deleted from the system.
When you are ready to exit, press ENTER again. The system will prompt:
Print List of Garnishments (YES/NO): NO
Answer YES to print a list or just press ENTER to exit this
area.
If answer Yes, the printer sleection screen will be displayed.
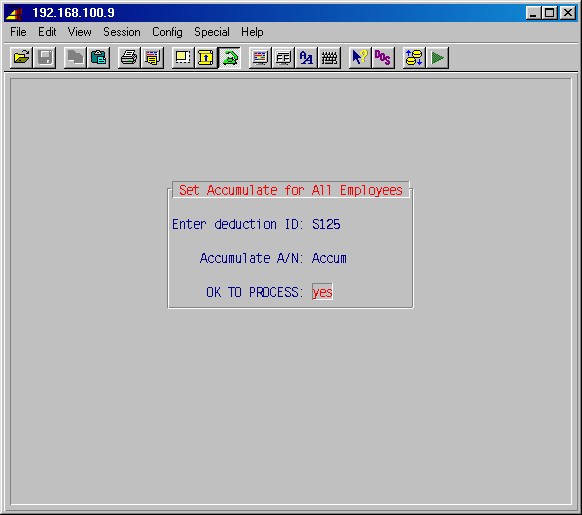
This procedure allows setting, for all employees at once, the total to deduct for the selected deduction. This is usually run once a year at the beginning of the year. This procedure will erase the existing total (e.g. yearly limit) for the selected deduction ID for all employees, and set the new amount entered for all employees as of the date entered.
For example: A maximum of $9400 may be deducted on a 401k plan, starting from the first of the year. Later in the year, after a total of $9400 has been deducted for an employee, no more money will be deducted for 401k for that employee. This step should be run at the beginning of the year, before any employee has reached the limit.
This selection will display the following input screen:
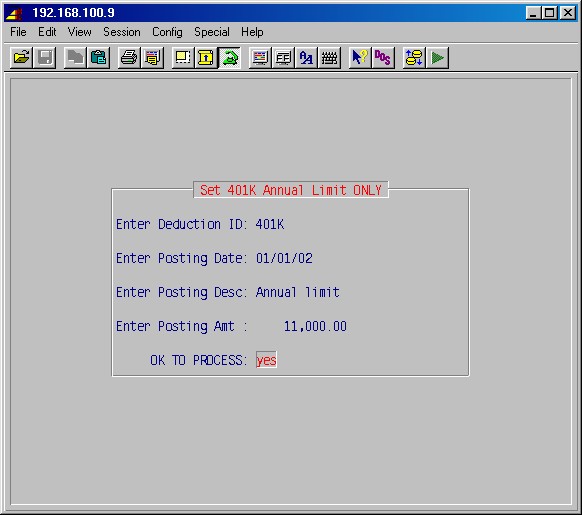
Top
Enter deduction ID:
Specify the deduction ID.Enter posting date:
Specify the date as a notation of when this limit was entered.Enter posting description:
Type your description for this deduction.Enter posting amount:
Specify the total to be deducted.Ok to process: no
This allows you to exit without the changes. Answer YES to finalize the entries and exit this area.
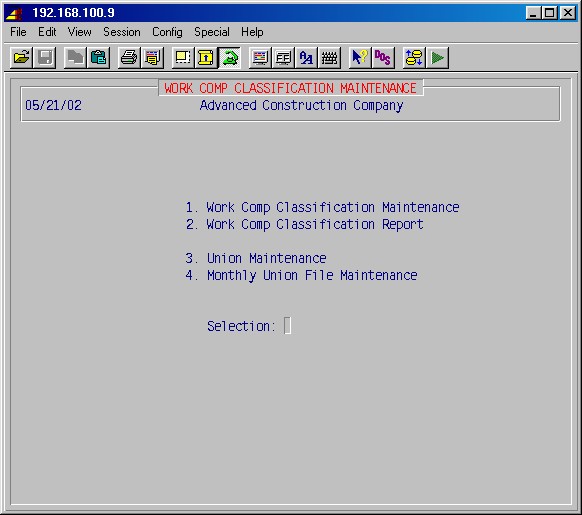
These procedures are used to set up and modify the various classifications for workman's compensation and union information files and pay scales. This selection will display the following menu:
Classifications needed for employees must be entered in the list here first. There must be entries for each work comp class for each state in which the employee works. With each workmen's comp class, a labor burden percentage for that class may also be entered. This percentage is used to help appropriately reflect real labor cost in the job cost system, above the FUTA, SUTA, Work Comp, FICA and Union.
This selection will display the following input screen :
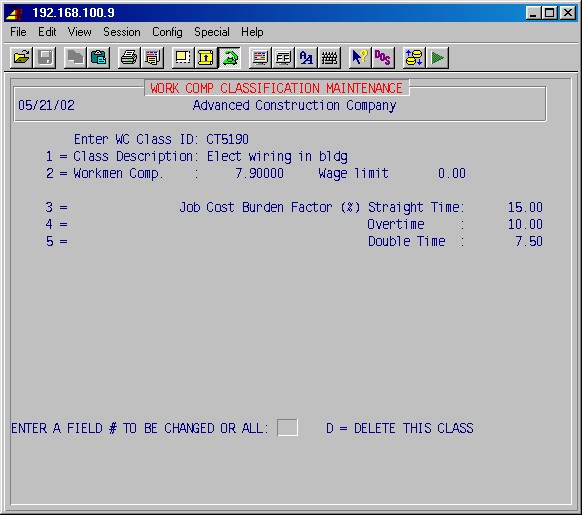
Enter WC class ID:
Specify an identification code consisting of the two letter state code + the four character work comp class code to designate the workman's compensation classification ID + an optional 5th character for work class extension.
1 = Class description
Type a short description of this classification.
2 = Workmen comp:
Enter the workmen's comp rate for this group of employees (e.g. 7.90 for $7.90/$100 wages).NOTE: Fields 3 through 5 are optional, but may be used alone or in combination as the specific situation requires. This information is used in charging overhead and other costs above SUTA, FUTA, FICA, and Work Comp to jobs. The labor is "burdened" with these other costs.
3, 4, 5 = Job cost burden factor
Type the labor burden percentage for these employees, (e.g. 18.6 for an 18.6% burden), for each category of hours. The earned pay for the employees in this class will be multiplied by this factor; the result will show on the job cost reports as additional job cost burden as well as post to General Ledger.
This procedure will print a report, by work comp class IDs, which will list all of the items entered in 5-4-1: Work Comp Classification Maintenance.
Selecting this procedure will display the printer selection screen. Type the printer number and the number of copies and press ENTER. Your report will now be printed and you will return to the 5-4: Class & Union Information Menu.
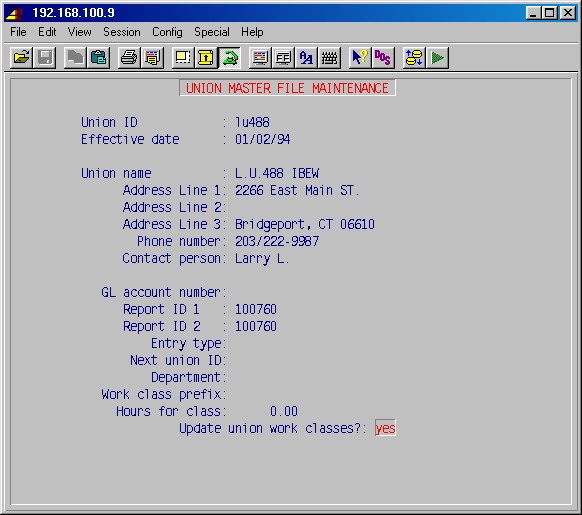
The procedures in this area will allow you to input union information and pay rates and print reports of that information.
This selection will display the following menu screen:
To do maintenance on a union in the list, use the arrow keys to highlight the union and press ENTER. If you wish to enter a new union, press <INS>. The following entry screen will be displayed:
Union ID:
If you are adding a new union, specify an identification code of up to seven letters or numbers to designate the union. If you specify an existing union, the system will assume you are trying to record the contract with this local with a different effective date. If you do start a new effective date in this manner, all the contributions and work classes will be copied from the prior effective date.Union name, address, phone, contact person:
These fields are self-explanatory. Type this information as you want it to appear on reports.G.L. Account number:
Leave blank or enter the appropriate GL account number for this union if different from the department setup.Report ID 1:
Report ID 2:
Employer identification numbers to print on the union reports.The following five fields may be used in a "master union" configuration to allow the system to automatically choose an appropriate set of benefits for various sets of circumstances. You must set up a sub-union for each set of conditions which may occur and "chain" these sub-unions together using the "next union ID" field. The system will search through the sub-unions until it finds a matching set of conditions and use that benefit package. If it reaches the end and hasn't found a match, it will use the last one.
Entry type:
This is either blank or M. Entering an M here designates a "master union". If you have a master union, you may have several sub-unions, but you must have at least one sub-union. If you designate this union as the master union, this is the union ID the employees are listed as belonging to, but all benefits will be calculated from the sub-union(s).If you enter M here and designate this as a master union, you must also complete the field "next union ID". This field is used in conjunction with a master union, and signifies the first sub-union to look at for a matching set of conditions.
For example: A member of a union may have a different benefit package for his work class depending on whether he works in the shop or the field.
Next union ID: (Only on master unions and sub-unions)
Specify the sub-union here for the first sub-union to search for a matching set of conditions.Department: (Only on sub-unions)
Specify the department here for the benefit package that matches this department.Work class prefix: (Only on sub-unions)
Specify the work class prefix. This is usually an "A" for apprentice. This is used in conjunction with the number of "hours in class" entered in the next field.Another reason to use the master/sub-union configuration is the following example:
For example: An apprentice in one class may be qualified for the next level of benefits based on the number of hours he has worked in that class, prior to having passed his exam for the next class. Additionally he may be eligible for different levels of benefits based on both the number of hours he has worked in a class and the department where he is working.
Hours for class: (Only on sub-unions)
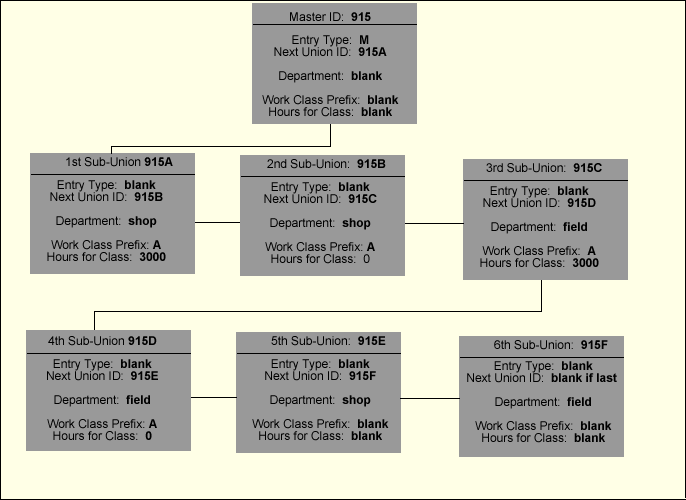
Enter the number of hours in this class. The sub-union with the highest number of hours, should be the first "next union ID" used on the "master union" and the sub-union with the lowest number of hours should be later in the chain.Example of a Master/Sub-Union Configuration
Sub-unions should be numbered as the conditions progress from the most specific to the most general. The system will go down the chain of sub-unions until it finds a set of conditions that match an employee and a time entry.
Employees working in local 915 have different benefit packages depending on whether they work in the shop or in the field. In addition, apprentices with more than 3000 hours in their work class qualify for different benefits from those available for apprentices with less than 3000 hours in a class.
Joe is an apprentice with 2500 hours in his class who works in the shop. His union benefits/contributions will calculate using sub-union 915B.
Fred is an apprentice who has more than 3000 hours in his class (he hasn't finished the tests yet) who works in the field. His benefits/contributions will calculate using sub-union 915C.
Sarah is a journeyman who works in the field. Her benefits/contributions will calculate using sub-union 915F.
When all entries have been make and corrected if necessary, press ENTER, and you will be prompted to update union work classes. If you answer YES, the following screen will be displayed:
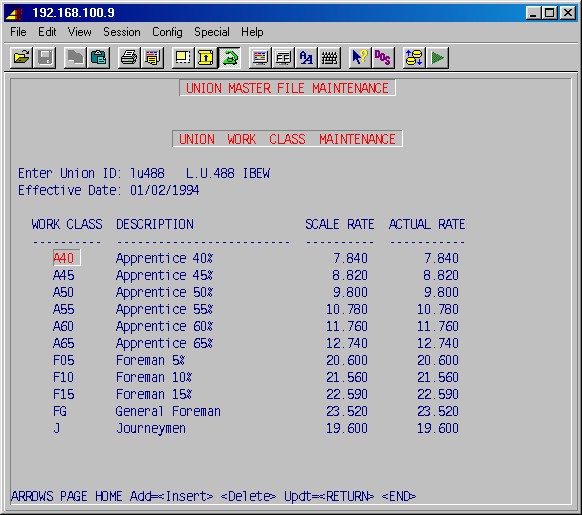
You may use this entry area to add union work classes and rates as needed to match your union agreement.
Work Class
Type a work class designation of your choosing of one to four letters or numbers. Note that the system will group these work classes by the first letter. It is important to have the same number of characters in use for each type of class. For example, to set up several journeymen, J1, JA, JB, J2, etc. are fine. J, JA, J1 are not correct since the first entry J has one character, JA and J1 have two characters. Examples of commonly used first letter designations are listed below:Work Class Prefix
F = Foreman
J = Journeyman
A = Apprentice
N = Non bargaining
P = Pusher (lead off mechanic)
O = Operator
G = General foreman
C = Clerical
E = Expeditor
S = EstimatorDescription
Type a short description for this work class.Scale rate
Type the union scale rate for this work class.Actual rate
Type the actual rate of pay for this work class. (This is mandatory)When all work classes are entered, press END to exit. The next screen allows you to set up union contributions.
NOTE: Before you set up union contributions, you must first set up the union work classes.
These procedures allow you to input for each union, the various union benefits, the contributor (company or employee), the method of calculation, and the contribution multiplier for each work class by shift.
This selection will display the following input screen :

TopEnter the Union ID:
Type the union ID and press ENTER. If this is a valid ID, the system will display the full name of the union.Line Description
Type a short description (up to 22 spaces) of the contribution.Paid by
Specify whether the contribution is paid by the employee or the employer.
EE = Employee ER = Company/EmployerDed ID
Specify the deduction ID from the miscellaneous pay and deductions area to accumulate this union deduction. Mandatory for EE (employee paid contribution).Earnings ID
Specify the deduction ID from the miscellaneous pay and deductions area to accumulate this union benefit. Optional, normally used only for ER (employer paid contribution). If this is a non-taxable benefit, then enter this deduction in the tax tables.PRT CK (Not Used)
PR MD
Primary union calculation Method: Specify the method by which the contribution is calculated from the 13 choices shown on the right side of the screen. The formulas for these 13 methods are detailed below:Calculation Method Summary
1 = % Gross Earnings
Regular hours x rate
+ Overtime hours x 1.5 x rate
+ Doubletime hours x 2 x rate
= Gross Earnings2 = % Gross Pay
Gross earnings + vacation = Gross Pay3 = % Regular Time Pay
Regular hours x rate = Regular Time Pay4 = % Straight Time Pay
(Regular hours + overtime + double time) x rate = Straight Time Pay5 = % Straight Time + Vacation
(Straight time pay) + (straight time pay x vacation factor) =
Straight time + Vacation6 = $ Per regular hours 7 = $ Per Hours Worked
Regular hours + overtime hours + doubletime hours = Hours Worked
(clock hours)8 = $ Per Hours Paid
Regular Hours + (overtime hours x 1.5) + (doubletime hours x 2) actually paid9 = % Gross Earnings + Travel
Gross earnings + travelNOTE: Travel is the compensation entered on the time entry line in 5-8 designated as type T.
10 = % Gross Pay + Travel
Gross earnings + vacation + travel11 = $ Weekly
Flat dollar amount per week (amount specified by the multiplier on the next screen).12 = $ Monthly
Flat dollar amount per month (amount specified by the multiplier on the next screen).13 = Gross - C1
Gross earnings - contribution 1MAN SEC
Mandatory Secondary union: If employees from a different union works in this union and need to pay partial benefits to this union, set this to Yes, and all deductions/benefits for the home union plus the one specified here will be calculated.SC MD
Specify the Calculation Method (as described above under PR MD) to be used for the secondary union.The system will number the contributions as they are entered. Select the contribution and press F7 to input multipliers.
NOTE: When the contributions are first set up, it is necessary to type each line number (one-at-a-time) and complete the next screen. Later, if you are simply adding a contribution, or making a change, you will select just that one and fill in the next screen.
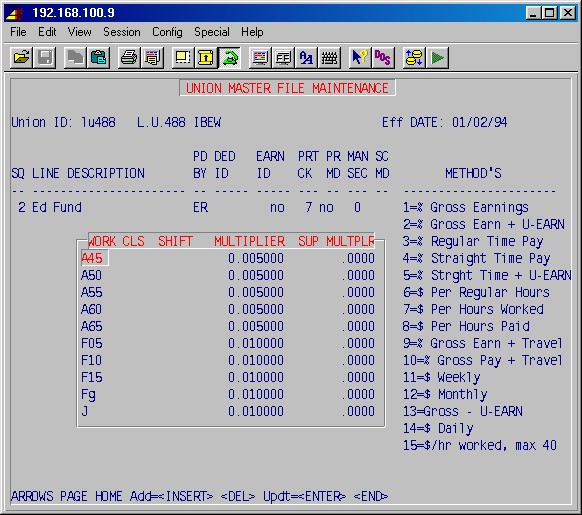
Work class
Type the work class from the list that was entered in union work class maintenance. Type ALL if the contribution is the same for all employees.Using the first letter for a group of work classes if they all have the same multiplier:
A would specify the multiplier for all Apprentices, J for all journeymen. Do not specify the first letter and the complete work class in the same group: A and A50.Shift
Type the shift code from the list below:
- All Shifts - First Shift - Second Shift - Third Shift Multiplier
Type the multiplier for this contribution based on the method specified on the previous screen.Sup Multplr:
This is for the second union, if dues are split between two unions. Type the multiplier for this contribution based on the calculation method specified on the previous screen.It is necessary to define a record for each work class and shift if they are different. When all records have been entered, press END and you will be returned to the previous screen with the prompt:
ENTER THE LINE NUMBER FOR ENTERING WORK CLASSES, ET AL ___
Type number 2, and repeat the process until all contributions have been defined. When you are finished press ENTER and you will be prompted for another union ID.
Update Weekly & Monthly Report Fields?: YES
Press ENTER to Update Seven Column Report Fields
This procedure allows you to input, for each union, the various work
classes, scale rate, actual rate, and the vacation factor. This procedure
is available through 5-4-3-1: Union Maintenance
where you may choose the Union and effective date from an F2 list.
See 5-4-3-1 for detailed instructions.
Enter Union ID:
Type the union ID and press ENTER.Effective Date:
This is the contract effective date. Note that there may be more than one entry for each union with different dates and it is necessary to specify both the Union ID and the effective date to specify a particular Union contract.If this is a valid Union ID and Effective date, the system will display the full name of the union and the following screen:
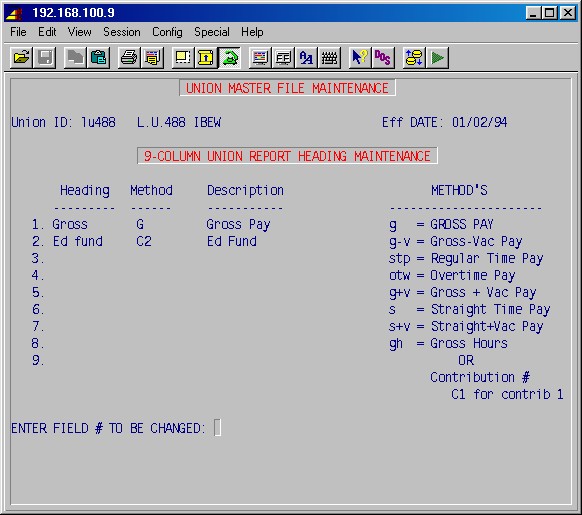
This procedure provides the means to specify a user-defined report used for reporting monthly totals to the union. The report may have up to seven user-defined headings. After entering a valid union ID and effective date, this selection will display the following input screen :
TopEnter the Union ID:
Type the union ID for which you wish to specify the headings for the monthly union report.The next seven fields define the report headings and the method by which you wish to extract union information from the database and display it on the report. The headings will be positioned from left to right on the report.
Heading
Type the heading name exactly as you want it to appear on the report (up to 9 letters or numbers).Method
Specify the method designation from the list below:
g = Gross Pay stp = Regular Time Pay otw = Overtime Wages g-v = Gross Pay - Vacation Pay g+v = Gross Pay + Vacation Pay s = Straight Time Pay s-v = Straght Time Pay - Vacation Pay s+v = Straight Time Pay + Vacation Pay gh = Regular Time Hours + OT Hours * 1.5 + DT Hours * 2 c1 = Union Contribution 1 c2 = Union Contribution 2 NOTE: Union contributions were entered and numbered in 4-3-2: Union Contribution Maintenance. These are user-defined and may range from contribution 1 through contribution 99 (c1 - c99).
Description
The system will fill in the description from the description you entered in 4-3-2: Union Contribution Maintenance.You may make changes or corrections by typing in the field number to be changed and pressing ENTER. When you are finished press ENTER and you will exit this procedure and return to the union maintenance menu.
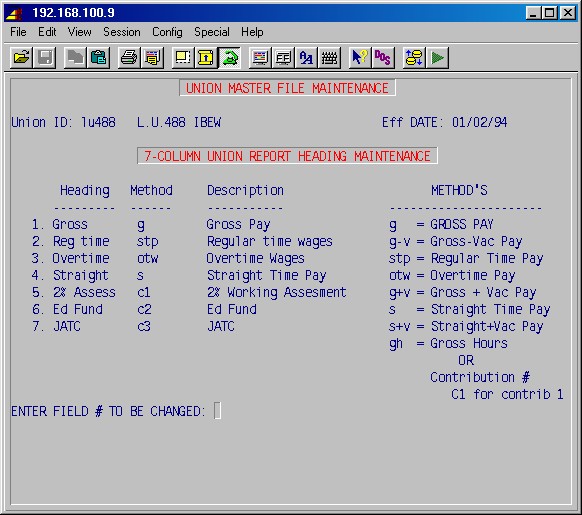
This procedure provides the means to specify a user-defined report used for reporting weekly totals to the union. The report may have up to nine user-defined headings.
This selection will display an input screen similar to the one in 5-4-3-4: Report Heading Maintenance Monthly, except there are nine fields to specify.
Refer to the instructions in 5-4-3-4: Report Heading Maintenance Monthly to complete this selection.
TopEnter beginning union ID:
Enter ending union ID:
Specify one or a range of union IDs for this report.The printer selection screen will now be displayed. Type the printer number and the number of copies and press ENTER. Your report will be printed and you will return to the union maintenance menu. Press ENTER again to return to the 5-4: Class & Union Information Menu.
Not operable as of this writing.
This will allow you to change the pay rate, shift, and payroll week of the monthly union contribution for a selected employee, union, and work class. It also allows change to a specific payroll union contribution (for a secondary, voided, or manual check).
Not in use at this time.
This area will be used to calculate the union contribution entered in
5-4-4 above.
Departments are set up in payroll to allow grouping employees for accounting purposes. Subtotals are shown for each department, and each department's subtotals may be posted to its own group of ledger accounts.
The following procedures allow adding, modifying, viewing and deleting department
information.
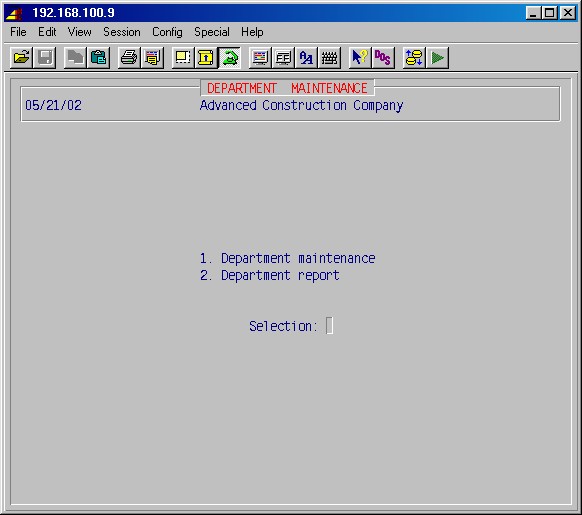
This selection will display the following menu screen:
In this procedure you may add new departments or update existing departments. This selection will display the following input screen :
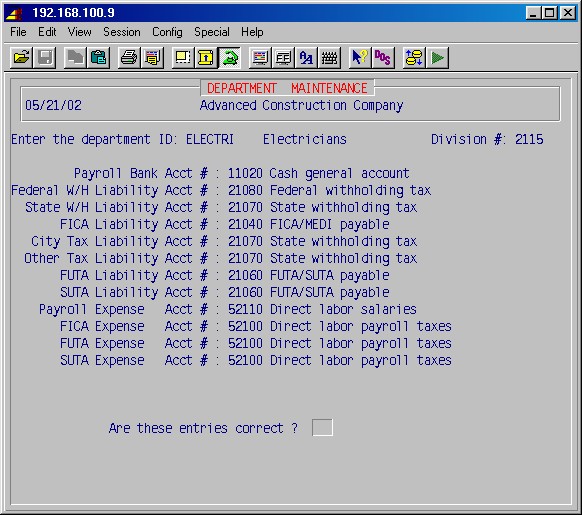
Enter the Department ID
If you are adding a new department, first call up an existing similar department. This will fill in all the account numbers from the existing department, requiring only changes to the new department. Type a descriptive department ID (a minimum of three characters is recommended to a maximum of seven letters or numbers) and press ENTER. Next, type a description for this department ID which will be printed on reports and press ENTER. A list of accounts will be displayed on the left side of the screen, for which you must specify the general ledger account for this department of employees.If you are viewing or modifying an existing department, type the department ID [H] and press ENTER. If this is a valid department, the system will display the name of the department and display a list of accounts on the left side of the screen, for which you must specify the general ledger account for this department of employees.
The following fields relate to your general ledger account numbers. For employees in this department, it is these accounts that will be credited and debited when payroll interacts with the general ledger. For each account displayed, specify the general ledger account number [H] appropriate for this department of employees, pressing ENTER after each. You must type a GL number for each account.
Payroll Bank Acct #:
The account from which pay checks will be drawn. (credit)Federal W/H Liability Acct #:
State W/H Liability Acct #:
FICA Liability Acct #:
City Tax Liability Acct #:
Other Tax Liability Acct#
FUTA Liability Acct #:
SUTA Liability Acct #:
The above accounts will be credited from payroll as appropriate. Each of the above fields must have a valid general ledger account number. If you do not have a city income tax or a state income tax, then use the federal liability account number.Payroll Expense Acct #:
FICA Expense Acct #:
FUTA Expense Acct #:
SUTA Expense Acct #:
The above accounts will be debited from payroll as appropriate. Each of the above fields must have a valid general ledger account number. If you do not have union expenses, then use the payroll expense account number.Are these entries correct ? ___
When all GL numbers have been entered, you will see this prompt. If correct, just press ENTER and the next screen will be displayed.
Type NO ENTER to make changes or corrections. When all entries are correct, type YES ENTER and another screen will be displayed with more accounts for which you must input general ledger numbers as follows:
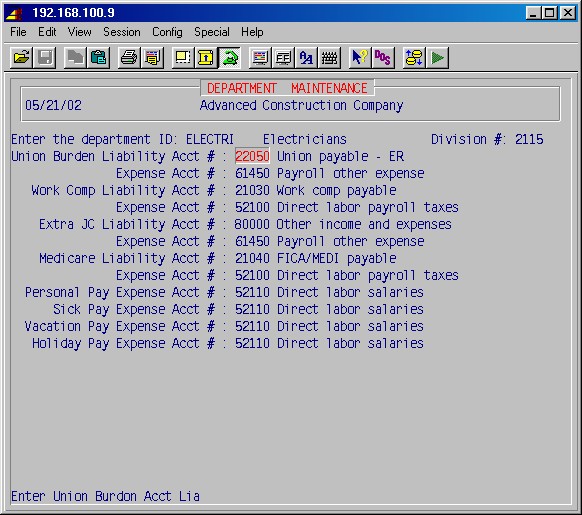
Continue specifying the general ledger account numbers [H] appropriate for this department of employees.
Division #:
If your company is divisionalized, type the division number here for this department.Are these entries correct ? ___
When all GL numbers have been entered, you will see this prompt. If correct, just press ENTER and you will be returned to the first screen and prompted for another department ID.
Type NO ENTER to make changes or corrections. When all entries are correct, type YES ENTER and you will be returned to the first screen and prompted for another department ID. Type ENTER again to return to the Department Maintenance Menu.
This procedure will print a report by department ID of all departments with the department description and the general ledger numbers entered for each account. Selecting this procedure will display the printer selection screen. Type the printer number and the number of copies and press ENTER. The report will be printed and you will return to the department maintenance menu. Press ENTER again to return to the payroll menu.
This procedure allows viewing department totals for the current payroll, year-to-date and quarters. This selection will display the following input screen :

During time entry, both a department and a division must be specified. This
reduces the number of departments that must be set up (we don't need a department
for every division). However, totals are collected for each department/division
combination.
Enter Department ID:
Type the department ID [H] and press ENTER. If the department ID is valid the system will display the department description.
Enter Division Num:
Type the division ID and press ENTER. If this is a valid division ID, the system will display the division description.
Enter Payroll Batch ID:
The system will specify the current batch ID you are working on. If you want to see the totals for that batch, just press ENTER. If you want to see the totals for another batch, enter that batch ID. If you want to see the department master, blank out the payroll batch ID and press ENTER.Please Select 1 of These Functions:
1 = CURRENT Displays current department totals 2 = Y.T.D. Displays year-to-date department totals 3 = 1st QTR Displays 1st quarter department totals 4 = 2nd QTR Displays 2nd quarter department totals 5 = 3rd QTR Displays 3rd quarter department totals 6 = 4th QTR Displays 4th quarter department totals Type the number which is appropriate for the totals you wish to see and press ENTER. The system will display totals for hours, earnings, taxes and deductions for the department as follows :
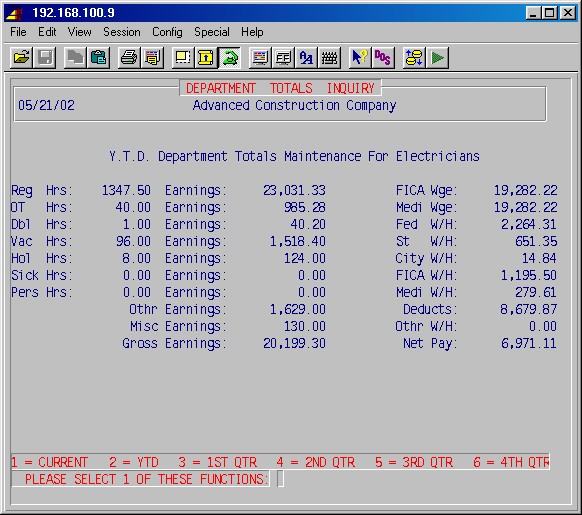
The system will display totals for hours, earnings, and deductions for the department.
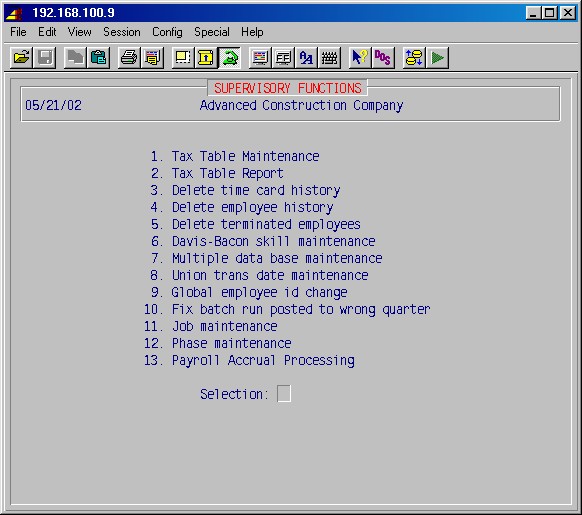
This menu contains selections to make corrections, delete data and change general setttings for the payroll module, and thus should only be used by personnel who are very familiar with the payroll module.
This selection will display the following menu screen:
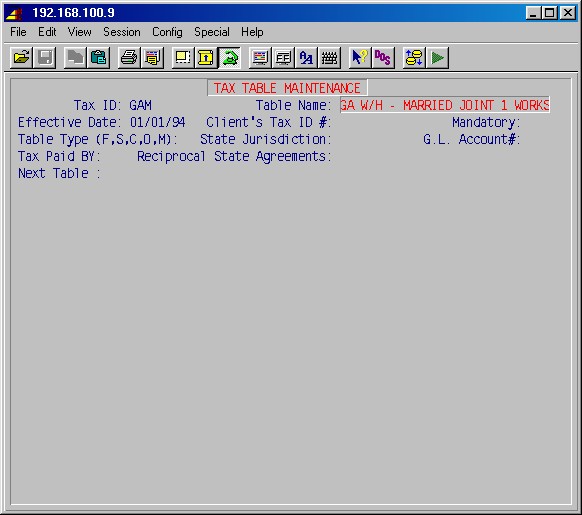
The payroll tax table procedures have been designed for completeness and ease of use. These procedures allow adding or changing the federal, state, or city tax tables without a programmer's assistance. The tax tables may be changed at any time and must be changed every time you receive new tax tables from federal, state, or city taxing authorities.
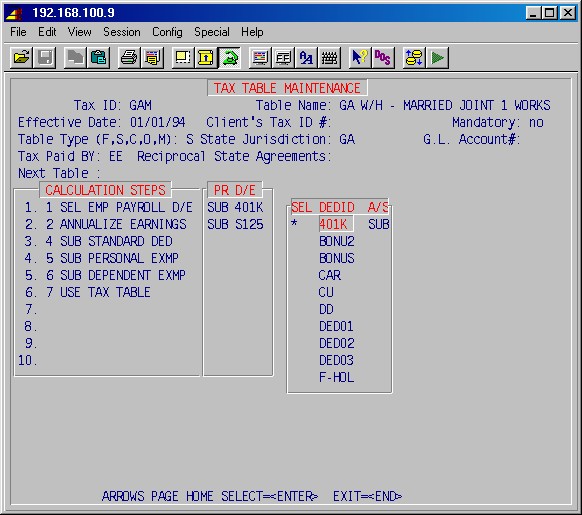
Note that the FDM (Federal married) is the master tax table from which the system pulls various information. In addition to federal married tax table information, the federal tax ID for all federal reports including W2s, magnetic media, and direct deposit, as well as the FUTA percent and limit are pulled from this table. It is essential that all information on this table be accurate.
NOTE: FICA and MEDICARE rates and amounts must be adjusted annually or any time you receive a circular E with new rates and limits. These are in the tax tables FICA and MEDI respectively.
This procedure allows adding or changing the federal, state, city, or local tax tables. Annual tax tables are provided for each state, city and county of the country, if needed. These are user maintainable from the circulars supplied by your tax authorities.
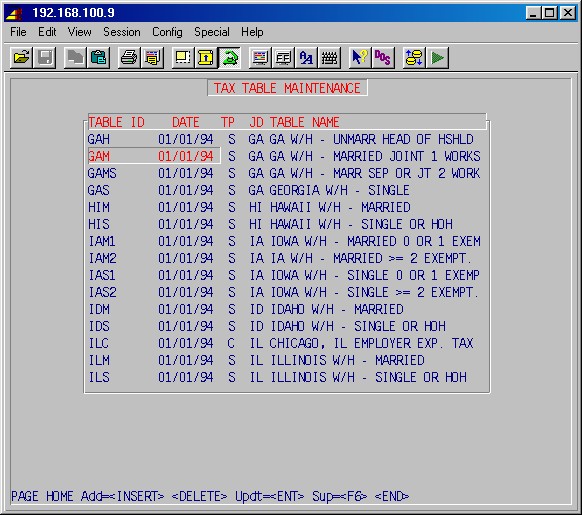
Table ID:
There are several reserved table IDs that the payroll system treats as special. These names CANNOT be used for state tax tables. The names are:
FDM - Federal Income Tax Witholding for Married Employees FDS - Federal Income Tax Witholding for Single Employees FICA - Federal Social Security Witholdings MEDI - Federal Medicare Witholdings SUTA - State Umemployment Tax Witholdings SUTANS - State Unemployment Tax - no S125 EIC - Federal Earned Income Credit The state tax table IDs start with the two letter U.S. Post Office abbreviation for the state followed by up to a three letter code that would identify the table as to what it contains.
Use the <ARROWS> and <PAGE> keys, or just type the two letter state abbreviation to reach the part of the list needed. Select from the displayed list the table to maintain.
The heading information is already supplied. DO NOT CHANGE THE EFFECTIVE DATE unless you want to create a new entry to replace the one supplied by SI Systems. Only your company's tax ID number needs to be entered. The ID must be entered on ALL THE TABLES relating to each state as well as FDM and FDS. Leave the G.L. Account# blank unless you want to specify an account to be used instead of the one specified in 5-5-1: Department Maintenance.

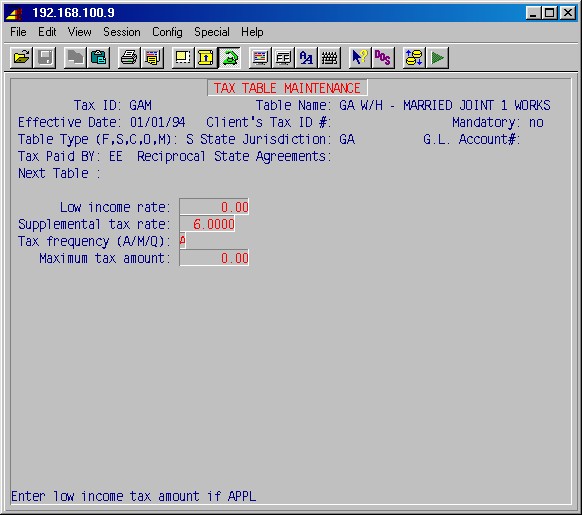
Answering YES to Change tax calculation methods displays this screen:

The tax calculation method (formula) is specified by selecting the functions from the displayed list in the order in which these functions should be applied. The tax calculation methods are already set up to match the specifications of the IRS, states, cities and localities - therefore consult SI Systems, Inc before changing them.
Change employee payroll deduction/earning: YES - displays a list of deduction IDs as shown below:
A deduction may either be added or subtracted form the gross pay before taxes are calculated. As shown in the sample above the 401K deduction is subtracted from the gross. If a deduction requires this characteristic, select the deduction and enter <A> for add or <S> for subtract.
NOTE: Unless you have selected the deduction ID and specified here if it is to be added or subtracted from gross, the deduction will not be handled correctly if used.
The payroll deductions which must be considered in the tax calculations MUST be matched by you to your company's corresponding deductions. Some examples are S125 cafeteria plans and 401K plans. Be sure to use the deduction IDs for your S125 and 401K deductions.

Based on the tax calculation method defined, entries for standard deductions, personal exemptions and dependent exemptions may be required. Follow the instructions found in the tax authority's circular.
You have the flexibility of specifying standard deduction, personal exemptions, and dependent exemptions information here, or you may enter that information in the tax table for each income range in the table if required. If you answer these questions YES (Use table for standard deduction: NO, etc.), then the information will come from the tax table entries as shown here.
The low income tax rate is not used at this time.The supplemental tax rate is used for special earnings such as bonuses (e.g. a time line of code M with a deduction ID of type E).
Essentially all tables will have a tax frequency of A for annual. An example of an exception is Denver's head tax which is calculated monthly.
Most tax tables will have no limit. An example of an exception is Denver's head tax, which has a monthly maximum.
If this is a federal table, an additional entry area for FUI will be visible as in the example below:
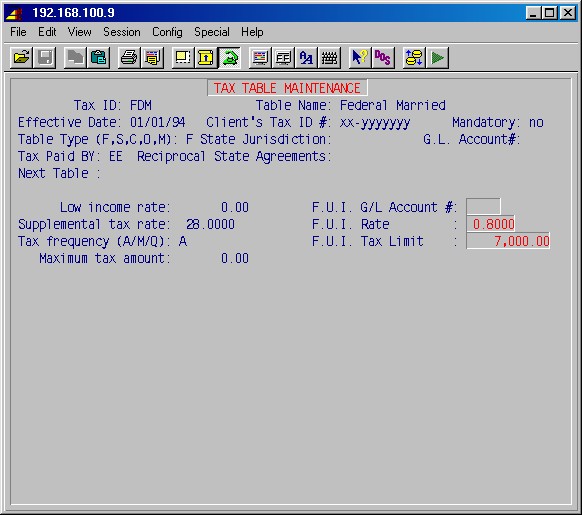
Here you may enter or update the federal unemployment insurance (FUI) GL liability account number (Not in use at this time), the rate, and the tax limit as required.
The next screen is the tax table entry area as shown in the following example:
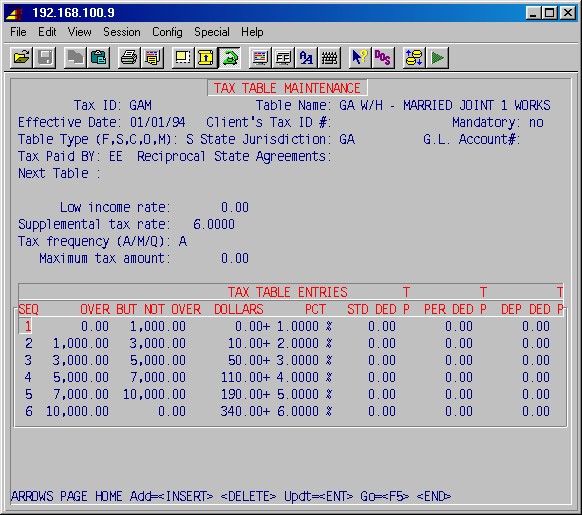
The tax table entries should follow the tax authority's circular for annual tax. Some states have standard deductions and personal deductions which vary with the tax table brackets. If needed, these deductions may be entered in the tax table on the same line as the bracket information.
The next entries are the tax table itself and control the annual tax amount to be computed from the annual taxable income. Each line is one tax bracket and has the following entries:
If the amount of wages is:
Over
The "lower" end of the tax bracket.But not over
The "upper" end of the tax bracket. (If nothing is entered, no limit, then this is the end of the tax table and must be the last line in the table.)The amount of tax to be withheld will be:
Dollars
This is the amount of tax to withhold for the lower end of this bracket.Plus percent
This is the percentage to apply to the taxable wages in excess of the lower end of this bracket.Caution, the last line of each table must have a zero for the "BUT NOT OVER" column, implying no limit.
If you answered YES to any of the questions above (in the tax tables: Use table for standard deduction: YES, etc.) you must enter that information here.
STD DED
This is the standard deduction expressed in dollars or a percent. After you enter the figure and press ENTER, specify in the next field a D for dollars or a P for percent.PER DED
This is the personal exemption deduction expressed in dollar or a percent. After you enter the figure and press ENTER, specify in the next field a D for dollars or a P for percent.DEP DED
This is the dependent exemption deduction expressed in dollar or a percent. After you enter the figure and press ENTER, specify in the next field a D for dollars or a P for percent.Last are supplemental tables for the tax authority, such as for SUI / SUTA - state unemployment:
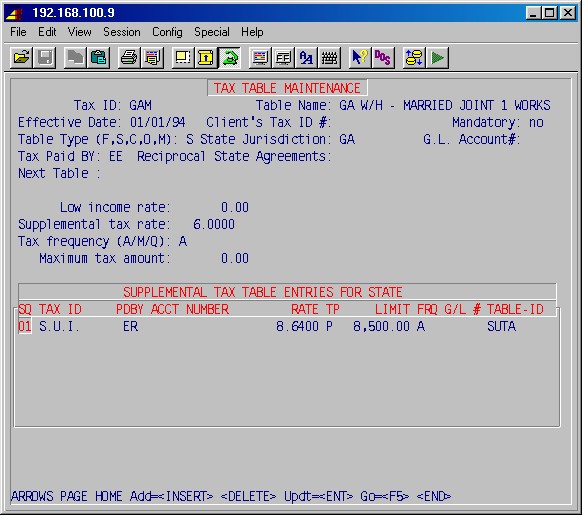
The tax ID for SUTA is S.U.I. for the tables supplied. Most SUTA is paid by ER: employer. Some states have both employee and employer paid SUTA, so two lines would be used.
NOTE: The rate for your company MUST be entered for each different tax table. The rates already in the table are the state maximum rates, not rates which include you company's experience factors.
Most states have an annual limit - A.
The GL account number, if filled in, is used instead of the one specified in 5-5-1: Department Maintenance. Normally leave blank.
The last column - Table ID - points to a master table for the calculating method, using the rate and limit from this table.
Two master tables are set up for S.U.I. - SUTA and SUTANS.
The SUTA method deducts S125 from the gross before calculating the tax.
The SUTANS method does not deduct S125 before calculating the tax.
To have an employee's taxes computed by a table you have entered, it is necessary to set the state ID in the employee's information to match the table ID to use. If there are no state taxes to be withheld then the state ID should be blank. It is not recommended to set up an empty table for a state that does not have income tax withholding as this takes time during the calculation run and will slow down the payroll calculations.
This procedure will print a report of a specified tax table or all tax tables showing all of the information entered in 5-7-1: Tax Table Maintenance above. Selecting this procedure will display the printer selection screen. Type the printer number and the number of copies and press ENTER. You will then be prompted:
Enter state ID to print or blank for all __
Specify the state you wish to print, or leave blank for all states, and press ENTER to print your reports.
The payroll system saves a complete copy of all time entries. This information is used by the system for a variety of reasons including work comp reports and payroll void checks. This procedure allows you to clean out these files through a date. It is recommended that you not delete information more current than eighteen months, at a minimum. Do not delete information to be used in printing the work comp reports until your work comp audit has been completed. Please check with SI Systems before you delete this information if you are not sure.
This procedure allows deleting pay history. Normally this would be done at the end of each year, although you should keep more than one year if you have the disk space.
If there is any possibility of needing the history you are about to delete, print the history for all employees before you run this step. We recommend keeping at least 18 months.
This selection will display the following input screen :
Enter the employee ID (* = ALL):
If you want to delete the history for just one or a few employees, you will need to enter the employees one-at-a-time and run this step for each. Type the first employee ID here and press ENTER, or type * ENTER for all employees.Delete through this check date:
Specify a valid date at least six months back.Begin deleting?
This is your last chance. If you are ready, type YES ENTER and the system will process this procedure and return to the history processing menu.
This procedure will delete all employees from your records which you have marked as terminated or layed off. Run this procedure just after W2's. Normally, keep employees at least 18 months after termination. This selection will prompt:
Type YES if you are ready to continue. The system will prompt:
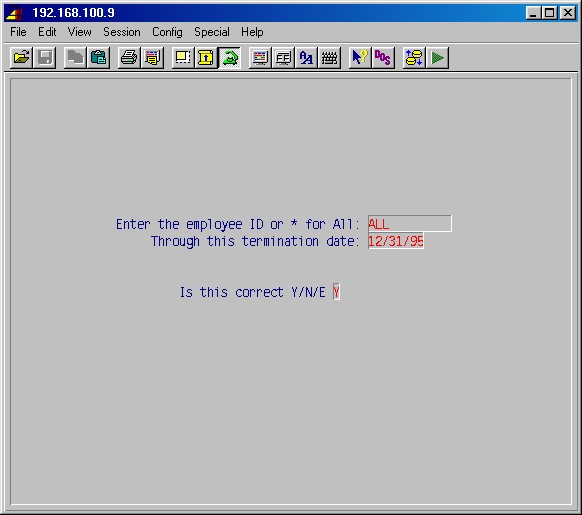
Enter the Employee ID or * for All:
If you want to delete one or a few terminated employees, type the employee ID here, and delete them one-at-a-time by running this procedure several times.If you want to delete all employees marked terminated or layed off, type * and press ENTER.
Through this termination date:
Specify a date through which to delete terminated employees. It is suggested that this date be at least 18 months ago.Is this correct?
Check you work and type YES ENTER to process this step.
This selection is used for maintaining Davis Bacon skill descriptions that print on the certified payroll report. Skill IDs must be entered here, then entered on the employee master setup screen (5-1-1, field #17) for the skill description to print on the certified report. As field #17 in 5-1-1 may not be left blank, at least one skill ID must be set up: NA for Not Applicable.
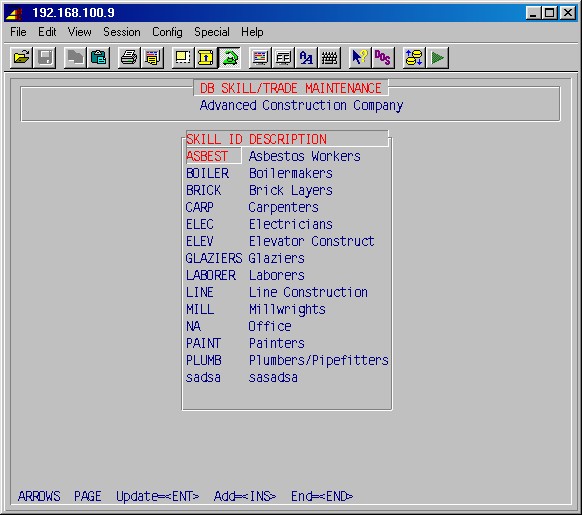
Use the ARROW, PAGE, HOME and ENTER keys to select and update a skill description.
Press INS to add a skill. Be careful when entering a new skill ID, as it can not be changed or deleted once entered.Press END when done.
This selection is used to set up names for other databases to be used when entering time lines in 5-8: Employee Time Entry when cost is to be posted to a job in another database (company). (GL journal entries will be created in the other company database as well as in this, si, database to reflect these postings.)

LOGICAL
Enter the name you wish to use for the database, (e.g. ab).
The default or "home" database is si (the one you're in now).FULL PATH NAME
Enter the actual location and physical name of the database (e.g. /uu/AB/ab).AR/AP
For the home database enter an Accounts Receivable GL account number; for another database enter an Accounts Payable payroll expense GL account number from that database.EXP GL
Leave blank for the home database; for another database enter the applicable payroll expense GL account number from that database.
This selection allows you to change the date of the entry for the union report. You'll first be prompted:
Enter Union ID:
Enter the ID [H] of the union.
Enter Employee ID:
Enter the ID [H] of the employee.Next the following screen will appear, showing all union transaction for the selected union and employee.
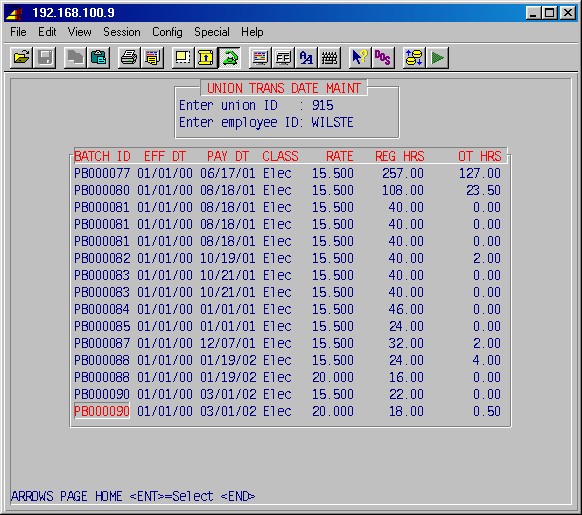
BATCH ID
This is the ID of the batch containing these dues, for payrolls in process.EFF DT
The effective date for this benefit package.PAY DT
Change the date for these dues to appear on the union report.Use the ARROW, PAGE and HOME keys to highlight the transaction you want to change, and press ENTER. Change the date and press ENTER.
Press END when done.
To exit this procedure leave the union and employee IDs blank.
Use this selection to change the ID of an employee throughout the database.
To exit this selection, leave the employee IDs blank and press ENTER.
Old Employee ID
Enter the current ID of the employee you wish to change.
New ID
Enter the new ID you want for this employee.
This selection is used to either correct a wrong check date, or move check postings from one quarter to another, or both. You'll be prompted:
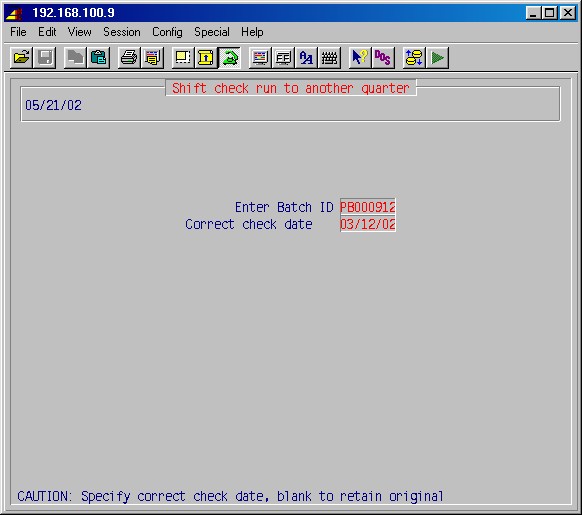
Enter Batch ID
Enter the ID of the payroll batch to be corrected, or leave plank to exit this procedure.
Correct Check Date
Enter the correct for the checks in the selected payroll batch, or leave blank to retain the original date.
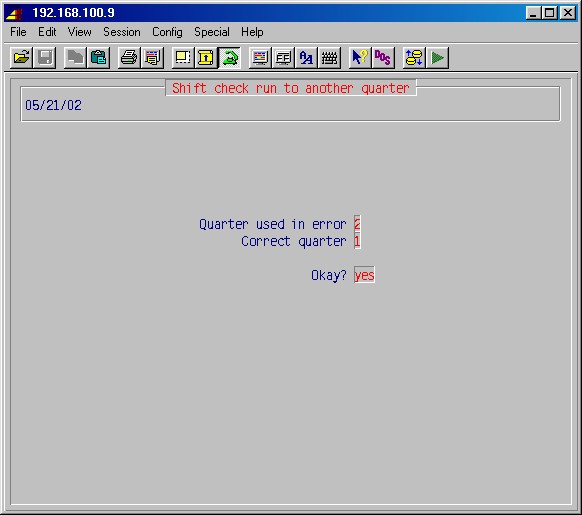
Quarter Used in Error
Enter the number of the quarter the batch was incorrectly posted to (1, 2, 3 or 4).
Correct quarter
Enter the number of the quarter the batch should be posted to.
If you are only correcting the check date, enter the same number in both entries above.
Okay?
When you are sure the above entries are correct answer Yes, and the check
dates will be changed, if specified above, and the totals for both quarters
specified will be adjusted.
Recalculate Quarter:

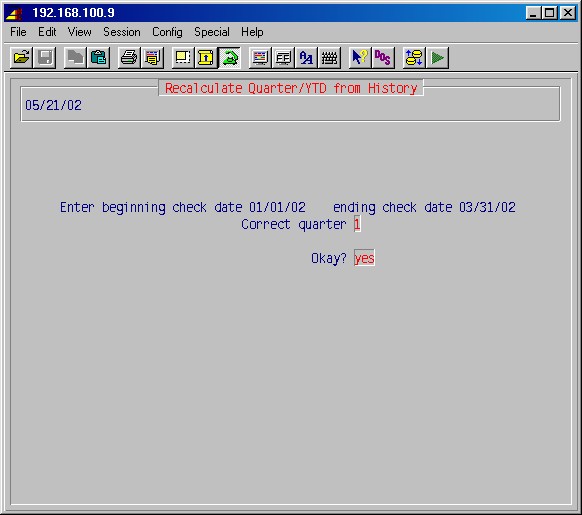
This selection is identical to 7-1-1 and is described in the JC Manual.
This selection is identical to 7-2 and is described in the JC Manual.
The procedures in this section allow entering hours worked for employees. These can be regular hours, overtime hours, vacation hours, holiday hours, personal and sick hours. Hours for salaried employees may also be entered. The job and phase, workmen's comp class, union local (if needed), and a special pay rate may be designated for each group of hours.
NOTE: Any changes in employee pay rates should be made before time card entry. Changes made in the master pay rate in employee maintenance after time entry will not automatically update the rate of pay in time entry. If pay rates are not correct during this procedure, they can only be corrected by adjusting the pay rate on each time line entry in this batch.
The payroll system allows processing more than one payroll at the same time. For instance, a field payroll may be processed at the same time as an office payroll, or field payrolls for different offices or cities may be processed at the same time.
Each of the payrolls in process is called a BATCH, with its own title, dates and time entries. All reports, check runs and update steps are separate for each batch. For instance, the office payroll batch may have finished time entry and proofing, and be printing checks while the field payroll is still having time entered.
The first operator to attempt time entry sets up a batch, which other time entry operators may use. Changes to the batch information (dates, etc.) may only be made by the operator who created the batch. In setting up the batch, several items of information are required.
If one or more batches are already started, then selecting 5-8: Time Entry, will display a list of these batches with their descriptions, dates and the last step run. Highlight the desired batch and hit <ENTER> to select it.
This selection will display the following menu screen:
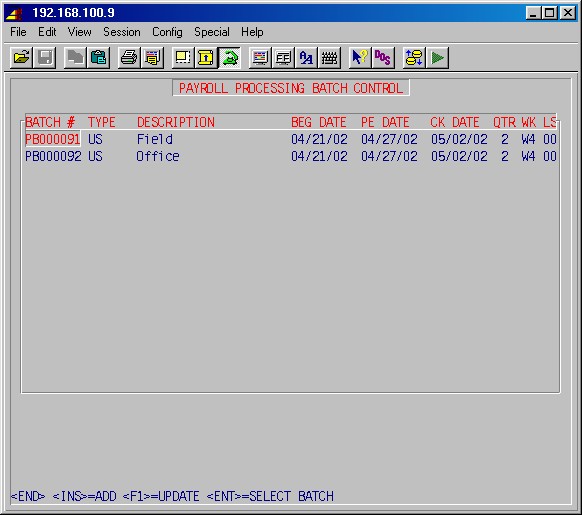
Select the batch and press ENTER for the time entry menu or press <INS>
to start a new batch. The system will display the following input screen to
start a new batch:
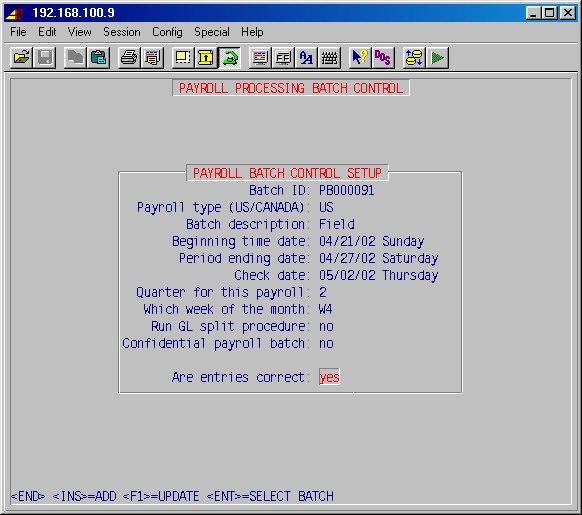
Payroll Type
Payrolls may be either Canadian or US. Quite different processing is involved for each type. Specify US or Canada.
Batch Description
The batch description is used to inform operators what kind of time should be entered in this batch - Field vs Office, etc.
NOTE: The following three dates are limited by the payroll date locks set in 13-8-15: Accounting Period Dates. If you are not allowed to enter the dates desired because of the date locks, then enter any dates allowed - you will be able to change them later, and finish up this batch. Set the date locks in 13-8-15 correctly, then edit this batch using F1 and specify the correct dates.
Beginning Time Date
This date specifies the earliest date of work to be entered for this batch - your payroll beginning date for the pay period.
Period Ending Date
This date specifies the latest date of work to be entered for this batch.The time entry procedures will only accept time line dates between and including the beginning and ending dates above.
Check Date
This date specifies the date to be printed on the checks and posted to the check register.
Quarter For This Payroll
Enter values of 1 to 4, specifying the quarter into which this payroll's totals should post. The system defaults the quarter for you, but the operator must verify that the quarter is correct, especially at the very beginning and ending of a quarter. Specifying the correct quarter is very important! If you have any questions ask your accountant for direction.
Which Week of the Month
Specify W1 to W5 to indicate the week of the month into which this payroll falls. This is used by some deductions which may be specified to deduct for only certain weeks.
Run GL Split Procedure
Answer YES here if splitting of employee totals between departments/divisions has been set up in 5-1-10: Employee Total to GL Split Maintenance, and you want to use this for this payroll.
Confidential Payroll Batch
If this payroll batch is to only be accessed by users with confidential payroll permission, enter Yes here.
Are Entries Correct
Enter No here if you want to go back and correct any of the above entries, otherwise accept Yes.
After the batch is set up or chosen, the time entry menu is displayed as shown:
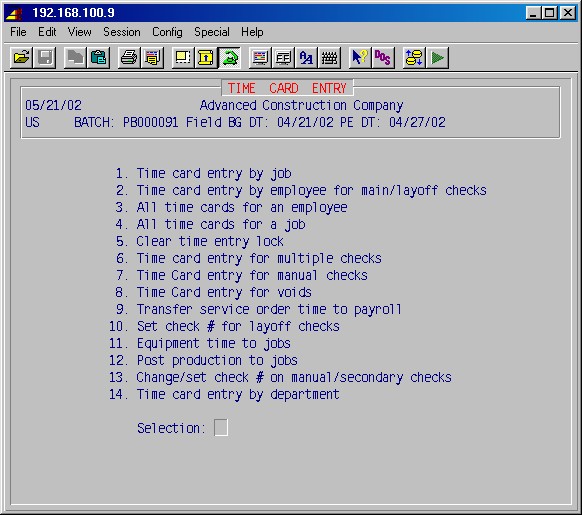
This procedure allows you to input time, job by job. Note that the job can be in a different database (company). This selection will display the following input screen :
NOTE: For layoff checks, use the procedure in step 5-8-10 below.
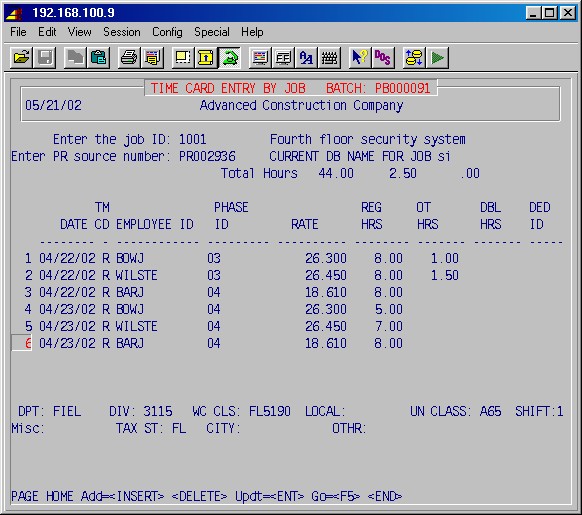
It should be noted that if an error is made in any of the fields, it is possible to return to that field after the line is finished by using the update function.
Enter the Job ID:
If the job to which you wish to charge this time is in another database (company), press F5 and the system will prompt:Update DB Name For Job:
Enter the name of the database which contains the job you want (these database names are set up in 5-7-7: Multiple Database Maintenance).
Type the job ID [H] from job cost to which you wish to charge this time. If this time is not to be charged to any job, specify the job you administrator has set up for overhead time.
Enter PR source number:
Usually, just press ENTER and the system will assign a number to identify this group of time entries.Later, after you have exited this area, if you need to go back and make changes to this particular group of entries, it is necessary to type the system generated source number to recall this group. This number will appear on the employee time edit reports.
Next, you will be prompted:
NO ENTRIES - Do you want to add? Yes
If you are ready to input time entry for this job, just press ENTER to continue. The cursor will be positioned on the date for the first line of time entry. If not, type NO ENTER and you will be prompted for another job ID.
DATE
Type the date of the time worked or the week ending date, as desired. The system will default to the first date of the payroll week specified when the batch was started. For subsequent time for this job, if no entry is made here the date typed previously will be used. This date is then stored and becomes the default date for future entries. The date may be changed to other dates within the payroll week using the up and down arrows or by typing a date within the payroll week. The <HOME> key alternates between the week beginning and week ending dates. If all entries have been made, press END before the next date to end this group of time entry and return for the next job.NOTE: For certified payrolls (jobs of type "C"), the time must be entered for each day of the week for each employee. This includes time both on and off the certified job.
TM CD (time code)
Pressing ENTER with no entry defaults to R regular hours, or type one of the following codes and press ENTER:NOTE: If you select time code M or N for miscellaneous per-unit pay, the number you enter in regular hours is the multiplier and is not recorded as hours.
R = Regular Hours (paid)
V = Vacation Hours (paid) H = Holiday Hours (paid) S = Sick Hours (paid; generates absence record in human resources module) T = Travel Time Pay (paid) P = Personal Hours (paid) O = Off duty hours (not paid; generates absence record in human resources module) E = Exempt-certified (paid; uses tax tables, etc., as set up under Employee Maintenance, NOT the job worked on, charged to job, but not recorded on certified report. E.g. warehouse time or building something for the job in the shop). M = Miscellaneous per-unit pay (paid) (see note later under DED ID) N = Miscellaneous per-unit non-union pay (paid; not recorded on union reports) B = Banked hours - only used for Canadian payrolls C = Commission pay - Enter the total gross commission as the rate and enter the hours normally. The system calculates the regular and overtime pay. NOTE: Time codes S and O are used in conjunction with absentee logging system, in the #18: Human Resources Module. If you are not using the Human Resources module, you may enter a reason code of NA when prompted.
If you select time code S or O, the system will prompt:
Enter absence reason code: _______
Type your code form the list of absence reasons you entered in 18-2: Absentee Point Description, if you are using the #18 Human Resources Module. Otherwise, type NA and press ENTER.EMPLOYEE ID:
Type the employee ID [H] of the person who worked this time.PHASE ID
Type the phase [H] of this job to which to charge this time.NOTE: For ease of entry, the system remembers the job and/or phase from the prior time entry. If the job and/or phase is the same, just press ENTER after each and the system will fill in the employee and phase.
The following fields (displayed horizontally on the bottom third of the screen) may be switched on or off to be accessed in the add mode. This switch is located in the utilities section, 13-8-8: Time Card Entry/Tax Control.
If you need to make regular changes to these fields, this option may be switched on, which will cause each line of the time entry to cursor through these fields.
If you need to make only occasional changes to these fields, this option may be switched off, and the cursor will skip through them in the add mode. Then, if you need to make changes, use the update mode.
NOTE: Changing the following seven fields will only change the information for this procedure and will not update the master files.
RATE
The rate field is skipped during normal input to reduce errors and improve efficiency. Use the <TAB> key to access the RATE when in the REG HRS field.The dollar/hour pay rate for these hours. If the pay rate is the normal pay for this employee, just press ENTER and his pay will be filled in from the payroll records.
If this is miscellaneous per-unit pay with a time code of M or N as described below, the rate you enter here now refers to the rate per unit (entered under regular hours).
REG HRS (regular hours)
Type the number of regular, vacation, holiday, sick, personal, travel, or off-work idle hours here.If this is miscellaneous per-unit pay with a time code of M or N as described below, the number of units (not hours), is entered here.
OT HRS (overtime hours)
Type the number of overtime hours here.DBL HRS (double time hours)
Type the number of double time hours here.NOTE: Notice the line under the source code labeled total hours. The sum of the hours in each category of regular hours, overtime, and doubletime will be displayed here as each new line is entered.
DPT: (department ID)
The accounting department [H] to charge for these hours. The department defaults from the phase of the job, if used, or from the employee.DIV:
The GL division to charge with this time. The division defaults from the phase of the job, if used, or from the department above.WC CLASS:
The workman's comp class [H] for these hours.LOCAL:
The union ID [H] for union payrolls:UN CLASS: (union class)
The union work class [H] of the local for these hours.SHIFT:
The shift, 1 through 5, for these hours. If shift differentials are not used, just leave the shift at 1.Misc:
This is a notation field where you may input any miscellaneous seven character designation which may be useful to your company.TAX ST: (state tax)
The state ID [H] for income tax withholding for work done on this job.CITY: (city/locality tax)
The city/locality ID [H] for income tax withholding for work done on this job.OTHR: (other tax)
The other tax ID [H] for special tax purposes.DED ID (deduction ID)
If you have specified M or N in the previous time code field, you may want to specify here a deduction ID. If you specify M or N, with no deduction ID in this field, the pay goes to miscellaneous earnings in employee totals. If you specify a deduction ID, the deduction type may only be E (earnings) or R (reimbursement), and the pay goes to other in employee totals. E (earnings) is taxable pay and R (reimbursement) is non-taxable.Example: To reimburse an employee for travel expenses of $100.00 and charge them to a job, you would use time card entry and type M for time code, $100.00 for the rate, 1 for regular hours, and your company's deduction ID for reimbursement for expense.
Note: If you have specified M in the time code field and a type E deduction type, then the "Supplemental tax rate" specified in the federal tax tables will be used to calculate the federal tax.
Continue entering hours for this job, one line at a time. You may make corrections or changes at any time after a line is completed, by moving the cursor with the arrow keys to the desired line and pressing ENTER. You then move through the fields with the ENTER key until you reach the field you wish to change, type the new data, and continue pressing ENTER until you have moved through all the fields.
When you have made and corrected all time entries for this job, press END. You will then be for prompted for another Job ID, as above. Leave the Job ID blank and press ENTER to return to the previous menu.
This procedure allows you to input time, employee by employee. This selection will display the following input screen :
NOTE: For layoff checks, after the time has been entered and step 5-10 is run, use the procedure in step 5-8-10 below.
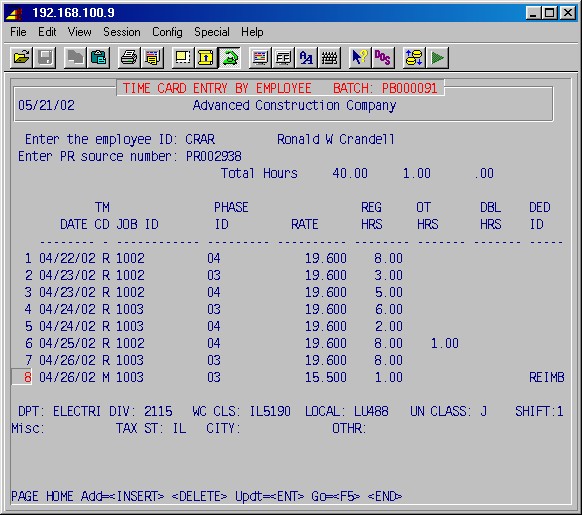
It should be noted that if an error is made in any of the fields, it is possible to return to that field after the line is finished by using the update function.
Enter the Employee ID:
Type the employee ID [H] of the person who worked this time. Leave the employee ID blank to exit.Enter PR Source Number:
Usually, just press ENTER and the system will assign a number to identify this group of time entries.Later, after you have exited this area, if you need to go back and make changes to this particular group of entries, it is necessary to type the system generated source number to recall this group. This number will appear on the employee time edit report.
Next, you will be prompted:
NO LABOR ENTERED ADD: YES
If you are ready to input time entry for this employee, just press ENTER to continue. The cursor will be positioned on the date for the first line of time entry. If not, type NO ENTER and you will be prompted for another employee ID.
DATE
Type the date of the time worked or the week ending date, as desired. The system will default to the first date of the payroll week specified when the batch was started. For subsequent time for this employee, if no entry is made here the date typed previously will be used. This date is then stored and becomes the default date for future entries. The date may be changed to other dates with the payroll week using the up and down arrows or by typing a date within the payroll week. If all entries have been made, press END before the next date to end this group of time entry and return for the next job.NOTE: For certified payrolls (jobs of type "C"), the time must be entered for each day of the week for each employee. This includes time both on and off the certified job.
TM CD (time code)
Pressing ENTER with no entry defaults to R regular hours, or type one of the following codes and press ENTER:NOTE: If you select time code M or N for miscellaneous per-unit pay, the number you enter in regular hours is the multiplier and is not recorded as hours.
R = Regular Hours (paid)
V = Vacation Hours (paid) H = Holiday Hours (paid) S = Sick Hours (paid; generates absence record in human resources module) T = Travel Time Pay (paid) P = Personal Hours (paid) O = Off duty hours (not paid; generates absence record in human resources module) E = Exempt-certified (paid; uses tax tables, etc., as set up under Employee Maintenance, NOT the job worked on, charged to job, but not recorded on certified report. E.g. warehouse time or building something for the job in the shop). M = Miscellaneous per-unit pay (paid) (see note later under DED ID) N = Miscellaneous per-unit non-union pay (paid; not recorded on union reports) B = Banked hours - only used for Canadian payrolls C = Commission pay - Enter the total gross commission as the rate and enter the hours normally. The system calculates the regular and overtime pay. NOTE: Time codes S and O are used in conjunction with absentee logging system, in the #18: Human Resources Module. If you are not using the Human Resources module, you may enter a reason code of NA when prompted.
If you select time code S or O, the system will prompt:
Enter absence reason code: _______
Type your code form the list of absence reasons you entered in 18-2: Absentee Point Description, if you are using the #18 Human Resources Module. Otherwise, type NA and press ENTER.EMPLOYEE ID:
Type the employee ID [H] of the person who worked this time.PHASE ID
Type the phase [H] of this job to which to charge this time.NOTE: For ease of entry, the system remembers the job and/or phase from the prior time entry. If the job and/or phase is the same, just press ENTER after each and the system will fill in the employee and phase.
The following fields (displayed horizontally on the bottom third of the screen) may be switched on or off to be accessed in the add mode. This switch is located in the utilities section, 13-8-8: Time Card Entry/Tax Control.
If you need to make regular changes to these fields, this option may be switched on, which will cause each line of the time entry to cursor through these fields.
If you need to make only occasional changes to these fields, this option may be switched off, and the cursor will skip through them in the add mode. Then, if you need to make changes, use the update mode.
NOTE: Changing the following seven fields will only change the information for this procedure and will not update the master files.
RATE
The rate field is skipped during normal input to reduce errors and improve efficiency. Use the <TAB> key to access the RATE when in the REG HRS field.The dollar/hour pay rate for these hours. If the pay rate is the normal pay for this employee, just press ENTER and his pay will be filled in from the payroll records.
If this is miscellaneous per-unit pay with a time code of M or N as described below, the rate you enter here now refers to the rate per unit (entered under regular hours).
REG HRS (regular hours)
Type the number of regular, vacation, holiday, sick, personal, travel, or off-work idle hours here.If this is miscellaneous per-unit pay with a time code of M or N as described below, the number of units (not hours), is entered here.
OT HRS (overtime hours)
Type the number of overtime hours here.DBL HRS (double time hours)
Type the number of double time hours here.NOTE: Notice the line under the source code labeled total hours. The sum of the hours in each category of regular hours, overtime, and doubletime will be displayed here as each new line is entered.
DPT: (department ID)
The accounting department [H] to charge for these hours. The department defaults from the phase of the job, if used, or from the employee.DIV:
The GL division to charge with this time. The division defaults from the phase of the job, if used, or from the department above.WC CLASS:
The workman's comp class [H] for these hours.LOCAL:
The union ID [H] for union payrolls:UN CLASS: (union class)
The union work class [H] of the local for these hours.SHIFT:
The shift, 1 through 5, for these hours. If shift differentials are not used, just leave the shift at 1.Misc:
This is a notation field where you may input any miscellaneous seven character designation which may be useful to your company.TAX ST: (state tax)
The state ID [H] for income tax withholding for work done on this job.CITY: (city/locality tax)
The city/locality ID [H] for income tax withholding for work done on this job.OTHR: (other tax)
The other tax ID [H] for special tax purposes.DED ID (deduction ID)
If you have specified M or N in the previous time code field, you may want to specify here a deduction ID. If you specify M or N, with no deduction ID in this field, the pay goes to miscellaneous earnings in employee totals. If you specify a deduction ID, the deduction type may only be E (earnings) or R (reimbursement), and the pay goes to other in employee totals. E (earnings) is taxable pay and R (reimbursement) is non-taxable.Example: To reimburse an employee for travel expenses of $100.00 and charge them to a job, you would use time card entry and type M for time code, $100.00 for the rate, 1 for regular hours, and your company's deduction ID for reimbursement for expense.
Note: If you have specified M in the time code field and a type E deduction type, then the "Supplemental tax rate" specified in the federal tax tables will be used to calculate the federal tax.
Continue entering hours for this employee, one line at a time. You may make corrections or changes at any time after a line is completed, by moving the cursor with the arrow keys to the desired line and pressing ENTER. You then move through the fields with the ENTER key until you reach the field you wish to change, type the new data, and continue pressing ENTER until you have moved through all the fields.
When you have made and corrected all time entries for this job, press END. You will be prompted, "Enter Deductions/Earnings: NO" as shown in the following screen:
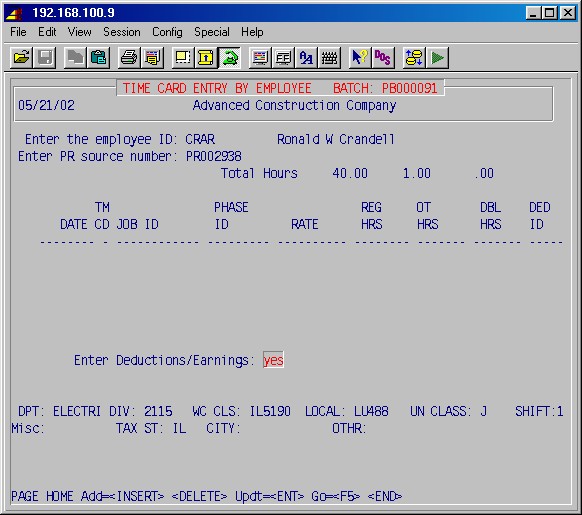
Answering YES will reveal the following screen where deductions and calculating methods may be modified for this payroll batch ONLY. A frequency of W or W0 will still effect this payroll batch only.
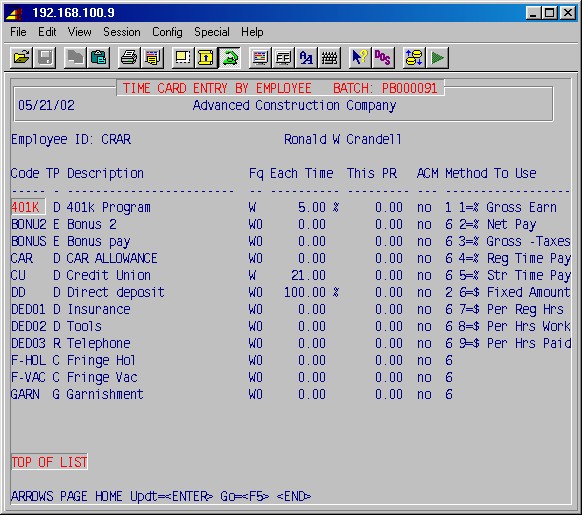
Press END when you are finished and the system will prompt you for another employee ID.
This procedure allows you to recall all time entries for an employee regardless of how the time was entered. Use of this is just like time entry above, but you may only update or delete a time line - add is not allowed.
Enter the Employee ID:
Type the employee ID [H] that you wish to view or update. If this is a valid employee ID, the name of the employee will be displayed.
All time entries for this employee for this payroll will now be displayed.
NOTE: The screen will only display eight entries at a time, although the total hours line will show the sum of all the entries. You may view more entries by pressing the PAGE or ARROW keys.
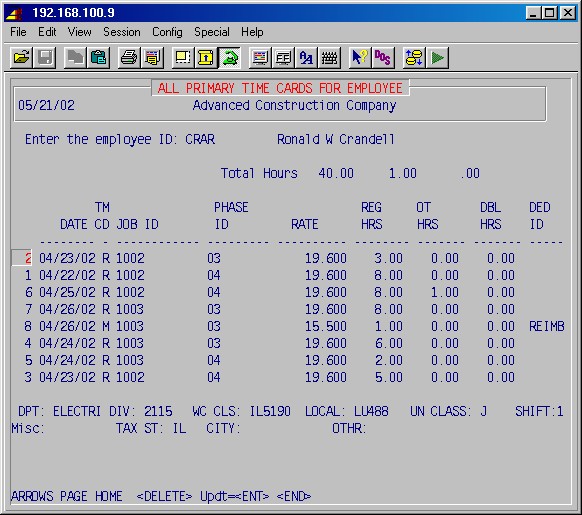
The time entry procedures are designed to allow many operators to work in this area at once, however, the processing steps that follow may be run only when no one is working in time entry for the selected batch. Therefore, the system keeps track of whether anyone is working in time entry.
It is possible for the system to become confused and think that someone is still working in time entry when, in fact, no one is. This step clears the computer's confusion. Use this step only when no one is actually working in time entry.
To perform this procedure simply select 5-8-5: Clear Time Entry Lock from the time card entry menu and press ENTER. The system will clear itself and return you to the payroll main menu.
This procedure provides techniques for creating secondary computer printed checks in addition to the employee's normal check. You may create as many secondary checks as desired by re-entering this step with a new source ID.
It should be noted that if an error is made in any of the fields, it is possible to return to that field after the line is finished by using the update function.
Any changes in employee pay rates should be made before time card entry. This selection will display the following input screen (items in bold type are sample entries for a secondary check):
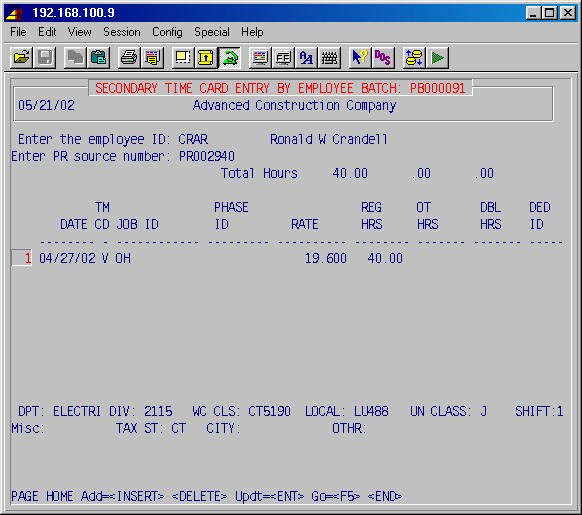
Employee ID:
Type the employee ID of the person who worked this time. If this is a valid ID, the full employee name will be displayed. Leave the employee ID blank to exit.Enter the source ID or <ENTER>:
Leave this blank and let the system assign a source ID when first creating a secondary check, or enter the source number to correct an entry.The procedures to complete the time lines of a secondary check are the same as for a regular check detailed in 5-8-2: Time Card Entry by Employee.
This procedure allows you to tell the computer about a hand written payroll check and force the numbers in the computer to match the check you have already written.
Time lines are entered just like a normal check. Hours and pay rate must be adjusted as required so that the total hours and gross pay equal the gross pay on your manual check. When asked, you must adjust deductions for this check to match what you deducted on the hand check. Any changes you make to deductions are for this check only and do not affect the normal deductions. If you recall this check for any reason, it will set the deductions back to standard and you must re-set them again.
When you exit the deduction area, there is a short delay while the system performs the equivalent of a step #10 (Process payroll) on this one check. The system uses all the normal rules to calculate federal wages and FICA wages. The final screen shown you a summary of the check as the computer has calculated it using the deductions you specified and normal tax tables. Deductions should be accurate, however you may have to force the net pay to equal the manual check by adjusting the federal tax (field #3).
If the gross pay or deductions are not accurate, you must start over and recall this check by entering the employee ID and the check number. You may then update time lines and deductions as required. When you finalize the check and leave this area the check is then set. Since this is a manual check, the system will leave it alone when step #10 is run for other checks in this batch.
NOTE: If you recall this same manual check for any reason (even to just look at it) you will start from scratch. The system will set everything back to what the computer calculated and deductions and net pay may have to be adjusted again.
Below are samples of the screens in this area:
This procedure allows you to void payroll checks by entering the payroll check number. This selection displays the following entry screen:
Enter the Employee ID:
Specify the employee ID of the employee whose check you wish to void.Enter Check # To Be Voided:
Enter the payroll check number you wish to void (may be obtained from employee history in 5-21-1)For confirmation, the system displays the check date, gross pay, and net pay. If this is the correct check, type YES and press ENTER. The system will display the original time lines with minus hours as shown below:
Verify that these time dates and hours are accurate for this check and press END to void the check. The system will not void the check unless the total balances to the original check. Time dates will likely require changing to fit the work week allowed by this batch.
NOTE: Checks created under the old payroll should not be processed through this area. Those must be voided by using the manual check area (5-8-7) and entering minus hours and deductions.
This procedure transfers time billed through service orders to payroll time entry just as if it were entered directly in payroll time entry. Once the time entries are transferred, they may be edited just like any other time. This selection will first display this prompt:
Transfer service order time to payroll:
If you have started this procedure in error or wish to exit now, type N and press ENTER to return to the payroll menu. Type YES ENTER to continue. These fields will now be displayed:
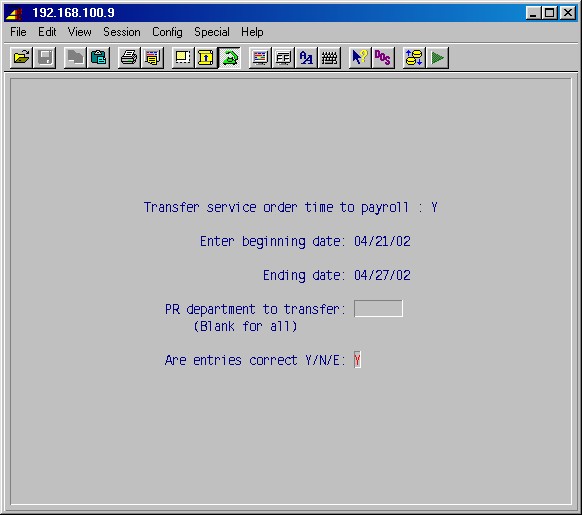
Enter Beginning Date:
This specifies the earliest time billing to transfer.Enter Ending Date:
This specifies the latest time billing to transfer.PR Department to Transfer: (Blank for All)
Specify a payroll department to transfer, or just press ENTER for all departments.After these answers are supplied, the system will search through all the time billings which fit the dates specified, and transfer to payroll time entry all the items which have not previously been transferred. Each time billing will be marked as it is transferred so that it will not be transferred more than once.
This function is used primarily in union shops to enter a check number
for a payroll check typed in the field to pay a union employee at the end
of a job. The typical flow would be this:
1) A separate payroll would be run through step 11 Print pre-check journal for those union employees in the field who need to be paid at the end of a job.
2) The pre-check journal would be faxed to the field where the checks would be prepared manually.
3) The field office would fax back the check numbers which were used to pay the employees.
4) Any adjustments could be made to the deductions if required.
5) The actual check numbers would be entered in this step as shown below. After these check numbers are entered, the system locks in these values for these checks and any subsequent running of step 10 will not affect the values of these checks. Also, when the check printing step is run, any checks which have been entered in this step will not print.
NOTE: If you discover that changes need to be made after the check number is entered and the values locked, use this step to remove the check number, make the necessary changes, and then re-add the check number.
This procedure allows you to requisition equipment time to a specified job and job phase at a specified hourly rate. This selection first prompts:
Type N ENTER to exit this area, or press just ENTER to continue. The system will display the following input screen:
1. Date:
This is the date this equipment time requisition will be charged to the job. Today's date will be displayed. Specify another date if required and press ENTER.2. Job ID:
Specify the job ID and press ENTER. If this is a valid job ID, the system will display the job name.4. Foreman:
This is an informational field if you want to record the name of the foreman who authorized this requisition.5. Department:
Specify the AR department (tools or equipment) from which this equipment is being requisitioned. If this is a valid department ID, the system will display the name of the department.6. JWO:
Specify the service order number or leave blank if not related to a service order.Enter Field # to Change, <A> to Abort, Return to Continue
You may go back and correct any field you have entered up to this point, or type A ENTER to abort and exit this procedure. Press ENTER to continue.Equip ID
Equip description
Specify the equipment ID for the first piece of equipment. If this is a valid equipment ID, the system will display the equipment description.If this equipment is assigned to another job, the system will prompt:
Equipment assigned to job xxxxx re-assign? YESIf you do not want to re-assign this piece of equipment to this job, type NO ENTER. If you do want to re-assign to this job, press just ENTER.
Hours
Specify the number of hours you wish to charge to the job for this piece of equipment.Price
The system will display the price per-hour for this equipment previously entered into 9-13 Equipment card maintenance.3. Phase ID:
Specify the job phase ID and press ENTER. If this is a valid phase ID, the system will display the phase name.The system will prompt: Any changes to line 1 NO
Type YES ENTER to go back and make changes or press just ENTER to continue. The system will now start a second time line and prompt for and equipment ID. Repeat this procedure until you have entered all equipment time lines for this job. When you are finished entering time, be sure the equipment ID on the last line is blank and press just ENTER. The system will prompt:
Any more entries NO
Type YES ENTER to add another equipment line and so on. When you are ready to continue, press just ENTER. The printer selection screen will be displayed. Type the printer number and the number of copies and press ENTER. The system will print the equipment time requisition and prompt:
Did the time requisition print OK YES
Type NO ENTER to reprint if necessary or press just ENTER to continue. The system will prompt:
Enter more equipment time YES
If you are finished with this procedure, type NO ENTER and the system will return you to the payroll system main menu. If you have more equipment time to enter for other jobs, press just ENTER and the system will take you back to the start and prompt for a date.
This step is the same as Job Cost, step 7-7-1: Manual Posting to Jobs. This allows you to post from the time cards, the quantity of material installed on the jobs.
This step allows you to change the check number previously entered into
the system for a manual check and set the check number on a secondary check;
which makes it a manual check.
Change the Check Number on Manual Checks
This allows you to change the check number on a manual check already entered into the system without having to completely re-enter the manual check. Just enter the employee ID and the old check number. The system will display the gross and net amount of this check for verification. If this is correct, just enter the new check number. A sample input screen is shown below:
Set the Check Number on a Secondary Check
This procedure is very similar to 5-8-10 where you set the check number on layoff checks. The situation is similar in that time would be entered for a secondary check in step 5-8-6, the information sent out to the field, where the secondary check would be manually prepared, and the check number reported back to you to enter into the system.
In this step you enter the employee ID, leave the "enter old check number" blank, and enter the source number for the time you entered in 5-8-6 for this secondary check. Just enter the new check number to complete the procedure.
The employee time edit reports in this section will print a detailed list of the time entered in procedure 5-8: Employee Time Entry. This report should be printed prior to step 10 Process payroll to allow you to review all time entries and make corrections if necessary, before you process payroll. You may want to store these reports as permanent records for future reference. Use as many of these reports as your company needs.
NOTE: If the operator is not authorized to use step 5-1: Employee Information, then no pay rates will show on the edit report.
This selection will display the following menu screen:
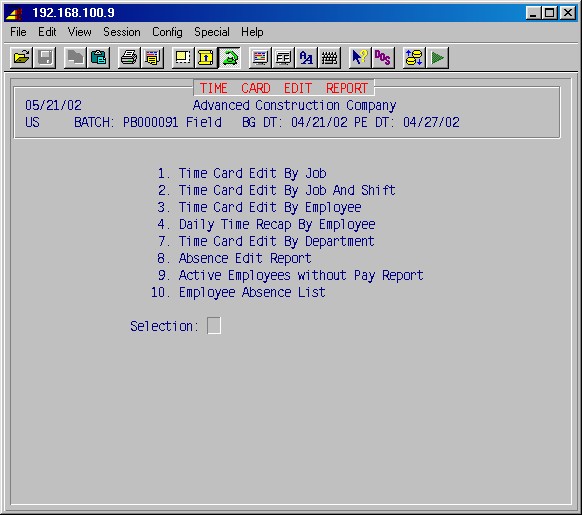
This procedure prints a report organized and subtotaled by job, listing alphabetically employee IDs of all employees who worked on each job, regardless of the manner used to input the time. This selection will first prompt:
Print time entered by alan or ALL?
Specify the name of the operator who made the time entries you wish to print or type ALL ENTER to include all time entries from all operators.
One line per employee NO
Selecting the default NO ENTER will specify a report with all time entries made in steps 5-8 for each date for each employee. Typing YES ENTER will specify a report just totaling the time for each employee.
Job to print (blank for all)
If you want to limit the report to time entries for just one job, enter the ID of that job here; otherwise leave blank. Then press ENTER.
Next, the printer selection screen will be displayed. Type the printer
number and the number of copies and press ENTER to print your report.
This procedure prints a report organized and subtotaled by job and shift, listing alphabetically employee IDs of all employees who worked on each job, regardless of the manner used to input the time. This selection will first prompt:
Print time entered by alan or ALL?
Specify the name of the operator who made the time entries you wish to print or type ALL ENTER to include all time entries from all operators.
Next, the printer selection screen will be displayed. Type the printer number and the number of copies and press ENTER to print your report.
This procedure will print a report organized and subtotaled by employee,
listing alphabetically all job IDs which each employee worked on, regardless
of the manner used to input the time. This selection will first prompt:

Print time entered by or ALL?
Specify the name of the operator who made the time entries you wish to print or type ALL ENTER to include all time entries from all operators.
Employee to Print (Blank for All):
You may specify an employee to print or just leave blank for all employees.
By employee ID (rather than by name)? no
By default, the report will print alphabetically, by employee name. If you want the report sorted by employee ID, answer this YES.
Next, the printer selection screen will be displayed. Type the printer number and the number of copies and press ENTER to print your report.
This procedure will print a report of all employees, organized alphabetically by employee name, showing the number of regular, overtime, and total hours worked per day for a one week period of time. The report will optionally show travel time. This selection will first prompt:
Print travel time no
Answer this YES, if you also want travel time on this report. If you answer YES, the system will next prompt:
Enter week beginning date: / /
This date must be a Monday. Type the date for the week you wish to print and press ENTER.
Next, the printer selection screen will be displayed. Type the printer number and the number of copies and press ENTER to print your report.
This procedure will print a report organized by job and subtotaled by departments, showing each employee in the department who worked on a particular job. This selection will first prompt:
Print Time Entered by alan or ALL?
Specify the name of the operator who made the time entries you wish to print or type ALL ENTER to include all time entries from all operators.
Next, the printer selection screen will be displayed. Type the printer number and the number of copies and press ENTER to print your report.
This procedure will produce a report by employee ID, listing by date, all absences and points accrued through today that are still active. Selecting this procedure will display the printer selection screen. Type the printer number and the number of copies and press ENTER to print your report.
This procedure will print a list of active employees that have not been paid in the selected payroll batch. "Active" means that termination and lay-off dates are both blank for the employee (in 5-1-1). "Not paid" means that no time lines have been entered.
This procedure will calculate each employee's pay, taxes, and deductions, based on pay rate, deductions, hours on time cards, etc. The results of these calculations are stored in 5-2 Employee Totals - Current Period. Printing the pre-check journal shows the results of processing payroll.
No employee permanent totals are updated yet. Therefore, you may make changes to time entries or deductions for this batch as necessary, then run 5-10 Process Payroll again after the changes.
This selection will display the following screen:

Select the batch you wish to process and press ENTER. The system will display the following:
CALCULATING PAYROLL TOTALS
This processing may take several minutes to an hour depending on the size of your payroll and the power of your computer. When it is finished, you will return to the payroll main menu.
This procedure will print a pre-check journal for the operator to review to ensure that the payroll processing results are correct prior to updating totals and printing payroll checks.
NOTE: This procedure must be run before you will be allowed to run step 5-12: Update YTD & QTD Totals and continue processing this payroll.
The pre-check journal is organized alphabetically by employee ID and by default, details all pay and deduction figures that will appear on the employee's paycheck and pay stub. This report is very detailed and quite long. If you wish to run a smaller report, you may do so by answering yes to the first prompts as follows:
Print short format: no
If you answer this YES, the report will print one employee per line and list only the employee ID, employee name, regular, overtime, double time, vacation, holiday, sick, and personal hours, gross pay, taxes, deductions, and net pay.
Print deductions ONLY: no
If you answer this YES, you will get a report showing only employee ID and employee name, listing each deduction.
If errors are found, you may go back and change time entries in 5-8-3 All Time Cards for an Employee, deductions in 5-3-2 Employee Deduction Maintenance, or employee current totals in 5-2: Employee Totals, as necessary to correct the errors. You must then complete the steps necessary to print this report again as follows:
If you change employee deductions - Run 5-10: Process Payroll again If you change time entries - Run 5-9: Employee Time Edit Report and 5-10: Process Payroll again If you change tax withholding amounts in employee totals - Do not run step 5-10 Process Payroll again
Next, run step 5-11: Print Pre-Check Journal again and double check your figures before continuing.
NOTE: You should not proceed past this point until this pre-check journal is exactly correct. Procedures 2,3,8,9,10 and 11 may be run over and over to make any changes or additions. After you have performed step 5-12 Update YTD & QTD Totals, you cannot change this payroll.
CAUTION: This procedure will update all employee's YTD and QTD totals and should not be run until the pre-check journal has been verified as correct because this procedure cannot be reversed.
This step will update the YTD (year-to-date) and QTD (quarter-to-date) employee totals (step 5-2: Employee Totals) with the current totals for the payroll now processed through step 5-11.
This procedure is protected from being run more than once to prevent totals
from being doubled.
This selection will first display the following message:
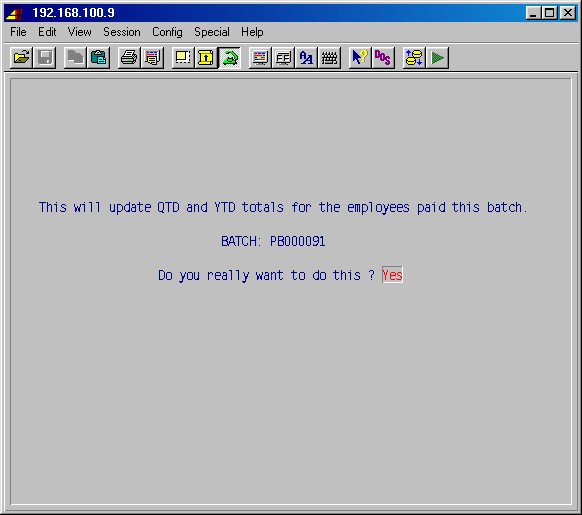
Again, this is a point of no return. If you have not verified the payroll figures, do not continue; just press ENTER for the default NO and you will return to the payroll main menu.
When you are ready to proceed, type YES ENTER and the system will begin processing this step. The system will display a series of messages of the updates taking place starting with:
This processing may take several minutes to an hour depending on the size of your payroll and the power of your computer system. When it is finished, you will return to the payroll main menu.
Step 5-12 must be run first before payroll checks can be printed.
This procedure will print employees' payroll checks. This procedure may be run more than once (for instance, if there is a printer problem) without doubling any totals.
The checks are normally printed in order of departments, then employee name.
First, prepare the payroll printer with payroll checks aligned and ready to
be printed.
This selection may first prompt you for a payroll batch, if you have not previously
selected the batch. Select the batch if required; the system will next display
the printer selection screen. Type the printer number for the payroll check
printer and the number of copies and press ENTER. You'll then be given
the option to print alignment checks (to ensure checks are properly aligned
in the printer). Next, if you are printing on a laser printer, answer that prompt
YES.
The system will then prompt:
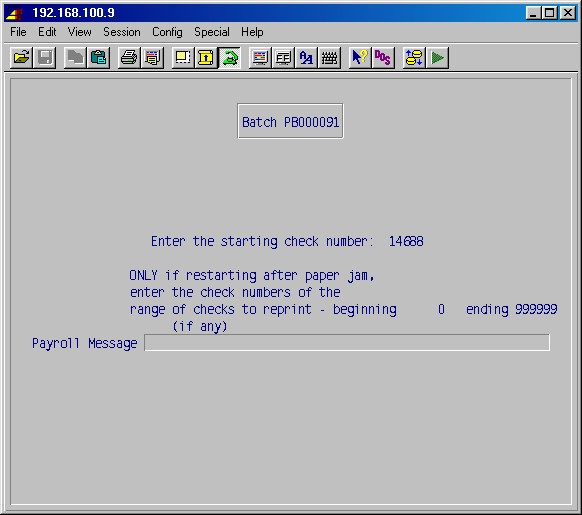
Enter the starting check number:
Type the check number of the first check to be printed and press ENTER. This group of payroll checks will now be printed.
Only if starting after paper jam,
enter the check number of the
last GOOD check
If the checks jammed, this is the number of the last check that printed correctly before the jam.
Payroll Message___________
You may use this to enter any message you want to appear on the employees' pay stubs.
If any employees have a direct deposit deduction, you will see this message displayed:
Creating direct deposit file for batch: PBxxxxxxx
Printer problems
If there is a printing problem, a misalignment, or a paper jam, the fastest way to stop the printer and not waste checks is to turn the printer off line or turn off the power to the printer. Next, cancel the print job (press F2, CANCEL - Then specify the printer number to cancel). Turn the printer back on or online. It will probably print a little bit more before stopping. The checks may now be realigned, and the procedure repeated from the beginning or restarted where it left off.
This procedure will print a complete check register of all checks printed in step 5-13, plus and manual or layoff checks. This procedure will first display the following selection screen:
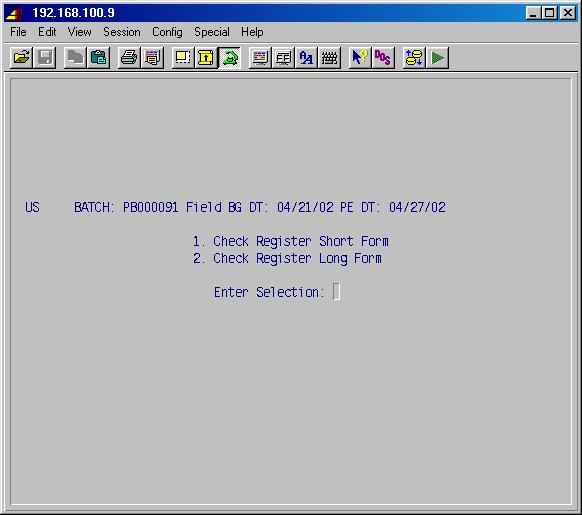
1. Check register short form
The short form check register is organized by check number, one line per check, with the basic check register information plus withholding taxes.
2. Check register long form
The long form check register is organized by employee ID and includes all information on the check and the check stub including all deductions (similar to the pre-check journal).
Next, the printer selection screen will be displayed. Type the printer number and the number of copies and press ENTER and this report will be printed.
This procedure will print the payroll journal, which is a part of the payroll audit trail. This is a permanent file and should be retained.
This journal is organized by employee ID and lists each employee paid this payroll with all hours, earnings, and withholding taxes for this pay period, the current quarter, and the year-to-date.
Selecting this procedure will display the printer selection screen. Type the printer number and the number of copies and press ENTER. The system will print the payroll journal and totals for this payroll and return to the payroll main menu.
This selection will display the following menu screen:
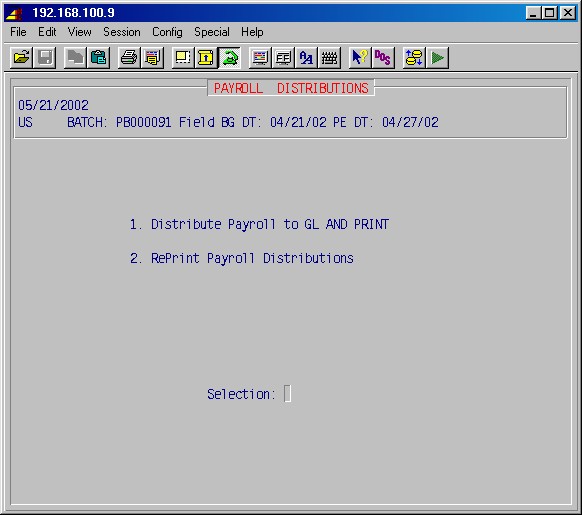
This procedure will distribute the payroll totals to the general ledger journal by payroll department as follows:
Payroll G/L Account Net Pay CR - Cash in Bank Federal W/H CR - Federal W/H Taxes Liability State W/H CR - State W/H Taxes Liability City W/H CR - City W/H Taxes Liability FICA W/H CR - FICA W/H Tax Liability FUTA CR - FUTA Tax Liability SUTA CR - SUTA Tax Liability FICA Employer Portion CR - FICA W/H Tax Liability FICA Employer Portion DR - FICA Expense Account FUTA DR - FUTA Tax Expense SUTA DR - SUTA Tax Expense Deductions CR - Deductions Gross Pay DR - Expense Accounts
After the distribution has been made, a payroll distribution report will be printed. This is part of the payroll audit trail and should be retained as a permanent record.
This selection will display the following input screen :
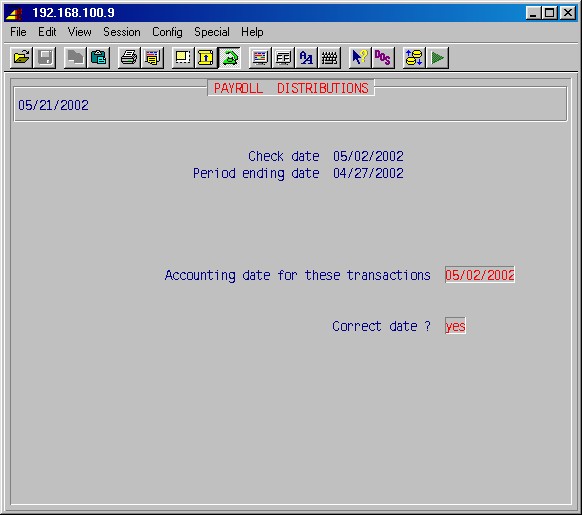
TopCheck date
Period ending date
These two dates are the dates entered when the batch was set up.Enter cash GL account # or leave blank:
This allows you to override the normal department cash account if required. Leave blank for the normal cash account.Accounting date for these transactions
The system will display the period ending date as the suggested accounting date for these transactions. You may select either of these two dates as the accounting date for this payroll. Specify the correct date for your company and press ENTER.Correct date ?
When the date is correct type YES ENTER.When you have verified the correct date and typed YES ENTER, you will be prompted:
Summarize departments YES
Type NO ENTER if you do not want the departments summarized or press just ENTER if you want the report printed by department and the system will perform the distribution of GL and then print the report.
This procedure will print a report, organized by GL numbers, of all payroll GL entries distributed in the last procedure with the option of summarizing departments if desired. This report is part of the payroll audit trail and should be retained as a permanent record.
This procedure will display an input screen exactly like the one in 5-16-1. Select the date entered above. You will then be prompted:
Summarize departments YES
Type NO ENTER if you do not want the departments summarized or press just ENTER if you want the report printed by department and the system will perform the distribution of GL and the print the report. The report will now be printed and you will return to the payroll main menu.
These procedures calculate and distribute the payroll and union burden information for this week to the jobs, calculate various union contributions, and produce several important reports.
Any applicable procedures in this section must be run before 5-18: Clear Payroll Work Files is run. The system will alert if the procedures are attempted out of order or some steps are omitted.
This selection will display the following menu screen:
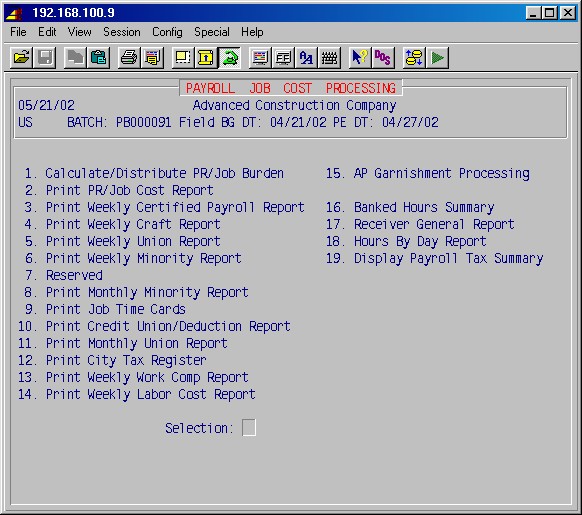
This procedure performs several functions. First, this week's time cards are processed to extract all those associated with jobs. Then, the appropriate burdens are applied based on the work class and union if any. Finally, the results are posted to the job cost journal. The figures required for a certified payroll are also prepared here. The system will first prompt:
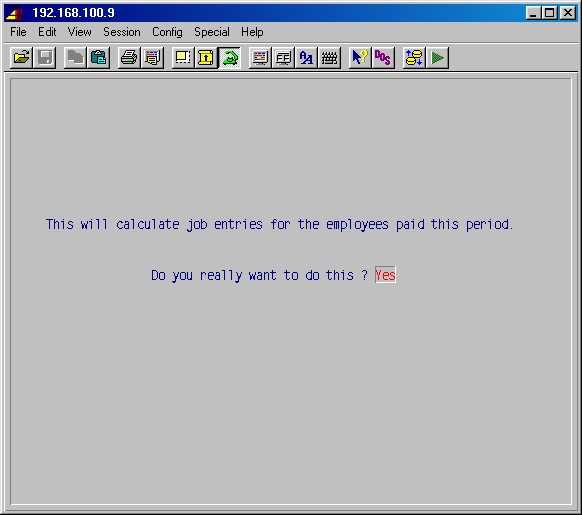
Press just ENTER if you want to exit this procedure. Type YES ENTER if you are ready to proceed. The system will next display the following input screen :
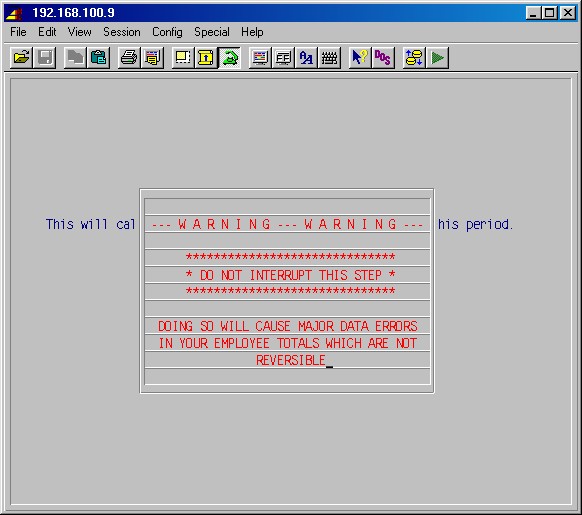

These dates were specified for the current payroll and are the dates in 5-16-1: Distribute Payroll to GL. Normally specify the same date as in 5-16-1 as the accounting date and type YES ENTER. The payroll burdens will be distributed to job cost and the system will return you to the 5-17: Job Cost Processing Menu.
This report is organized and sub-totaled by job ID and phase, and lists all employees and hours worked on the job, gross pay, and the amounts of the various burdens based on factors you have specified in the payroll system and the company portion of union contributions, if any.
This selection first displays the following prompt:
Print job summary only? no
Answering this YES will print a shorter summary report. The printer selection screen will now be displayed. Type the printer number and the number of copies and press ENTER. Your report will be printed and the system will return you to the 5-17 Job Cost Processing Menu.
This optional report should be run if there are any jobs requiring certified payrolls (jobs marked as type C). This is the only time these reports are available, so do not skip them if they are needed.
Selecting this procedure will display the following screen:
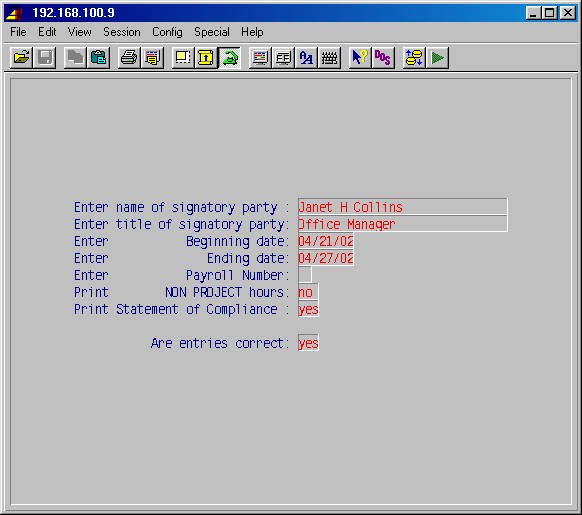
Enter name of signatory party
Type the name of the person who will be signing this report.Enter title of signatory party
Type the title of the person who will be signing this report.Enter beginning date
This should be the first date in this payroll batch.Enter ending date
This should be the last date in this payroll batch.Enter Payroll Number
Type an number as you wish to have it appear on the report.Print NON PROJECT hoursEnter Yes only if you wish the report to include hours worked on other jobs.Print Statement of Compliance
Enter Yes if you wish the "Statement of Compliance" text to also be printed on the report.Are entries correct
Enter Yes unless you want to go back and correct any of the above.Next the printer selection screen will appear. Type the printer number and the number of copies and press ENTER. Your report will now be printed and the system will return you to the 5-17: Job Cost Processing Menu.
This procedure prints a report of your payroll organized by union work class. This is the only full record giving the breakdown by craft.
Selecting this procedure will display the printer selection screen. Type
the printer number and the number of copies and press ENTER. Your
report will now be printed and the system will return you to the 5-17:
Job Cost Processing Menu.
The weeks's union work history is contained in this report. This is the only full record of your payroll by local for the week.
Selecting this procedure will display the printer selection screen. Type the printer number and the number of copies and press ENTER. Your report will now be printed and the system will return you to the 5-17: Job Cost Processing Menu.
This selection will print a report of the accumulated week's work history by job and minority code. This is the only full record of your payroll by minority. This should be printed after each week's payroll if it is needed at all.
Selecting this procedure will display the printer selection screen. Type the printer number and the number of copies and press ENTER. The system will prompt:
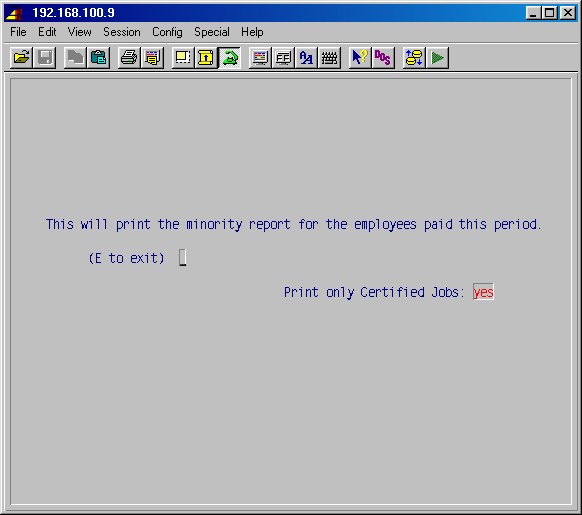
(E to exit)
Type an E if you don't want to print this report now, or just press ENTER to continue.Print Only Certified Jobs
Enter Yes to only print certified jobs or No to print all jobs. Press ENTER and your report will be printed and the system will return you to the 5-17: Job Cost Processing Menu.
This procedure will print a monthly report of the accumulated month's work history by job and minority code. This is the only full month record of your payroll by minority. This should be printed after the last payroll of the month if it is needed, and then cleared.
Selecting this procedure will display the printer selection screen. Type the printer number and the number of copies and press ENTER. The system will prompt:
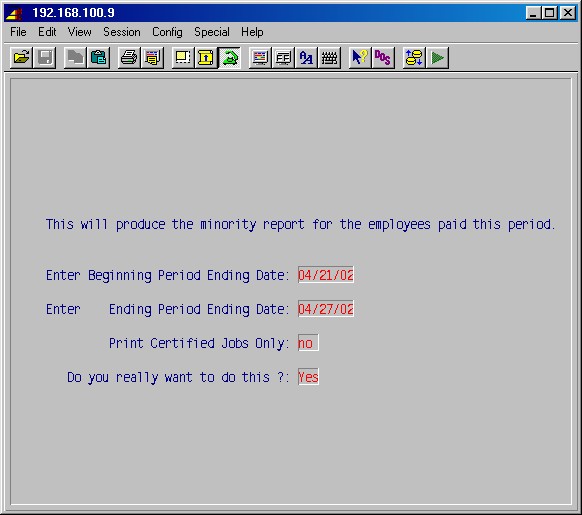
Specify the date range for this report. If you want just certified jobs, answer the prompt YES, otherwise just press ENTER for a full report.
Do you really want to do this?: no
Press just ENTER if you want to exit this procedure, or type YES ENTER to proceed.
This is a special custom program that can be defined to print time cards for each employee/job combination from this week's payroll for use in recording next week's time. This program varies from installation to installation, however the following describes how it works in general.
This selection will display the following input screen:

Enter date 1:
Type the date of the first work day for the next week and press ENTER. Continue filling in all work days for the next week.
Enter dept <RET> = ALL:
Specify the department ID for the time cards you wish to print, or press just ENTER to print time cards for all departments.
Are entries correct:
Type NO ENTER to go back and make corrections. Type YES ENTER to continue. The system will now prompt:
Build exception list: NO
Either answer NO to this and build an actual list in the next field, or answer YES and build an exception list here. If you choose to build an exception list, you simply list the employee IDs for which you do not want to print new time cards and press ENTER.
Build actual list:
If you built an exception list, answer NO here. If not, type YES ENTER here, and list all employee IDs for which you want to print new time cards for the next week.
The printer selection screen will now be displayed. Type the printer number and the number of copies and press ENTER. Your report will now be printed and the system will return you to the 5-17: Job Cost Processing Menu.
This procedure prints registers detailing specified deductions, by employee ID, for this pay period.
Selecting this procedure will display the printer selection screen. Type the printer number and the number of copies and press ENTER. The system will prompt:
Enter deduction ID, or ALL:
Specify the deduction ID for which you wish to print a report and press ENTER, or type ALL and press ENTER to print a report of all deductions. The system will prompt:
Is this deduction for credit union
Enter Yes if the deduction specified if for a credit union.
Your registers will now be printed and the system will return you to the 5-17: Job Cost Processing Menu.
This procedure prints a report of the accumulated month's union work history, organized and subtotaled by union. This should be printed after the last payroll in a month. It may be reprinted for up to several months later.
Selecting this procedure will prompt:
Print Monthly Union Report With Work Class Subtotals
Enter Yes if you want subtotals by work class.
Then the printer selection screen will appear. Type the printer number and the number of copies and press ENTER. The following input screen will then be displayed:

Payroll Week 1 Period Begin/End Date
Type the payroll period beginning date for the first week. The system will fill in the rest of the period beginning and ending dates for the month. If adjustments are required, you may ENTER through the fields, or press F1.Payroll Month Ending PE Date
The system will fill in the payroll month period ending date corresponding to the ending date of the last week. You may change this as required, or press ENTER to continue.Are these entries correct: NO
Since the default is NO, press just ENTER to go back and make changes. You may type E here to exit here. When correct, type YES ENTER, and the monthly union report will print.
This procedure will print a report of the city taxes, organized by city and employee ID, for the current payroll. This selection will first prompt:
Enter city tax ID:_______
Specify the city tax ID and press ENTER, or press just ENTER for all cities.
The printer selection screen will then be displayed. Type the printer number and the number of copies and press ENTER. Your report will now be printed and the system will return you to the 5-17: Job Cost Processing Menu.
This procedure will print a report, organized and subtotaled by work comp risk code, detailing each employee, total hours, pay, and the work comp amount. This report will be zero if 5-16-1: Distribute Payroll to GL, has not been run.
Selecting this procedure will display the printer selection screen. Type
the printer number and the number of copies and press ENTER. Your
report will now be printed and the system will return you to the 5-17:
Job Cost Processing Menu.
This procedure will print a report, organized by job name, showing the total labor cost for the weekly payroll detailed by regular hours, overtime hours, doubletime hours, regular pay, overtime pay, doubletime pay, total hours, total pay, expense, burden, regular rate and burdened rate.
This selection will first prompt:
Enter job cost posting date: / /
Type the payroll date for this report. The printer selection screen will then be displayed. Type the printer number and the number of copies and press ENTER to print your report.
CAUTION: This step must be done prior to clearing the payroll work files in step 5-18: Clear Payroll Work Files.
These procedures are used to process garnishments, set up in step 5-3-8: AP Garnishment Maintenance, and produce the AP checks for these garnishments through these steps here in the payroll module. This is a processing step - the garnishment deductions were committed when the payroll was processed. These AP garnishment processing steps are very similar to the AP entry and processing steps in the accounts payable module and after these steps are run, this data becomes available to the AP module for all AP reports and check reconciliation. This selection displays the following menu:
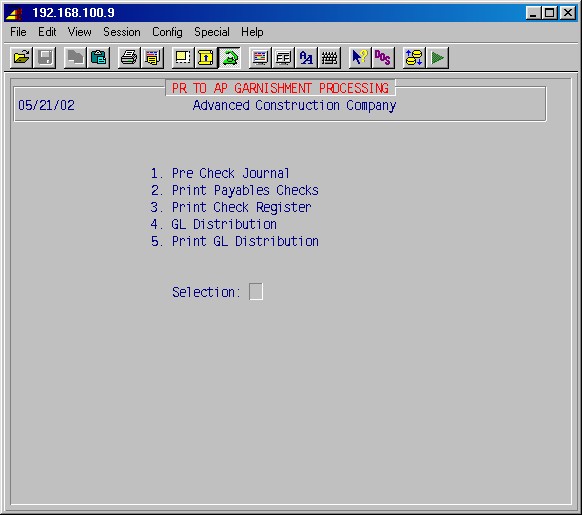
This procedure will print a pre-check journal of the AP garnishment invoices produced during the current payroll. This report is one of the AP reports which should be preserved for this payables run, along with the check register and the payables GL distribution.
This selection will first display the printer selection screen. Type the printer number and the number of copies and press ENTER. The report will be printed and the system will return to the previous screen.
This procedure will print the AP garnishment checks for each garnishment deduction in the current payroll. Be sure you have loaded the AP checks in the printer before you start this step.
This selection will display the printer selection screen. Type the printer number and the number of copies and press ENTER. The system will prompt:
Print alignment check: NO
Answer YES if you want to print an alignment check, or press just ENTER. The system will prompt:
Is this a laser printer: NO
Answer YES if you are using a laser printer, or press just ENTER to continue. The system will display the following input screen :
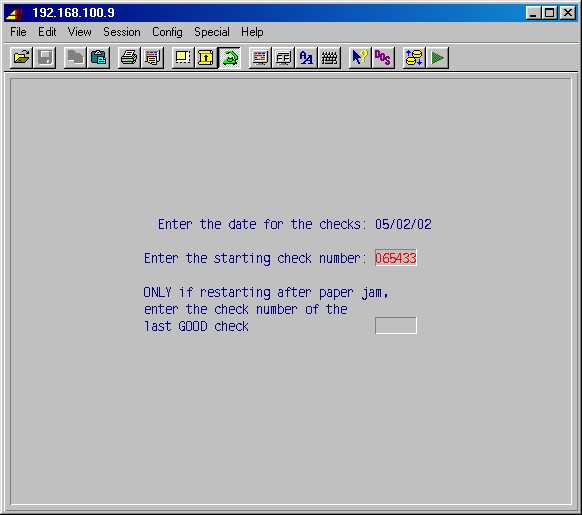
Enter the date for the checks
The system defaults to the payroll check date. You may change this date if required; this date is also the accounting date. Press ENTER to accept this date.Enter the starting check number
Specify the starting check number.Only if restarting after paper jam
enter the check number of the
last good check
Leave blank if you are just starting a new check run. If you are restarting, after a paper jam, enter the last good check number.NOTE: For a complete discussion of what to do if the checks jam during check printing, refer to the AP manual, step 4-6: Print AP Checks.
Your checks will be printed and the system will return you to the previous menu.
This procedure will print a check register of the AP garnishment checks for the current payroll printed in step 5-17-15-2 above. This report is one of the AP reports which should be preserved for this payables run, along with the pre-check journal and the payables GL distribution.
Selecting this procedure will display the printer selection screen. Type the printer number and the number of copies and press ENTER. Your check register will be printed and the system will return to the previous menu.
This procedure will process and distribute to the general ledger journal, the ledger entries for the AP garnishment checks for the current payroll. This procedure must be run before the entries can be printed out in step 5-17-15-5. Selecting this procedure will display the following input screen:
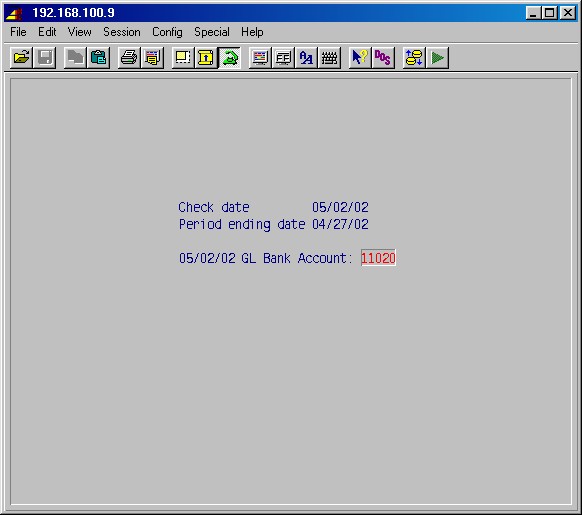
TopThe system will display the check date and period ending date for this batch. It will suggest the GL Bank Account and a posting date the same as the check date. You may specify the period ending date as required. Press ENTER to complete the processing.
This procedure will print the distribution processed in step 5-17-15-4 above. That step must be run prior to this one. This report is one of the AP reports which should be preserved for this payables run, along with the pre-check journal and the check register. Selecting this procedure will display the printer selection screen. Type the printer number and the number of copies and press ENTER.
The distribution will be printed and the system will return to the previous menu.
This is a special report used with Canadian payrolls.
This is a special report used with Canadian payrolls.
This is a special report used with Canadian payrolls.
This procedure displays the tax liability for this payroll batch. For each tax ID, the total gross and the total tax will be displayed.
CAUTION: This procedure should not be run until all procedures through 5-17 have been completed.
This step will not run if the GL postings are out of balance for any reason.
This procedure will clear all payroll work files used in preparing this payroll and remove all miscellaneous pay and deductions which have a one time frequency code. It will also update the payroll history with information from this week's payroll. When completed the system will return to the payroll main menu. This completes this payroll cycle.
NOTE: If this step is run before 5-12: Update YTD & QTD Totals, it has the effect of discarding any time entered without updating any payroll totals. Then payroll time entry may be begun again fresh.
This selection will prompt:
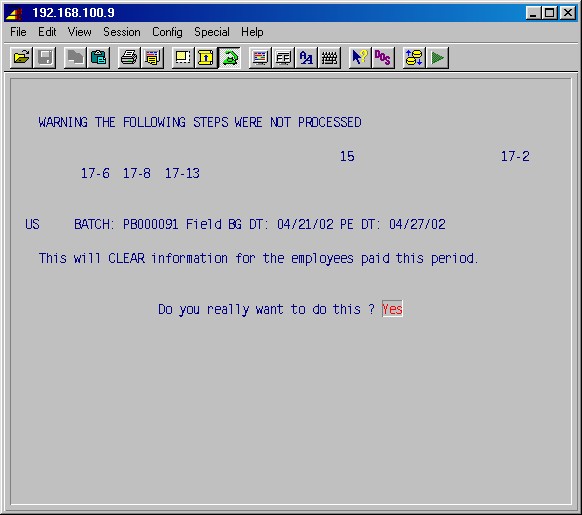
Press just ENTER if you want to exit this procedure, or type YES ENTER to continue.The payroll work files will now be cleared and the system will return you to the payroll main menu.
The procedures in this section allow you to print 941 and other quarterly payroll reports to submit to federal, state, and city agencies for reporting all taxes including FICA, federal withholding, FUTA, SUTA, and SDI. This selection will display the following menu screen:
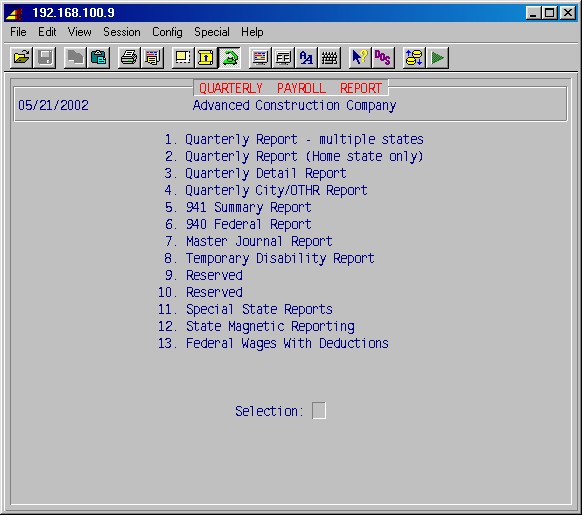
This procedure prints the quarterly state payroll report. The system requires you to specify one state at a time and looks at the detail state records to report the employees' incomes and taxes in that state only.
This selection will display the following input screen :
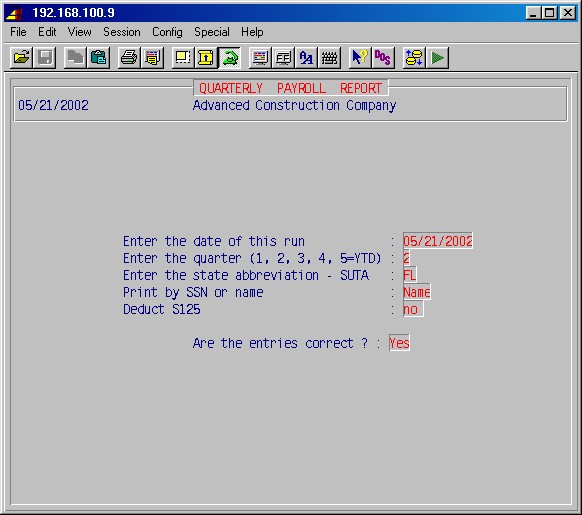
Enter the date of this run (MMDDYY):
Type the date of this report (normally the last day of the quarter).
Enter the quarter (1,2, 3, 4 or 5):
Specify the calendar quarter for this report.
Enter the state abbreviation - SUTA:
Specify one state abbreviation here. If you have employees who have worked in other states, you must run this report once for each state.
Deduct S125:
Answer YES to deduct S125 from report figures.
Are these entries correct ?:
Since the default is NO, press just ENTER to go back and make changes. When correct, type YES ENTER.
The report now will be printed, and the system will return you to the 5-19: Quarterly Report Menu.
This procedure prints the quarterly state payroll report for the employee's home state only. This report assumes that all income belongs to the employees' home states and the system looks only at the earnings records to report the employees' incomes and taxes for the state you specify.
This selection will display the following input screen :

This screen is completed just like the first screen in 5-19-1 above.
The printer selection screen will next be displayed. Type the printer number and the number of copies and press ENTER.
The report now will be printed, and the system will return you to the 5-19: Quarterly Report Menu.
This selection will print a quarterly payroll report (or a YTD report), organized by employee and state, showing all earnings and all taxes for each state for each employee. The system looks at the detail state records to report the employees' incomes and taxes for each state.
This selection will display the following input screen :
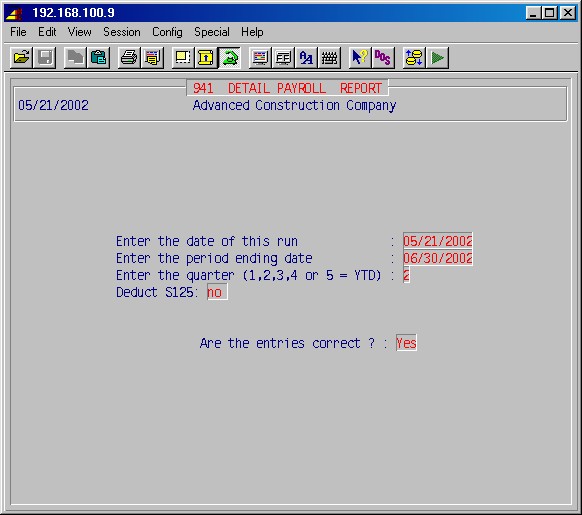
Enter the date of this run (MMDDYY):
Type the date of this report (usually the last day of the month for the quarter).Enter the period ending date (MMDDYY):
Type the date of the last day of the calendar quarter for this report.Enter the quarter (1,2,3,4 or 5=YTD):
Specify the calendar quarter for this report. You may also print a year-to-date report by specifying 5.The printer selection screen will next be displayed. Type the printer number and the number of copies and press ENTER. Your report will now be printed.
This procedure will print a quarterly payroll report of all employees' earnings and city taxes for a specified city. The system looks at the detail state/city records to report the employees' income and taxes for the specified city.
This selection will display the following input screen :
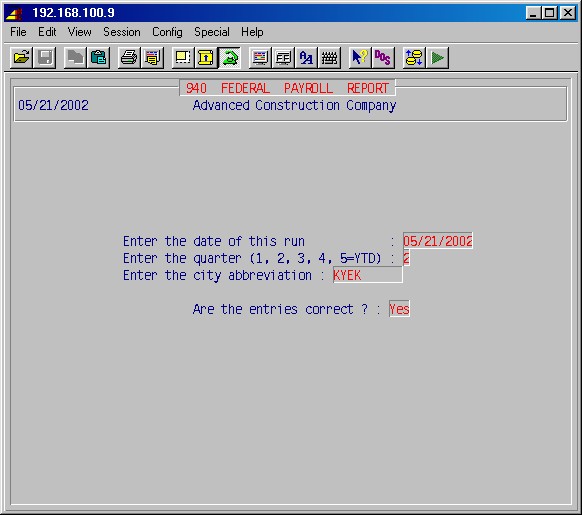
Enter the date of this run (MMDDYY):
Type the date of this report (normally the last day of the quarter).
Enter the quarter (1,2, 3, 4 or 5):
Specify the calendar quarter for this report.
Enter the city abbreviation:
Type the city ID here.
Deduct S125:
Answer YES is you want S125 to be deducted from report figures.
The printer selection screen will next be displayed. Type the printer number and the number of copies and press ENTER. The report will be printed, and the system will return you to the 5-19: Quarterly Report Menu.
This procedure will produce a 941 liability summary report for a specified quarter, which will provide the history totals for federal withholding, FICA, and medicare by date, month, and quarter - the exact information required to complete the 941 report. The report subtotals federal withholding, and both the employer and employee portion of FICA and medicare.
This selection will display the following input screen :
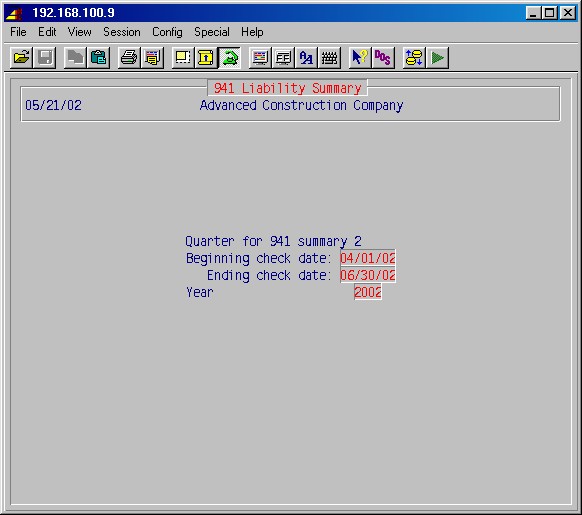
Quarter for 941 summary
Type the quarter (1, 2, 3, or 4) and press ENTER.
Beginning check date
Accept or change this suggested beginning check date as needed and press ENTER.
Ending check date
Accept or change this suggested ending check date as needed and press ENTER.
Year
The system will suggest this year. Type another year as required and press ENTER.
The printer selection screen will now be displayed. Type the printer number and the number of copies and press ENTER to print your report.
This procedure prints the federal quarterly payroll report, organized by employee and social security number. The system looks only at the earnings records to report the employees' gross wages, FUTA wages and FUTA taxes, FICA wages and FICA taxes, and medicare wages and medicare taxes. The totals from this report are used to fill in the 940 return.
This selection will display the following input screen :
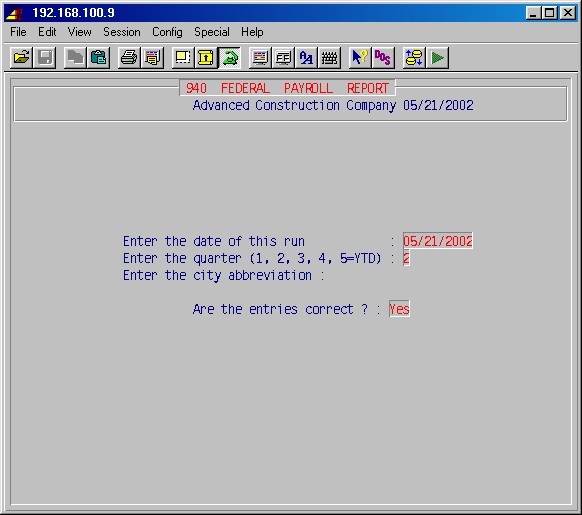
Enter the date of this run (MMDDYY):
Type the date of this report (normally the last day of the quarter).
Enter the quarter (1,2, 3, or 4):
Specify the calendar quarter for this report.
The printer selection screen will next be displayed. Type the printer number and the number of copies and press ENTER.
The report will now be printed and the system will return you to the 5-19: Quarterly Report Menu.
This procedure prints a master payroll journal similar in format to step 5-15, but for all employees in the file. This report shows all employees, not just those on this week's payroll.
Selecting this procedure will display the printer selection screen. Type the printer number and the number of copies and press ENTER. The system will then prompt:
Quarter for this report _________
Specify the calendar quarter for this report (1,2 3, or 4). The report will now be printed and the system will return you to the 5-19: Quarterly Report Menu.
This is a special custom program which is not applicable to general situations.
This area is reserved for special reports required by your state and will display a selection screen similar to this:
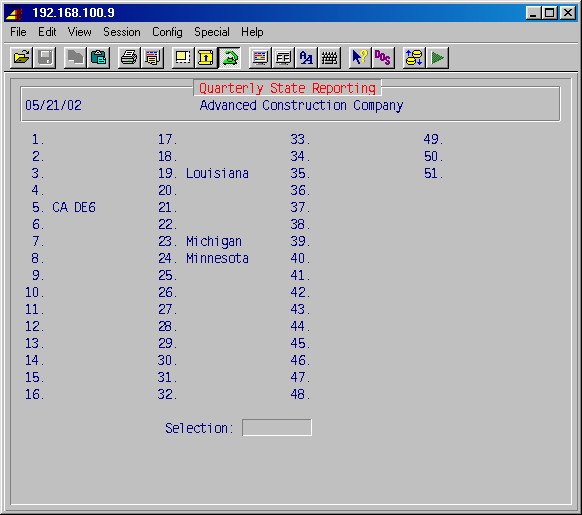
Enter the number of the report you want and press ENTER.
This area is reserved for magnetic quarterly reporting if required by your state and will display a selection screen similar to this:
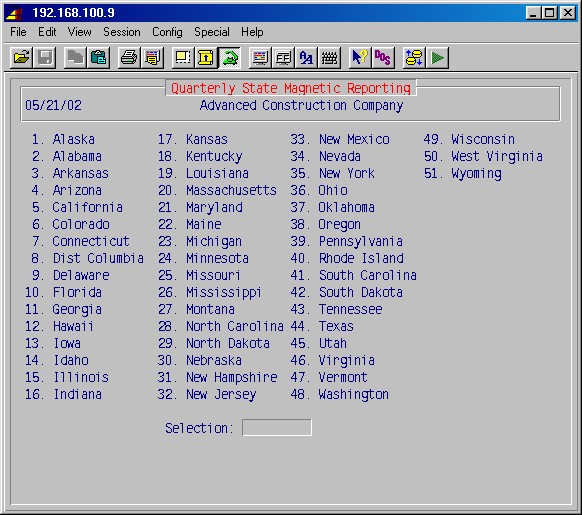
Enter the number of the applicable state you want and press ENTER.
The procedures in this section allow you to make a copy of the payroll database, process and print the W2s, prepare magnetic media for reporting to state and federal agencies, and clear the employee totals.
Since W2's must be processed after the last payroll of the year, and YTD totals must be cleared before the first payroll of the year may be processed, step 5-20-3: Copy Payroll Files Only to a New Database was developed to allow you to make a copy of the payroll portion of the database for the purpose of processing and printing W2s at a later time. Making this copy is the first thing you do after you have completed the last payroll of the year through step 5-18. After this copy is made and verified, you are free to clear YTD totals (step 5-20-10) in the main company database and process the first payroll in the new year.
This selection will display the following menu screen:
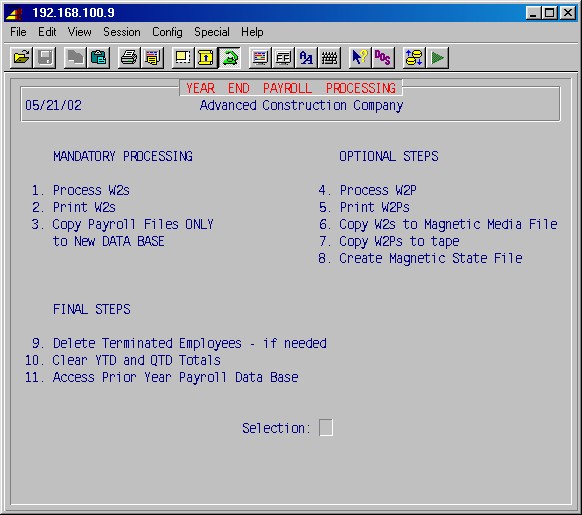
This step must be run before printing the W2s in 5-20-2, and may be run again as required after correcting the payroll numbers. This selection will first display the following prompt:
Print 2 state and city records per W2: yes
There is room for two state and two locality records on each W2 form; answering YES will reduce the number of W2s printed. Answer NO if you require a separate W2 form for each state/city tax record.
The system will next display the following input screen :

Payroll year beginning date for S125:
Payroll year ending date for S125:
If your company has an S125 cafeteria plan for employee benefits, type the date of the first day and the date of the last day of the calendar year for this S125 plan.Subtract vacation from gross:
This applies to unions only, where the union issues a W2 for vacation pay. If you are a non-union shop, answer this NO.The next nine fields relate to specific boxes on the W2 forms and should be completed in accordance with the requirements for those boxes. The deduction description is the exact description you wish to appear on the W2s. The deduction ID refers to the system ID for the deduction specified on the W2s.
250 W2s or more, no totals printed:
If you have 250 or more W2s and you submit your payroll information to the IRS on magnetic media, answer this question YES. If not, answer NO.Space adjustment for left margin : 02
This allows you to adjust the left margin for your printer as required. Enter the number of characters to move the printout towards the right on the form. The default 02 is correct for most printers. We suggest you print W2s on blank paper first and hold the printout up against a W2 form to see what adjustment is needed.Do you really want to process W2s:
If you want to abort this procedure or make changes, type NO ENTER. When you are ready to continue, type YES ENTER. The W2s will now be processed and the results saved in a file ready to be printed on paper or forms at your convenience.
Select some or all departments to print:
Step 5-20-1 must be run before this procedure.
This procedure will print the W2 statements on plain paper and on W2 forms.
Normally, this procedure is run first using plain paper to be sure all information,
such as social security numbers and addresses, is correct.
After verifying all information, run this procedure using the proper continuous
W2 forms. If the forms are not aligned properly or the paper jams, simply
stop the print run and restart it. All the W2s will be printed again.
This selection will prompt:
Enter the printer number to be used: ______
Be sure the forms are inserted properly in the printer, type the printer number and press ENTER to print the W2s.
This is a mandatory procedure used to make a copy of your payroll files and create a temporary new database of these year-end payroll files for the purpose of processing W2s.
NOTE: This is a highly recommended step under any conditions. This is MANDATORY if you need extra time to make payroll adjustments and finalize step 5-20-1: Process W2s, before you have to start a payroll in the new year. Even if you have run step 5-20-1: Process W2s, and the results are satisfactory, it is still recommended that you do this step.
If you are unsure if you need to run this step or you are unsure of the path name your database, please call SI Systems for assistance.
This procedure must be run after you have completed your calendar year end procedures and before you start a payroll in the new year. This allows you to process W2s from this new temporary payroll database at your convenience, making any adjustments required, while continuing to process new payrolls and other payroll data on your normal accounting database.
This selection is almost completely automatic and will take anywhere from a few minutes to hours depending on the size of your payroll and the speed of your machine. The system will display messages regarding dumping and reloading. You will be prompted to press the space bar as required. A new database will be created which is named with the same name as your company database plus pr plus the payroll year. (For example: a copy of the si payroll would be named sipr2002 for the 2002 payroll year).
NOTE: This step must be done before the totals are cleared.
This procedure will process the W2Ps and save the results to a file for printing on paper or forms at your convenience. Simply selecting this procedure will cause this step to be performed.
This procedure will print the W2Ps on plain paper and on W2P forms. Normally,
this procedure is run first using plain paper to be sure all information
is correct.
After verifying all information, run this procedure using the proper continuous
forms. If the forms are not aligned properly or the paper jams, simply stop
the print run and restart it. All the W2Ps will be printed again. This selection
will prompt:
Enter the printer number to be used:________
Simply type the printer number and press ENTER and the system will perform the print job.
NOTE: This step must be done before the totals are cleared.
This procedure will assemble the W2 information and save it in text format in a file on the hard disk which may later be copied on DOS floppies to submit to the IRS.
The procedures to copy this file to DOS floppy disks vary with different systems. In general, you will use the doscp command (doswrite for IBM AIX) and you will rename the file you send to the IRS, W2REPORT.DAT, or in accordance with their latest instructions.
This selection will display the following input screen :
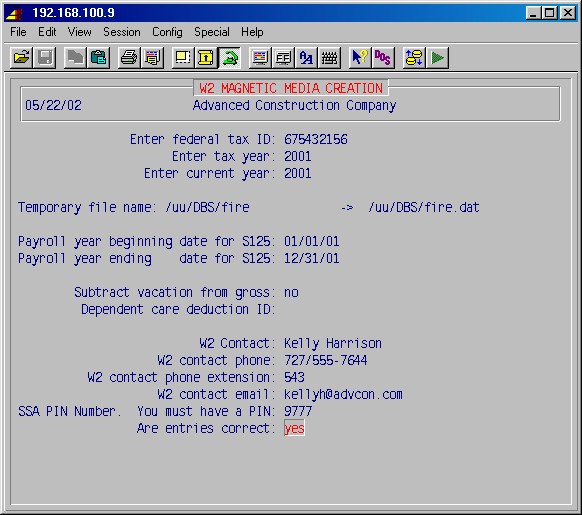
Enter federal tax ID:
Type you federal tax ID number here.
Enter tax year:
Type the tax year for which you are preparing the W2 file.
Enter current year:
Type the current year which will appear on the report.
Enter DOS file name:
Name the file for your purposes with a short (maximum of eight letters or numbers) descriptive name such as W2REPORT. The system will add the .dat extension to the name.
Payroll year beginning date for S125:
Payroll year ending date for S125:
If your company has an S125 cafeteria plan for employee benefits, type the date of the first day and the date of the last day of the calendar year for this S125 plan.
Subtract vacation from gross:
This applies to unions only, where the union issues a W2 for vacation pay. If you are a non-union shop, answer this NO.
Dependent Care Deduction ID:
Enter the ID used for the Dependent Care deduction, if used.
Are entries correct:
Check your answers. If you want to make changes, just press ENTER. When you are ready to proceed, type YES ENTER and the system will prepare your file and return you to the year end payroll processing menu.
Next select some or all departments to process:
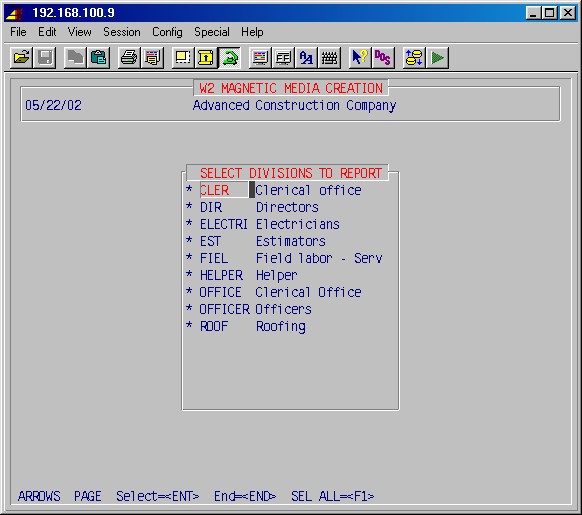
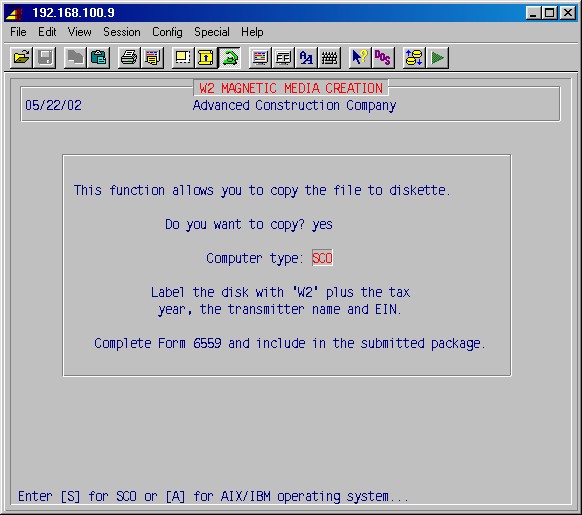
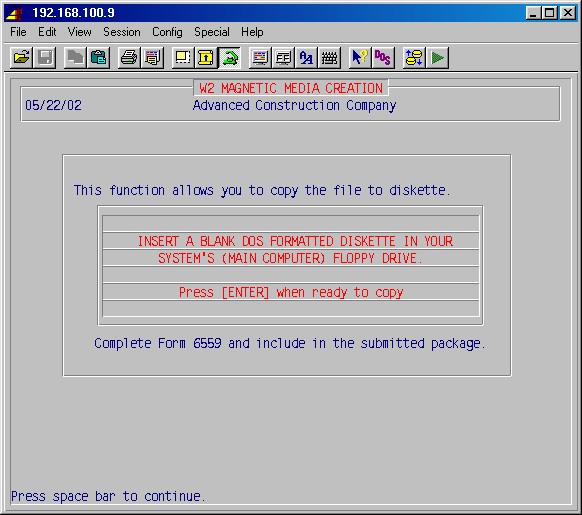
This procedure is not applicable at present.
NOTE: This step must be done before the totals are cleared.
This procedure is used in states with a state income tax. It works very
similar to 5-20-7 in that a state income tax report
is assembled and saved in text format in a file on the hard disk which may
later be copied on DOS floppies to submit to the state. This selection will
display the following input screen :

Complete this screen using the instructions in your state income tax circular.
Are entries correct:
Simply press ENTER if you need to go back and make corrections. When you are ready, press YES ENTER and your state income tax file will be prepared.
This procedure will delete all employees from your records which you have marked as terminated or layed off. This selection will prompt:

Type YES if you are ready to continue. The system will prompt:

Enter the employee ID or * for all:
If you want to delete one or a few terminated employees, type the employee ID here, and delete them one-at-a-time by running this procedure several times.
If you want to delete all employees marked terminated or layed off, type * and press ENTER.
Is this correct?
Check you work and type YES ENTER to process this step.
CAUTION: Do not clear these totals until the W2s have been processed and verified. Then, this procedure must be run before the first payroll of the new year. Do not process W2s again after the totals are cleared.
This selection will clear all payroll information from the year-to-date and quarter-to-date employee totals files. All of the totals as may be viewed in 5-2: Employee Totals, will be set back to zero. This procedure must not be run until after the W2s have been processed and verified, and must be run before the first payroll of the new year. This selection will prompt:
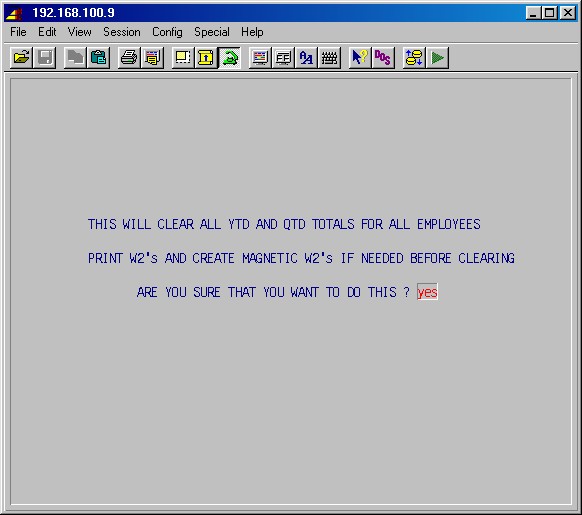
Next, the system will prompt:
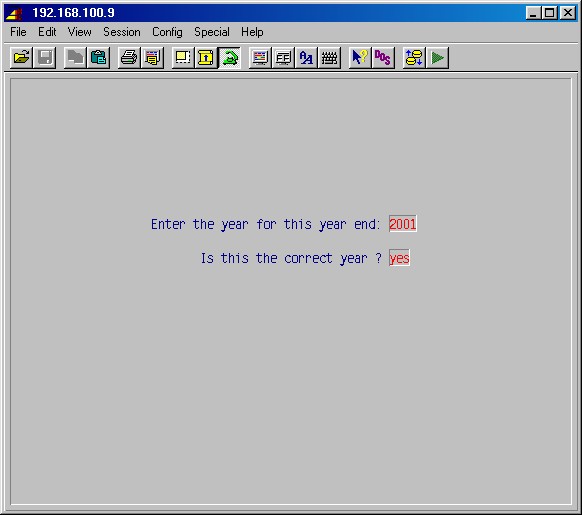
TopType the year for which you wish to clear the totals. If this is correct, press YES ENTER and the system will process this step and return to the Year End Payroll Processing Menu.
This procedure allows you to access prior year payroll databases. The system prompts for the payroll year and then displays the main menu of the payroll database. The Name of your company in the box at the top of the main menu will be followed by the payroll year to alert you that you are in the payroll copy. When you exit the main menu of the payroll copy, you will return to the 5-20 Menu of your Main Company.
All information for every payroll check that is created is stored in this history processing area. This information is stored here during 5-18: Clear Payroll Work Files, as each payroll is run.
These procedures allow viewing or printing payroll history, check by check, for any or all employees for various spans of time. This selection will display the following menu screen:
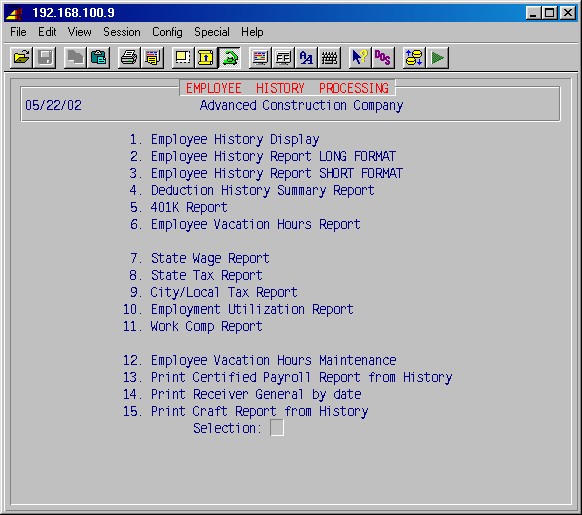
This selection allows you to view the history for a specified employee. The system will first prompt:
Enter employee ID:
Type the ID number of the employee whose records you wish to view and press ENTER. The system will next display a screen of all payroll checks that have been issued to that employee by date and check number as follows :

In many cases, this screen will provide all the information you need. To exit this area simply press the F1 function key.
If you need to view the detail history of a check, select which check by moving the cursor to the check line for the check number you wish to view.
Press ENTER and the system will display the detail of hours, pay, withholding, and deductions for that check as follows :
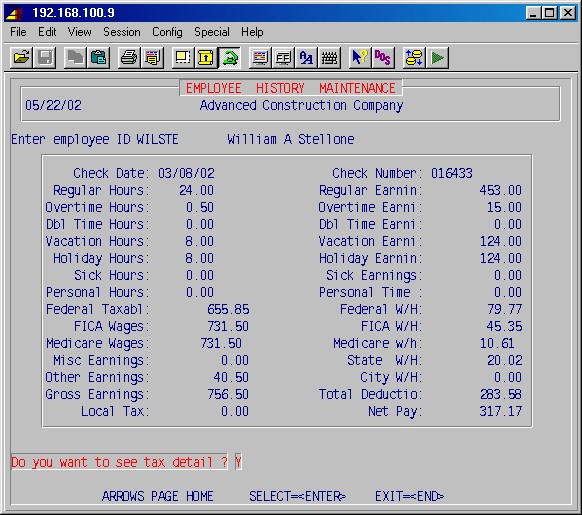
If you want to see the detail for state and city taxes, type YES ENTER and the following screen will be displayed :
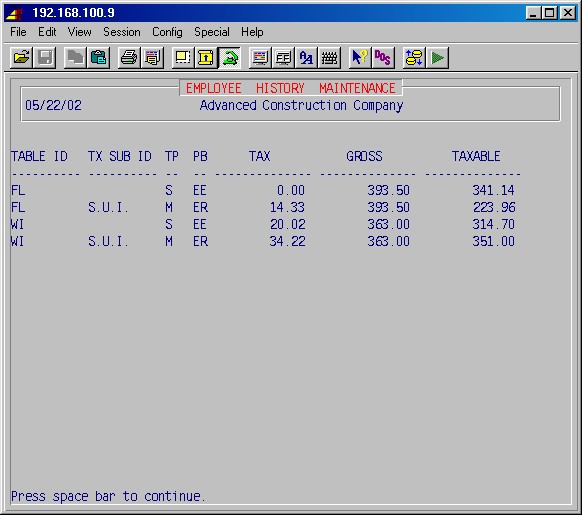
Press the space bar and the screen will again display the previous check history screen. This time the system will prompt:Do you want to see the detail for deductions ? NO
Type YES ENTER and the deduction detail will be displayed as follows :
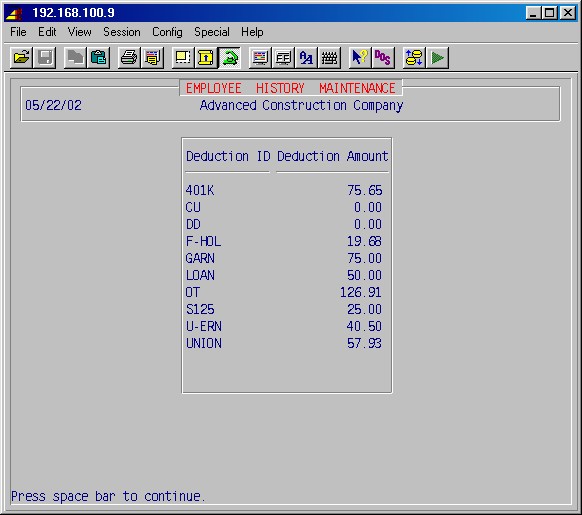
TopPress the space bar, and the system will return you to the employee's check history where you may specify another check date and check number to view.
When you want to exit this area, press ENTER twice and you will return to the first employee history screen where you may type another employee ID.
Press ENTER to exit this procedure and return to the History Processing Menu.
This procedure will print a complete history of all checks issued to a specified employee or all employees for a specified period of time. This long format report will detail all hours, pay, withholding, and deductions in a format similar to the pre check journal prepared in 5-11. This selection will display the following input screen :
Enter beginning employee ID:
Enter ending employee ID:Specify one employee ID in both fields, type a range of employee IDs, or just leave blank for all employees.Enter beginning date:
Enter ending date:Type the beginning and ending dates for the range of check dates you wish to print.Are entries correct:
Press just ENTER if you need to make changes, or type YES ENTER to continue.
The printer selection screen will now be displayed. Type the printer number and the number of copies and press ENTER. The report will now be printed and you will return to the History Processing Menu.
This procedure prints a history of all checks issued to a specified employee or all employees for a specified period time. This is similar to 5-21-2 except this report does not provide as much detail, listing one check per line.
This selection will display the following input screen :
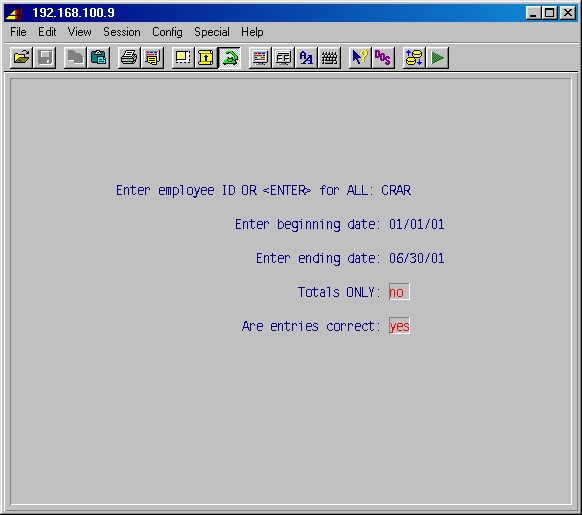
TopEnter employee ID or <Enter> for all:
Type the employee ID for the employee you wish to print out or press just ENTER to print all employees.Enter beginning date:
Enter ending date:Type the beginning and ending dates for the range of check dates you wish to print.Totals ONLY: NO
Answering this YES will print a report with totals only for all of the checks for this employee for this date range.Are entries correct:
Press just ENTER if you need to make changes, or type YES ENTER to continue.The printer selection screen will now be displayed. Type the printer number and the number of copies and press ENTER. The report will now be printed and you will return to the History Processing Menu.
This procedure will print a report by employee name showing the gross wages and total amount deducted for two specified deductions for a specified period of time. This is most often used to produce a report showing the total deducted for a 401k program or a specific insurance deduction.
This selection will display the following input screen :
Enter beginning date
Enter ending date
Type the range of dates for this report and press ENTER.Enter ded ID 1 / report desc
You may print a report with your choice of one or two deductions. One this first line, specify the deduction ID and press ENTER. Next, type a description for this deduction as you want it to appear on the report and press ENTER.Enter ded ID 2 / report desc
Repeat the instructions above for another deduction or press just ENTER twice to leave these fields blank.Subtract deductions from gross: NO
Type YES ENTER if you want the gross pay displayed on this report to be reduced by the amount of these deductions. This would generally only be used in the case of pre-tax deductions such as 401k plans.Employee ID (blank for all):
Leave blank to print report for all employees or enter the ID of the employee you want to print, then press ENTER.Are entries correct: NO
Press just ENTER to go back and make changes. When you are ready, type YES ENTER to continue.The printer selection screen will now be displayed. Type the printer number and the number of copies and press ENTER. The report will be printed and the system will return to the 5-21: History Processing Menu.
This procedure will print a payroll report by employee ID and name showing, for a specified period of time, the gross wages and the amount deducted for a 401k plan. This selection will display the following input screen :
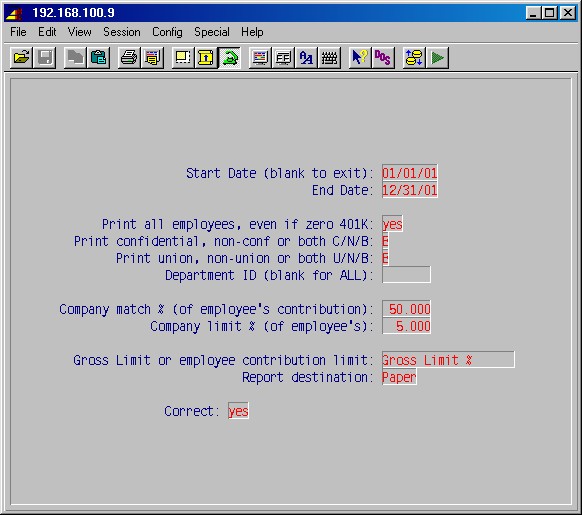
TopStart date (blank to exit)
End date:Type the range of dates for this report and press ENTER.Company match % (of employee's contribution):
Specify the company match as a percentage of the employee's contribution. This is used on the report to show the dollar amount of the company's match.Company limit % (of employee gross):
Specify the company limit as a percent of the employee's gross. This is used on the report to show the dollar amount of the company's match.Correct: YES
Press just ENTER to go back and make changes. When you are ready, type YES ENTER to continue.The printer selection screen will now be displayed. Type the printer number and the number of copies and press ENTER. The report will be printed and the system will return to the 5-21: History Processing Menu.
This procedure prints a report for a specified employee or all employees, showing the number of payroll hours which have accrued on an annual basis, based on the anniversary of each employee's hire date. This report is used by companies that accrue vacation time based on number of hours vested annually from the anniversary date. This report monitors, from the payroll records, number of hours worked, whether the vacation time is vested, and the number of hours of vacation used from the payroll records. Maintenance may be performed on figures for this report, if necessary, in 5-21-12: Employee Vacation Hours Maintenance.
This selection will display the following input screen :
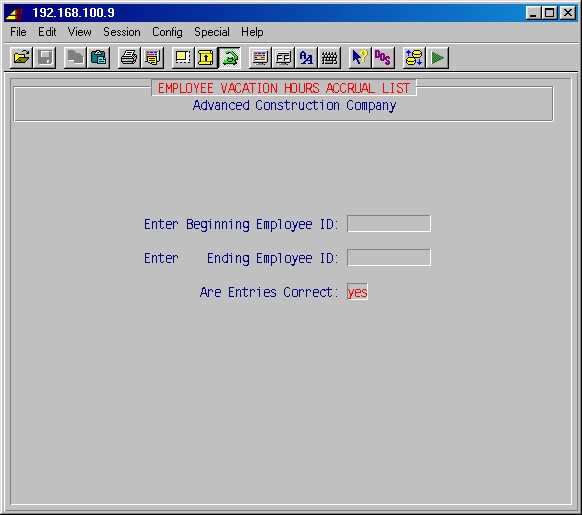
TopEnter beginning employee ID
Enter ending employee IDType the range of employee IDs you want on this report. If you want to print only one employee, type that employee's ID in both fields. If you want all employees, press just ENTER for both fields.Are entries correct: NO
Press just ENTER if you need to make changes. When you are ready, press YES ENTER to continue.The printer selection screen will now be displayed. Type the printer number and the number of copies and press ENTER to print your report.
This is a special report, usually prepared quarterly, used in New York and New Jersey. It will count how many weeks an employee has worked and earned wages in excess of a specified minimum wage. The report will report workers by name, social security number, number of weeks, and the amount per week.
This selection will display the following input screen :
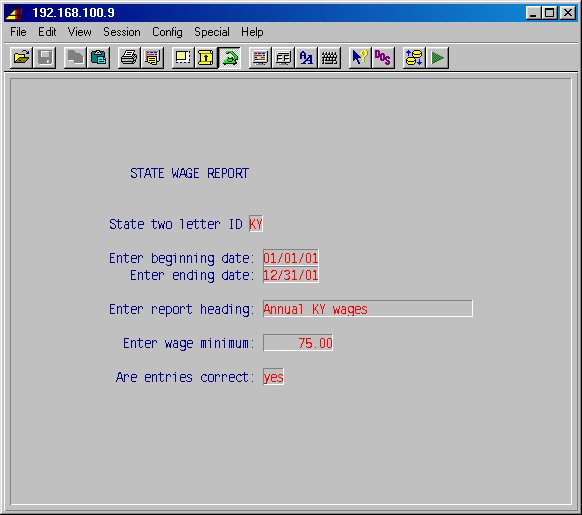
TopState two letter ID:
Enter the standard two letter ID for the state you want to print.Enter beginning date:
Enter ending date:Type the range of dates for the payroll you wish to report.Enter report heading:
Type the heading for this report exactly as you want it to appear.Enter wage minimum:
Type the wage minimum required by state regulations.Are entries correct:
Just press ENTER if you need to go back and make changes, or type YES ENTER to continue.The printer selection screen will now be displayed. Type the printer number and the number of copies and press ENTER. The report will now be printed and the system will return you to the History Processing Menu.
This procedure will print a state tax report similar to the report prepared in 5-19-2: Quarterly State Report. This procedure will allow a state report to be prepared for any specified period of time, primarily for states that require this report monthly.
This selection will display the following input screen :
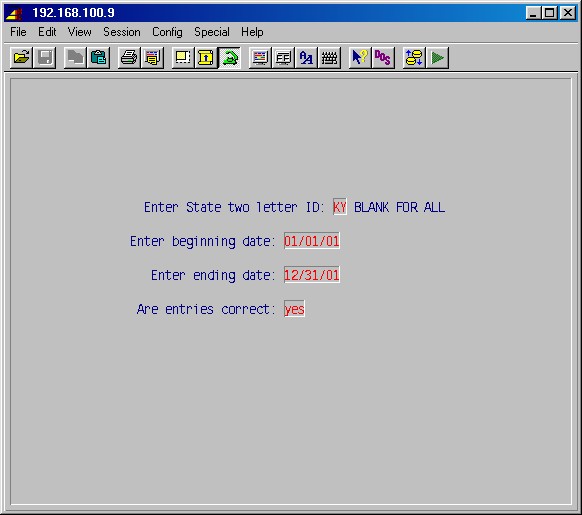
Enter State two letter ID: (BLANK FOR ALL)
Type the two letter state ID here.
Enter beginning date:
Enter ending date:
Type the range of dates for the payroll you wish to report.
Are entries correct:
Just press ENTER if you need to go back and make changes, or type YES ENTER to continue.
The printer selection screen will now be displayed. Type the printer number and the number of copies and press ENTER. The report will now be printed and the system will return you to the History Processing Menu.
This procedure will print a report similar to the one prepared in step 5-19-4: Quarterly City Report. This procedure will allow a city report to be prepared for any specified period of time, primarily for cities that require this report monthly.
This selection will display the following input screen :
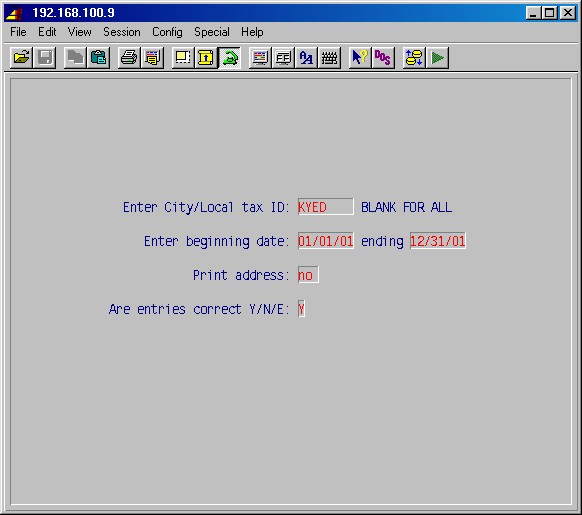
Enter State/City/Local tax ID: (BLANK FOR ALL)
Type the state, city or local tax ID here, as listed in 5-7-1: Tax Table Maintenance.
Enter beginning date:
Enter ending date:
Type the range of dates for the payroll you wish to report.
Are entries correct:
Just press ENTER if you need to go back and make changes, or type YES ENTER to continue.
The printer selection screen will now be displayed. Type the printer number and the number of copies and press ENTER. The report will now be printed and the system will return you to the History Processing Menu.
This procedure will print a report of your employees by work comp classes from job history. If jobs or history have been deleted which had labor between the dates below, then this report will be wrong.
Selecting this procedure will display the following screen:
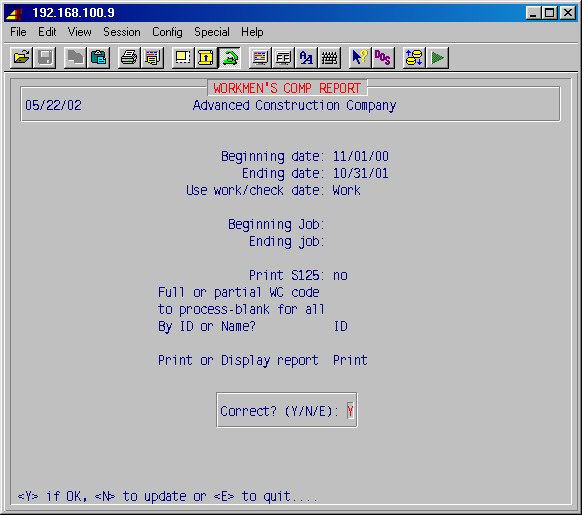
Beginning date
Ending date
Type the range of dates for the time lines you wish to report and press ENTER.
Print S125:
If you want to print S125 on this report, answer YES.
Print or Display report
Type D if you only want to view this report on the screen, or just press ENTER to print it.
By ID or Name
Type N if you want employees listed in order of names rather than by IDs, or just press ENTER.
Correct? (Y/N/E)
If the above entries are correct, just press ENTER. If you want to go back and correct some of the entries, type N and press ENTER. If you decide you don't want to run this report now, type E and press ENTER.
Next, if you answered Y, the printer selection screen will appear. Type the printer number and the number of copies and press ENTER.
This procedure allows you to perform maintenance on the history data reported in the 5-21-11: Employee Vacation Hours List below. That report shows, for a specified employee or all employees, the number of payroll hours which have accrued on an annual basis, based on the anniversary of each employee's hire date. That report is used by companies that accrue vacation time based on number of hours vested annually from the anniversary date. That report monitors, from the payroll records, the number of hours worked, whether the vacation time is vested, and the number of hours of vacation used.
Maintenance is performed in this area primarily when a new database is being set up or if an error has been made in payroll which may effect this report. This selection will display the following input screen :
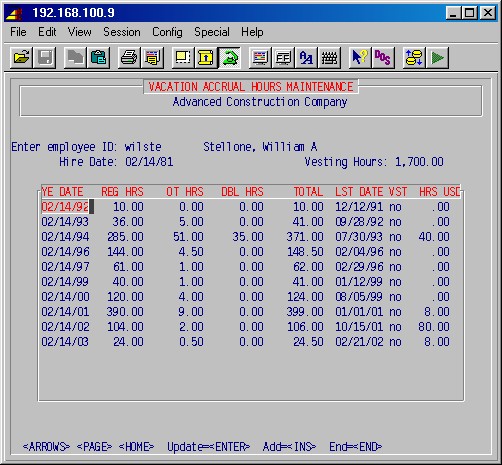
Enter employee ID
Type the employee ID and press ENTER. If this is a valid employee ID, the system will display the employee's name and hire date.
Vesting hours
The first time you choose this procedure, you will be prompted to enter the number of vesting hours. The number of hours to vest vacation time is normally a company wide policy, and should be entered here. After it is entered, it will always appear and may not be easily changed.If you are setting up a new database and you wish to enter the payroll hours and vacation hours used for the current year or previous years, press INS (the Insert key) and complete the fields as prompted.
YE date
This is the year end date based on the employee's anniversary date.
Reg hours
OT hours
Dbl hours
Enter the number of regular hours, overtime hours, and doubletime hours that the employee has worked since his last anniversary date.
Total
The system will display the sum of the regular, overtime, and doubletime hours.
Lst date
This is the date of the last payroll. If you are setting up a new database, you may enter this date if you wish or you may just let the system enter the date of the first payroll you process on the new database.
Vst
Answer YES or NO if this employee has worked the number of hours required to vest vacation benefits.
Hrs usd
This is the number of vacation hours used since the last anniversary date of this employee.
If you need to update or correct any information, press ENTER and make the changes. When you are finished, press END and the system will prompt for another employee ID. press ENTER again to return to the 5-21: History Processing Menu.
© 2001 SI Systems, Inc.
2323 Belleair Road
Clearwater, FL 33764
800/422-2277, 727/531-0669
Fax: 727/536-8858