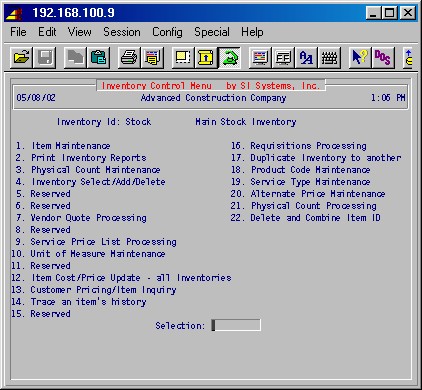
From the main menu, if #8 Inventory-Stock/Requisitions is selected, this inventory control menu is displayed.
8-1 Item Maintenance - This selection allows you to input information concerning each inventory item, and update or change that information as required. You have the option of expanded entry allowing very detailed input of various selling prices and labor rates, or abbreviated entry for faster input of the basic description fields.
8-2 Print Inventory Reports - These procedures will print various inventory reports as of a specified date and specified ranges of report parameters. These reports will list the item IDs, description, qualifier, DCI number, number on hand, cost/UOM, the extended amount, and total.
8-3 Physical Count Maintenance - This procedure allows
you to record an inventory quantity and cost, specifying whether to add this
quantity to those on hand or replace those on hand. This procedure is normally
used only for manual updating of the inventory after the annual inventory
count. Routine inventory receiving is done in the purchase order system or using
steps 8-14: Trace an Item's History. If you are not using
the purchase order module, inventory receiving may also be done here.
8-4 Inventory Select/Add/Delete - The system has the capability to allow you to maintain several inventories if desired. For instance, some companies will maintain a main stock inventory, job site inventory for selected jobs, and truck inventories. This procedure will list all inventories you have set up in order to let you switch between them for the purpose of item maintenance and inventory reports. It also allows you to add a new inventory. The current inventory is displayed at the top of the input area on procedures that allow for different inventories.
This procedure also allows (with proper permission) you to delete an inventory,
which would be done when you are completely through using a job/truck inventory
and you want to put it out of commission. This will delete any reference to
this job/truck inventory out of the inventory
system.
8-7 Vendor Quote Processing - These procedures will allow you record quotes from one or more vendors for each inventory item, print quote lists and spread sheets, and do maintenance on usage history.
8-9 Service Price List Processing - The procedures in this area allow you to identify, price, and produce a list of inventory items that you want the service technicians to carry with them in their service trucks. This list will assist the technicians in pricing the parts used on a service order to enable them to deliver an invoice at the time the service is performed.
8-10 Unit of Measure Maintenance - This selection allows you to specify various units of measure and the count that they represent. The system comes with the most common units of measure as shown in the screen below.
8-12 Item Cost Update- All Inventories - Item cost normally is not changed manually because this is updated when you enter the cost in inventory receiving maintenance. However, this procedure will allow you to input new cost data for specified item IDs for all inventories.
8-13 Item inquiry - This procedure allows you to display inventory information for a specified item ID. The system will display current inventory locations, quantity on hand, list selling price, and cost price.
8-14 Trace an Item's History - This procedure provides an alternative method of receiving new inventory purchases into the inventory system if you are not using the purchase order system. If you are using the PO system, receiving should be done in that area.
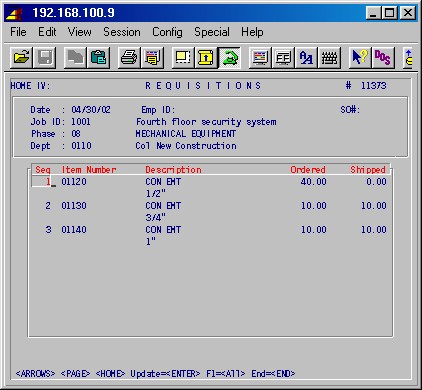
8-16 Requisitions Processing - These procedures allow you to create and print requisitions, as well a perform various requisition maintenance activities. You may requisition material from the main stock inventory to a job, a job site inventory, a truck inventory or a service order, or requisition from the job or truck inventory back to the main stock inventory, or from one truck inventory to another.
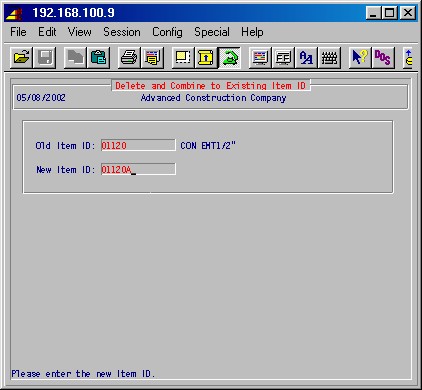
8-17 Duplicate Inventory to another - This procedure allows you to make a copy of an inventory or to merge one inventory into another.
8-18 Product Code Maintenance - This procedure allows you to set up and maintain product codes. Product codes allow you to identify items in inventory as belonging to groups.
8-19 Service Type Maintenance - This procedure allows you to set up and maintain service types. Service types parallel AR sales types (as set up in 1-4-1: Sales Type Maintenance) and controls your accounting in service, but this feature allows you to have multiple service types without having to set up an AR sales type for each.
8-20 Alternate Price Maintenance - This procedure allows you to set up and maintain alternate prices (price schedules) for items, allowing different customers to have different prices for each item. 8-21 Physical Count Processing - This procedure allows you to create a separate database only containing only inventory data, used when doing a physical counts of the inventory. The on-hand quantities in the main database inventory can then be set to zero, allowing normal requisitions, sales and receiving to continue while physical counts are entered in the inventory database. Once complete, the physical counts in the inventory database can be added back into the main database.
Sales types (departments) and GL account numbers
Sales types (departments) should already have been set up as part of the AR
module setup in 1-4-1.
Select 7-1-1: Job Description Maintenance and ensure the job STOCK is set up right (e.g. sales type ID, tax IDs).
Select 8-1: Inventory Maintenance and ensure that the item with ID :M has been set up.
Select 8-10: Unit of Measure Maintenance and set up the unit of measures you'll be using.
Select 8-18: Product Code Maintenance and set up product codes, if desired.
Used in 8-16: Requisitions Processing.
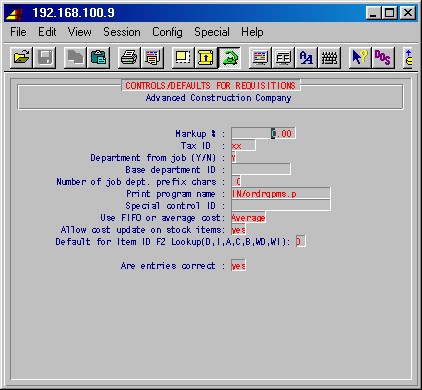
Markup %
Enter the percentage that item cost is to be marked up when requisitioning to
a job.
Tax ID
Enter the tax ID for tax on item requisitioned to a job.
Department from job (Y/N)
If you want the department (sales type) for the requisition to come from the
job, enter Yes. If you want the department to be the default below, enter
No.
Base department ID
Enter the default department (sales type) for requisitions to jobs.
Number of job dept. prefix chars
Normally 0.
Print program name
Normally IN/ordrqpms.p
Special control ID
Leave blank.
Use FIFO or average cost
Specify for stock requisitions, POs and Service Orders whether the system uses
the actual cost of an item (FIFO) or a weighted average as a basis for
cost. Answer <A>verage or <F>ifo. If you haven't been
using FIFO, you can't just switch, so answer <A>.
Allow cost update on stock items
If answered no the system prevents you from changing the cost on stock items
during requisition.
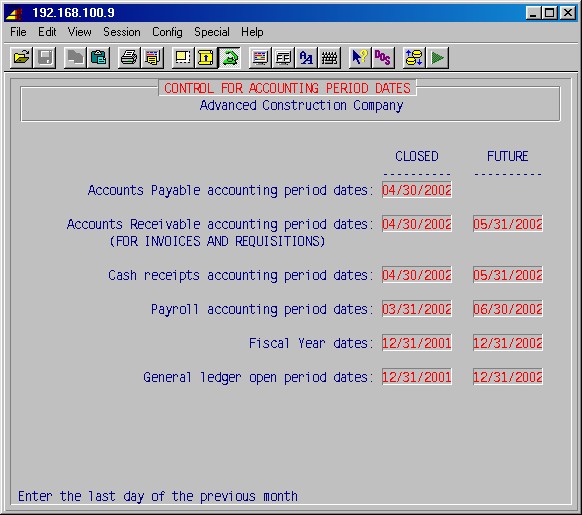
Enter appropriate dates to control the accounting dates (new transaction dates entered will have to be later than the "closed" dates and before or on the "future" dates). The purpose of these "date locks" is to prevent inadvertent entry of wrong dates, e.g. wrong year.
Accounts Receivable closed accounting period date
Operators will not be allowed to enter requisition dates with or earlier than this date.
Accounts Receivable future date limit
Operators will not be allowed to enter requisition dates later than this date.Top
This selection allows you to input information concerning each inventory item, and update or change that information as required. This selection will prompt:
Abbreviated entry : NO
You may choose from two input screens here. The abbreviated entry screen allows
you to input or make changes to the principal components of the inventory item
description. The expanded entry screen allows you additional detail and options.
We will explain both input screens in
detail.
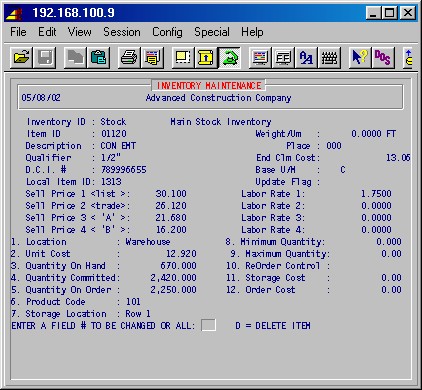
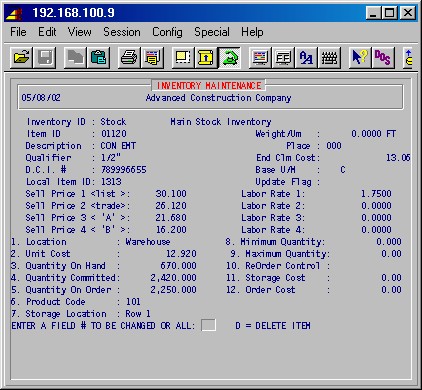
Selecting the default NO by pressing just ENTER, will display a detailed input screen which will be displayed in three sets of fields, one set at a time, starting at the top 1/3 of the screen. You have the ability to edit each set when it is displayed.
This data input screen with all three sets of fields is represented as
follows (items in bold are examples):
TopItem ID:
If you are entering an existing item ID
Type the item ID [H] and press ENTER. The first set of ten fields will be displayed on the upper 1/3 of the screen and will be filled in with any data previously entered into the system.If you are entering a new item ID
Type up to a 15 character (numbers and letters) ID to identify this item. If this item ID has not been entered previously, the system will prompt:No item exists. Do you want to create a new one ? YES
Press just ENTER to continue defining a new item, or type NO ENTER to position the cursor back on the item ID. You may now retype an ID, or press just ENTER to exit this procedure and return to the Inventory Control Menu.
Description:
This is the primary description. Type a description (up to 25 characters) which will categorize this item by type. The primary description should be broad - from the general to the specific - with a space between each characteristic. The qualifier to complete the description will be specified below. As in the sample screen above, the description CON EMT describes "conduit, emt".Qualifier:
This will qualify the main description by size, color, number, etc. Type a qualifier (up to 25 characters) to complete the description (Example: 3/4" describes 3/4" EMT).D.C.I. #:
This is the industry standard number assigned to this item. Type this number (up to 20 characters) or leave the question mark (?) if you don't know the DCI #.Local item ID:
This is a place for an alternate item ID for this item if needed. Otherwise, leave the question mark (?).Weight/Um:
This is the weight of this item per the unit of measure for industry standard packaging quantities. Type the weight and press ENTER; then type the unit of measure (from the unit of measure file in 8-10: Unit of measure maintenance) and press ENTER. (When 8-9: Service Price List Processing is used, the Weight field is used to store the service list price.)Place:
This allows you to specify the place (position) in the list of main descriptions where you want this item to appear. If you leave this field at 000, the system will sort and display the inventory items in alpha-numeric order by main description then qualifier.End clm cost:
Type the end column cost for this item here.Base U/M:
Type the unit of measure used for pricing this item as found in the unit of measure file in 8-10: Unit of measure maintenance.Update flag:
This indicates whether the prices for this item will be automatically updated from industry pricing services.Custom
This selection gives access to a separate user defined screen as set up in 13-8-16: User Defined Data Maintenance, with as many as 17 fields to hold additional information about an item.
When this set of ten fields is completed, any field may be changed by typing the number of the field and pressing ENTER. The field will be highlighted to indicate it is in an edit mode. Type the new data and press ENTER.When you are finished making entries to the first set of fields, press ENTER and a second set of eight fields will be displayed below the first set.
Sell price 1 <list>:
Type your list selling price here. If one of the national price updating services is used, this will be filled in by the lowest selling price supplied.Sell price 2 <trade>:
Type your trade selling price here. If one of the national price updating services is used, this will be filled in by the next lowest selling price supplied.Sell price 3 <'A'>:
Type your sell price per trade service pricing 'A' guidelines here. If one of the national price updating services is used, this will be filled in by the third lowest selling price supplied.Sell price 4 <'B'>:
Type your sell price per trade service pricing 'B' guidelines here. If one of the national price updating services is used, this will be filled in by the fourth lowest selling price supplied.Labor rates are used in conjunction with the unit estimating module.
Labor rate 1:
Type the labor rate per hour for a slower than normal installation.Labor rate 2:
Type the labor rate per hour for a normal installation.Labor rate 3:
Type the labor rate per hour for a fast installation.Labor rate 4:
Type the book value per hour for labor.When this set of eight fields is completed, any field may be changed by typing the number of the field and pressing ENTER. The field will be highlighted to indicate it is in an edit mode. Type the new data and press ENTER. When you are finished making entries to this
second set of fields, press ENTER and a third set of twelve fields will be displayed below the first and second set.Location:
Type the location (up to twelve characters) of the inventory item. This is normally left warehouse for the main inventory, but may be more specific if inventory is stored in multiple locations.Unit cost:
Type the unit cost price of this item per the base unit of measure specified above.Quantity on hand:
This field allows you to manually adjust the quantity on hand, however this figure will be kept current by the system if you are using the purchase order and service order modules.Quantity committed:
This field allows you to manually adjust the quantity committed, however this figure will be kept current by the system if you are using the service order module.Quantity on order:
This field allows you to manually adjust the quantity on order, however this figure will be kept current by the system if you are using the purchase order module.Product code:
You may enter a sales or product code (up to 12 characters) for this item which is unique to your company if desired, from list of sales type IDs entered in 1-4-1.Storage location:
Type your warehouse location code (up to 25 characters) if desired.Minimum quantity:
This is a quantity which you determine is the minimum you want to have on hand. This will cause this item to print on the reorder report when the quantity falls below this minimum number.Maximum quantity:
This is the maximum quantity you want to have on hand. This number will aid you in reordering.Reorder control:
This feature is not available at this time.Storage cost:
Type your cost of storage here if desired.Order cost:
Type your cost of ordering this item here if desired.When this set of twelve fields is completed, any field may be changed by typing the number of the field and pressing ENTER. The field will be highlighted to indicate it is in an edit mode. Type the new data and press ENTER. When you are finished making entries to this third set of fields, press ENTER twice and the cursor will return to the item ID field ready for another item entry.
To exit this procedure, press ENTER again and you will return to the Inventory Control Menu.
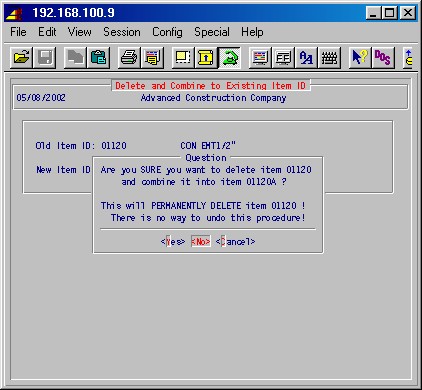
Deleting an inventory item
To delete an inventory item, type the item ID and press ENTER. The first set of fields will be displayed and the bottom line menu will prompt you to enter a field to be changed. Here you may delete the entire inventory item record by typing "d" and pressing ENTER. The system will prompt:Do you really want to delete this item from this inventory ?: NO
If you are sure, type YES ENTER and the item will be deleted from the system.
The abbreviated entry screen allows you to input or make changes to the principal components of the inventory item description on an abbreviated input screen. At the prompt:
Abbreviated entry : NO
Type YES ENTER to choose the abbreviated screen. This screen will look like this :
Item ID:
If you are entering an existing item ID
Type the item ID [H] and press ENTER. The screen will be filled in with any data previously entered into the system.If you are entering a new item ID
Type up to a 15 character (numbers and letters) ID to identify this item. If this item ID has not been entered previously, the system will prompt:No item exists. Do you want to create a new one ? YES
Press just ENTER to continue defining a new item, or type NO ENTER to position the cursor back on the item ID. You may now retype an ID, or press just ENTER to exit this procedure and return to the Inventory Control Menu.
Description:
This is the primary description. Type a description (up to 25 characters) which will categorize this item by type. The primary description should be broad - from the general to the specific - with a space between each characteristic. The qualifier to
complete the description will be specified below. As in the sample screen above, the description CON EMT describes "conduit, emt".Qualifier:
This will qualify the main description by size, color, number, etc. Type a qualifier (up to 25 characters) to complete the description (Example: 3/4" describes 3/4" EMT).
Base U/M:
Type the base unit of measure used for pricing this item as found in the unit of measure file in 8-10.
Local item ID:
This is a place for an alternate item ID for this item, if needed. Otherwise leave blank.
DCI/Bar Code ID:
This is the industry standard number assigned to this item. Type this number (up to 20 characters) or leave the question mark (?) if you don't know the DCI #.
Sales Type ID:
Enter the sales type [H] this item is normally posted to.
Division ID:
Enter the division [H] this item is normally posted to.
Tax Control Flag:
Normally leave blank.
List Price 1 <'L1'>:
Type your list selling price here. If one of the national price updating services is used, this will be filled in by the lowest selling price supplied.
List Price 2 <'L2'>:
Type your trade selling price here. If one of the national price updating services is used, this will be filled in by the next lowest selling price supplied.
List Price 3 <'L3'>:
Type your sell price per trade service pricing 'A' guidelines here. If one of the national price updating services is used, this will be filled in by the third lowest selling price supplied.
List Price 4 <'L4'>:
Type your sell price per trade service pricing 'B' guidelines here. If one of the national price updating services is used, this will be filled in by the fourth lowest selling price supplied.
Average Cost:
Type the unit cost price of this item per the base unit of measure specified above.
Reorder control:
This feature is not available at this time.
Vendor ID:
Enter the ID of the vendor normally supplying this item, if applicable.
Quantity On Hand:
This field allows you to manually adjust the quantity on hand, however this figure will be kept current by the system if you are using the purchase order and service order modules.
Quantity On Order:
This field allows you to manually adjust the quantity on order, however this figure will be kept current by the system if you are using the purchase order module.
Quantity Committ:
This field allows you to manually adjust the quantity committed, however this figure will be kept current by the system if you are using the service order module.Minimum Quantity:
This is a quantity which you determine is the minimum you want to have on hand. This will cause this item to print on the reorder report when the quantity falls below this minimum number.Maximum Quantity:
This is the maximum quantity you want to have on hand. This number will aid you in reordering.Product code:
You may enter a sales or product code (up to 12 characters) for this item which is unique to your company if desired. This groups items for the same markup and/or the same commission percentage.Commission %
Not generally used.Assembly Flag
Enter YES if this item is an assembly of other items.Custom Data
This selection gives access to a separate user defined screen as set up in 13-8-16:User Defined Data Maintenance, with as many as 17 fields to hold additional information about the item.When this set of fields is completed, any field may be changed by typing the number of the field and pressing ENTER. The field will be highlighted to indicate it is in an edit mode. Type the new data and press ENTER.
If you wish to see or print a list of purchases for this item press P and ENTER.
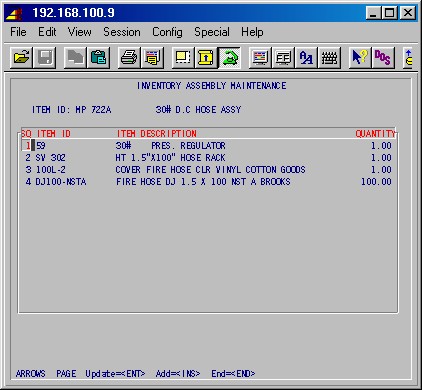
If this item is an assembly and you want to enter or see what items make up this assembly, press A and ENTER. This will take you to the following screen :
SQ
This is a line (sequence) number automatically assigned by the system.ITEM ID
Enter the ID [H] of an item that is part of this assembly.ITEM DESCRIPTION
The description of the selected item will be displayed.QUANTITY
Enter the quantity of this item used in this assembly.You may use the ARROW, PAGE and ENTER keys to highlight and update a line. Use the DEL key to delete a line and the INS key to add a line.
Press END when done, and you'll be returned to the previous screen.
When you are finished making entries to this third set of fields, press ENTER and the cursor will return to the Item ID field ready for another item entry.
To exit this procedure, press ENTER again and you will return to the Inventory Control Menu.
Deleting an inventory item
To delete an inventory item, type the item ID and press ENTER. The first set of fields will be displayed and the bottom line menu will prompt you to enter a field to be changed. Here you may delete the entire inventory item record by typing "d" and pressing ENTER. The system will prompt:Do you really want to delete this item from this inventory ?: NO
If you are sure, type YES ENTER and the item will be deleted from the system.
These procedures will print various inventory reports for the inventory selected (in 8-4), as of the date run and specified range of report parameters.
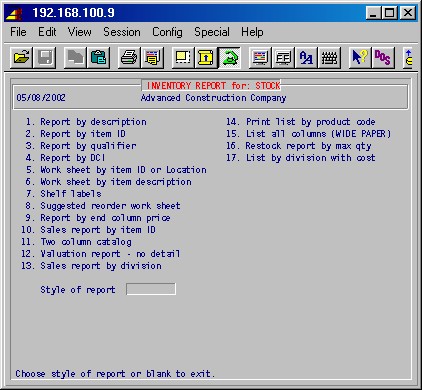
Most of these reports will list the item IDs, description, qualifier, DCI number, number on hand, cost/UOM, the extended amount, and total.
Style of report
Type the number of the report you want and press ENTER.
You'll then be prompted:
Print items with update flags only? NO
Answer Yes if you want to print only those items you have flagged for automatic updates from industry pricing services. Press just ENTER to print all items.
Print items with zero quantity? yes
Answer No if you do not want items with zero quantities printed.
Are entries correct: yes
Check you entries and type NO ENTER to go back and make changes, or press just ENTER to continue. You'll then be prompted for the printer and number of copies.TopNOTE: When you perform these procedures, the system will notify you that these reports are being printed; however, it may be several minutes before your printer starts printing the report. This is because the system may take some time to process the large number of items on the printout.
This selection will print a report of selected inventory items in description order. The system will prompt:
Beginning description:
Ending description:
Beginning item ID:
Ending item ID:
Specify a range of descriptions and/or item IDs by typing the beginning and ending descriptions (and/or IDs), or a particular description (and/or ID) by putting it in both fields, or all inventory items by leaving all fields blank.
Which Price Column:
Specify which price column to print (L1, L2, L3 or L4).
This selection will print a report of selected inventory items by item IDs, in alpha-numeric order. The system will prompt:
Beginning item ID:
Ending item ID:
Specify a range of descriptions and/or item IDs by typing the beginning and ending descriptions (and/or IDs), or a particular description (and/or ID) by putting it in both fields, or all inventory items by leaving all fields blank.
Which Price Column:
Specify which price column to print (L1, L2, L3 or L4).
Use Regular or Local Item ID?:
If you type L the report will be printed in order of Local Item IDs rather than regular item ID, and the above item ID range will apply to local item IDs.
This selection will print a report of selected inventory items in qualifier
order. The system
will prompt:
Beginning description:
Ending description:
Beginning item ID:
Ending item ID:
Specify a range of descriptions and/or item IDs by typing the beginning and ending descriptions (and/or IDs), or a particular description (and/or ID) by putting it in both fields, or all inventory items by leaving all fields blank.
Which Price Column:
Specify which price column to print (L1, L2, L3 or L4).
This selection will print a report of selected inventory items in DCI # (the industry standard number assigned to this item), order. The system will prompt:
Beginning DCI:
Ending DCI:
Specify a range of DCI numbers by typing the beginning and ending DCI numbers, or a particular DCI number by putting it in both fields, or all inventory items by leaving both fields blank.
TopWhich Price Column:
Specify which price column to print (L1, L2, L3 or L4). 8-2-5: Inventory Work Sheet by Item ID This selection will print an inventory work sheet in item ID order showing the complete description with the qualifier for each item. A work sheet is simply a listing, used to take physical inventory counts of the inventory items, with the base unit of measure adjacent to a blank line to mark the actual quantity on hand.
The system will prompt:
Print by storage location:________
Beginning item ID:
Ending item ID:
Specify a range of item IDs by typing the beginning and ending IDs, or a particular item ID by putting it in both fields, or all inventory items by leaving both fields blank.Beginning Prod Code:
Ending Prod Code:
Specify a range of product codes by typing the beginning and ending product codes, or a particular product code by putting it in both fields, or all inventory items by leaving both fields blank.
Beginning Location: Ending Location:
This selection will print an inventory work sheet in item ID order showing
the complete description with the qualifier for each item. A work sheet
is simply a listing, used to take physical inventory counts of the inventory
items, with the base unit of measure adjacent to
a blank line to mark the actual quantity on hand.
The system will prompt:
Print by storage location:________
Beginning item ID:
Ending item ID:
Specify a range of item IDs by typing the beginning and ending IDs, or a particular item ID by putting it in both fields, or all inventory items by leaving both fields blank.
Beginning Prod Code:
Ending Prod Code:
Specify a range of product codes by typing the beginning and ending product codes, or a particular product code by putting it in both fields, or all inventory items by leaving both fields blank.Beginning Location: Ending Location:
This selection will print an inventory work sheet in item description order showing the complete description with the qualifier for each item. A work sheet is simply a listing, used to take the physical inventory count of the inventory items, with the base unit of measure adjacent to a blank line to mark the actual quantity on hand.
The system will prompt:
Beginning description:
Ending description:
Specify a range of qualifier descriptions by typing the beginning and ending description, or a particular item description by putting it in both fields, or all inventory items by leaving both fields blank.
Beginning item ID:
Ending item ID:
Specify a range of item IDs by typing the beginning and ending IDs, or a particular item ID by putting it in both fields, or all inventory items by leaving both fields blank.
Beginning Prod Code:
Ending Prod Code:
Specify a range of product codes by typing the beginning and ending product codes, or a particular product code by putting it in both fields, or all inventory items by leaving both fields blank.
This selection will print inventory shelf labels, eleven to a page, with your SKU # (item ID), inventory description, and qualifier, DCI #, minimum and maximum quantities, unit of measure, and weight.
The system will prompt:
Beginning item ID:
Ending item ID:
Specify a range of item IDs by typing the beginning and ending IDs, or a particular item ID by putting it in both fields, or all inventory items by leaving both fields blank.
This selection will print a reorder worksheet showing suggested reorder amounts calculated by the system. The list will be in numerical order by item IDs, with a complete description, on hand, minimum quantity, maximum quantity, and reorder quantity, cost, and extended amount.
The system will prompt:
Beginning item ID:
Ending item ID:
Specify a range of item IDs by typing the beginning and ending IDs, or a particular item ID by putting it in both fields, or all inventory items by leaving both fields blank.
Beginning Prod Code:
Ending Prod Code:
Specify a range of product codes by typing the beginning and ending product codes, or a particular product code by putting it in both fields, or all inventory items by leaving both fields blank.
Min/Max list only:
Answer Yes to print a report that only lists item ID, minimum quantity, maximum quantity, description and unit of measure for each selected item. If you answer No the report will print all items where the minimum quantity is greater than zero and the on-hand quantity is less than the minimum quantity, listing item ID, on-hand, minimum quantity, maximum quantity, suggested order quantity, description, DCI code, cost, unit of measure and extended amount for each selected item.
This selection will print a report by end column price.
This selection will prompt:
Beginning code:
Ending code:
Specify a range of item IDs by typing the beginning and ending end column code numbers, or a particular code number for one item by putting it in both fields, or all inventory items by leaving both fields blank. This is used only by those companies which have used the end column price column for special category codes instead of actual prices.
This selection will print a sales report in item ID order, showing the complete description, the selling prices, cost, month-to-date and year-to-date quantities sold, and the year-to-date extended amount based on the list price.
The system will prompt:
Usage date:
Enter any date in the month and year you want to report.
Beginning item ID:
Ending item ID:
Specify a range of item IDs by typing the beginning and ending IDs, or a particular item ID by putting it in both fields, or all inventory items by leaving both fields blank.
Beginning local item ID:
Ending local item ID:
Specify a range of local item IDs by typing the beginning and ending local item IDs, or a particular local item ID by putting it in both fields, or all inventory items by leaving both fields blank.
Beginning description:
Ending description:
Specify a range of qualifier descriptions by typing the beginning and ending description, or a particular item description by putting it in both fields, or all inventory items by leaving both fields blank.
Location:
Normally leave blank. If you enter a character here, the report will be limited to items that have this character as the third character from the left in "Storage Location".
Subtotal by group:
If you answer Yes here, you'll get a subtotal for each group of items where the first four characters of the item ID are identical.
This selection will print a two column catalog in item ID order, showing item ID, description, price and unit of measure.
The system will prompt:
Beginning item ID:
Ending item ID:
Specify a range of item IDs by typing the beginning and ending IDs, or a particular item ID by putting it in both fields, or all inventory items by leaving both fields blank.
Beginning local item ID:
Ending local item ID:
Specify a range of local item IDs by typing the beginning and ending local item IDs, or a particular local item ID by putting it in both fields, or all inventory items by leaving both fields blank.
Beginning description:
Ending description:
Specify a range of qualifier descriptions by typing the beginning and ending description, or a particular item description by putting it in both fields, or all inventory items by leaving both fields blank.
Beginning DCI:
Ending DCI:
Specify a range of DCI numbers by typing the beginning and ending DCI numbers, or a particular DCI number by putting it in both fields, or all inventory items by leaving both fields blank.
Which price column:
Specify which price column to print (C for cost, L1, L2, L3, L4 or leave blank to not print any price). You may also type end here, if you want to exit this report without printing it.
This selection will calculate and print the value of the selected inventory, showing total negative value and total positive value, based on quantity on hand and cost.
The system will prompt:
List prefixes of inventories to skip (Trucks, jobs, etc.):
Here you may enter up to 20 prefixes of inventories you wish to exclude from the report. Any inventory with an ID beginning with one of these prefixes will be excluded.
This selection will print a sales report of items in groups of divisions, showing the complete description, the selling prices, cost, month-to-date and year-to-date quantities sold, and the year-to-date extended amount based on the list price.
The system will prompt:
Usage date (last day of month):
Enter the date of the last day in the month and year you want to report.
This selection will print a list of selected items grouped by product code, showing product code, item ID, description, qualifier, tax code, the four list prices and, optionally, a cost column.
The system will prompt:
Enter Beginning Product Code:
Enter Ending Product Code:
Specify a range of product codes by typing the beginning and ending product codes, or a particular product code by putting it in both fields, or all inventory items by leaving both fields blank.
Print Cost:
Answer Yes if you also want the cost column printed.
Print By Desc OR Item ID:
Type D if you want the report to list in order of description within the product code groups, otherwise I to list by item ID.
OK To Print Report:
Answer Yes when you're ready to print the report.
This selection will print a list of selected items showing item ID, description, qualifier, DCI number, alternate item ID, product code, unit of measure, the four list prices and cost.
The system will prompt:
Beginning item ID:
Ending item ID:
Specify a range of item IDs by typing the beginning and ending IDs, or a particular item ID by putting it in both fields, or all inventory items by leaving both fields blank.
This selection will print a list of selected items where the max quantity is greater than zero, showing storage location, item ID, description, qualifier, and a line to write a count, with a new page for new each first character of the storage location.
The system will prompt:
Beginning item ID:
Ending item ID:
Specify a range of item IDs by typing the beginning and ending IDs, or a particular item ID by putting it in both fields, or all inventory items by leaving both fields blank.
Location (BLANK ALL):
If you enter a character here, the report will be limited to items that have this character as the first character in "Storage Location".
NOTE: This procedure does not update accounting.
This procedure allows you to record an inventory quantity and cost, specifying whether to add this quantity to those on hand or replace those on hand.
This procedure is normally used only for manual updating of the inventory after the annual inventory count. Routine inventory receiving is done in the purchase order system. If you are not using the purchase order module, inventory receiving should be done in 8-14: Trace an Item's History, not here.
Corrections are made by specifying the item ID you wish to change or correct, and making a reversing entry, by entering the same cost and a negative quantity, which will have the effect of canceling the original entry. Then specify the item ID a third time, and enter the correct quantity.
This selection will first prompt:
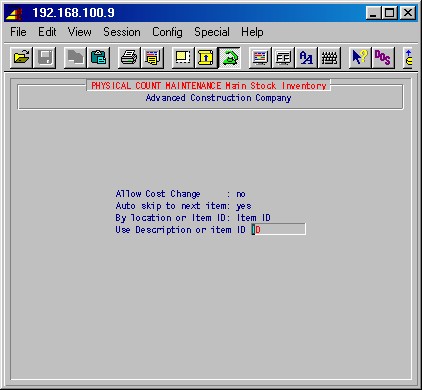
Allow cost change:
Answer Yes if you want to be able to change the costs of items.
Auto skip to next item:
Answer Yes if you want to have the system automatically suggest the next item when done with an item.
"use description or item ID: Item ID
If you answered Yes to Auto skip to next item, you'll be prompted:
Use Description or item ID
Type D if you want the system to automatically advance to the next item in description order; otherwise I.
Next the system will display the following input screen :
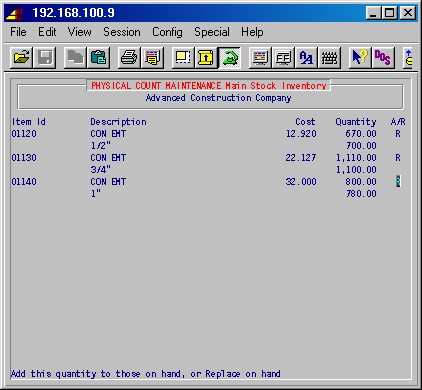
Item ID:
Type the item ID here and press ENTER. The description, previous cost, and quantity on hand will be displayed by the system.
Description:
The description will only be displayed here and may not be changed in this procedure.
Cost:
The previous cost will be displayed highlighted to indicate it is in the edit mode. Type the new cost figure here if it is different.
Quantity:
Type the quantity you wish to add or subtract from the quantity on hand. If you wish to subtract from the quantity on hand (as in the case of a reversing entry for a correction) just enter a negative number.
After the quantity has been entered, the system will prompt:
Add this quantity to those on hand, or Replace on hand
If you are adjusting the quantity on hand as you may need to do after the
annual inventory count, type Replace ENTER here. The cursor will
now be positioned for you to input another item ID. If you want to exit this
area, leave the Item ID blank and press ENTER again and you
will return to the #8 Inventory-stock/requisitions menu.
The system has the capability to allow you to maintain several inventories
if desired. For instance, some companies will maintain a main stock inventory,
job site inventory for selected jobs, and truck inventories. This procedure
will list all inventories you have set up in order to let
you switch between them for the purpose of item maintenance and inventory reports.
It also allows you to add a new inventory.
This selection will display the following input screen :
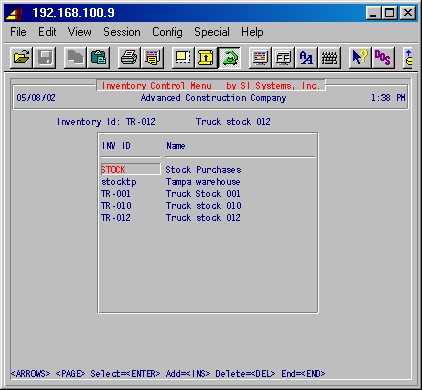
Use the ARROW or PAGE keys to highlight the inventory you want and press ENTER to select it.
Press END to leave this procedure without changing inventory.
Press INS if you wish to create a new job site inventory and the system will prompt:
ID of new job site/truck inventory:
Enter the ID of the new inventory (must be a valid job ID) and press ENTER.NOTE: Before you create a new inventory you must first create a job in 7-1-1: Job cost description maintenance. Then create the new inventory with an inventory ID the same as the job ID.
Press DEL if you want to delete an inventory. This is normally only done when you are completely through using a job/truck inventory and you want to put it out of commission. This will delete any reference to this job/truck inventory out of the inventory system. Prior to running this procedure, you should requisition any remaining inventory back to stock. After this procedure is run, you should also delete the job cost history for the job associated with this inventory.
TopReally delete ALL of this inventory: NO
If you want to exit this area without doing anything, press just ENTER. If you are sure you want to delete this inventory, type YES ENTER and the inventory will be deleted.
These procedures will allow you record quotes from one or more vendors for each inventory item, print quote lists and spread sheets, and do maintenance on usage history.
This selection will display the following menu screen:
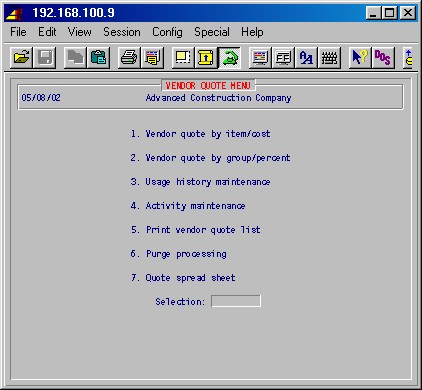
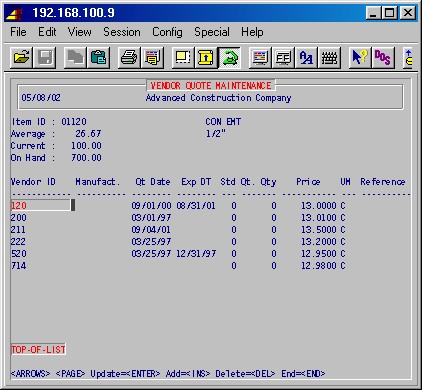
This procedure allows you to record, view, and update quotes from one or more vendors for each inventory item.
This selection will display the following input screen :
Top
Item ID:Type the item ID of the inventory item for which you wish to input a vendor quote and press ENTER. If this is a valid item ID, the system will display the complete description, on hand quantity, current month's and previous three month's usage, and vendor quotes previously entered for this item.Vendor ID
Type the vendor ID [H] for the quote you are entering.Manufact
Optional. Type an abbreviated name for the manufacturer (up to 10 characters).Qt Date
Optional. Type the date of this quote.Exp Date
Optional, but if used, the quote will not be effective after this date. Type the expiration date of this quote.Std
Optional. Type the standard package quantity here (if an item can only be purchased in packages, the system will round the suggested order quantity up or down to the nearest multiple of this quantity.)Qt. Qty
Optional. Type the quantity of this item which the vendor is quoting.Price
Type the actual quote price here in price per unit of measure, or if the reference is a "%" mark, enter the percentage here.UM
The unit of measure, as set up in 8-1 for the item, is automatically displayed.Reference
If the quote price is a percentage (%) of the trade service price, enter a "%" mark here.Use the ARROW, PAGE, ENTER, INS and DEL keys to update, add or delete quotes.
Press END and the screen will be cleared and the system will prompt you for another item ID. You may continue to input vendor quotes or press just ENTER to exit this area and return to the 8-7: Vendor Quote Processing menu.
This procedure allows you to record, view, and update quotes from one or more vendors for groups by product code. This selection will first prompt:
Product Code:
Enter the code for the product code group you want. Press ENTER and the system will display the following input screen :
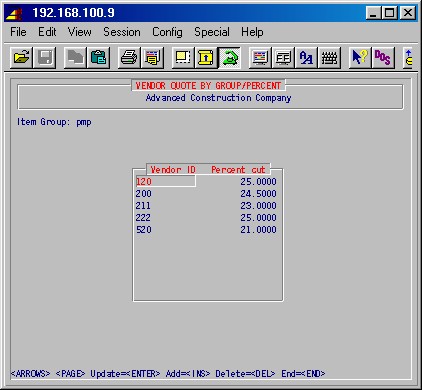
TopVendor ID
Type the vendor ID [H] for the quote you are entering.Percent cut
Enter this vendor's quoted percentage reduction from the trade service end column cost. (The Product Code and Trade Service End Column Cost for an item are shown in 8-1: Non-Abbreviated Entry, as End Clm Cost and Product Code.)Use the ARROW, PAGE, ENTER, INS and DEL keys to update, add or delete quotes.
Press END and the screen will be cleared and the system will prompt you for another product code. You may continue to input vendor quotes or press just ENTER to exit this area and return to the 8-7: Vendor Quote Processing Menu.
The annual history, by month, for the number of items used of each inventory item is maintained by the system. Normally this history would not be changed manually because the system generates these totals from requisitions, however this procedure will allow you to change the history usage numbers, if required, for any specified item ID.
This selection will display the following input screen :
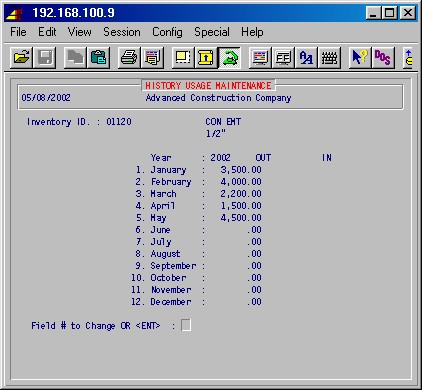
TopInventory ID:
The inventory ID and name of the currently selected inventory will be displayed.Item ID:
Type the item ID [H] here. If this is a valid item ID, the complete description will be displayed.Year:
Type the year you wish to view and press ENTER.The usage for the year, by month will now be displayed. These fields are in the edit mode, and may be changed, one-at-a-time, pressing ENTER after each. You may press F1 to accept the values in all fields if desired.
When you are finished, you may enter a field number to change or press just ENTER. The system will prompt for another item ID, or press ENTER again to exit this area and return to the 8-7: Vendor Quote Processing Menu.
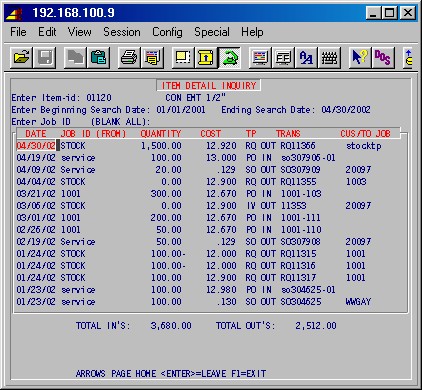
This procedure will allow you to view and edit the item activity log. This
log shows you when and from which vendor a specified item was purchased,
along with the quantity and the cost. Normally this log would not be changed
manually because the system generates
this information from purchases, however items may be edited if required.
You'll first be prompted:
Print or Display?
Type P to print the list, or D to display it on the screen.
If you selected D for display, this selection will display the following screen :
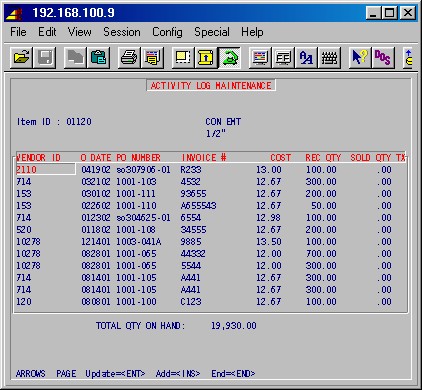
TopItem ID:
Type the item ID for the item you wish to view or edit here. If it is a valid item ID, the system will display the complete description and a list of purchases of this item.You may now use the ARROW, PAGE, ENTER and INS keys to update existing and add new entries. When you are finished press END. The system will prompt for another item ID, or you may press just ENTER to exit this area and return to the 8-7: Vendor Quote Processing Menu.
If you selected P for print, this selection will prompt:
Item ID:
Type the item ID for the item you wish to list. If it is a valid item ID, the system will display the complete description.Beginning job:
Ending job:Enter a job ID range to limit the report to those jobs, or leave blank for all jobs.Beginning date:
Ending date:Enter a date range to limit the report to those dates, or leave blank for all dates.Next the printer selection screen will appear, and when entered the report will print.
This procedure will print a report by vendor showing any previous quotes for a specified range of item IDs. The report details the item ID, complete description, manufacturer, stock number, date of quote, quantity, and price.
This selection will display the following input screen :
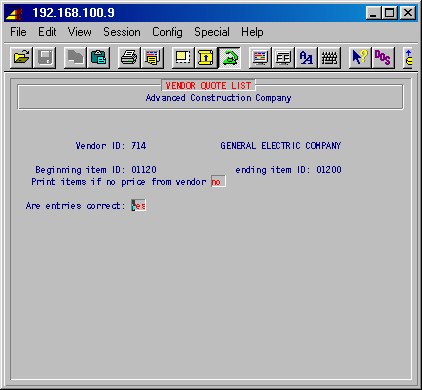
TopVendor ID:
Type the vendor ID [H] for the vendor's quotes you wish to print.Beginning item ID:
Ending item ID:Type the range of item IDs you want to print by specifying the beginning and ending item IDs.Are entries correct:
Check you work. If you need to make changes, type NO ENTER. When you are ready to continue type YES ENTER.The printer selection screen will now be displayed. Type the printer number and the number of copies and press ENTER and your report will be printed.
This procedure will print a spread sheet of quotes for a specified range of item IDs for up to nine specified vendors. The vendor quotes must have previously been entered into the system.
This selection will display the following input screen :
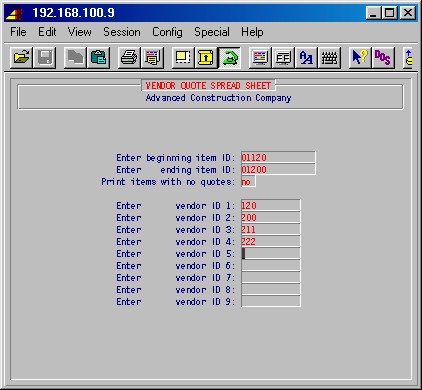
TopEnter beginning item ID: Enter ending item ID:
Type the range of item IDs you want to print by specifying the beginning and ending item IDs.Enter vendor ID 1 - 9:
Type the vendor IDs, up to a maximum of nine, for which you want to compare quotes.The printer selection screen will now be displayed. Type the printer number and the number of copies and press ENTER to print your spread sheet.
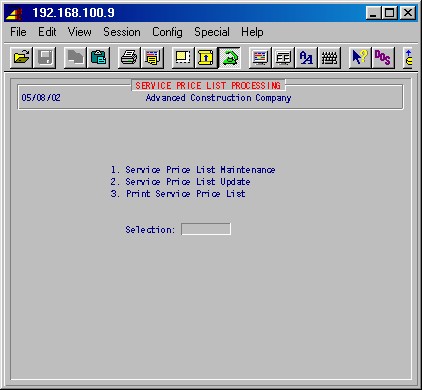
The procedures in this area allow you to identify, price, and produce a list of inventory items that you want the service technicians to carry with them in their service trucks. This list will assist the technicians in pricing the parts used on a service order to enable them to deliver an invoice at the time the service is performed.
The first selection allows you to "tag" those inventory items you want to put on the list. Then, in the second selection, you define the multiplier to be applied to cost for these items to calculate the retail price to be shown on this service order price list. The third selection allows you to print these service price lists.
This selection will display the following menu screen:
This selection allows you to create and maintain a list of those inventory items you want to put on a printout of inventory items to be carried with your service technicians on service calls. These must be items that are in your other inventories that you simply want to price separately and list on a printout instead of the entire inventory list. These items are entered by item ID and will show the complete description and the selling price.
If there are previous entries in this area, the system will display them as in the example below. If there are no entries, the system will first prompt:
NO ENTRIES ADD: yes
Press just ENTER and the system will display the following input screen :
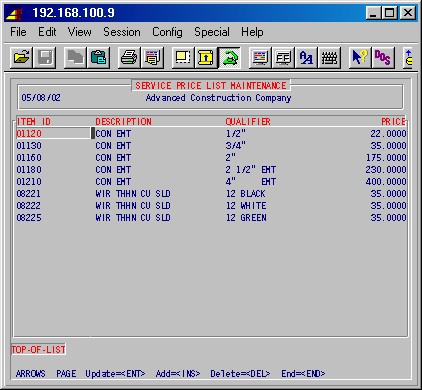
TopYou may view all of the entries, a screenfull at a time, by using a combination of the ARROW, PAGE and HOME (first/last) keys. If you want to update or delete a line, highlight the item ID, and press DEL or ENTER.
If you want to add an item, press INS and enter the ITEM ID. If this is a valid item ID, the system will display the description, qualifier, and the price (the price is also accessible as "Weight" in the 8-1: Non-Abbreviated Item Maintenance Screen).
To leave this area, press END and the system will return you to the 8-9: Service Price List Processing Menu.
This selection allows you to define the multiplier to be applied to cost or one of the four list prices, for the items listed in step 8-9-1 above, to calculate the retail price to be shown on this service order price list. This selection will display the following input screen :
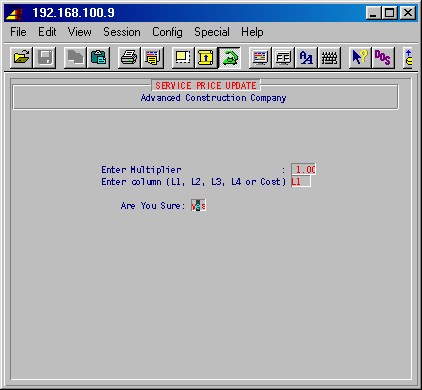
Enter multiplier:
Type the multiplier (cost x multiplier = selling price) and press ENTER.
Enter column (L1, L2, L3, L4 or Cost)
Select which price or cost is to be used as basis for calculating the service price. Type L1, L2, L3, L4 or Cost and press ENTER.
Are You Sure:
Press just ENTER if you want to exit without making a change. If you want to change the multiplier to the one just entered, press YES ENTER.
The price list will now be updated and the system will return you to the 8-9: Service Price List Processing Menu. If you wish, you may now view the new prices by selecting step 8-9-1.
This procedure will print the service price list you have prepared in the two preceding steps. Selecting this procedure will display the printer selection screen. Type the printer number and the number of copies and press ENTER. Your report will be printed and the system will return you to the 8-9 Service Price List Processing menu.
This selection allows you to specify various units of measure and the count that they represent. The system comes with the most common units of measure as shown in the screen below. This selection will display the following input screen :
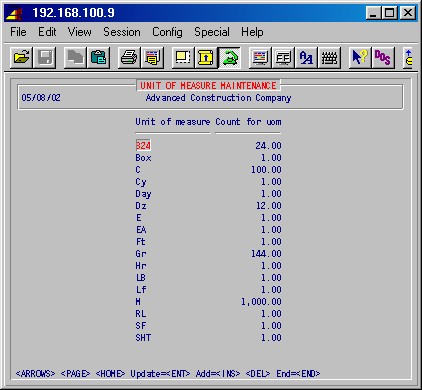
You may view all of the entries, a screenfull at a time, by using a combination of the ARROW, PAGE and HOME (first/last) keys. If you want to update line, highlight the line, and press ENTER.
If you want to add an item, press INS and enter the UOM and Count.
If you want to delete a line, highlight it and press DEL.
Be careful not to delete or change any UOM which has already been used somewhere in the system!
When you are finished press END and the system will return you to the #8 Inventory Control Menu.
TopItem cost normally is not changed manually because this is updated when you enter the cost in inventory receiving maintenance. However, this procedure will allow you to input new cost and price data for specified item IDs for all inventories. You'll first be prompted:
Update costs (or sell prices)
To update costs type C, to update sell prices type S; press ENTER. If you selected S above, this selection will display the following input screen :
Enter item ID:
Type the item ID for the item you want to enter the new cost. If this is a valid item ID, the system will display the complete description and the unit of measure of this item for verification.
Enter new cost:
Type the new cost figure here and press ENTER. The system will now prompt for a new item ID. When you are finished, press ENTER again and you will return to the Inventory Control Menu.
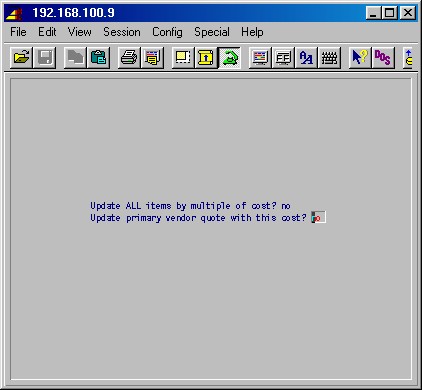
If you answered S above, you'll next be prompted:
Update ALL items by multiple of cost?
If you answer No to this you will be prompted for item IDs and allowed to enter each of the four sell prices as shown on the above screen, item by item. If you answer Yes here, the system will display the following input screen :
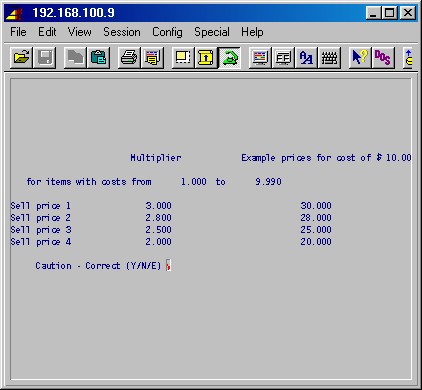
Multiplier
You'll be prompted for a multiplier for each of the four sell prices, and the system will show the resulting price on a $10 cost item.
Caution - Correct (Y/N/E)
If you a really sure that you want to calculate and set the sell prices for all items in all inventories, type Y and press ENTER.TopIf you need to go back and correct one or more of the multipliers, type N and press ENTER.
To abandon this operation without making any changes, type E and press ENTER.
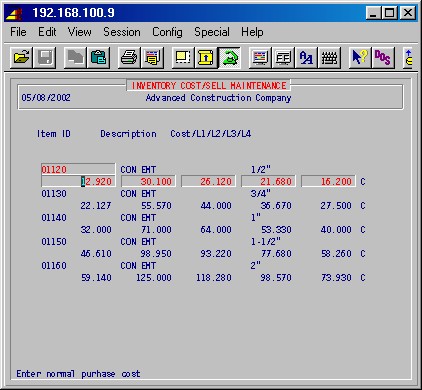
This procedure allows you to display inventory information for a specified item ID. The system will display current inventory locations, quantity on hand, list selling price, and cost price. This selection will display the following data screen :

Enter Item ID:
Type the item ID for the inventory item you wish to view. If this is a valid item ID, the system will display the complete description as well as the location, quantity, list price 1, and cost information as shown above.
Press the space bar or ENTER and the system will prompt you for another item ID. To exit this area, press ENTER again and you will return to the Inventory Control Menu.
TopThis procedure provides an alternative method of looking at the various transactions for an item.
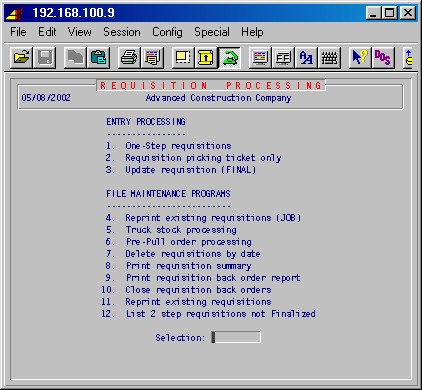
These procedures allow you to create and print requisitions, as well a perform
various requisition maintenance activities. You may requisition material from
the main stock inventory to a job, a job site inventory, a truck inventory or
a service order, or requisition from the job or truck
inventory back to the main stock inventory, or from one truck inventory to another.
You may choose between two basic methods of creating a requisition depending on your operating policies or preferences as follows:
One-step requisitions (step 8-16-1)
This procedure is usually used if you are sure the material is on the shelf
and you want to create and finalize a requisition in one step without creating
a picking ticket before the requisition is finalized.
Two-step requisitions (steps 8-16-2 and 8-16-3)
These procedures are usually used if you are not sure the material is on the
shelf and you wish to issue a picking ticket and physically pull the material
out of the warehouse before you finalize the requisition. You first issue a
picking ticket with step 8-16-2, and then finalize the
requisition with only the material picked off the shelf in step 8-16-3.
This selection will display the following menu:
This procedure will create and print a final requisition in one step without first creating a picking ticket. This procedure is usually used if you are sure the material is on the shelf and you do not need to create a picking ticket before the requisition is finalized. This selection will display the following input screen :
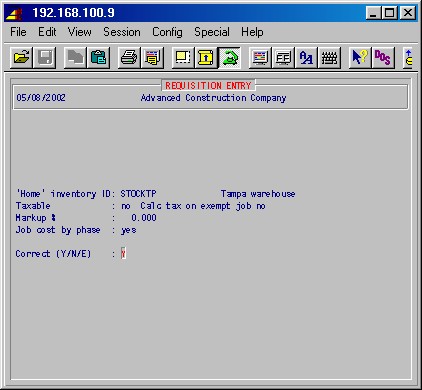
'Home' inventory ID
This is the inventory ID of the inventory from which you will be requisitioning this material. The default home inventory is Stock which is the main stock inventory.
This default Stock is used for any requisitions to or from the main stock inventory. Requisitions from jobs or trucks back to the main stock inventory are entered with negative quantities.
On all other requisitions, from truck to truck, truck to job, job to truck, or job to job, type the inventory ID here for the inventory from which you will be requisitioning material.
Taxable
If you will be calculating state sales tax on this requisition, type Yes here.
Markup
Specify a percentage markup to apply to this requisition if required.
Job cost by phase
Answer YES if different phases must be used for different line items.
Correct (Y/N/E)
Type No ENTER to go back and make changes, or End ENTER to end this procedure and return to the 8-16: Requisitions Menu. When you are ready to continue, type Yes ENTER and the following input screen will be displayed :
Top1. Date
The system will suggest today's date for the requisition date. You may specify another date or press just ENTER.2. Emp ID
Optional. Specify the employee ID of the employee requesting this requisition or press just ENTER to leave this field blank.3. SO#
Optional. If a valid SO number is specified, then all items requisitioned will automatically be added to the list of items used on the service order.4. Job ID
Specify the job ID [H] and press ENTER. If this is a valid job ID, the system will display the job name.5. Phase
Specify the phase [H] and press ENTER. If this is a valid phase for this job, the system will display the phase description.6. Cst DPT
Specify the sales department [H] for cost and press ENTER. If this is a valid sales department, the system will display the department name.7. Inv DPT
Specify the sales department [H] for inventory and press ENTER. If this is a valid sales department, the system will display the department name.The system will display the following prompt:
NO ENTRIES ADD: YES
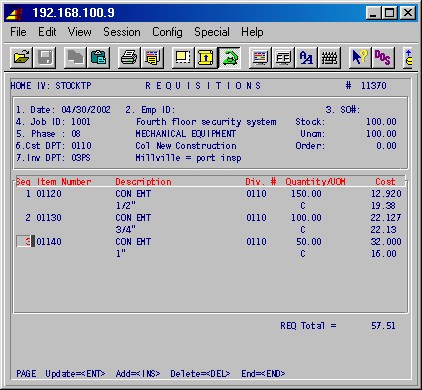
Press just ENTER to continue and enter the material list. The system will display an input area to enter the material with the following fields:
Seq
Each item is numbered by the system as you enter it and displayed with consecutive sequence numbers.Item number
Specify an inventory item ID and press ENTER. If this is a valid item ID, the system will display information about this item in the following fields:Description
This is the description of this item including the qualifier as entered in inventory item maintenance.Cost
This is the cost + markup per unit-of-measure.Stock
This number represents the quantity of this item in this inventory.Uncm
This number represents the uncommitted quantity of this item in this inventory.Order
This number represents the quantity on order with POs.Div. #
Enter the GL division for this requisition, if any.Quantity/UOM
With the description, cost, and unit of measure of this item displayed for your reference, you may now enter the quantity of this item for this requisition. The extended cost of the specified quantity of this item will now be displayed under the cost amount.REQ Total
This field shows you a running total of this requisition as the items and quantities are entered.Continue entering items and quantities until the requisition is completed. You may review the entire list by using the ARROW and PAGE keys. Items may be deleted by pressing DEL and a highlighted line updated by pressing ENTER. Press INS to add more lines.
When you are finished, press END. The system will prompt:
Print Field Copy : NO
If you also want a field copy (picking ticket) printed showing only the item number and description and the amount ordered, with no dollar figures, press YES ENTER. If you want only the complete requisition to print, press just ENTER.
Post to category: (blank for default)
If you want the cost to be posted to some other phase expense category than the default (M), enter it here. Valid choices are L, M, N, C, E, S, O, B and H.
The printer selection screen will now be displayed. Type the printer number and the number of copies and press ENTER. Your requisition will be printed and the system will prompt:
Did requisition print OK YES
Check the printed requisition. If you need to reprint for any reason, type NO ENTER to automatically reprint. Press just to continue. The inventory totals will be updated from this requisition and the system will return you to the bottom of the first input screen in this section.
You may now create another requisition from the same inventory with the same setup information by pressing Yes ENTER and continuing. Press No ENTER to change this screen for another requisition, or press End ENTER to return to the 8-16: Requisitions processing menu.
This is the first step in a two-step requisition procedure. This is generally
used if you wish to create and print a picking ticket first, pull the inventory
out of stock, and then complete the requisition based on what was actually
pulled. This procedure will create the picking
ticket, and step 8-16-3: Update Requisition will complete
the requisition.
This selection will display the following input screen :
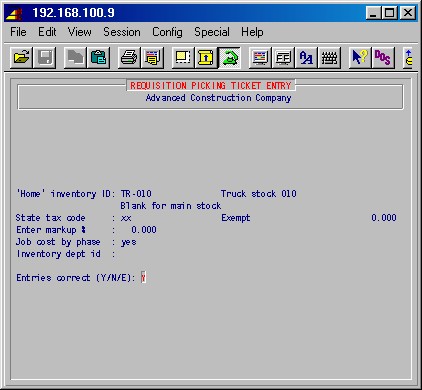
This is the inventory ID of the inventory from which you will be requisitioning this material.
State tax code
If you will be collecting state sales tax on this requisition, type you state tax code here, or type XX if tax is not to be charged.
Other tax code
Not used.
Markup
Specify a percentage markup above cost to apply to this requisition as it is costed to the job, if required.
Job cost by phase
Answer YES if different phases must be used for different line items.
Inventory dept ID
Specify the sales type (department) for inventory cost, if different from cost department.
Entries correct (Y/N/E)
Type No ENTER to go back and make changes, or End ENTER to end this procedure and return to the 8-16 Requisitions menu. When you are ready to continue, type Yes ENTER and the following input screen will be displayed :
1. Date
The system will suggest today's date for the requisition date. You may specify another date or press just ENTER.
2. Emp ID
Optional. Specify the employee ID of the employee requesting this requisition or press just ENTER to leave this field blank.
3. SO#
Optional. If a valid SO number is specified, then all items requisitioned will automatically be added to the list of items used on the service order.
4. Job ID
Specify the job ID [H] and press ENTER. If this is a valid job ID, the system will display the job name.
5. Phase
Specify the phase [H] and press ENTER. If this is a valid phase for this job, the system will display the phase description.
6. Cst DPT
Specify the sales department [H] for cost and press ENTER. If this is a valid sales department, the system will display the department name.
7. Inv DPT
Specify the sales department [H] for inventory and press ENTER. If this is a valid sales department, the system will display the department name.
The system will display the following prompt:
NO ENTRIES ADD: YES
Press just ENTER to continue and enter the material list. The system will display an input area to enter the material with the following fields:
Seq
Each item is numbered by the system as you enter it and displayed with consecutive sequence numbers.
Item number
Specify an inventory item ID and press ENTER. If this is a valid item ID, the system will display information about this item in the following fields:
Description
This is the description of this item including the qualifier as entered in inventory item maintenance.
Cost
This is the cost + markup per unit-of-measure.
Stock
This number represents the quantity of this item in this inventory.
Uncm
This number represents the uncommitted quantity of this item in this inventory.
Order
This number represents the quantity on order with POs.
Div. #
Enter the GL division for this requisition, if any.
Quantity/UOM
With the description, cost, and unit of measure of this item displayed for your reference, you may now enter the quantity of this item for this requisition. The extended cost of the specified quantity of this item will now be displayed under the cost amount.
REQ Total
This field shows you a running total of this requisition as the items and quantities are entered.
Continue entering items and quantities until the requisition is completed. You may review the entire list by using the ARROW and PAGE keys. Items may be deleted by pressing DEL and a highlighted line updated by pressing ENTER.
Press INS to add more lines.
When you are finished, press END.
The printer selection screen will now be displayed. Type the printer number and the number of copies and press ENTER. Your picking ticket will be printed and the system will prompt:
Did picking ticket print OK YES
Check the printed picking ticket. If you need to reprint for any reason, type NO ENTER to automatically reprint. Press just ENTER to continue.
TopThe system will return you to the bottom of the first input screen in this section.
You may now create another picking ticket from the same inventory with the same setup information by pressing Yes ENTER and continuing. Press No ENTER to change this screen for another picking ticket, or press End ENTER to return to the 8-16: Requisitions Processing Menu.
This is the second part of the two-step procedure of creating a requisition.
The picking ticket was created and printed in the first part of this procedure
in 8-16-2: Requisition Picking Tticket Only above.
The picking ticket will have been marked as to what material was
actually shipped.
In this procedure, you will now complete the requisition by marking the quantity of the items shipped. The items and quantities on the original picking ticket which you do not mark shipped in this procedure will be transferred to a new requisition, which will be automatically created. All requisitions with unshipped items will be shown on the back order report, 8-16-9: Print Requisition Back Order Report. This selection will prompt:
Enter requisition # or 99999 for ALL: 00000
Type the job requisition number printed on the top of the picking ticket and press ENTER.
To update all your requisitions, click here.
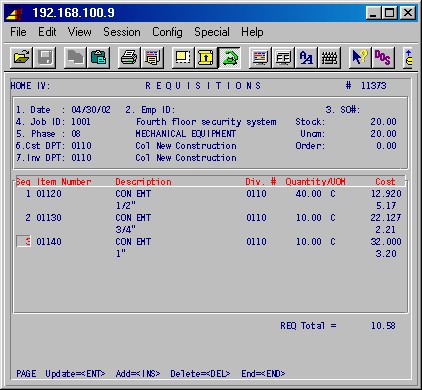
The system will display an input screen as follows :
This screen looks similar to the original input screen in 8-16-2: Requisition Picking Ticket Only, where this requisition picking ticket was created. This input screen now needs to be updated with the number of each item pulled from inventory and shipped.
To update this list, use the ARROW and PAGE keys to move to the desired item, press ENTER and enter the quantity shipped for the item from the picking ticket.
When you are finished, press END.
Or, if all items have been fully shipped, you may press F1 and the "Shipped" quantities will be set to the "Ordered" quantities for all items and the final posting copy of the requisition will be printed.
The printer selection screen will now be displayed. Type the printer number and the number of copies and press ENTER. The final requisition will be printed and the system will prompt:Did the requisition print OK YES
Check the printed requisition. If you need to reprint for any reason, type NO ENTER to automatically reprint. Press just ENTER to continue. The inventory totals will be updated from this requisition and the system will prompt you for another requisition number.
You may now enter another requisition number from the picking ticket, or press just ENTER to return to the 8-16: Requisitions Processing Menu.
TopIf you want to either mark all items on all your requisitions as shipped, or update them one by one, enter 99999 at this prompt:
Enter requisition # or 99999 for ALL: 00000
The system will prompt:
Really update all your stock requisitions?
Type YES and press ENTER to proceed.All items shipped on all your stock requisitions?
If all items have been fully shipped, type YES and press ENTER and the "Shipped" quantities will be set to the "Ordered" quantities for all items on all your stock requisitions and the final posting copies of the requisitions will be printed.If you want to update each requisition, one by one, without having to enter requisition numbers, type NO and press ENTER. Each requisition will then be presented in turn with an update screen like the one here.
In the steps above, the inventory totals are updated with the printing
of the final requisition. This procedure allows you to view all requisitions
for a specified job and phase for a specified period of time and then reprint
a requisition for any reason without causing the
inventories to be updated again. If you know the requisition number and
do not need to view the outstanding requisitions, step 8-16-11:
Reprint Existing Requisitions allows you to reprint by just entering
the requisition number. This selection will display the following input
screen :
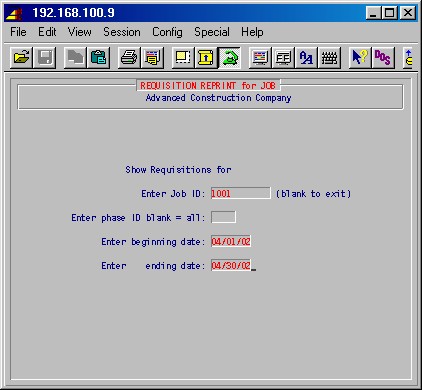
Enter Job ID
Specify the job ID of the job for which you wish to display the outstanding requisitions.
Enter phase ID blank = all
Specify a phase ID or press just ENTER to display the outstanding requisitions for all phases of this job.
Enter beginning date
Enter ending date
Type the range of dates for the requisitions you wish to display and press ENTER. The following screen will be displayed :
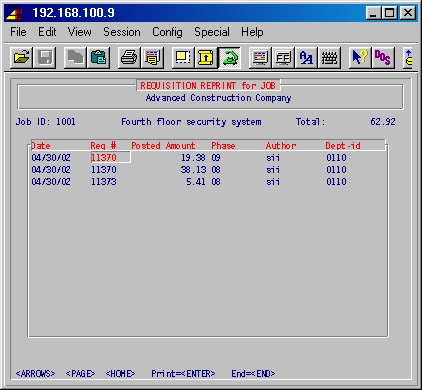
TopThe system will display all requisitions for the specified job, phase and date range. Use the PAGE or ARROW keys to scroll up and down through requisition. Press HOME to jump to the first or last requisition.
To print a requisition, use the above keys to highlight the requisition which you wish to print, and press ENTER. The printer selection screen will now be displayed. Type the printer number and the number of copies and press ENTER. Your requisition will be printed and the system will prompt:
Did requisition print OK YES
Type NO ENTER to print again. When the printing is OK, press just ENTER and the system will return to the above screen. Here you may continue to select requisitions to print.
Press END to exit this procedure and return to the 8-16: Requisitions Processing Menu.
These are specialized programs not applicable for most companies.
These are specialized programs not applicable for most companies.
This procedure will allow you to delete requisitions by date. This selection will first prompt:
OK to delete requisitions: ?
Type NO to cancel this procedure and return to the 8-16:
Requisitions Processing Menu.
Type YES to continue. The system will prompt:
Enter cut-off date: / /
Type the date you wish to use as a cut-off date to delete requisitions.
All requisitions dated prior to this date will be deleted. After you have
entered the cut-off date, press ENTER. The system will delete these
requisitions and return you to the 8-16: Requisitions Processing
Menu.
This procedure will print a summary of all requisitions issued through a specified posting date. This report is generally run at the end of each day to have a report which shows what requisitions have been issued. This selection will prompt:
Enter beginning requisition post date: /
/
Enter ending requisition post date: / /
Ok to run report?: yes .
Specify the date and press ENTER. The printer selection screen will now be displayed. Type the printer number and the number of copies and press ENTER.
This procedure will print a report of all requisitions with items and quantities not shipped in the second part of the two-step requisition procedure (step 8-16-3 Update Requisition). This report may be printed grouped by job or by item ID and may be used to prepare a purchase order to re-order these items. This selection will prompt:
Print by job: YES
If you want the list to print by job, press just ENTER. The printer selection screen will now be displayed. Type the printer number and the number of copies and press ENTER. Your report will be printed and the system will return to the 8-16: Requisitions Processing Menu.
This procedure will close requisition back orders by requisition number and line number of the requisition. This selection will display the following input screen:
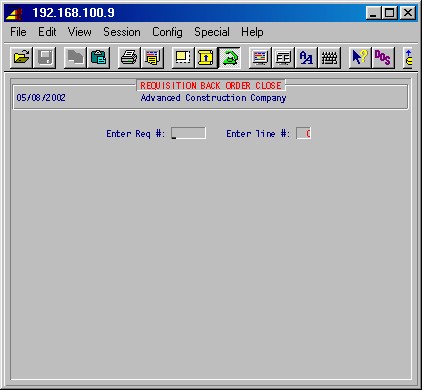
TopEnter Req #
Type the requisition number and press ENTER.Enter line #
Type the line number of this requisition which is on back order which you want to close and press ENTER. The system will prompt you for another line number and so on.When you are finished, press ENTER again and the system will prompt you for another requisition number. To exit this procedure, press ENTER again and the system will return to the 8-16: Requisitions Processing Menu.
In steps 8-16-1, 8-16-2, and 8-16-3 above, the inventory totals are updated with the printing of the final requisition. This procedure will allow you to reprint requisitions which have not been closed or deleted without updating inventory totals again. This selection will display the following input screen :
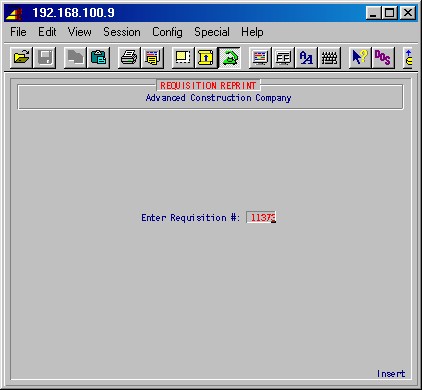
TopSpecify the requisition number you wish to reprint and press ENTER. If this is a valid open requisition number, the printer selection screen will be displayed. Type the printer number and the number of copies and press ENTER. Your requisition will be printed and the system will prompt: Did the requisition print ok YES
If the requisition did not print properly, type NO ENTER and you will see the printer selection screen allowing you to select a printer and reprint. If it printed ok, press just ENTER and you will be prompted for another requisition number.
When you are ready to exit this area, press ENTER again and you will return to the 8-16: Requisitions Processing Menu.
This is a specialized program which will copy an inventory from one inventory ID to another inventory. This is generally used to facilitate copying all of the item ID's in one inventory to a new inventory without affecting requisitions and physical item counts; however, the quantities may be copied if you wish. This program is basically used in the situation where you want to create a new truck inventory and want to make an exact copy of another truck's inventory for the new one.
Typically, a master service truck is set up on the system which contains item
ID's for a standard service truck. Then, when you want to set up a new truck,
this step is performed to copy the master service truck to the new one. The
items are copied to the new truck without taking the
items out of stock or inventory. Requisitions are then make to move quantities
of these items from the source of inventory that is stocking this truck. This
selection will display the following input screen :
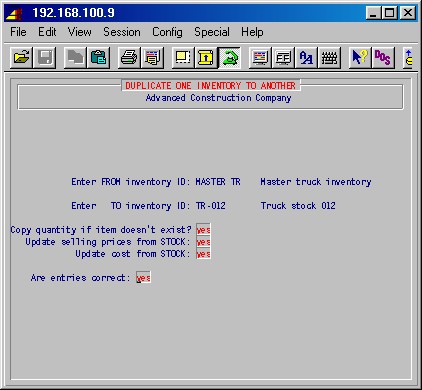
Enter FROM inventory ID
Enter TO inventory ID
Specify the "from" inventory ID and the "to" inventory ID.
Copy quantity if item doesn't exist? NO
Press just ENTER if you want to copy over just the item ID's without quantities. If you answer YES, the system will copy all item ID's that are not already present in the copy "to" inventory with the quantity associated with those items in the copy "from" inventory. Any items previously existing in the "to" inventory will be preserved with their current quantities.
Are entries correct: YES
If entries are correct, press just ENTER to perform this procedure.Top
This procedure allows you to set up and maintain product codes. Product codes allow you to identify items in inventory as belonging to groups. At least one product code, na, should be set up.
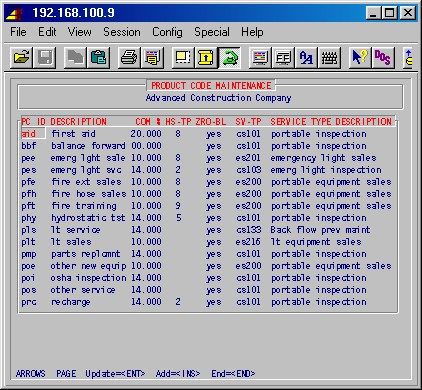
PC ID
Enter a product code ID of up to 5 characters.
DESCRIPTION
Enter the description of this product code.
COM %
Enter a commission percentage, if applicable.
HS-TP
If you have the Preventive Maintenance Contract module, enter the history type, as set up in 1-4-10: History Type Maintenance, under which you want this product to show.
ZRO-BL
If you enter NO you'll not be allowed to requisition or sell more items than you have; if you enter YES you'll be allowed to go below zero on hand for items with this product code.
SV-TP
You may associate this product code with a service type by entering a service type ID, as set up in 8-19: Service Type Maintenance.
SERVICE TYPE DESCRIPTION
This description will automatically display, once a service type has been entered. When done, press END.Top
This procedure allows you to set up and maintain service types. Service types parallel AR sales types (as set up in 1-4-1: Sales Type Maintenance) and controls your accounting in service, but this feature allows you to have multiple service types without having to set up an AR sales type for each. You need to have one service type for each sales type, but you may have multiple service types pointing toward the same sales type. If desired, you may just set up one service type for each sales type with the service type ID the same as the sales type ID.
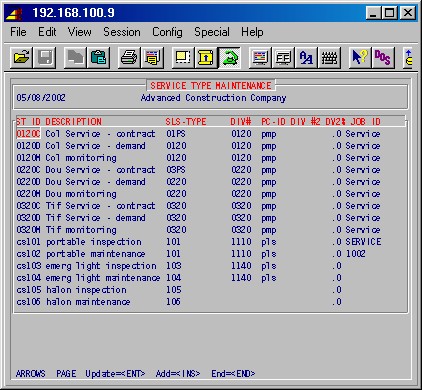
ST ID
Enter the ID for this service type, maximum five characters.
DESCRIPTION
Enter the description for this service type.
SLS-TYPE
Enter a valid sales type as set up in 1-4-1: Sales Type Maintenance.
DIV#
Enter the division number, if applicable.
PC-ID
This allows you to associate this service type with a product code, as set up in 8-18: Product Code Maintenance.
DIV #2
Enter a division number for the second division if this service type is to be split between two division.
DV2%
If you entered a division in<blockquote> above, enter the percentage that is to go to this division.
JOB ID
When entering a service order in 2-1, the default job normally comes from the entered dispatch board, as set up in 2-15-3. However, if you enter a job ID here, then that job ID will be used instead when the service type is entered in 2-1.
Use the ARROW, PAGE and ENTER keys to update a line. Press INS to add lines.
Press END when you are done.
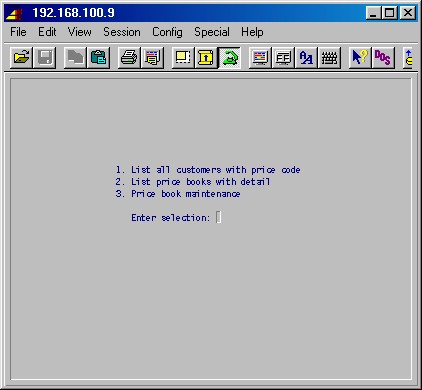
TopThis procedure allows you to set up and maintain alternate prices for items. It will display the following selection menu:
This selection will list all customers which have work addresses with alternate prices with price codes in a selected range, showing price code, customer ID, customer work address number and customer name. You'll first be prompted:
Enter Beginning Price Code:
Enter Ending Price Code:
Enter a range of price codes to print, or leave blank for all. Then the printer selection screen will appear and the report will be printed.
This selection will list items with alternate prices with price codes in
a selected range,
showing item ID, item description and sell price. You'll first be prompted:
Enter Beginning Price Code:
Enter Ending Price Code:
Enter a range of price codes to print, or leave blank for all. Then the printer selection screen will appear and the report will be printed.
This selection allows maintenance of alternate prices for different price
codes. You'll first
be prompted:
Enter Price List Code:
Type the code of the price list you want, or leave blank to exit, and press ENTER.
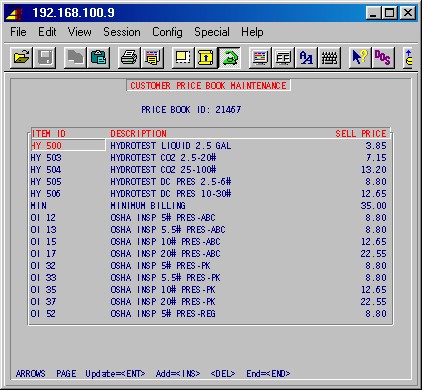
TopITEM ID
The ID [H] of the item.DESCRIPTION
The description of the item, as entered in 8-1.SELL PRICE
The alternate price of the item for the selected price list.Use the ARROW, PAGE and ENTER keys to update prices. Press INS to add lines.
Press END when you are done.
This procedure allows you to create a separate database containing only inventory
data, used when doing a physical count of the inventory. The on-hand quantities
in the main database inventory can then be set to zero, allowing normal requisitions,
sales and receiving to continue
while physical counts are entered in the inventory database. Once complete,
the physical counts in the inventory database can be added back into the main
database.
CAUTION: Only one user should be doing these steps and be coordinating entering of quantities into the Physical Count database by other operators. It is strongly recommended that daily backups be done just prior to doing steps 1, 3, 4 and 6!
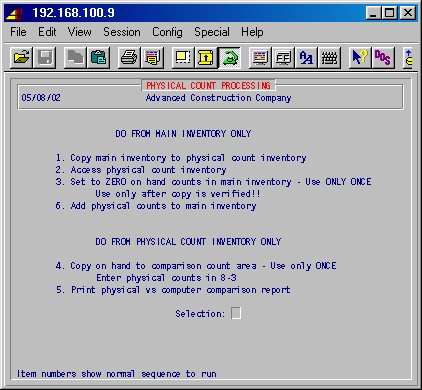
This step creates a brand new database which only contains the inventory data from your main database (the database or company you are running this step from).
WARNING: If you run this step, the existing Physical Count database will be erased along with any physical count quantities entered in it!
You will be presented with a series of prompts, as in the examples which follows:
Your current data base is named /uu/ACC/acc
Enter the pathname for the directory where the inventory data should go.
/uu/ACC
You need to be familiar with the file systems on you system and what space
is available in them. The directory you specify above must have enough free
space to hold you inventory data while being copied from your main database
to the Physical Count database. Contact
SI Systems if you need help with this.
You'll next see: dumping ...., while the inventory data is being dumped to the directory specified above.
If this step has been done before, you'll next be prompted:
A database named /uu/ACC/accin already exists, do you want to replace
it? (y/n)
Having gotten this far, you have no choice than to answer Y and press
ENTER.
New PROGRESS database /uu/ACC/accin created (from /u/Si/si).
Press space bar to continue.
Press the space bar
. ...** This session is being run with the -i (no integrity) option.
Press space bar to continue.
Press the space bar.
loading ... Records = ... Errors
= 0
If number of errors listed are not zero then something is wrong.
YOUR NEW SYSTEM IS LOADED AND READY TO GO
Press space bar to continue.
Press the space bar, and you'll be returned to the Physical Processing menu,
in the database where you started running this step.
Next you should do step 8-21-2, and look up some items in 8-1, or maybe print a item report, in the Physical Count database. Once you have verified that the data looks ok in the Physical Count database, you may do step 8-21-3.
Select this choice to enter the Physical Count database.
Be careful to note which database you are in when working with these steps (usually the company name on top of menus will have PhysCt appended to it.
When you type Q and press ENTER at the Main Menu in the Physical Count database, you will be returned to the Physical Count Processing Menu in the main database (the database in which you did 8-21-2).
Use only after copy is verified!!
When you have done steps 8-21-1 and verified that you have valid inventory data in the Physical Count database, you may do this step. This will set quantity on hand to zero for all items in the specified inventories, and allow you to continue purchase receiving and
selling/requisitioning from the inventories in the main database.You'll be prompted:
Inventory ID:
Enter the ID of each of the inventories where you want to set quantity on hand to zero. Note that you would enter STOCK for your main inventory. Press F1 to accept all entries, or press ENTER through each.
TopYou will then be given a last chance to abandon this step:
If you are sure that you are ready to clear all quantity on hand figures in the inventories selected above, answer Yes, and press ENTER.
From the main database first do 8-21-2 to get into
the Physical Count database, and when there do this step, only one
time. This will store the on hand quantities in a separate area for later
comparison in step 8-21-5, which is also run from
inside the Physical Count
database.
WARNING: This step sets all quantity on hand figures to zero!
To enter the results from your physical count, do step 8-21-2 from the main database to get into the Physical Count database, and when there use step 8-3 to enter the physical counts. You can then do step step 8-21-5, which is also run from inside the Physical Count database, to list the difference between the on hand quantities you had in the computer when you did step 8-21-1 and 8-21-4.
From the main database first do 8-21-2 to get into the Physical Count database, and when there you can print this report as many times as you wish. You'll be prompted:
Inventory to print ( STOCK for main inventory, blank for all )
Enter the inventory which you wish to list, STOCK for the main inventory, or leave blank for all inventories.
Print separate page per inventory
Answer Yes if you want each inventory on a separate page. The report will list item ID, item description, cost, unit or measure, physical count (the newly entered quantity on hand), computer count (the on hand quantities you had in the computer when you did step 8-21-1 and 8-21-4), the physical value (dollars, based on the cost and newly entered quantities on hand), and the difference in value (dollars).
Once all physical count quantities on hand have been entered in step 8-3, in the Physical Count database, and you have returned to the main database, you may then do step 8-21-6.
From the main database do this step to add your newly entered and verified
quantity on hand (physical count) figures to the current quantity on hand
figures in you main database. This selection will prompt:
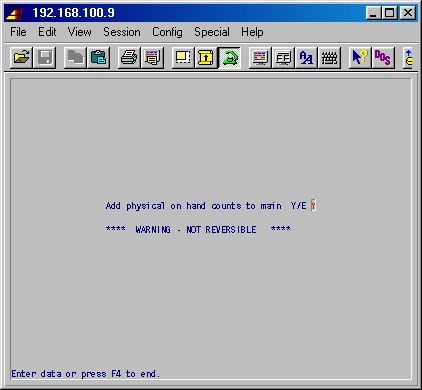
If you are sure that you are ready to add the quantity on hand figures in the Physical Count database to those in the main database, YES, and press ENTER.
This completes the physical count processing steps, and should result in quantities on hand in the computer matching the actual physical on hand quantities in your inventories. The Physical Count database may now be deleted to make space in your computer file systems, if needed.
This procedure allows combining of all the information and references to one item ID with another item ID.