
From the main menu, if 9 - Equipment Processing/Fixed Assets is selected, then this menu appears on the screen. The selections on this menu are divided into three groups.
This first group, consisting of selections #1 through #5, is used to set up and maintain tool cards, maintenance schedules and tool rental/requisitions.
This second group, consisting of selections #6 through #12, allows you to maintain detailed records of fixed assets, including purchase date and amount, life, age, scrap value, and various depreciation methods and accumulated depreciation, as well as the accounting for depreciation and book value. Amortization schedules may be calculated and printed for any simple interest loan terms.
As is the case with all SI Systems' accounting modules, this fixed assets processing module is fully integrated with general ledger, payroll, job costing, requisitions, and other applicable accounting functions.
This third group, consisting of selections #12 through #18, is used to set up and maintain equipment cards, maintenance schedules and equipment rental/requisitions.
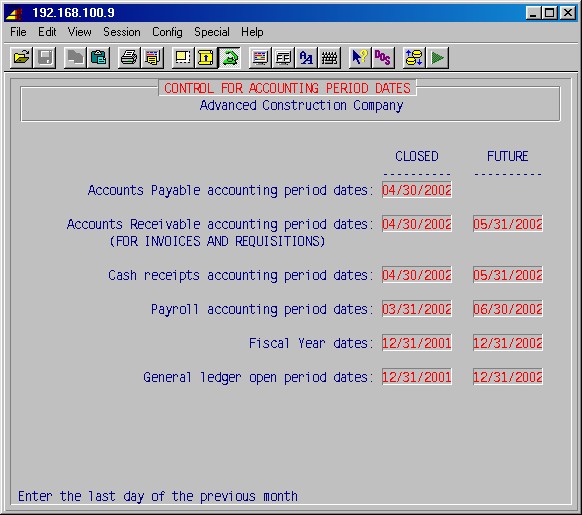
Accounts Receivable closed accounting period date
Operators will not be allowed to enter invoice or requisition dates with or earlier than this date.
Accounts Receivable future date limit
Operators will not be allowed to enter invoice or requisition dates later than this date.
Sales types (departments) should already have been set up as part of the AR module setup in 1-4-1.
Selecting #1 Tool Card Maintenance from the Equipment Processing/Fixed Assets
Menu will present the following maintenance screen :

Enter Tool ID:
Type the ID [H] of the tool you want. Using F2, you may search for a tool by its ID or by its description. If it doesn't exist, you'll be prompted:NO TOOL EXISTS. DO YOU WANT TO CREATE A NEW ONE ?
If you want to create a new tool card, answer Yes and press ENTER.
1. Tool Desc:
Enter the description of this tool.
2. Serial #:
Enter the serial number of this tool.
3. Vendor id:
Enter the ID [H] of the vendor of this tool. If a valid ID, the system will automatically fill in the vendor's name, address and phone, as set up in 4-1.
4. Name:
5. Address:
7. Phone:
Enter or change the vendor's name, address and phone, as needed.
8. Comments:
Enter any comments about this tool.
9. Mnt Rqmts:
Enter any maintenance requirements for this tool.
10. Purch Dt:
Enter the date this tool was purchased.
11. Cost New:
Enter the cost of this tool.
12. Wnty Day:
Enter the warranty period for this tool, in days.
13. Wnty Tel:
Enter the phone number to call in case warranty repair or replacement is needed.
14. Day Rate:
Enter the daily dollar rate to be charged to jobs renting or requisitioning this tool.
15. Mnt Due:
Enter the next date for maintenance on this tool, if applicable.
16. Last Mnt:
Enter the most recent date of maintenance on this tool, if applicable.
The following fields are automatically filled in when requisitioning a tool in 9-4:
17. Last Rnt:
This is the date this tool was last rented/requisitioned.
18. Job Id: Brch
The ID [H] (and optional branch code) of the job (and branch) renting or requisitioning this tool. If not currently rented/requisitioned, enter SHOP.
19. Phase Id:
The ID [H] of the phase of the job renting or requisitioning this tool. If not currently rented/requisitioned, enter TOOL.
20. Employee:
The ID [H] of the employee renting or requisitioning this tool. If not currently rented/requisitioned, leave blank.
21. Ck Out Dt:
The date this tool was rented or requisitioned. When returned, blank out this date by entering a question mark (?).
22. Source Requisition:
This is automatically filled in by the system when a tool is requisitioned to a job in 9-4.
23. Total Rented Days:
This is normally automatically accumulated by the system when a tool is requisitioned back to the shop from a job in 9-4.
24. Total Rent Revenue:
This is normally automatically accumulated by the system when a tool is requisitioned back to the shop from a job in 9-4.
25. Total Maint Cost:
Enter the total cost so far for maintaining this tool.
ENTER A FIELD # TO BE CHANGED OR ALL: D = DEACTIVATE TOOL
If you need to change anything on this screen, type the number of the field and press ENTER.To jump to the previous tool in the list of tool IDs press the UP ARROW.
To jump to the next tool in the list of tool IDs press the UP ARROW.To deactivate this tool (e.g. at the end of its useful life or if lost), type D.
When done with this tool, just press ENTER and you'll be prompted for another tool ID.
To exit this procedure, leave the tool ID blank and press ENTER.
This selection will first prompt:
Print Cost Report:
If you want a report which shows the value of selected tools, answer Yes here.
Branch to print (Blank for all):
If you want to limit the report to a branch, enter its ID here.
Next this selection screen will appear:

Date for this report
Enter the date you want on the report and press ENTER.
Style of report
Select one of the 5 choices and press ENTER.
Beginning Dollar Amount:
Ending Dollar Amount:
If you selected to run the cost reports, enter dollar range here for the tools that you want to be included on the report.
Correct?
Answer Yes and press ENTER when the above entries are correct.
You'll then be prompted for a range appropriate to the choice you selected, e.g. a range of descriptions, to be included on the report.
This selection will first prompt:

Date for this report
Enter the date you want on the report and press ENTER.
Beginning Maintenance date
Ending Maintenance date
Enter the date range for the report.
Style of report
Select one of the 2 choices and press ENTER:1. The date range above applies to the last maintenance date for a tool.
2. The date range above applies to the next maintenance date for a tool.
Correct date?
Answer Yes and press ENTER when the above entries are correct.
This selection will open this menu:

This selection is used to requisition tools to jobs and back to the shop. It allows for charging rent (posted to JC and GL) and posting cost to the requisitioning job. When requisitioning a tool back to the shop from the job, the Total Rented Days and Total Rent Revenue for the tool are automatically updated.

Enter state tax code
If you will be collecting state sales tax on this requisition, type you state tax code here, or type XX if tax is not to be charged.Enter Other tax code
Not used.Enter Markup %
Specify a percentage markup above cost to apply to this requisition as it is costed to the job, if required.Enter default department
Specify the sales type (department) for tools cost, if different from cost department.Print picking ticket
Answer Yes if a picking ticket is needed.Job cost by phase
Answer YES if different phases must be used for different tools.Charge cost to JC
Answer Yes if requisitions returning tools from a job to the shop are to post cost to the job. This allows charging the entire value of a tool to a job until the tool is returned from a job.Charge rental to JC/GL
Answer Yes if requisitions returning tools from a job to the shop are to post daily rental fees to the job and to sales types (which will then post to GL).Entries correct (Y/N/E)
Type No ENTER to go back and make changes, or End ENTER to end this procedure and return to previous menu. When you are ready to continue, type Yes ENTER and the following input screen will be displayed (items in bold type are examples):
1. Date
The system will suggest today's date for the requisition date. You may specify another date or press just ENTER.2. Job ID
Specify the job ID [H] and press ENTER. If this is a valid job ID, the system will display the job name.3. Phase ID
Specify the phase [H] and press ENTER. If this is a valid phase for this job, the system will display the phase description.4. Emp ID
Optional. Specify the employee ID of the employee to whom this tool is being checked out, or press just ENTER to leave this field blank.5. Department
Specify the sales department [H] for cost and press ENTER. If this is a valid sales department, the system will display the department name.6. JWO
Optional. If cost is posted to a job, then this work order number will included on the job lines.Tool ID Number
Specify an tool ID [H] and press ENTER. If this is a valid tool ID, the system will display the description of the tool.Tool Description
This is the description of this tool as entered in 9-1.Price
This is the rental price + markup for the tool, and is automatically filled in when requisitioning a tool back to the shop from a job.Quantity
The number of days a tool has been requisitioned/rented to a job will be calculated when requisitioning a tool back to the shop from a job.Continue entering tools until the requisition is completed, making changes as you go.
When you are finished, leave the Tool ID blank and press END.
The printer selection screen will now be displayed. Type the printer number and the number of copies and press ENTER. Your requisition will be printed and the system will prompt:
Did requisition print OK Yes
Check the printed requisition. If you need to reprint for any reason, type NO ENTER to automatically reprint. Press just ENTER to continue. The system will return you to the bottom of the first input screen in this section.
You may now create another requisition with the same setup information by pressing Yes ENTER and continuing. Press No ENTER to change this screen for another requisition, or press End ENTER to return to previous menu.
If you have not charged rent to jobs when using 9-4-1
above, or didn't use 9-4-1 and instead used 9-1
to enter jobs and dates a tool was rented, you may use this selection to
update the Total Rented Days and Total Rent Revenue for tools,
and charge rent to jobs. This step is normally run monthly.

Enter cutoff date for rental charges
If you only want to update through a certain date, enter it here.Enter beginning job ID
Enter ending job IDEnter a range of jobs to be included, or leave blank for all.Charge rental to JC/GL
Answer Yes if requisitioned/rented tools are to post cost to the jobs and to sales types (which will then post to GL).Entries correct (Y/N/E)
Type No ENTER to go back and make changes, or End ENTER to end this procedure and return to previous menu. When you are ready to continue, type Yes ENTER and the printer selection screen will now be displayed. Type the printer number and the number of copies and press ENTER.

These choices will display, and allow you to update, tools in the order selected, for one or all selected jobs, tool descriptions or tool IDs.
The selections 9-6 through 9-12 allow you to maintain detailed records of fixed assets, including purchase date and amount, life, age, scrap value, and various depreciation methods and accumulated depreciation, as well as the accounting for depreciation and book value. Amortization schedules may be calculated and printed for any simple interest loan terms.
As is the case with all SI Systems' accounting modules, this fixed assets processing module integrated with other applicable accounting functions.
The depreciation methods used are for financial accounting purposes (Book), State Income Tax (State), and Federal Income Tax on assets purchased after 1980 (ACRS).
In sl or straight line depreciation the amount of depreciation is the same for each year of an asset's useful life.
Db or declining balance is an accelerated form of depreciation. During the early years this method produces greater depreciation and then progressively smaller amounts in later years. This is appropriate for assets that depreciate more in the first five years. When a declining balance is 2 times the straight line depreciation rate it is called 2db or double declining balance.
ACRS is Accelerated Cost Recovery System. Scrap value is not considered when using ACRS, so depreciation is based on the original cost of the asset. The years of useful life are usually reduced so that annual depreciation is increased.
This selection is used to enter and maintain assets.

Asset ID
Enter the ID [H] of the asset you want to set up or maintain.
1. Class type
Enter the type of asset by expected useful life in years.
2. Description of item
Enter a description of this fixed asset.
3. Serial Number
Enter the serial number of this fixed asset.
4. Acquisition date
Enter the date this fixed asset was acquired.
5. Depreciation start date
The starting date for depreciation.
6. Asset account
Enter the GL account number [H] for assets.
7. Accum depreciation account
Enter the GL account number [H] for accumulated depreciations.
8. Deprec. expense acct/div.
Enter the GL account number [H] and (optionally) division number [H] for depreciation expenses.
Enter field to change, <E> to Exit or <RETURN>:
If you need to correct any of the above fields, enter its number and press ENTER.
To leave this procedure, type E.
To continue to the next screen just press ENTER.

1. Asset class (Years):
Enter the number of years of useful life for this asset.
2. Depreciation method:
Enter type of depreciation method you are using for state, books and federal:
sl Straight Line Depreciation is the same for each year of the asset's useful life. The estimated value of an asset at the end of its useful life is called salvage value, scrap value, disposal value, or trade-in value. db Declining Balance Accelerated Method 1.5db One and one half times declining balance rate 2db Double declining balance rate ACRS Accelerated Cost Recovery System Defined as having 3, 5, 7, 10, 15, 20, 27.5, or 31.5 years of useful life. A business owner may switch from the db (declining balance) method to the straight-line method for the remaining useful life of the asset if the straight-line method produces a higher annual depreciation.
3. 1st Year convention %
The one time only percentage which may be deducted for the first year.
4. Life in months
Enter the fixed assets' expected useful life in months.
5. Age in months
The number of months since this fixed asset was acquired.
6. Purchase price
Enter the acquisition cost of this fixed asset.
7. Accumulated depreciation
This will fill in when 9-8 or 9-9 is run.
8. Current Cost
This will fill in when 9-8 or 9-9 is run.
9. Scrap value
Enter the estimated value of the asset at end of its useful life.
10. Monthly depreciation
This will fill in when 9-8 or 9-9 is run.
11. Y.T.D. depreciation taken
This will fill in when 9-8 or 9-9 is run.
12. Last depreciation date
This will fill in when 9-8 or 9-9 is run.
Enter field to change, or <RETURN>:
If you need to correct any of the above fields, enter its number and press ENTER.
To return to the first screen and be prompted for another asset ID, just press ENTER.
To leave this procedure, leave the asset ID blank and press ENTER.
Use this selection to print one page per fixed asset, showing the data as entered in 9-6 above.

Enter class to print or <RETURN> for ALL:
If you want to limit the report to just one class (number of years), enter it here, or just press ENTER for all.
Enter beginning asset ID <RETURN> for ALL:
Enter ending asset ID <RETURN> for ALL:
Enter a range of asset IDs or leave blank to print all.
This selection will calculate and print reports of monthly state and/or book depreciation.

This selection will calculate depreciation for the state column.
This selection will calculate depreciation for the company book column.
This selection will print depreciation data for the state column. The report shows asset ID and description, depreciation method i.e. blank, straight line, 1.5db, 2db, db or acrs, current depreciation, YTD depreciation, accumulative depreciation and last depreciation date.
This selection will print depreciation data for the company book column. The report shows asset ID and description, depreciation method i.e. blank, straight line, 1.5db, 2db, db or acrs, current depreciation, YTD depreciation, accumulative depreciation and last depreciation date.
This selection will calculate and print reports of monthly state and/or book depreciation.

This selection will calculate depreciation for the state column.
This selection will calculate depreciation for the federal column.
This selection will print depreciation data for the state column. The report shows asset ID and description, depreciation method i.e. blank, straight line, 1.5db, 2db, db or acrs, current depreciation, YTD depreciation, accumulative depreciation and last depreciation date.
This selection will print depreciation data for the federal column. The report shows asset ID and description, depreciation method i.e. blank, straight line, 1.5db, 2db, db or acrs, current depreciation, YTD depreciation, accumulative depreciation and last depreciation date.
Use this procedure to clear the Monthly Depreciation and/or Y.T.D.
depreciation taken fields for all fixed assets with a type greater than 0.

You may selectively clear the state, company book or federal columns for either monthly or yearly fields, by choosing 1 through 8.
The ACRS depreciation method is normally used for large assets (i.e. property, buildings, etc.). Use this selection to set up the tables for each asset class (expected life in years) that you'll be using. You'll first be prompted:
Life (years):
Enter the number of years for this class and press ENTER.

This is automatically assigned by the system as you add entries.
Percentage
Enter the percentage for each year, one line per year.
The first year you want to take as much as you can off your taxes.
The total of all lines should be 100%.
Use ARROW, PAGE and ENTER keys to update the percentage on a line. Press INS to delete a line. Press END when done.
To leave this procedure, leave Life blank and press ENTER.
You can use this program to calculate interest or payments on investments, loans, notes, etc. For instance, if you were buying a company vehicle you would fill in the data needed and the screen would then show the Principle Amount, Monthly Payments, Total number of Payments showing amount of last payment, Interest Rate, Initial Month 1st payment will be made and Accrued interest.
This selection will prompt with the following input screen :

Enter a title to be printed, if you chose to print the schedule.
Standard Options:
Monthly Payments: (T = 12 Payments/Year)
Full Duration of Loan: NO Balloon Payment
Change default options? (Y/N):
If you answer Yes here, you'll be prompted:
Balloon Payment Number: 24
If the loan is only run for a certain number of payments, with a substantial final payment, enter the number of the final payment.
Payments Per Year (52,12,4,1): 12
Enter number of payments per year (52 = weekly, 12 = monthly, 4 = quarterly, 1 = yearly).
Accrued Interest payment: 0.00
If applicable, enter this amount. This would be used if you were to only start making regular payments after a period of time, and would amount to the interest accrued during that period.Are Entries Correct:
Answer Yes when the preceding three entries are correct.
Next you'll be prompted:
Enter Principal Amount Of Loan:
Enter the amount of the loan or investment.
Monthly Pmt.
Enter the amount of each regular payment.
Interest Rate - Annual Per-cent
Enter the annual interest rate.

Key in first 3 letters of month:
Enter the first the characters of the initial full month of loan (month prior to 1st payment).

Is the above information correct (Y/N):
To go back and correct the entries, answer No.
If the entries are correct answer Yes, and you'll be prompted:
Print the output (Y/N):
Here you may choose between having the schedule displayed on the screen on sent to the printer. Answer Yes to have the results printed, or No to have them displayed.
When the results have been displayed or printed, you'll be prompted:
Another Review / Printing Same Data (Y/N)
If you want to print or display the results again, answer Yes.
If you answered No above, you'll be prompted:
Enter another schedule (Y/N)?
Answering Yes here you'll be prompted for the schedule name and so on. Answering No will take you back to the menu.
Selecting #13 Equipment Card Maintenance from the Equipment Processing/Fixed Assets menu will present the following maintenance screen :

Enter Equipment ID:
Type the ID of the equipment you want. If it doesn't exist, you'll be prompted:
NO EQUIPMENT EXISTS. DO YOU WANT TO CREATE A NEW ONE ?
If you want to create a new equipment card, answer Yes and press ENTER.
1. Equipment Desc:
Enter the description of this equipment.
2. Serial #:
Enter the serial number of this equipment.
3. Vendor id:
Enter the ID [H] of the vendor of this equipment. If a valid ID, the system will automatically fill in the vendor's name, address and phone, as set up in 4-1.
4. Name:
5. Address:
7. Phone:
Enter or change the vendor's name, address and phone, as needed.
8. Comments:
Enter any comments about this equipment.
9. Mnt Rqmts:
Enter any maintenance requirements for this equipment.
10. Purch Dt:
Enter the date this equipment was purchased.
11. Cost New:
Enter the cost of this equipment.
12. Wnty Day:
Enter the warranty period for this equipment, in days.
13. Wnty Tel:
Enter the phone number to call in case warranty repair or replacement is needed.
14. Hr Rate:
Enter the hourly dollar rate to be charged to jobs renting or requisitioning this equipment.
15. Mnt Due:
Enter the next date for maintenance on this equipment, if applicable.
16. Last Mnt:
The most recent date of maintenance on this equipment.
The following fields are automatically filled in when requisitioning a piece of equipment in 9-16:
17. Last Rnt:
The date this equipment was last rented/requisitioned.
18. Job Id: Brch
The ID [H] (and optional branch code) of the job (and branch) renting or requisitioning this equipment. If not currently rented/requisitioned, enter Equip.
19. Phase Id:
The ID [H] of the phase of the job renting or requisitioning this equipment.
20. Employee:
The ID [H] of the employee renting or requisitioning this equipment. If not currently rented/requisitioned, leave blank.
21. Ck Out Dt:
The date this equipment was rented or requisitioned. When returned, blank out this date by entering a question mark (?).
22. Source Requisition:
This is automatically filled in by the system when equipment is requisitioned to a job in 9-16.
23. Total Rented Hours:
This is normally automatically accumulated by the system, when equipment is requisitioned back to the shop from a job in 9-16.
24. Total Rent Revenue:
This is normally automatically accumulated by the system, when equipment is requisitioned back to the shop from a job in 9-16.
25. Total Maint Cost:
Enter the total cost so far for maintaining this equipment.
ENTER A FIELD # TO BE CHANGED OR ALL: D = DEACTIVATE Equipment
If you need to change anything on this screen, type the number of the field and press ENTER.
To deactivate this equipment (e.g. at the end of its useful life or if lost), type D.
When done with this equipment, just press ENTER and you'll be prompted for another equipment ID.
To exit this procedure, leave the equipment ID blank and press ENTER.
This selection will first prompt:
Print Cost Report:
If you want a report which shows the value of selected equipment, answer Yes here.
Branch to print (Blank for all):
If you want to limit the report to a branch, enter its ID here.
Next this selection screen will appear:

Date for this report
Enter the date you want on the report and press ENTER.
Style of report
Select one of the 5 choices and press ENTER.
Beginning Dollar Amount:
Ending Dollar Amount:
If you selected to run the cost reports, enter a dollar range here for the equipment that you want to be included on the report.
Correct?
Answer Yes and press ENTER when the above entries are correct.
You'll then be prompted for a range appropriate to the choice you selected, e.g. a range of descriptions, to be included on the report.
This selection will first prompt:

Date for this report
Enter the date you want on the report and press ENTER.
Beginning Maintenance date
Ending Maintenance date
Enter the date range for the report.
Style of report
Select one of the 2 choices and press ENTER:1. The date range above applies to the last maintenance date for an equipment.
2. The date range above applies to the next maintenance date for an equipment.
Correct date?
Answer Yes and press ENTER when the above entries are correct.
This selection is used to requisition equipment to jobs and back to the shop.
When requisitioning a piece of equipment for a job which is already requisitioned for the job, it will be returned to the shop and the rent charged to JC and GL and the Total Rented Hours and Total Rent Revenue for the equipment are automatically updated.

Enter state tax code
If you will be collecting state sales tax on this requisition, type you state tax code here, or type XX if tax is not to be charged.
Enter Other tax code
Not used.
Enter Markup %
Specify a percentage markup above cost to apply to this requisition as it is costed to the job, if required.
Enter default department
Specify the sales type (department) for equipments cost, if different from cost department.
Print picking ticket
Answer Yes if a picking ticket is needed.
Job cost by phase
Answer YES if different phases must be used for different equipment.
Entries correct (Y/N/E)
Type No ENTER to go back and make changes, or End ENTER to end this procedure and return to previous menu. When you are ready to continue, type Yes ENTER and the following input screen will be displayed :

1. Date
The system will suggest today's date for the requisition date. You may specify another date or press just ENTER.
2. Job ID
Specify the job ID [H] and press ENTER. If this is a valid job ID, the system will display the job name.
3. Phase ID
Specify the phase [H] and press ENTER. If this is a valid phase for this job, the system will display the phase description.
4. Foreman
Optional. Specify the employee ID of the foreman requesting this requisition or press just ENTER to leave this field blank.
5. Department
Specify the sales department [H] for cost and press ENTER. If this is a valid sales department, the system will display the department name.
6. JWO
Optional. If cost is posted to a job, then this work order number will be included on the job lines.
Equip ID
Specify an equipment ID [H] and press ENTER. If this is a valid equipment ID, the system will display the description of the equipment.
Equip Description
This is the description of this equipment as entered in 9-13.
Price
This is the rental price plus markup for the equipment, and is automatically filled in when requisitioning a piece of equipment back to the shop from a job.
Quantity
The number of hours a piece of equipment has been requisitioned/rented to a job will be calculated when requisitioning equipment back to the shop from a job.
Continue entering equipments until the requisition is completed, making changes as you go.
When you are finished, leave the Equip ID blank and press END.
The printer selection screen will now be displayed. Type the printer number and the number of copies and press ENTER. Your requisition will be printed and the system will prompt:
Did requisition print OK Yes
Check the printed requisition. If you need to reprint for any reason, type NO ENTER to automatically reprint. Press just ENTER to continue. The system will return you to the bottom of the first input screen in this section.
You may now create another requisition with the same setup information by pressing Yes ENTER and continuing. Press No ENTER to change this screen for another requisition, or press End ENTER to return to the previous menu.
This selection will print the repair history for a selected piece of equipment.
Date for this report
Enter the date for the last repair history entry to be printed and press ENTER.
Start date
Enter the date for the last repair history entry to be printed and press ENTER.
Equipment ID
Enter the ID of the equipment to report and press ENTER.
Starting vendor to print, <CR> for first
Ending vendor to print, <CR> for last
If you want to limit the repair history to a range of vendors, enter it here.
All correct ?
When the above entries are correct, answer Yes.
This selection allows deletion of tools, equipment and fixed assets. It will first prompt:
Enter Tool/Equip/Fixed Asset ID:
Leave blank and press ENTER to leave this procedure.
Enter the ID [H] of the tool, equipment of fixed asset which you want to delete and press ENTER. The rest of the screen will then fill in with the data for the selected item :

ENTER A 'D' to delete, blank to exit:
If you are sure that you really want to delete the selected item, type D and press ENTER. Otherwise, just press ENTER.
You'll then be prompted for another ID. If you want to leave this procedure, simply leave it blank and press ENTER, and you'll be returned to the Tools/Equipment/Fixed Asset Menu.
© 2001 SI Systems, Inc.
2323 Belleair Road
Clearwater, FL 33764
800/422-2277, 727/531-0669
Fax: 727/536-8858
